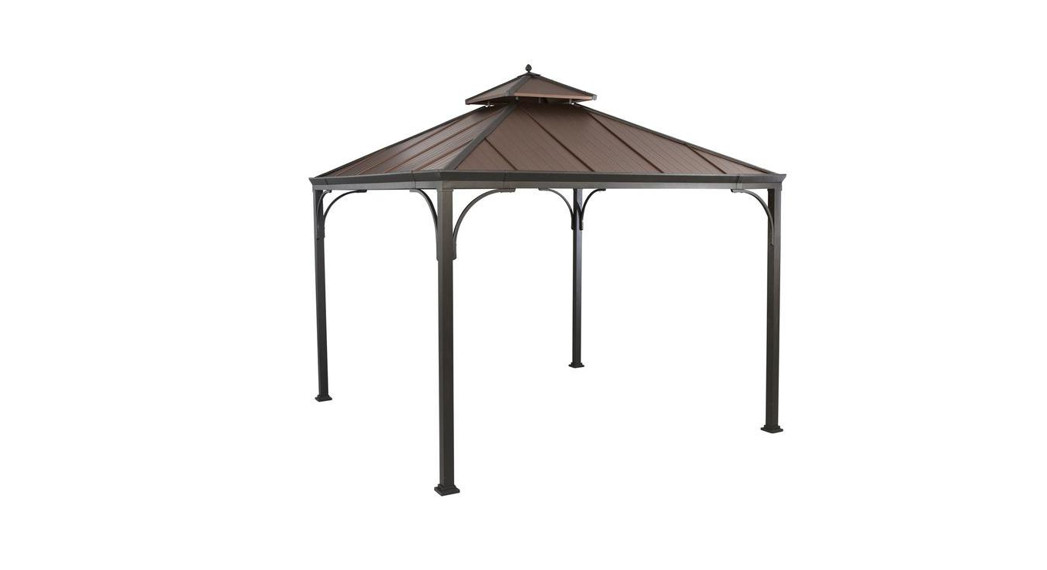
![]() Assembly InstructionsItem#: L-GZ680PST-M
Assembly InstructionsItem#: L-GZ680PST-M
Safety Information
- More than 6 persons is required for this assembly
- Some parts may contain sharp edges. Wear protective gloves.
- When assembling and using this product, basic safety precautions should always be followed to reduce the risk of personal injury and damage to equipment. Please read all instructions before assembly and usage.
![]() DANGER: This unit is heavy! Do not assemble this item alone.
DANGER: This unit is heavy! Do not assemble this item alone.
![]() WARNING: Do not leave the gazebo where there is a risk of high wind, as possible damage will occur to the structure.
WARNING: Do not leave the gazebo where there is a risk of high wind, as possible damage will occur to the structure.
![]() CAUTION: Do not climb on top of the gazebo. Falling off the gazebo can result in serious injury, possibly even death.
CAUTION: Do not climb on top of the gazebo. Falling off the gazebo can result in serious injury, possibly even death.
NOTICE: For outdoor use only.
Warranty
1 YEARS WARRANTYWHAT IS COVEREDThis limited warranty is extended to the original purchaser and applies to defects in materials and workmanship of your item provided the item is maintained with care and used only for personal, residential purposes. The item is warranted to be free from defects in material or workmanship for a period of 2 years.
WHAT IS NOT COVEREDWe do not reimburse for transportation of delivery costs, or compensate the individual or any outside party for assemblingor disassembling the product.Contact the Customer Service Team at 1-866-578-6569 or visit www.sunjoygroup.com
Pre-Assembly
PLANNING INSTALLATIONBefore beginning the assembly of this product, make sure all parts are present. Compare parts with the Hardware Included and Package Contents lists. If any part is missing or damaged, do not attempt to assemble the product. Contact customer service for replacement parts.
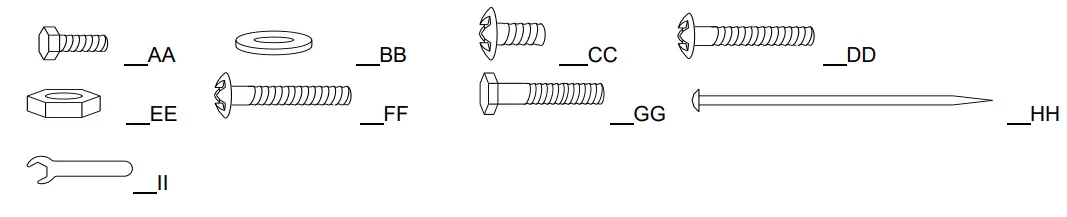
HARDWARE INCLUDED
![]() NOTE: Hardware not shown to actual size.
NOTE: Hardware not shown to actual size.
| Description | Part# | Label | Qty |
| M6X15 bolt | BM06015C | AA | 80 |
| M6 flat washer | UD06C | BB | 276 |
| M6X15 screw | SM06015C | CC | 116 |
| M6X60 screw | SM06060C | DD | 16 |
| M6 nut | LM06C | EE | 16 |
| M6X40 screw | SM060640C | FF | 16 |
| M6X40 bolt | BM06040C | GG | 32 |
| Dia.8X250 stake | DD08250C | HH | 16 |
| M6 wrench | W10D | II | 2 |
PACKAGE CONTENTS

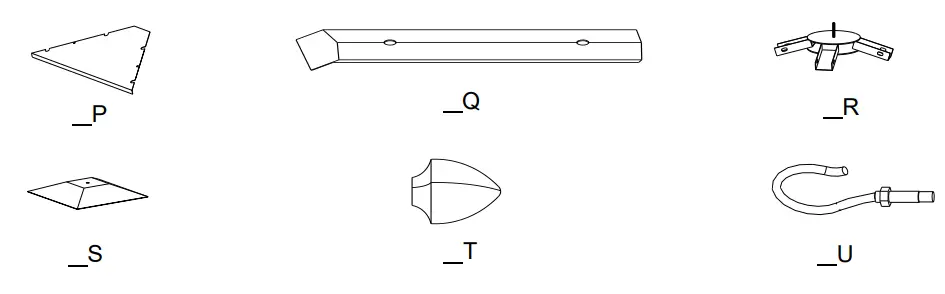
| Description | Part# | Label | Qty |
| Post | GZ0680XXM01 | A | 4 |
| Cover | GZ0680XXM02 | B | 4 |
| Stake base | GZ0680XXM03 | C | 4 |
| Decorative groove | GZ0680XXM04 | D1 | 4 |
| Corner part | GZ0680XXM05 | D2 | 4 |
| Support | GZ0680XXM06 | E | 8 |
| Long beam | GZ0680XXM07 | F | 4 |
| Connector | GZ0680XXM08 | G | 4 |
| Middle beam | GZ0680XXM09 | H | 4 |
| Beam 1 | GZ0680XXM10 | I1 | 4 |
| Beam 2 | GZ0680XXM11 | I2 | 4 |
| Beam 3 | GZ0680XXM12 | I3 | 4 |
| Beam 4 | GZ0680XXM13 | I4 | 4 |
| Left small cover | GZ0680XXM14 | J1 | 4 |
| Left middle cover | GZ0680XXM15 | J2 | 4 |
| Middle cover | GZ0680XXM16 | J3 | 4 |
| Right middle cove | GZ0680XXM17 | J4 | 4 |
| Right small cover | GZ0680XXM18 | J5 | 4 |
| Coping | GZ0680XXM19 | K | 4 |
| Decorative connec | GZ0680XXM20 | L | 8 |
| Cover tablet 1 | GZ0680XXM21 | M1 | 4 |
| Cover tablet 2 | GZ0680XXM22 | M2 | 4 |
| Top connector | GZ0680XXM23 | N1 | 4 |
| Top beam | GZ0680XXM24 | N2 | 4 |
| Small roof beam | GZ0680XXM25 | O | 4 |
| Small roof cover | GZ0680XXM26 | P | 4 |
| Small roof board | GZ0680XXM27 | Q | 4 |
| Small roof connecto | GZ0680XXM28 | R | 1 |
| Small roof cap | GZ0680XXM29 | S | 1 |
| Finial | GZ0680XXM30 | T | 1 |
| Hook | GZ0680XXM31 | U | 1 |
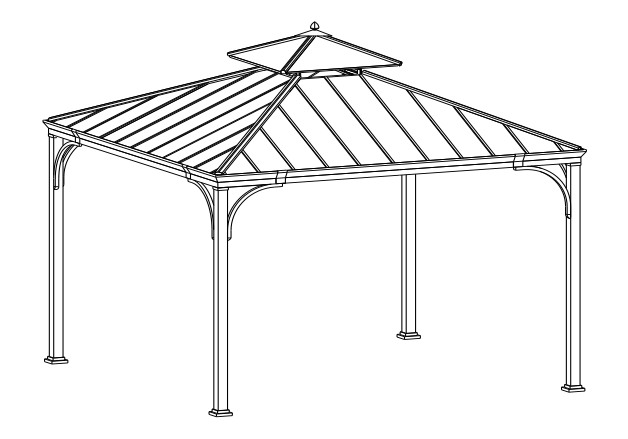
Assembly
![]() NOTE: To avoid destroying the finish, please handle it with care.
NOTE: To avoid destroying the finish, please handle it with care.
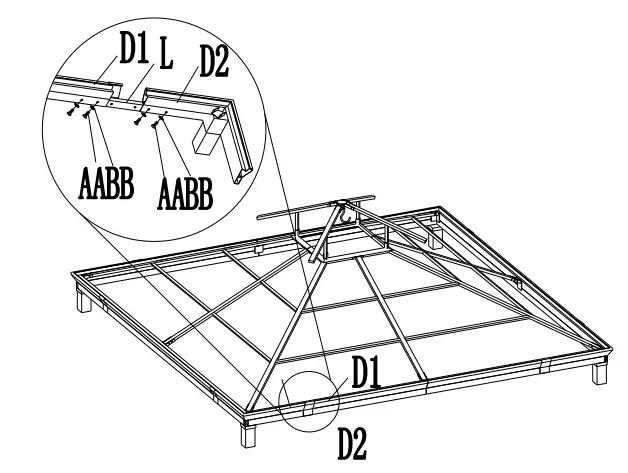
- Attaching the decorative connector□ Insert the decorative connector (L) into the decorative groove (D1) and corner part (D2). Then use bolts (AA) and flat washers (BB) to secure.

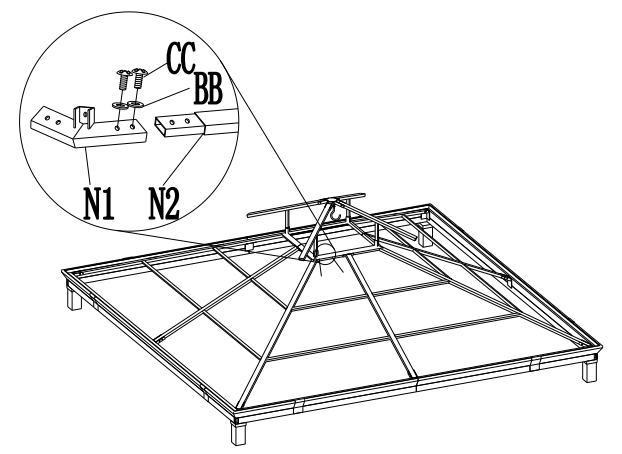
- Attaching the top connector to the top beamAttaching the top connector (N1) to the top beam (N2) using screw (CC) and flat washers (BB).
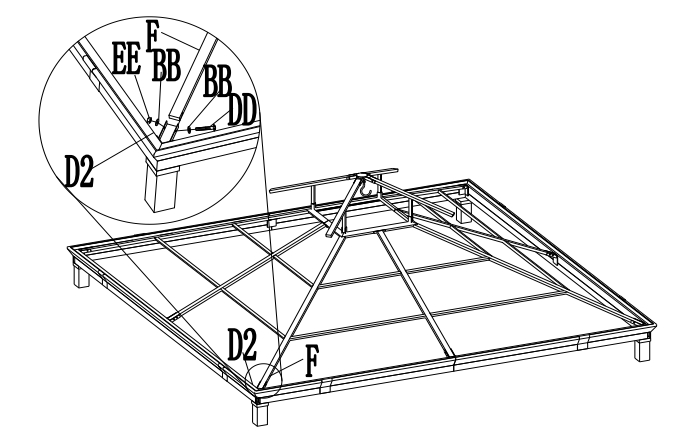
- Attaching the beamsInsert the long beam (F) to the beam connector and secure using screws (DD), flat washers (BB) and nuts (EE).
- Securing the beams to the frameSecure the long beams (F) to the top connectors (N1) using bolts (AA) and flat washers (BB).
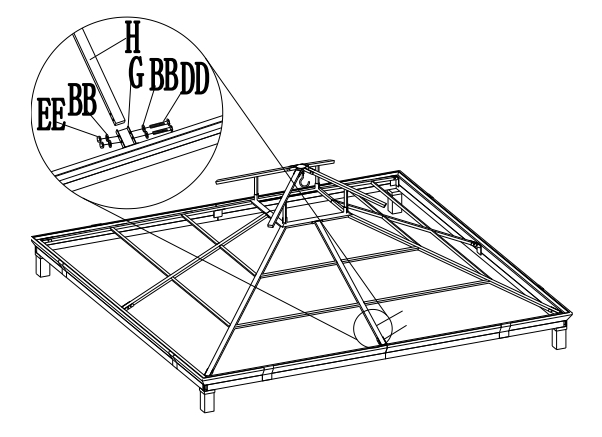
- Securing the connectorsSecure the connector (G) to the decorative groove (D1) using bolts (AA) and flat washers (BB).
- Securing the middle beam to the connectorSecure the middle beams (H) to the connectors (G) using screws (DD), flat washers (BB), and nuts (EE).
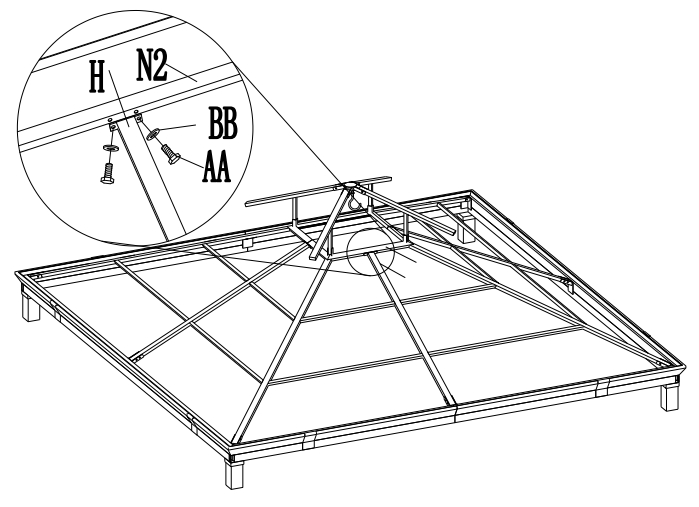
- Securing the middle beam to the frameUse bolts (AA) and flat washers (BB) to secure the middle beam (H) to the frame (N2).
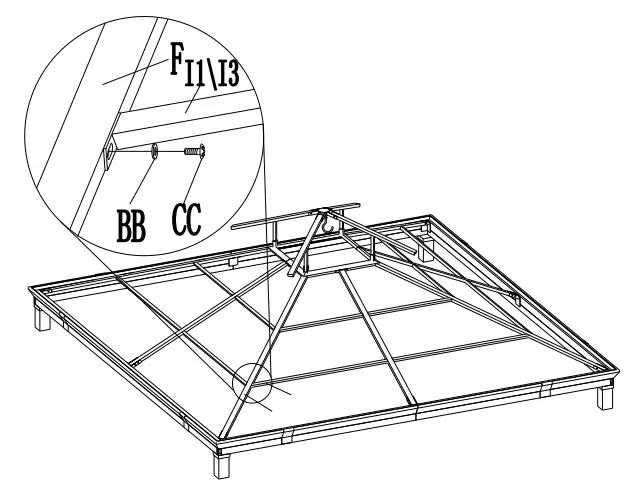
- Securing the beams to the long beamsSecure beam 1 (I1) and beam 3 (I3) to beams (F) using screws (CC) and flat washers (BB). Repeat this step for beam2 (I2) and beam 4 (I4).
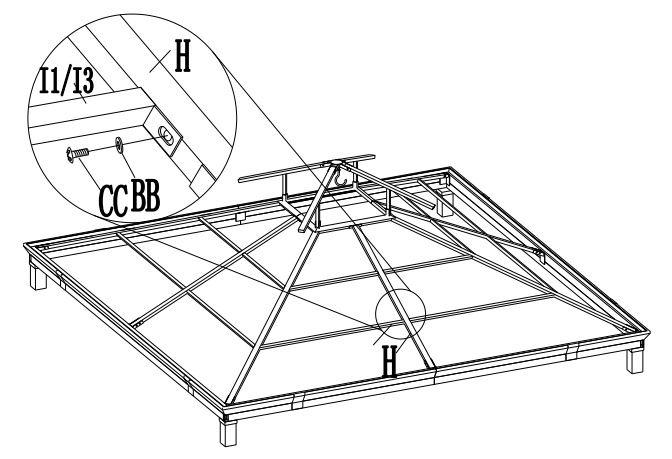
- Securing the beams to the middle beamsSecure the other end of beam 1 (I1) and beam 3 (I3) to the middle beam (H) using a screw (CC) and flat washer (BB). Repeat this step for beam 2 (I2) and beam 4 (I4).
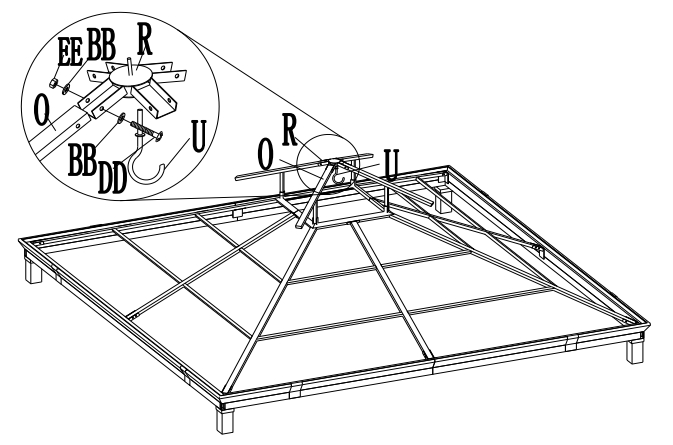
- Attaching the small roof beams to the connectorAttach the small roof beams (O) to the small roof connector( R) using screws (DD), flat washers (BB), and nuts (EE). Then install the hook (U) to the small roof connector (R).
- Attaching the small roof beams to the frameAttach the small roof beams (O) to the frame (N1) using screws (CC) and a flat washer (BB).
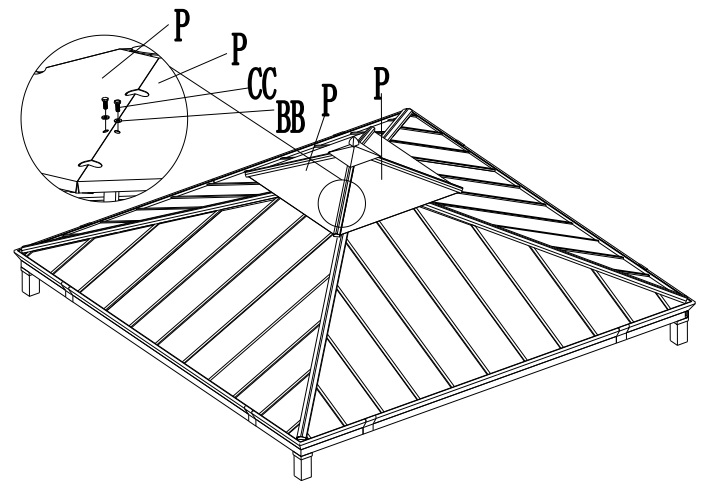
- Securing the small roof cover to the small roof beamSecure the small roof covers (P) to the small roof beams (O) using screws (CC) and flat washers (BB).
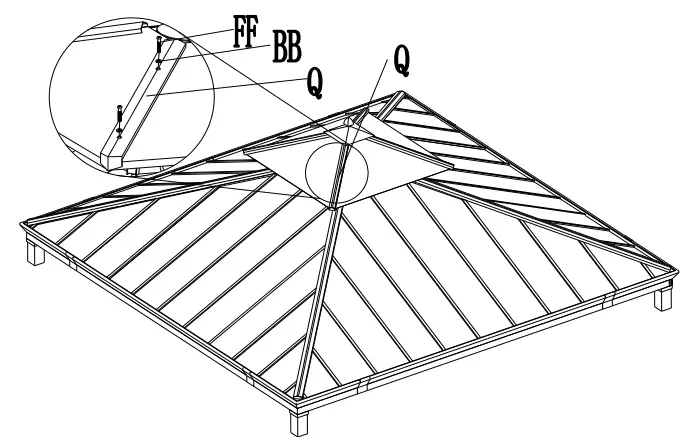
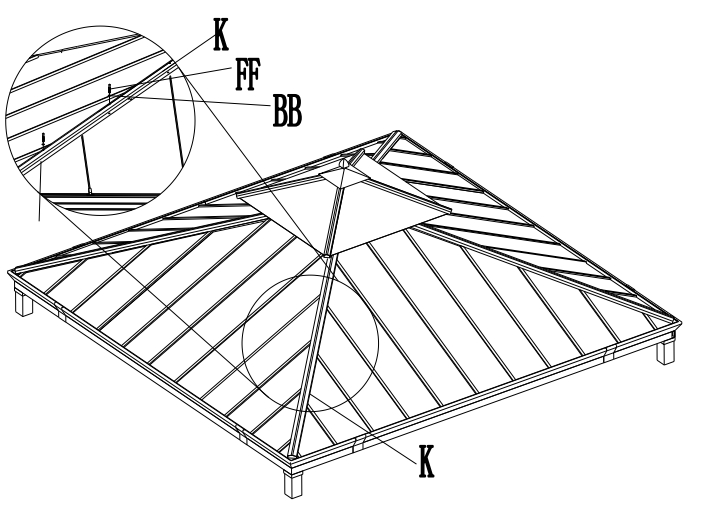
- Attaching the small roof boards and covers to the roof beamAttach the small roof boards (Q) to the small roof covers (P) and secure them to the small roof beams (O) using screws (FF) and flat washers (BB).
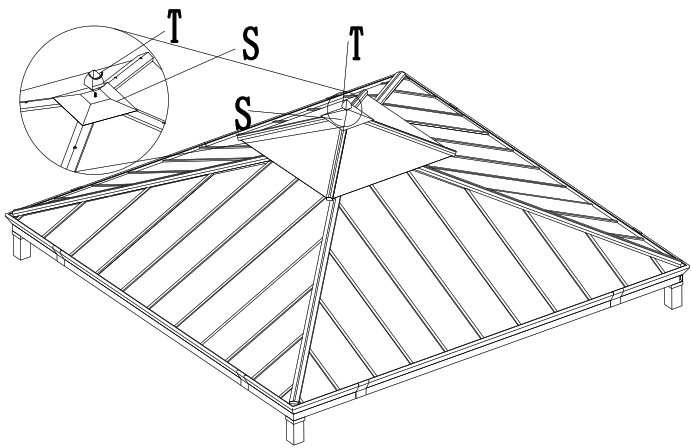
- Attaching the small roof cap and finialAttach the small roof cap (S) to the small roof assembly. Attach the finial (T) to the top of the small roof cap (S).
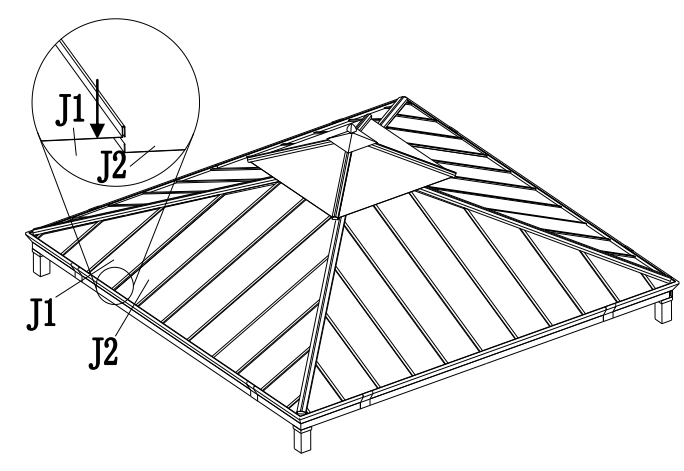
- Attaching the left small and middle coversAttach the left middle covers (J2) to the left small covers (J1) as shown.
- Securing the left middle and left small coversAttaching the left middle covers (J2) and the left small covers (J1) to beam.
- Attaching the right middle coversAttach the middle covers (J3) to the left middle covers (J2). Attach the right middle covers (J4) to the middle covers (J3). Attach the right small covers (J5) to the right middle covers (J4).
- Attaching the right middle cover to the right small coverUse the screws (CC) and flat washers (BB) to secure the right middle cover (J4) and right small cover (J5) to the beam.
- Attaching the coping to the small roof beamInsert one end of the copings (K) to the holes of the small roof beams (O).
- Securing the copings to the beamsUse the screws (FF) and flat washers (BB) to secure the copings (K) to the beam.
- Attaching the cover tabletsUse the screws (CC) and flat washers (BB) to install the cover tablets (M1/M2) to the decorative grooves (D1).
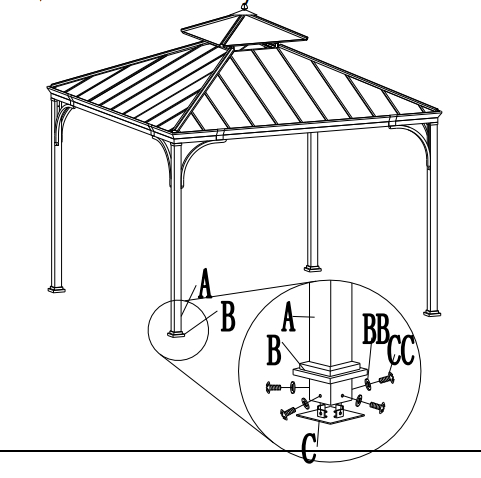
- Connecting the stake base and postAttach the covers (B) to the posts (A) and connect the stake bases (C) and posts (A) by using the screws (CC) and flat washer (BB).
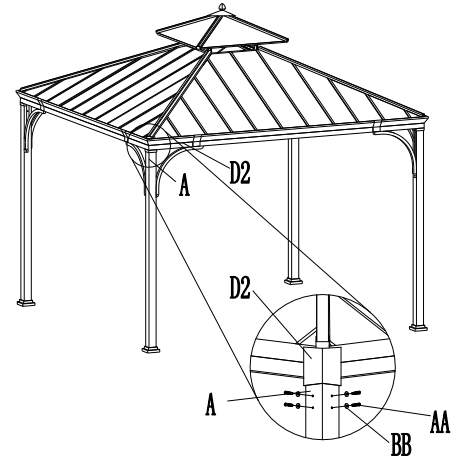
- Connecting the top assembly to the postsRaise the top assembly and insert the posts (A) into the cannula of the decorative grooves (D2). Then connect them using bolts (AA) and flat washers (BB).
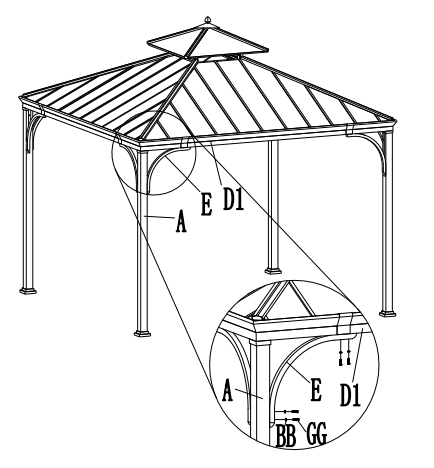
- Attaching the supportsUse the bolts (GG) and flat washers (BB) to install the supports (E) to the corners of the posts (A) and decorative grooves (D1).
- Securing the gazeboLift the covers (B) and use the stakes (HH) to secure the whole gazebo to the ground.


Care and Cleaning
- Before using, clean the gazebo completely with a soft dry towel.
- Do not put your gazebo in wet conditions where there is a risk of rust developing.
- When not in use, store in a cool, dry area.
- Limited Warranty.
- Our iron/steel components for garden accessories and furniture are coated with rust-inhibiting paint that protects them from rusting. However, due to the nature of iron, surface oxidation (rusting) will occur once these protective coatings are scratched. This is a natural process and is not a defect! To minimize this condition, we recommend care when assembling & handling the product to prevent scratching the paint. Should any scratching or damage occur, we recommend immediate touch-up with rust-inhibiting paint. Surface rust can also be easily removed with a very light application of common cooking oil. If surface oxidation (rusting) occurs and if no measure is taken to prevent this, the oxidation may start dripping on to deck or patio and cause damaging stains, which may be difficult to remove. This can be prevented if the measure is taken to keep the product from oxidizing
Important
- Please do not return this product to the store. For technical assistance or replacement parts, please call Sunjoy Group at 1 (866) 578-6569 between 8:00 AM EST and 8:00 PM PST. You may fax your replacement parts form (which is included in the packaging) to 1 (740) 283-3549 or email
References
[xyz-ips snippet=”download-snippet”]