![]()
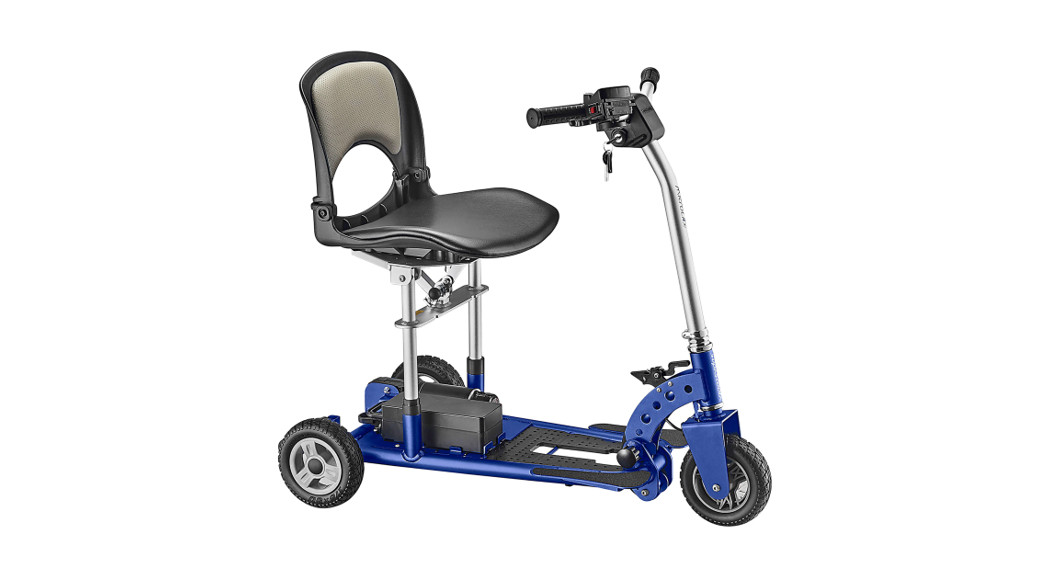
Motorized vehicle MicroLite![]()
![]() User ManualYou must read this manual before using your MicroLite
User ManualYou must read this manual before using your MicroLite
Manufacturer:
EUROGREEN INTERNATIONAL INC.No.48, Ln. 220, Sec.1, Fuzion Rd, Yuanlin Township, Changhua County, 51055, TAIWANSAVE THIS MANUAL FOR FUTURE REFERENCE.
INTENDED USE
- Intended use of the deviceAs a motorized portable electric vehicle for indoor or outside use by persons with medical conditions that require assistance.
- Device descriptionA battery-operated lightweight 3 wheels portable mobility device designed for using indoor and limited outdoor use. It is used in a sitting position and operated by a hand-controlled throttle located on the handlebars. The brake is automatically controlled when releasing the throttle by the electronic controller and magnetic motor brake. The product is supplied ready to use with a battery and charger and it can be disassembled and folded for transport.
- T technological characteristicsUnique one-piece folding frame designed to suit users up to 100kgs. The compact design and minimal component weight are of significant benefit to the elderly who are independent and have a need to transport the scooter in a motor vehicle.
SAFETY SYMBOLS, WORDS, AND LABELS
What You Need to Know About Safety Instructions
Warning and Important Safety Instructions that appeared in this manual are not meant to cover all possible conditions and situations that may occur. Common sense, caution, and care must be exercised when operating or cleaning your MicroLite.Always contact your dealer, distributor, service agent, or manufacturer about problems or conditions you do not understand.
 This is the safety alert symbol. It is used to alert you to potential personal injury hazards. Obey all safety messages that follow this symbol to avoid possible injury or death.
![]() WARNING indicates a potentially hazardous situation that, if not avoided, could result in death or serious injury.
WARNING indicates a potentially hazardous situation that, if not avoided, could result in death or serious injury.
![]() CAUTION indicates a potentially hazardous situation that, if not avoided, may result in minor or moderate injury.
CAUTION indicates a potentially hazardous situation that, if not avoided, may result in minor or moderate injury.
![]() Radio wave sources may affect the motorized vehicle.
Radio wave sources may affect the motorized vehicle.
SAFETY INSTRUCTIONS
![]()
- Please read this manual before using your MicroLite.
- Do not turn your Scooter “On” before you are seated and ready to go.
- Practice riding in an open area free of vehicles, pedestrians, and obstacles before using your MicroLite near other people. It is also recommended that someone accompanies you during practice.
- The MicroLite was designed for hard and flat surfaces. It should not be used on steep slopes or loose surfaces
- Reduce speed when turning.
- Take extreme care when driving in wet conditions.
- For your safety, it is recommended that you wear a helmet.
- Do not operate the Forward/Reverse switch when moving. This could damage your MicroLite.
- Do not use the MicroLite on slopes over 8 degrees.
- Do not drive on slopes when the yellow battery light is on. When it is on you should recharge your battery, or replace it with a spare battery if you have one.
- Always switch the power “Off” before leaving your scooter or while it is unattended.
- Do not put your fingers on the Speed (throttle), Lever, before you turn the key switch “On”. This could cause MicroLite to move without warning.
- Y our key switch must be in the “Off” position before connecting the battery.
A. ENVIRONMENTAL CONDITIONS WARNING:![]() The scooter is not designed for use in a heavy rainstorm, or in snowy or icy conditions.i. Contact with water or excessive moisture can cause an electrical malfunction. The frame, motors, and other scooter parts are not water-tight and may rust or corrode from the inside.To avoid a scooter failure:
The scooter is not designed for use in a heavy rainstorm, or in snowy or icy conditions.i. Contact with water or excessive moisture can cause an electrical malfunction. The frame, motors, and other scooter parts are not water-tight and may rust or corrode from the inside.To avoid a scooter failure:
- Minimize exposure of your scooter to rain or very wet conditions.
- Never take your scooter into a shower, tub, pool, or sauna.
- Do not use your scooter in fresh or saltwater (such as at the edge of a stream, lake or ocean).
- Make sure all electrical connections are secure.ii. Proceed slowly and use extra care if you must operate your scooter on a wet or slick surface.
- Do so only if you are sure it is safe.
- Stop if one or both main wheels lose traction. If this occurs, you may lose control of your scooter or fall.
- Never operate your scooter on a slope or ramp if there is snow, ice, water or oil film present.iii. When not in use, keep your scooter in a clean, dry place.
B. TERRAINi. This scooter is designed for use on firm, even surfaces such as concrete, asphalt and indoor flooring.ii. Do not operate your scooter in sand, loose soil or over rough terrain. Doing so may damage wheels, bearings, axles or motors, or loosen fasteners.
C. STREET USE WARNING:In most states, scooters are not legal for use on public roads. Be alert to the danger of motor vehicles on roads or in parking lots.i. At night, or when it is hard to see, use reflective tape on your scooter and clothing.ii. It may be hard for drivers to see you. Make eye contact with drivers before you proceed. When in doubt, yield until you are sure it is safe
D. MOTOR VEHICLE SAFETYi. Never sit on this scooter while in a moving vehicle.ii. Always move to an approved vehicle seat.iii. Never transport this scooter in the front seat of a vehicle. It may shift and interfere with the driver.iv. Always secure this scooter so that it cannot roll or shift.
E. TRANSFERS WARNING:It can be dangerous to transfer on your own as it requires good balance and agility. Be aware that there is a point during every transfer when the seat is not below you.
F. TO AVOID A FALL:i. Always turn the key off before you transfer to or from your scooter. If you fail to do so you may touch the throttle control lever and cause your scooter to move when you do not expect it. ii. Move your scooter as close as you can to the seat you are transferring to.iii. Transfer as far back onto the seat surface as you can. This will reduce the risk that you will miss the seat and fall.
G. REACHING OR LEARNING WARNING:Reaching or leaning affects the center of balance of your scooter.If done improperly, a fall or tip-over is possible.To reduce the risk of injury and/or damage to the scooter:i Never reach or lean, it is safer to shift your weight sideways or rise up from the seat.ii Never try to pick up an object from the floor by reaching down between your knees.iii Never reach or lean over the top of the seatback.
H. DRIVING IN REVERSE WARNING:Use extra care when you drive your scooter in reverse. You may lose control or fall if one of the rear wheels hits an object.i. Operate your scooter slowly and at an even speed.ii. Stop often and check to make sure your path is clear of obstacles.
I. WEIGHT LIMITi. Never exceed the weight limit of the scooter.ii. The scooter is not designed for weight training and is unsafe for use as a seat while weight training. Weight training from the scooter substantially changes the stability of the scooter and may cause tipping.iii. Exceeding the weight limit is likely to damage the seat, frame, or fasteners and may cause severe injury to you or others from scooter failure.
J. STAIRWAYS AND ESCALATORS WARNING:The scooter is not designed to travel up or down stairs or escalators. Always use an elevator. DO NOT use an escalator to move the scooter between floors. Serious bodily injury may occur. DO NOT attempt to move an occupied scooter between floors using a stairway.
ELECTROMAGNETIC INTERFERENCE
![]() It is very important that you read this information regarding the possible effects of Electromagnetic Interference on your MicroLite. This motorized scooter has an immunity of 20 V/m which should protect it from Electromagnetic Interference (EMI) from Radio Wave Sources. These EM waves are invisible and their strength increases as one approaches the source. All electrical conductors act as antennas to the EM signals and to varying degrees, all power wheelchairs and scooters are susceptible to electromagnetic interference (EMI). This interference could result in abnormal, unintentional movement and/or erratic control of the vehicle.
It is very important that you read this information regarding the possible effects of Electromagnetic Interference on your MicroLite. This motorized scooter has an immunity of 20 V/m which should protect it from Electromagnetic Interference (EMI) from Radio Wave Sources. These EM waves are invisible and their strength increases as one approaches the source. All electrical conductors act as antennas to the EM signals and to varying degrees, all power wheelchairs and scooters are susceptible to electromagnetic interference (EMI). This interference could result in abnormal, unintentional movement and/or erratic control of the vehicle.
Motorized scooters may be susceptible to electromagnetic interference (EMI), which is interfering with electromagnetic energy (EM) emitted from sources such a radio stations, TV stations, amateur radio (HAM) transmitters, two-way radios, and cellular phones. The interference (from radio wave sources) can cause the motorized scooter to release its brakes, move by itself, or move in unintended directions. It can also permanently damage the motorized scooter control system. The intensity of the interfering EM energy can be measured in volts per meter (V/m). Each motorized scooter can resist EMI up to certain intensity. This is called its “immunity level.” The higher the immunity level, the greater the protection. At this time, current technology is capable of achieving at least a 20 V/m immunity level, which would provide useful protection from the more common sources of radiated EMI.
Because EM energy rapidly becomes more intense as one moves closer to the transmitting antenna (source), the EM fields from hand-held radio wave sources (transceivers) are of special concern. It is possible to unintentionally bring high levels of EM energy very close to the motorized scooter control system while using these devices. Therefore, the warnings listed below are recommended to prevent possible interference with the control system of the motorized scooter, which should reduce the chance of unintended brake release or motorized scooter movement that could result in serious injury.
![]() Do not operate hand-held personal communication devices such as citizens band (CB) radios, or turn ON personal communication devices and cellular phones while the motorized scooter is turned ON.
Do not operate hand-held personal communication devices such as citizens band (CB) radios, or turn ON personal communication devices and cellular phones while the motorized scooter is turned ON.
- Be aware of nearby transmitters, such as radio or TV stations and try to avoid coming close to them.
- If unintended movement or brake release occurs, turn the motorized scooter OFF as soon as it is safe.
- Be aware that adding accessories or components, or modifying the motorized scooter may make it more susceptible to EMI; and NOTE: There is no easy way to evaluate their effect on the overall immunity of the motorized scooter.
- Report all incidents of unintended movement or brake release to the distributor listed on the back of this manual, and Note whether there is a radio wave source of EMI nearby. TURN “OFF” YOUR SCOOTER AS SOON AS POSSIBLE WHEN EXPERIENCING THE FOLLOWING:
- Unintended or uncontrollable movement.
- Unexpected brake release
- Important Information
- 20 Volts per meter (V/m) is a generally achievable and useful immunity level against interference from the radio wave sources (as of May 1994) (the higher the level, the greater the protection);
- This product has an immunity level of the following:
| Guidance and manufacturer’s declaration-electromagnetic immunity
The product is intended for use in the electromagnetic environment specified below. The customer or the user of the product _should assure that it is used in such an environment. |
|||
| Immunity test | IEC 60601 test level | Compliance level | Electromagnetic environment- guidance |
| Electrostatic discharge(ES D) IEC
61000-4-2 |
± 8 kV contact
± 2 kV, ± 4 kV, ± 8 kV, ± 15 kV air |
± 8 kV contact
± 2 kV, ± 4 kV, ± 8 kV, ± 15 kV air |
Floors should be wood, concrete or ceramic tile. If floors are covered with synthetic material, the relative humidity should be at least 30% |
| Electrical
fast transient/bu rst IEC 61000-4-4 |
+ 2kV for power supply
lines + 1kV for input/output lines |
+ 2kV for power
supply lines + 1kV for input/output lines |
Mains power quality should be that of a typical commercial or hospital environment. |
| Surge IEC61000-4-5 | + 1kV line(s) to line(s) + 2kV line(s) to earth |
± 1kV line(s) to line(s) + 2kV line(s) to earth |
Mains power quality should be that of a typical commercial or hospital environment. |
| Voltage Dips, short interruptions and voltage variations on power supply input lines IEC
61000-4-11 |
0% UT for 0,5
cycle 0% UT for 1 cycle 70% UT(30% dip in UT) for 25 cycles 0% UT for 5 s |
0% UT for 0,5 cycle
0% UT for 1 cycle 70% UT(30% dip in UT) for 25 cycles 0% UT for 5 s |
The mains power quality should be that of a typical commercial or hospital environment. If the user of the product requires continued operation during power mains interruptions, it is recommended that the product be powered from an uninterruptible power supply or a battery. |
| Power
frequency(50, 60 Hz) magnetic field IEC 61000- 4-8 |
30 A/m | 30 Alm | The product power frequency magnetic fields should be at levels characteristic of a typical location in a typical
commercial or hospital environment. |
| NOTE UT is the a.c. mains voltage prior to application of the test level. |
ASSEMBLE THE SEAT
Assemble the seat frame in the manner illustrated.
 The ARROW must point to the FRONTWhen assembling the seat to the frame
THE SEAT HAS THREE MOUNTING POSITIONS ABCNote: All 4 fixing screws must be used and tightened securely.

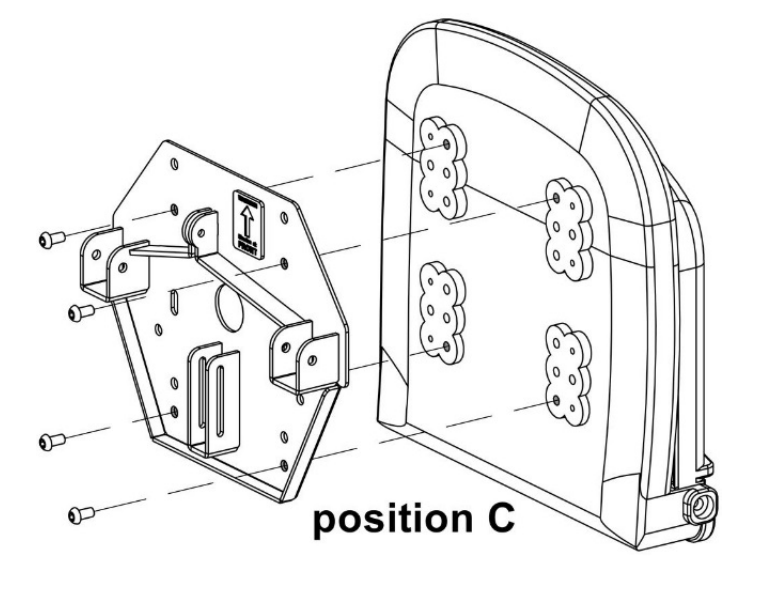
IN POSITION ATHE SEAT IS CLOSER TO THE HANDLEBARSIN POSITION BTHE SEAT IS IN THE MIDPOINT POSITIONIN POSITION CTHE SEAT IS AT ITS WIDEST DISTANCE
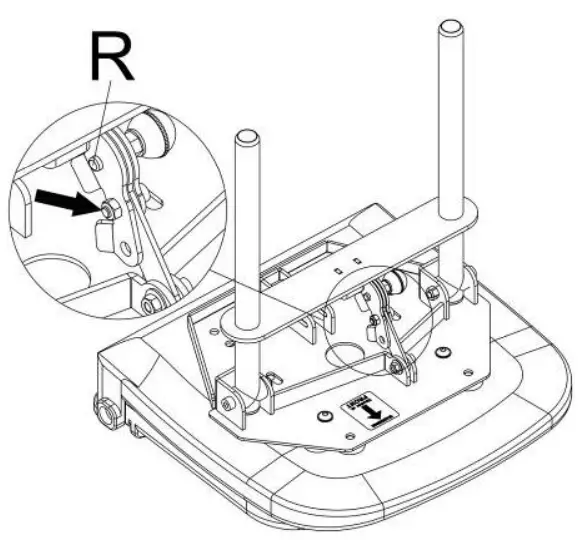
FOLDABLE SEA T FRAMETo open the seat frame Pull out the knob “P” in the direction of the arrow and lift the seat tube “O” up as illustrated.
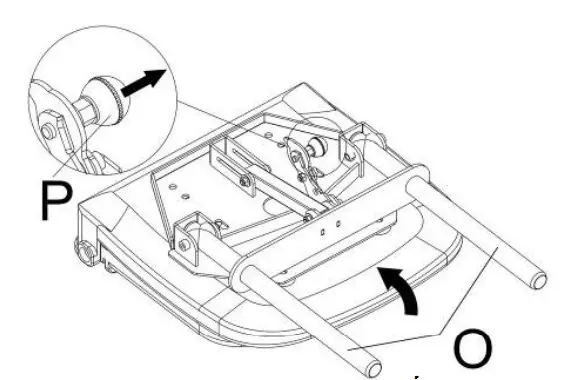
Push the support lever in the direction of the arrow until it clicks into position “R”.
Warning: Pin “R” must be locked into the position before using.

To fold the seat framePull out the knob “P” in the direction of the arrow and push Q downward as the arrow illustrated then push seat tube “O” downward to fold the seat frame.

TO OPEN THE MICROLITE
- Use one hand to hold the tiller handle and use the other hand to push the lock pin lever (A) per the illustration and lift the handle. Continue lifting the tiller until you hear the “click”, the locking into position.
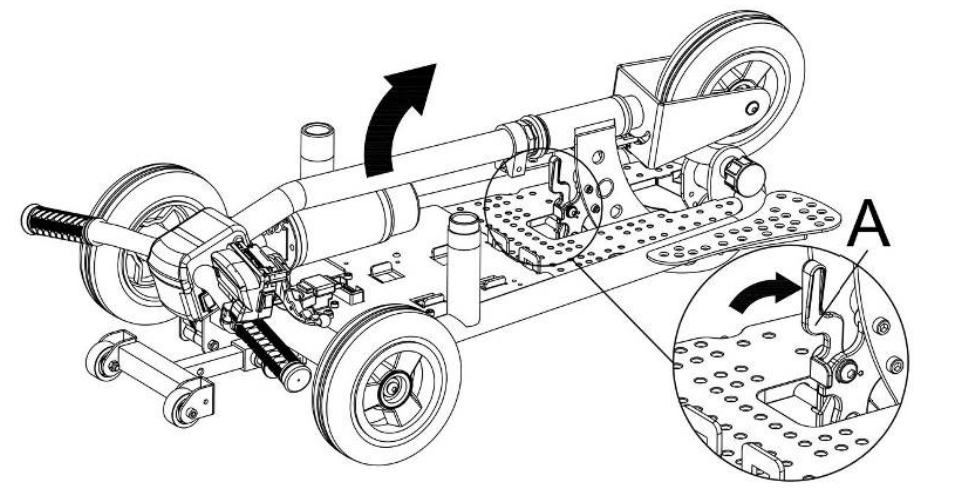
- You must check that the pin “G” has locked into position.
 Open the terminal cover “L” of the battery module first before locking it into a scooter.
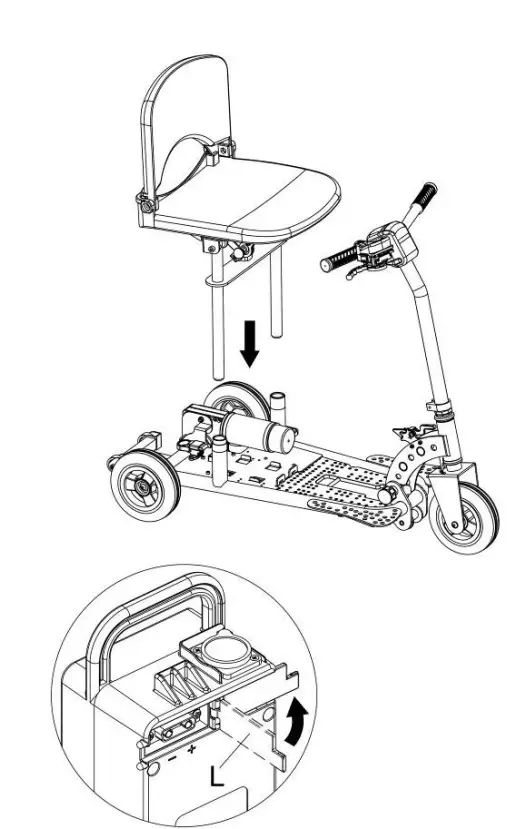
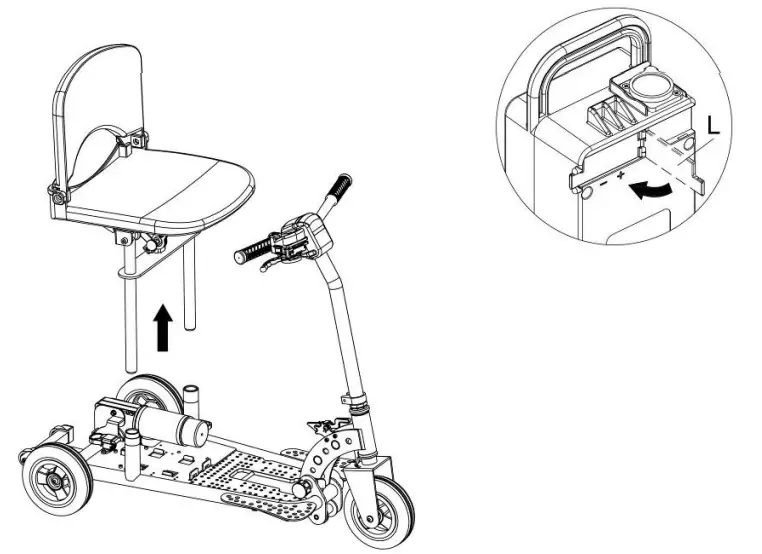
- Fit the seat onto the frame, and insert the seat frame tubes into the corresponding holes on the mainframe,

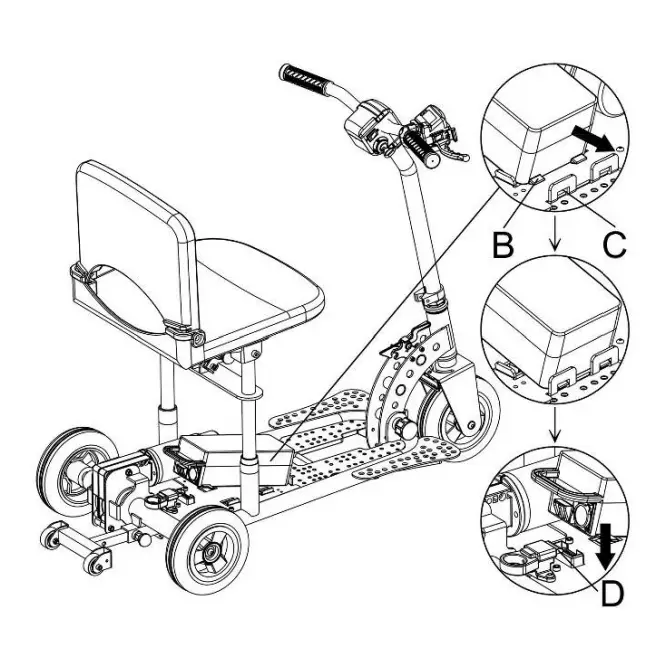
- Insert 2 block (B) into slots (C) as illustrated direction and push battery pack downward until you hear “click”, the locking of cam locker “D”.
- You must check that the battery module has locked into position.

![]()
- Owners’ manual must be read before using.
- Always ensure that the scooter is powered off before getting on or off.
- Do not exceed inclines more than 8 deg.
- The speed must be reduced when turning.
- Recharge the battery after every use.
- Always keep feet on footplates when using a scooter.
9038


The partition board (PB) on your MicroLite is not designed to be load-bearing, have your feet always stay on the footrest (M) per indicated above.DO NOT PUT EXCESSIVE WEIGHT ON THE PARTITION BOARD.
![]()
IT IS IMPORTANT THA T YOU TAKE EXTRA CARE TO PRACTICE IN AN OPEN SPACE AWA Y FROM OBSTRUCTIONS.
ANTI-TIP WHEEL![]()
Ensure that the anti-tip wheels are extended and locked in position “H” when driving. (As illustrated below)
Position “H” provides the greatest stability. Return the sliding tube to position “J” for transportation or disassembly.

WARNING! To prevent the scooter from tipping backward the anti-tip frame must be locked in the maximum extended position.
- Do not turn key switch “On” before you are seated and ready to go.
- Always turn the key switch “Off” before getting off the scooter.NOTE: Please be aware that should the scooter wheels meet an obstruction, you will need to help it out manually. Attempting to drive through an obstruction when the wheel is stuck could result in damage.
SEAT POST CLAMP – OPTIONAL

- Insert the seat frame tubes into the corresponding holes on the mainframe, and then tighten the lever clamp “K” as an illustration.
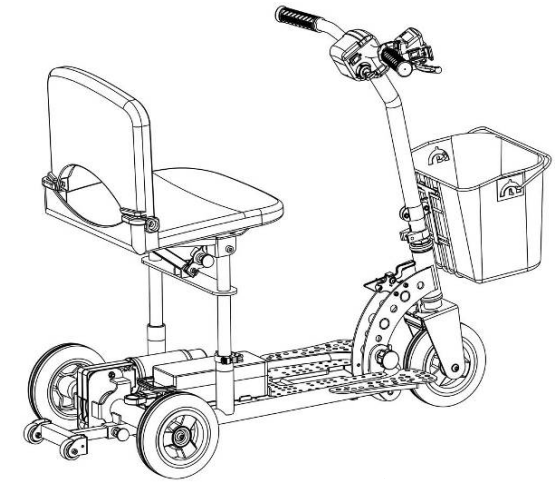
BASKET – OPTIONAL
- Fit the front basket as the positioning illustrated.
FLA T PACK KIT : (optional)To store folded seat onto the scooter Assemble the guide pin for each seat post as per the illustration

Make sure that stop pin “J” is touching horizontal plate “H”. Before tightening screws “D”, put the two guide pins into the corresponding seat post hole for adjustment, then tighten screws “D”.

The guide pin can be folded to save space as per illustration.
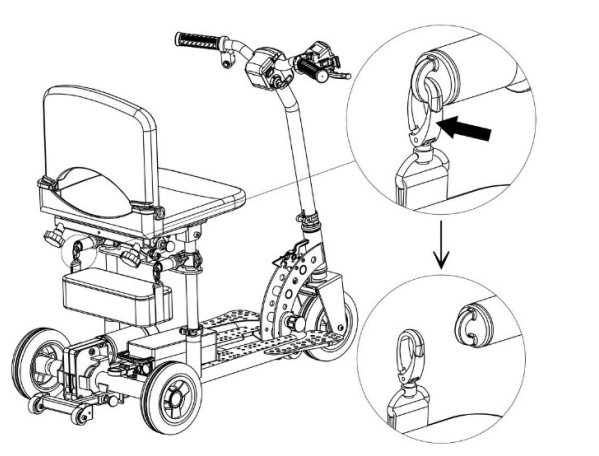
Caution: Please be cautious about avoiding pinching your fingers during operation.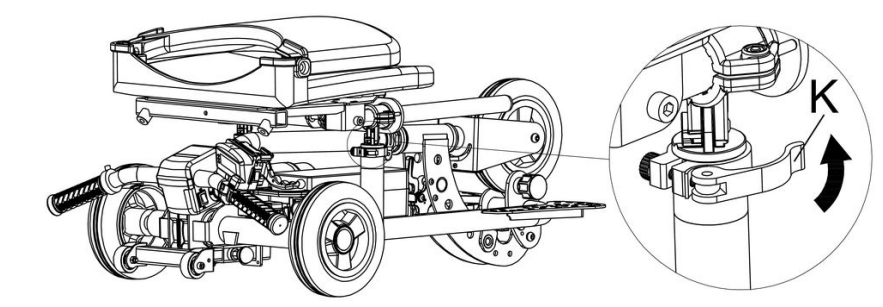 When the seat is folded and positioned on the scooter, the seat post clamp “K” must be tightened securely.SPARE BATTERY – OPTIONAL
The battery bag clips “M” attaches to “L”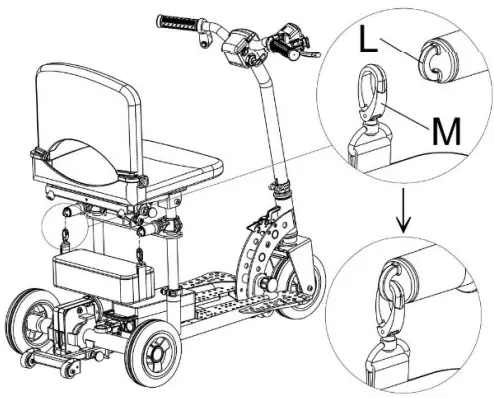
LIGHTS AND SWITCHES
To lock the speed lever for transportation:CAUTION! : ONLY BE USED WHEN TURNING POWER OFF.Pull the lever as arrow direction “R” andUse the other hand to turn the locker as arrow direction “Q”
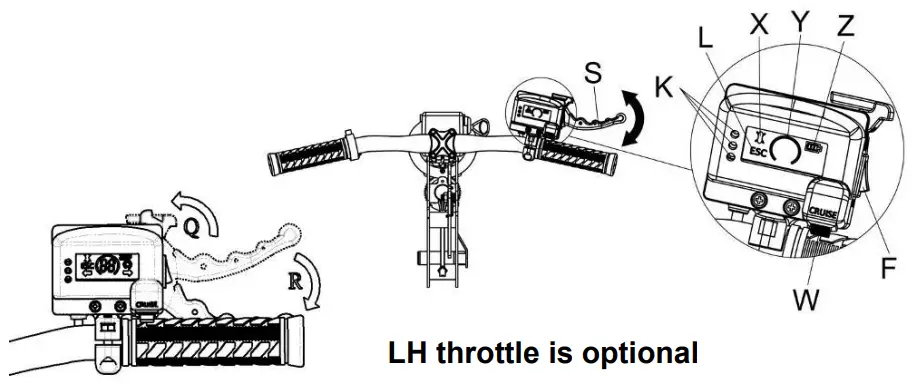
● F: Forward and Reverse switch.● S: Speed lever.● K: Battery voltage indicator.● H: Key switch● J: Speed selection: F / full speed, S / reduced speed● Z: Battery green level gaugeNote: I, W, X, L, YThese features are not fitted to the MicroLite.
![]() Do not place your fingers on the speed lever before you turn the key switch “On”.Do not operate speed selection switch “J” when the scooter is moving. Pull the speed lever “S” and accelerate slowly. Do not pull speed lever “S” in rapid operation.If the scooter will not move after the re-set, one of the following indicator lights may be displayed:
Do not place your fingers on the speed lever before you turn the key switch “On”.Do not operate speed selection switch “J” when the scooter is moving. Pull the speed lever “S” and accelerate slowly. Do not pull speed lever “S” in rapid operation.If the scooter will not move after the re-set, one of the following indicator lights may be displayed:
| Greenlight flashes quickly | The magnetic brake is turned off or connectors are loose. |
| Greenlight flashes slowly | Scooter being recharged with the key switch turn on. |
| Yellow & Red light ON | Low voltage of batteries detected by the controller |
| Green, Red & Yellow light ON | The potentiometer broke down. |
| Red & Green lights flash alternately | Overload protection. |
| Red light ON | Battery needs recharging or connection faulty – check grey color connector. |
| Yellow light flashes quickly | Unusual current output. |
AUTO SWITCH OFF ELECTRONIC SYSTEM
- The electronic system of this scooter is protected by a digital over the current cut-off system. If your MicroLite stops, you will need to turn the main key switch to the “Off” position, and then switch to “On” position to reset the system.
- Possible causes of over current cut-out are battery not fully charged or near the end of its life, or the slope is too steep for the scooter. Do not continue to overload the system as this may damage the controller.
- The electronic system of this scooter will switch itself “Off” after 3 minutes if the key switch is left in the “On” position when the scooter is not in use. You will then need to turn the key switch to the “Off” position, and then switch to the “On” position to reset the control system.
SWITCH TO FREEWHEEL
- This scooter is equipped with a magnetic brake. To release this brake, just turn the lever to the “FREEWHEEL” position, and then MicroLite can be moved manually.
Do not ride your MicroLite when the magnetic brake lever is in the “FREEWHEEL” position. (The brake must be in the “DRIVE” position before riding.)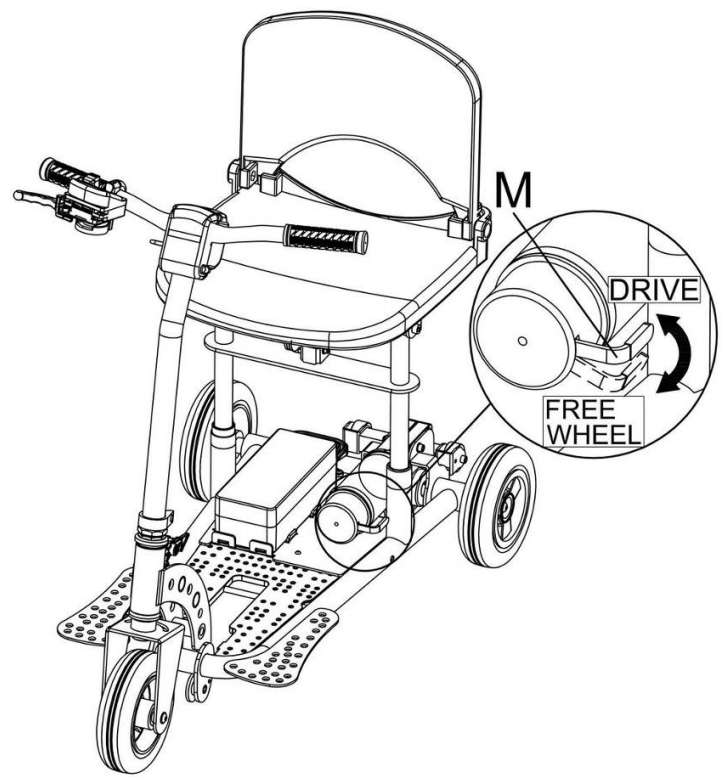
PRECAUTION
- When using your scooter for the first time you should practice at slow speed in a flat open area free of obstacles, until you are confident in turning, stopping, reversing, and judging braking distance.
- This scooter is designed for a maximum rider weight of 100kgs.
- Always switch power off (Key switch to “Off” position) before leaving your scooter.
- Do not store your scooter outside without adequate protection.
- Keep the shipping carton in a dry place after unpacking your MicroLite in case it needs to be shipped for service.
- This appliance is not intended for persons (including children) with insufficiency of physical, sensory or mental capabilities, or lack of experience and knowledge unless they have been given instructions concerning the use of the appliance by a person responsible for their safety. Children should be supervised to ensure that they do not play with the appliance.
Y our MicroLite is extremely maneuverable but sharp turns must only be done at very slow speed.
![]() Do not operate the Forward/Reverse switch when the scooter is moving. This could damage your MicroLite.
Do not operate the Forward/Reverse switch when the scooter is moving. This could damage your MicroLite.
HOW TO CLEAN THE SCOOTERAvoid power spray water washing of the scooter as this could cause damage to the wire connectors and electronic system.Completely dry off the scooter, if necessary use a dry cloth after cleaning your scooter.HOW TO CLOSE THE TERMINAL COVER OF BA TERRY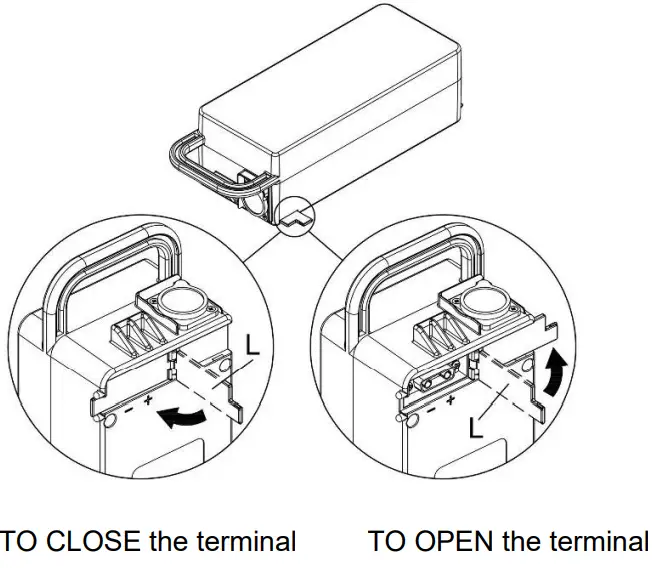
To open or close the terminal cover “L” by the above illustration per arrow direction.
FOLD THE MICROLITE
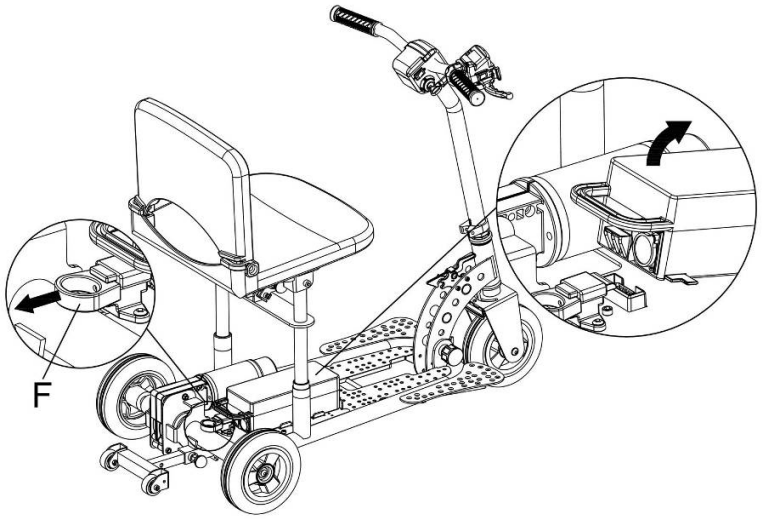
- Remove battery module from scooter
- Use one finger to pull the ring “F”, and use the other hand to pull the battery module upward and then move the battery pack away from scooter.
- Close the terminal cover “L” after moving the battery module from scooter per arrow illustration.
- Remove the seat from scooter.
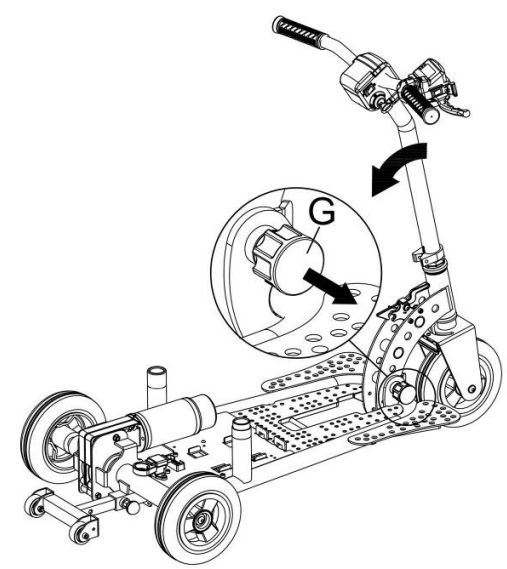
- Use one hand to hold the handle, and use the other hand to pull the lock pin knob (G) and turn it anticlockwise. Then fold the handle down until you hear the “click” of the locking pin fitting into position on the main frame.
 |
 |
TEMPORARY STORAGE OF YOUR SCOOTERTo store the scooter for a period of a month or more, it is recommended that you remove the battery away from a scooter and close the terminal cover during storage or during a period that the scooter is not used.
CHARGE BA TTERY
- When you get your new battery put it on charge for 24 hours.
- When recharging your battery, always charge it until the light on the charger turns green.
- Never use the battery for any purpose but to power your scooter.
- The battery charger can become hot during charging so your charger should be placed in a suitable place with good air flow and away from children.
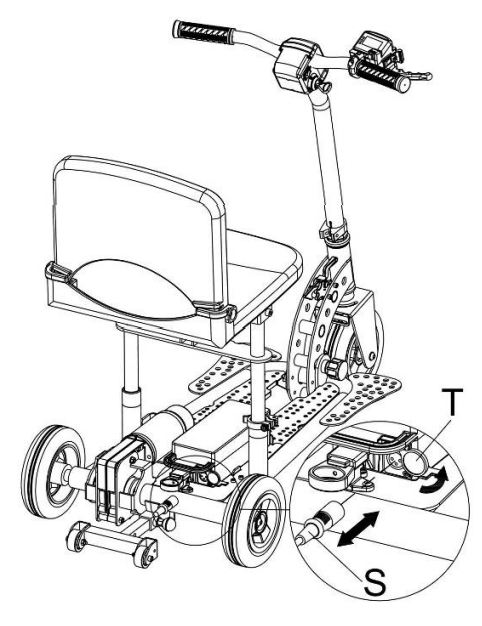
To recharge the batteries, follow the steps below:
- Place your Scooter close to a standard electrical wall outlet.
- Turn the scooter key switch to the “Off” position.
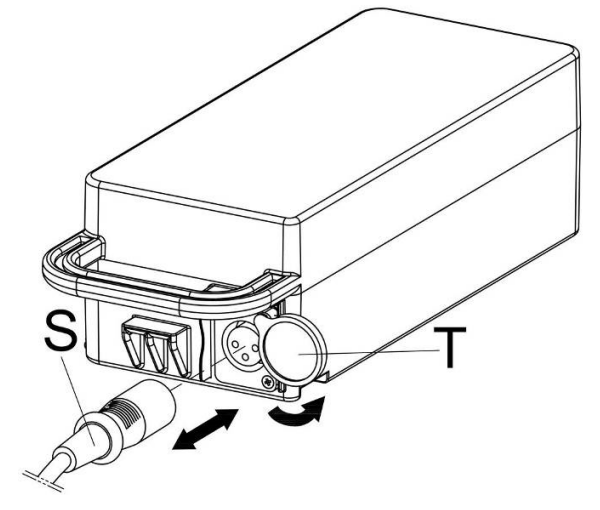
- Swing the charger’s cover away (T) as arrow direction.
- Plug the charger power cord (Round plug) (S) into the socket indicated on battery pack.
- Plug the charger power plug into a standard wall outlet.
- When charging is completed, the yellow LED will turn to green.
- Disconnect the charger power cord from the wall outlet and the plug from the scooter when the batteries are fully charged.Or remove the battery from scooter, and charge the battery individual.
- Swing the charger’s cover away (T) as arrow direction.
- Plug the charger power cord (Round plug) (S) into the socket indicated on battery pack.Do not place the battery on a concrete floor for charging. Raise the battery off the concrete with wooden blocks or similar objects.
IMPORTANT NOTICE:When removing battery away from a scooter, the battery terminal covers must be kept in closed at all times to avoid the possibility of something falling across the terminals and causing a short circuit.This could damage the battery or even cause it to explode.To dispose of your battery, return it to your dealer or a recycler.Improper disposal of the battery could result in an explosion causing injury and/or property damage.
Estimated travel distance with 80kg load
| 24V 11.6ah Lithium Battery | 10 -13 km (6.2 – 8 miles) | This larger battery is optional |
| 24V 8.7ah Lithium Battery | 8 – 10 Km(5 – 6.2 miles) | Std Battery |
Note:When the YELLOW light comes on there is approx. 23 minutes of travel time before the RED light comes on and a further 20 minutes before the battery runs out. Figures are based on a fully charged battery with firm & even road surfaces. This will vary according to passenger weight, battery age, and road conditions.
BATTERY CHARGER
![]() For your safety and proper use of the battery module, we strongly recommend that you read this manual completely before use.
For your safety and proper use of the battery module, we strongly recommend that you read this manual completely before use.
- For indoor use only, do not expose to rain.
- Disconnect the mains power supply before making or breaking the connections to the battery.
- This appliance is not intended for persons (including children) with insufficiency of physical, sensory, or mental capabilities, or lack of experience and knowledge unless they have been given instructions concerning the use of the appliance by a person responsible for their safety. Children should be supervised to ensure that they do not play with the appliance.
- This charger is not for recharging non-rechargeable batteries.
- Do not use for charging any batteries which are not specified by the manufacturer.
Understand the LED lights on the charger:NOTE: When starting to charge, if the LED on the charger shows green or red after being connected for a while, please reset by unplugging the charger from the battery and power supply then reconnect again. OR if the LED on the charger flashes red/green alternately or yellow, you will need to reset the charger by turning off the power until the flashing stops. Wait a few seconds then switch on again. RED: the charger is connected to a power source. ORANGE: charging the battery. GREEN: (flashing) almost fully charged SOLID GREEN fully charged
INSTRUCTIONS FOR USING BA TERRY MODULE1. Charge battery module:
- The battery module can only be charged using a dedicated charger which is specified for this battery module. Do not charge this battery module with any other chargers.
- Before using the battery module for the first time, fully charged the battery module with the specified charger.
![]() Only use the specific and approved charger delivered with this battery module.3. Before charging the battery module, plug the power cord into the main electricity. The LED indicator should display a RED light. Connect the output supply of the charger to the battery module, the charging process will start automatically, the LED indicator should display ORANGE light. When the charging process is completed, the LED indicator should display a SOLID GREEN light for a fully charged battery module. (Yellow led indicator flashing means the charger is ready for charging, while green flashing means constant voltage charging)
Only use the specific and approved charger delivered with this battery module.3. Before charging the battery module, plug the power cord into the main electricity. The LED indicator should display a RED light. Connect the output supply of the charger to the battery module, the charging process will start automatically, the LED indicator should display ORANGE light. When the charging process is completed, the LED indicator should display a SOLID GREEN light for a fully charged battery module. (Yellow led indicator flashing means the charger is ready for charging, while green flashing means constant voltage charging)
2. Use the battery module:
- The battery module is designed for SupaScoota mobility scooters only. Do not use a battery module on any other equipment.
- For your safety and also the life of the battery module, always switch off the scooter when it is not in use.Important note:The battery module has a built-in Power Management System with Overload protection. If the scooter stops due to overloading, turn thekey off and on again to reset.
![]() Important notes to help prolong the life of the battery:
Important notes to help prolong the life of the battery:
- Before the first use of your battery, put it on charge for 24 hours.
- Always recharge your battery as soon as possible after use.
- Never use the battery when the red light is “On”. You will discharge the battery below its designated voltage and damage it.
- Do not drop the battery.Do not use any battery which is NOT specified by the manufacturer. Do not open the battery case, this may cause unexpecteddanger and will void the warranty.
BATTERY CARE & STORAGE![]()
1. STORAGE:Remove charged battery module from scooter/charger and store in a place where the ambient temperature is above 5 degrees andlower than 30 degrees Celsius. Ensure that to have terminal cover is closed.Recharge it before the next use.
★STORAGE:Charge your battery every 2-3 months when it is not in use.2. Always contact our service agent before you try to replace the battery or the charger. Using an incompatible battery or charger may affect the performance or cause dangerous problems.
BATTERY SAFETY INSTRUCTIONDuring use, charge, or storage

- Do not disassemble or modify the battery module. The battery module contains safety and protection devices. If damaged, it may cause the battery to general heat, explode, or ignite.
- Do not short circuit the (+) and (-) terminals with other metals.
- Do not place the battery in a device with the (+) and (-) in the wrong way around.
- Do not use, leave battery module close to fire or inside of a car where the temperature may be above 60℃. Also do not charge or discharge in such conditions.
- Do not charge battery by connecting the cigarette lighter socket in a car.
- Do not heat or throw an old, failure battery module into a fire.Please send back to local distributor for recycling.
- Do not hit with a hammer (or any solid objects), step on or throw or drop to cause strong shock. Strong shock could damage battery cells and battery management system.
- Do not immerse, throw, and wet the battery module in water/ sea water.
- Stop using the battery if abnormal heat, odor, discoloration, deformation, or abnormal condition is detected.
- Be careful to protect the lithium battery when moving.Avoid any damage.
 report this ad
![]() Do not use this charger to charge any other batteries which are not specified by the manufacturer. Do not use any other charger which is not specified by the manufacturer to charge this battery module.
Do not use this charger to charge any other batteries which are not specified by the manufacturer. Do not use any other charger which is not specified by the manufacturer to charge this battery module.![]() During use, charge, or storage
During use, charge, or storage
- Do not put battery modules in your pockets or bags together with metal objects such as golf clubs, necklaces, hairpins, coins, or screws. Do not store batteries with such objects.
- When charging the battery module, use dedicated chargers and follow the specified conditions.
- Use the battery module only to power the scooter.
- Stop charging the battery if charging is not completed within the specified time.
- Always recharge your battery module as soon as possible after use.
- Batteries have life cycles. If the time that the battery powers equipment becomes much shorter than usual, the battery life is at an end. Contact our service agent to replace the battery or /and charger.
- While the battery is charged, used, and stored, keep it away from objects or materials with static electric charges.
- Do not store your battery module outside without adequate protection.
- If the terminals of the battery become dirty, wipe with a dry cloth before using the battery.
- Remove a battery whose life cycle has expired.
- When the battery is worm out, insulate the terminals by closing the terminal cover.
- DO NOT dispose of battery in fire. Improper storage and disposal of the battery could result in an explosion causing injury and or property damage.
Specifications |
|
| Number of Wheels | 3 |
| Front Wheel Size | 175mm (7”) |
| Rear Wheel Size | 175mm (7”) |
| Ground Clearance (tiller) Length | 45 mm (1.7”) |
| Length | 930 mm (36.5”) |
| Width | 500mm (19.7”) |
| Weight Without Seat | 11.8 kgs (26 lbs) |
| Weight of Seat | 4.6 kg (10.1 lbs included seat frame) |
| Max Loading | 100kg (220 lbs) on level ground |
| Turn Radius | 820 mm (32.3”) |
| Motor Output | 230 Watt |
| Transmission | Worm Drive Differential Gearbox |
| Reverse | Forward/Reverse Switch |
| Brakes | Dynamic Braking and Electromagnetic Brake |
| Braking Distance/time | 1-1.5 meter (39-59”) / 0.6 – 0.7 second |
| Battery (Lithium) | Lithium 24V 8.7ah / 1.5 kg (3.3lbs)- Std batteryLithium 24V 11.6ah / 1.8 kg (4 lbs)- Optional |
| Charger (Lithium) | Off-board 24 volt 2 amp- 0.5 kg (1.1 lbs) |
| Max Speed | 6 kph (3.7 mph) |
| 2nd speed choice | 3.3 kph (2.1 mph) |
| Slope Grade Ability | Max. Recommended – 8 Degrees |
| Travel Distance | Up to 8-10 km (5-6.2 miles) with 24V 8.7ah lithium battery. Or Up to 10-13 km (6.2- 8 miles) with a 24V 11.6ah lithium battery. |
MicroLite Warranty
Your MicroLite is fully guaranteed against faults arising due to defects in manufacture or materials as followsFrame: 2 years. The handlebar, tiller, and all other relating components except thoselisted below: 1 year.Subject to availability of parts, any such defects will be rectified, either by repair or by unit replacement.Warranty does not coverAny damage due to improper use or the replacement of parts arising from normal wear and tear such as tires, armrests, and upholstery.Claims due to a normal increase in operational noise level. This warranty does not cover labor or service calls.BatteriesLithium is covered by a 12-month warranty from the original manufacturer. Gradual deterioration due to being left in a discharged state or being left in cold conditions for long periods is not covered.
This section MUST BE READ and SIGNED by the purchaser and stamped by the dealer This warranty record must be kept by the purchaser and a copysupplied with any claimI/we acknowledge that the MicroLite has been delivered in good order and operating condition and that I/we have been instructed inthe care and maintenance, safe operation, and proper use of the unit.Purchasersname……………………………………………………………………….Purchase date…………………………………………….Address ……………………………………………………………………………………………………………………………………. ……………Serial No ……………………………..Key No…………………………………Signature…………………………………………………![]()
[xyz-ips snippet=”download-snippet”]