SVEN RX-G815 Gaming Mouse User Manual
1. BUYER RECOMMENDATIONS
- Unpack the device carefully. Make sure there are no accessories left in the box. Check up the device for damage; if the product was damaged during transportation, address the firm which carried out the delivery; if the product functions incorrectly, address the dealer at once.
- Check up the package contents and availability of the warranty card. Make sure the warranty card has a shop stamp, a legible signature or the seller’s stamp and purchase date, and the goods number corresponds to that in the warranty card. Remember: in case of warranty card loss or discrepancy of numbers you forfeit the right for warranty repairs.
- Before installing and using the speaker system, read this Manual carefully and keep it for future reference.
- Shipping and transportation equipment is permitted only in the original container
- Does not require special conditions for realization.
- Dispose of in accordance with regulations for the disposal of household and computer equipment.
2. APPOINTMENT
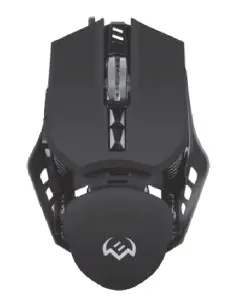
RX-G815 gaming mouse is an input device. It is designed for entering (entering) information into the computer, as well as controlling the operation of the computer.
3. PACKAGE CONTENTSЬ
- Gaming mouse — 1 pc
- User Manual — 1 pc
- Warranty card — 1 pc
4. SPECIAL FEATURES
- Non-slip coating Soft Touch
- Programmable buttons
- Braided cable
- RGB backlight
5. PREPARATION TO WORK
- Connect the gaming mouse to an available USB connector on the PC.
- After connecting to the USB port, the PC will automatically recognize the device.
- To use adjust the buttons and backlight, you need to install the software (downloaded from the website www.sven.fi). Run the previously downloaded file to install the driver, follow the installer’s advice.
- After installation, the program will automatically detect the presence of the mouse. You can call up the control window using the icon in the taskbar or in the Windows system tray.
Key assignments and mouse settings
«Profile 1» and «Profile 2» fields are used to configure the basic functions of the mouse for maximum convenience in the game. Initially, all mouse buttons are set to default settings(as shown below). However, the user has the ability to change the functions of these keys.
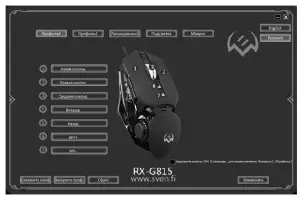 Fig. 1
You can reassign buttons by clicking on menu items, calling context menu, where you can reassign keys, assign a macro (pre-conᅣgured keyboard shortcut options), assign functionsto multimedia key (volume control, player control).
Save and reset settings
- Reset» button resets the settings. «Apply» button saves the settings.
Profile1/Profile 2
This mouse has the ability to switch between profiles.For example, in «Profile 1» mode, standard mouse keys are assigned, and in «Profile 2» mode, you can assign multimedia commands.
Button functions assigned by default (Fig. 2)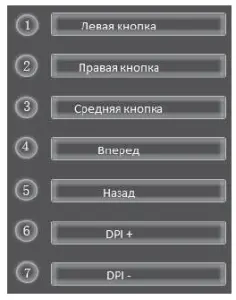 Fig. 2
You can change the functions of mouse buttons by assigning other values to buttons. The numbering of mouse keys corresponds to numbers of the list on the left. By clickingon menu items, you can bring up a pop-up window with functions that can be reassigned.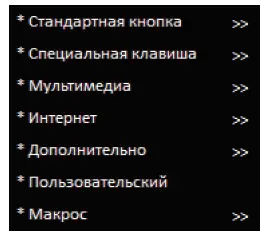 Fig. 3
List of standard button settings.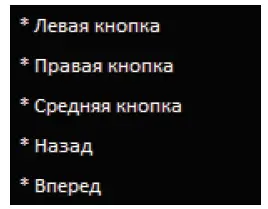 Fig. 2
Special key
- DPI – change sensor extension, «DPI+» increasing, «DPI–» decrease, «cycle DPI» – switching sensor expansion
- Hot button – emulation of a quick click of left mouse button, additional options of «Hot button» can be set in «Advanced» tab
- AIM – cursor speed when aiming. Pressing and holding the button allows you to reduce the DPI extension, for more accurate aiming
- LED mode – switching backlight modes
- Profile – switch between profiles «Profile 1/Profile 2»
- Button off – button off Fig. 5.
 Fig. 5.
Media
- Play/Pause – function works in player application
- Stop – stop playback
- Previous track – go to previous track
- Next track – go to next track
- Volume + – volume up
- Volumeь – – volume down
- Mute – mute Fig. 6
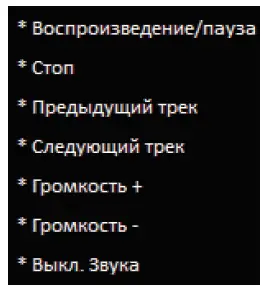 Fig. 6
Internet
- Homepage – launch browser, or open a new tab
- Search – search bar
- Previous page – previous browser page
- Next page – next browser page
- Stop – stop loading page
- Refresh – refresh page
- Favorites – favorites bookmarks in browser Fig. 7
 Fig. 7
Additionally
- My Computer – «My Computer»
- Calculator – calculator
- Desktop – minimize all windows Fig. 8
 Fig. 8
Keyboard shortcut
Most commonly used key combinations are Ctrl, Alt, Shift, as well as Win+F, Win+R. They are often called modifier keys. In combination, you can press not only one of these keys, but several at once. «Keyboard Shortcut» option allows you to assign mouse shortcuts to your keyboard.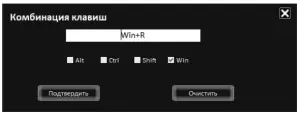 Fig. 9
Macro
You can assign a previously created macro to the button. A description of how to create a macro is described in «Macro» section.
«Advanced» tab
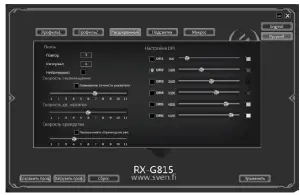 Fig. 10
- Fire – advanced fire button settings. «Repeat» зfield specifies the number of repetitions when the key is pressed. Field «Interval» – the interval between clicks. «Continuous» option isset, which allows you to fire continuously when you press the key.
- Speed move – adjusting speed of cursor. Check mark is set «Enhance pointer precision» increases the accuracy of the mouse pointer
- Double click speed – double-click speed
- Scrolling speed – wheel scroll speed. Check mark is set «Scroll page at a time» scrolls the page at a time
- DPI settings – DPI settings, allows you to flexibly adjust the sensor expansion from 500 to 8000 dpi. DPI mode backlight color can be set from the Windows palette by clicking on the color square. Fig. 11
 Fig. 11
Backlight
In backlight menu, you can adjust blink speed and mouse backlight modes.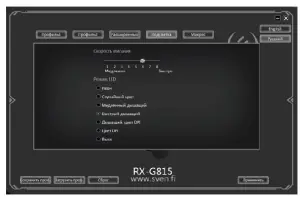 Fig. 12
Macro settings
Macro – it is a sequence of events consisting of pressing and releasing keyboard keys, mouse buttons, and time intervals between them. Macro allows you to simulate pressingmultiple keys when in reality you are pressing only one.
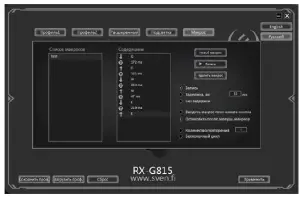 Fig. 13
Macro editor window is divided into two parts. In area of the list of macros the names of macros are listed, in the area of contents, the list of commands of the selected macro is • Creating macro name
- Hover your mouseover «Macro List» window, then right-click, select «New Macro» from the pop-up window. In window, enter the name of the macro and click «OK». Macro name will appear in list.displayed.
- Recording MacrosClick on the name of macro in «List of macros» window – line with the name will be highlighted in blue. Press «Record» button, then you can type a sequence of characters fromthe keyboard. If necessary, you can also emulate pressing the mouse buttons. «Stop» button stops recording commands.
- Additional macro optionsIn lower right corner are the delay options and the macros respond to pressing the macro button.
- Recording – delay between the commands will be generated by the duration of the keystroke, at the stage of recording the command, as is
- Delay, ms – delay introduced in ms (milliseconds)
- No delay – no delay between commands
- Enter macro while button is pressed – the macro input will continue while the macro button is pressed
- Stop when finished macro – will only stop after fully macro command is entered
- Number of repetitions – this option allows you to specify the number of repetitions of macro
6. TROUBLESHOOTING
| Problem | Solution |
| The mouse is not working. | 1. Disconnect the mouse from the PC and check connector pins for possible damage. If there is no external damage found and connector pins are OK, connect the mouse to the PC.
2. Address your nearest authorized service center. |
If none of the above methods can solve the problem, please seek professional advice at your nearest service center. Never attempt to repair the product yourself.
7. TECHNICAL SPECIFICATIONS
| Parameter, measurement unit | Value |
| OS compatibility | Windows |
| Resolution, DPI | 500-8000 |
| Q-ty of buttons | 6 + 1 (scroll wheel) |
| Interface | USB |
| Conformity with | EAC, CE, FCC, УкрСЕПРО |
| Сable length, m | 1.8 |
| Dimensions, mm | 135 × 80 × 35 |
| Weight, g | 135 |
Notes:
- Technical specifications given in this table are supplemental information and cannot give occasion to claims.
- Technical specifications are subject to change without notice due to the improvement of SVEN production.
Model: RX-G815
 report this ad
Manufacturer: SVEN PTE. LTD, 176 Joo ChiatRoad, 02-02, Singapore, 427447.Produced under the control of Oy Sven ScandinaviaLtd. 15, Kotolahdentie, Kotka, Finland,48310. Made in China.
Read More About This Manual & Download PDF:
[xyz-ips snippet=”download-snippet”]