OWNER’S MANUALPB-1000SB-1000POWERED SUBWOOFERS
![]()
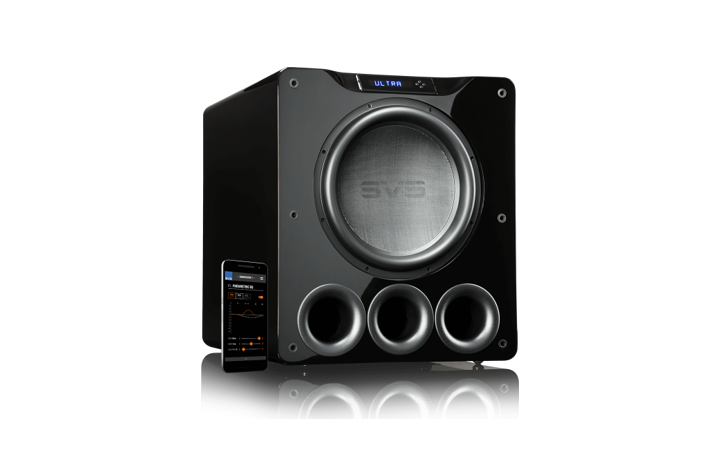
Thank you, and congratulations on purchasing your new SVS subwoofer!Prepare to be pleasantly shocked at what an SVS subwoofer will bring to your home music and theater system – we guarantee you a thrilling audio experience!SVS subwoofers deliver bass so accurate, detailed, clean, and dynamic – you’ll hear and feel things you never knew existed in your favorite movies and music. SVS audio products are designed to outperform competing consumer-direct and retail brands at every price point. By leveraging advanced technology, using the highest quality components, and applying rigorous engineering and design principles – the team at SVS has created a line of premium audio products that bring music and movies to life with stunning realism – all at truly affordable prices. SVS takes the guesswork out of purchasing and setting up your new subwoofer. Our Sound Experts in customer service will help you select the best SVS subwoofer for your specific application, and walk you through the entire set-up process to ensure your new SVS and your entire system is performing optimally.With our unmatched customer service and the most comprehensive consumerprotection policies and warranty coverage in the industry (www.svsound.com/bill-ofrights), you can rest easy knowing we’re standing behind our products 100%.Your complete satisfaction is our only goal
If you have any questions about your SVS product, please contact us directly.www.svsound.com • [email protected] • (877) 626-5623
IMPORTANT SAFETY INSTRUCTIONS
- Read these instructions.
- Keep these instructions.
- Heed all warnings.
- Follow all instructions.
- Do not use this apparatus near water.
- Clean only with dry cloth.
- Do not block any ventilation openings. Install in accordance with the manufacturer’s instructions.
- Do not install near any heat sources such as radiators, heat registers, stoves, or other apparatus (including amplifiers) that produce heat.
- Do not defeat the safety purpose of any polarized or grounding-type plug. A polarized plug has two blades with one wider than the other. A grounding-type plug has two prongs and a third grounding point. The wide blade or the third prong are provided for your safety.If the provided plug does not fit into your outlet, consult an electrician for replacement of the obsolete outlet.
- Protect the power cord from being walked on or pinched particularly at plugs, convenience receptacles, and the point where they exit from the apparatus.
- Only use attachments/accessories specified by the manufacturer.
- Use only with the cart, stand, tripod, bracket, or table specified by the manufacturer, or sold with the apparatus. When a cart is used, use caution when moving the cart/apparatus combination to avoid injury from tip-over.
- Unplug this apparatus during lightning storms or when unused for long periods of time.
- Refer all servicing to qualified service personnel. Servicing is required when the apparatus has been damaged in any way, such as power-supply cord or plug is damaged, liquid has been spilled or objects have fallen into the apparatus, the apparatus has been exposed to rain or moisture, does not operate normally, or has been dropped.
- WARNING: To reduce the risk of fire or electric shock, this apparatus should not be exposed to rain or moisture and objects filled with liquids, such as vases, should not be placed on this apparatus.
- To completely disconnect this equipment from the mains, disconnect the power supply cord plug from the receptacle.
- The mains plug of the power supply cord shall remain readily operable.
![]() The lightning flash with an arrowhead symbol within an equilateral triangle is intended to alert the user to the presence of uninsulated “dangerous voltage” within the product’s enclosure that may be of sufficient magnitude to constitute a risk of electric shock to persons.
The lightning flash with an arrowhead symbol within an equilateral triangle is intended to alert the user to the presence of uninsulated “dangerous voltage” within the product’s enclosure that may be of sufficient magnitude to constitute a risk of electric shock to persons.
![]() The exclamation point within an equilateral triangle is intended to alert the user to the presence of important operating and maintenance (servicing) instructions in the literature accompanying the product
The exclamation point within an equilateral triangle is intended to alert the user to the presence of important operating and maintenance (servicing) instructions in the literature accompanying the product
![]() The equipment is a Class II or double insulated electrical appliance. It has been designed in such a way that it does not require a safety connection to way that it does not require a safety connection to electrical earth.
The equipment is a Class II or double insulated electrical appliance. It has been designed in such a way that it does not require a safety connection to way that it does not require a safety connection to electrical earth.
PLACEMENT OPTIONS
If possible, place the subwoofer near the front stage, for best blending with the front and center loudspeaker channels.Corner placement will excite all room modes and will reduce the chances of encountering a null (an acoustic cancellation in the bass response) at the listening position. If the A/V receiver (AVR) equalizes the subwoofer channel during auto-set-up, corner placement will often provide the best overall performance.
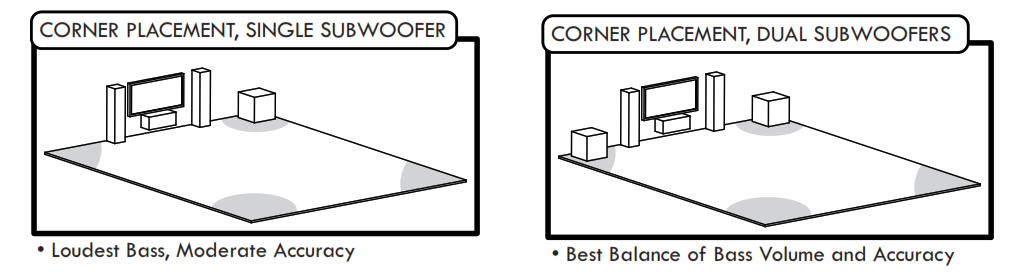
If corner placement sounds excessively boomy, then try moving the subwoofer to other available locations along the front stage, listening for the best balance of output and smooth accurate response. Always re-run auto-set-up after moving the subwoofer to a different location to ensure the acoustic distance and calibration level are set correctly.
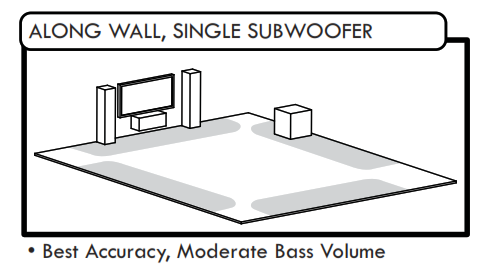
Consult with our Sound Experts as needed for additional guidance and recommendations on subwoofer placement.
AMPLIFIER FEATURES & CONTROLS
The amplifier in your SVS subwoofer has simple and straightforward connectivity and control options that make integrating the subwoofer into the listening environment an easy task.
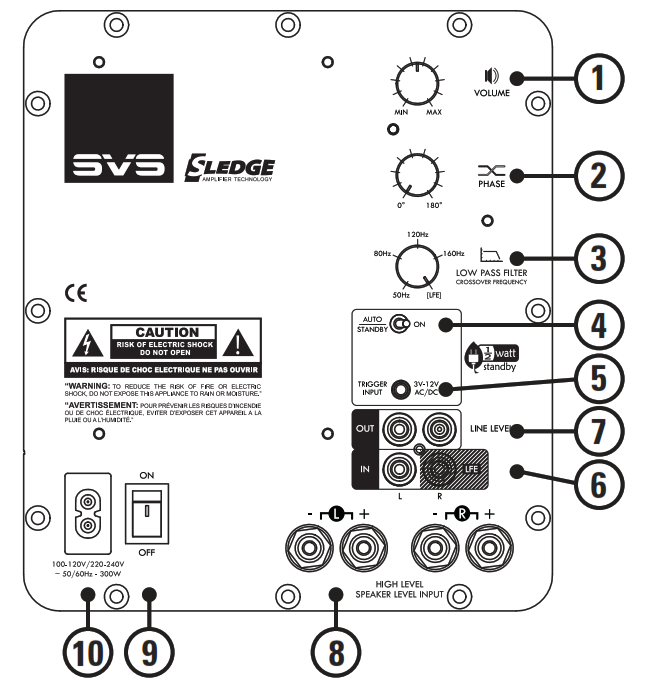
- Volume ControlThis control affects how loud the subwoofer plays. For connection to an A/V receiver, it should normally be set to 10 o’clock to 12 o’clock before running auto-set-up. For 2-channel applications, it should be adjusted to match the output level of the loudspeakers.
- Phase ControlThis control delays the signal being processed through the amplifier. For connection to an A/V receiver, it should be set to 0 degrees. For 2-channel applications, it should be adjusted to obtain the most coherent and stable soundstage and transition between the loudspeakers and the subwoofer.
- Low Pass FilterThis control affects the upper-frequency limit of the subwoofer. The control range is 50-160 Hz, along with a disable (LFE) setting. The slope of the low pass filter is 12 dB/octave. For connection to an A/V receiver, the low pass should be set to LFE (i.e., disabled). For 2-channel applications, it should be adjusted to blend with the natural roll-off frequency of your loudspeakers. The manufacturer’s rated bass extension for your loudspeakers is a good starting point, but final blending is best done by ear.
- Auto/Standby and On SwitchIf this switch is set to Auto/Standby, it will automatically turn on the subwoofer in the presence of a signal. If no signal is present for a period of several minutes, the amplifier will drop into Standby mode, where power consumption will be less than 0.5 watts. If this switch is set to On, the amplifier will remain on continuously and will not drop into Standby mode.
- 3V-12V Trigger InputThis feature will automatically bring the subwoofer amplifier out of Standby mode if a signal is sent to this input from another component in the system (typically the pre/pro or A/V receiver). The other component in the system must be equipped with a trigger output feature. The required cable jack is a TS 1/8” mono (pictured below).

- Line Level InputsThese inputs are used for line-level connections to the subwoofer. For a single mono connection to an A/V receiver, use the R/LFE input. For 2-channel applications, use both the L and R inputs.
- Line-Level OutputsThese outputs are used in 2-channel applications to high pass the signal being sent to the loudspeaker amplifier. The line-level outputs feature a fixed 80 Hz 12 dB/octave high pass filter.
- High Level (Speaker Level) InputsThis connection method is for 2-channel stereo applications where the integrated pre/pro/amplifier only has high-level (i.e., speaker-level) outputs.
- Main Power SwitchThis switch turns the amplifier on and off. During normal operation, the main power switch can be left on. It should be turned off during extended periods of non-use, or when making signal connections to the subwoofer.
- Power Cord ReceptacleThe receptacle accepts the AC power cord.
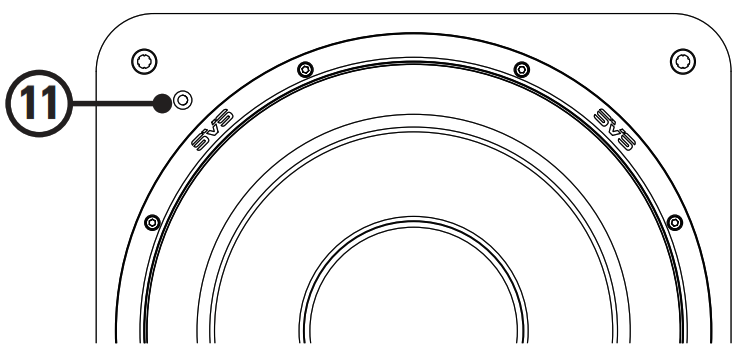
- Power Status Light (front panel)The power status light is located on the front panel of the subwoofer in the upper left corner. The light will illuminate blue when the amplifier is on. The light will illuminate red when the amplifier is in standby mode.

POWER & SIGNAL CONNECTIONS
Before making any power connections or signal (line-level or speaker level) connections, please make sure the subwoofer power switch is turned OFF.Connect the subwoofer power cord to the subwoofer amplifier and to an AC outlet. Using convenience outlets located on some AVR receivers or pre/pros is NOT recommended for your subwoofer as these outlets are not meant for high-power devices.Signal Connection Options:A/V Receiver (AVR)/Processor (PRO) ConnectionThis is the most common form of connection. The AVR/PRO will perform the upstream digital bass management and send the subwoofer a pre-filtered mono signal.• Using a high-quality and shielded RCA cable, connect the AVR/PRO subwoofer output jack to the Line Level R/LFE input on the subwoofer amplifier.• Set the low pass filter to LFE.• Set the phase control to 0 degrees.• Set the gain to between 10 o’clock and 12 o’clock.• Turn on the hard power switch.• Run the AVR/PRO auto-set-up routine.
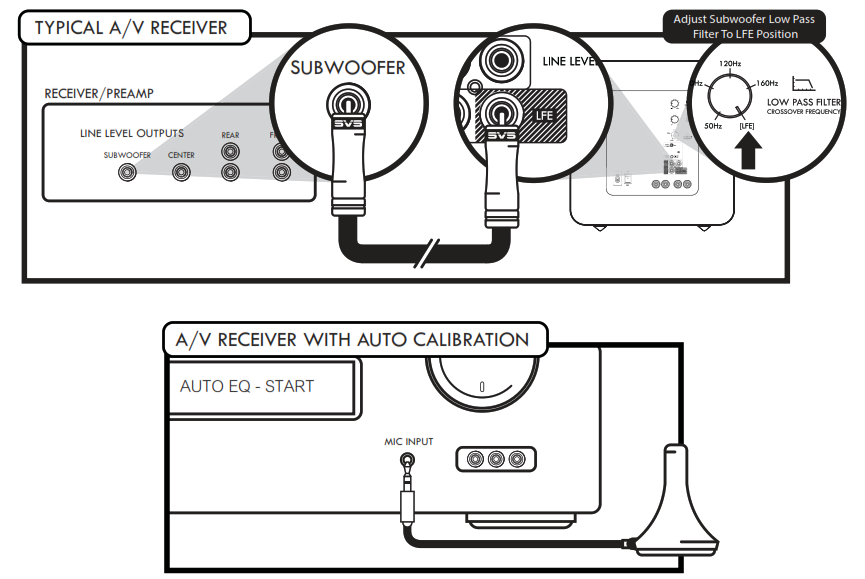
Occasionally AVR/PRO auto-set-up programs will make errors or select non-optimal settings. Consult with our Sound Experts as needed to double-check the speaker and subwoofer digital bass management settings in your AVR/PRO set-up menus to ensure optimal performance from your SVS subwoofer and the entire system.
Multi-Channel/Stereo Applications – Line Level ConnectionThis connection method is for multi-channel/stereo applications where the pre/pro has L/R line-level outputs.• Using high-quality and shielded RCA cables, connect the L/R line-level outputs from the pre/pro to the L/R line-level inputs on the subwoofer.• If the pre/pro does not have a spare set of line-level outputs, a 1M-2F Y-adapter may be used on each pre/pro output in order to split the signal and allow connection to both the loudspeaker amplifier and the subwoofer amplifier.• Adjust the low pass filter to blend with the natural roll-off frequency of your loudspeakers. The manufacturer’s rated bass extension for your loudspeakers is a good starting point, but final blending is best done by ear.• Adjust the gain to blend with the level of your loudspeakers.• Adjust the phase control to obtain the most coherent and stable soundstage and transition between the loudspeakers and the subwoofer.
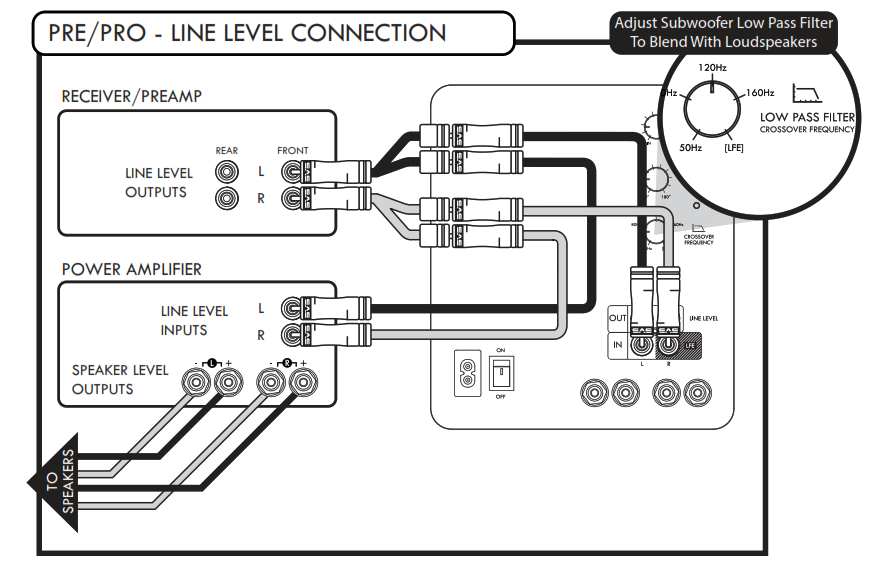
With this connection method, you do have the option of using the subwoofer to high pass the signal being sent to the loudspeaker amplifier. The line-level outputs feature a fixed 80 Hz 12 dB/octave high pass filter. In order to high pass the loudspeakers, connect the pre/pro outputs to the subwoofer line-level inputs. Then connect the subwoofer line-level output to the loudspeaker amplifier inputs. Adjust the low pass filter on the subwoofer to 80 Hz and then do final low pass blending by ear.
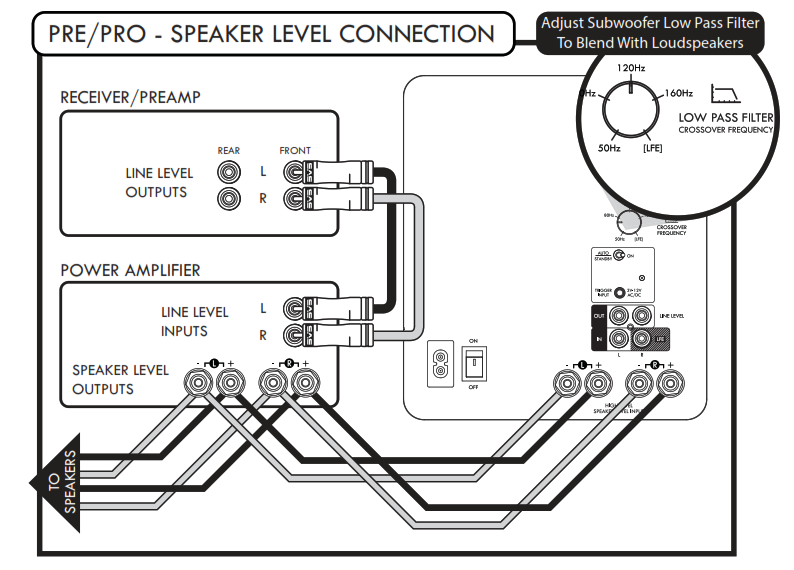
Multi-Channel/Stereo Applications – High Level (Speaker Level) Connection This connection method is for multi-channel/stereo applications where the integrated pre/pro/amplifier only has a high level (i.e., speaker-level) outputs.• Using high-quality speaker wire, connect the L/R speaker level outputs from the integrated amplifier to both the loudspeakers and the subwoofer L/R speaker level inputs on the subwoofer. This will require running two sets of wires from the outputs of the integrated amplifier.• Adjust the low pass filter to blend with the natural roll-off frequency of your loudspeakers. The manufacturer’s rated bass extension for your loudspeakers is a good starting point, but final blending is best done by ear.• Adjust the gain to blend with the level of your loudspeakers.• Adjust the phase control to obtain the most coherent and stable soundstage and transition between the loudspeakers and the subwoofer.
FEATURES & SPECIFICATIONS
PB-1000• Frequency Response: 19-270 Hz ± 3 dB (2-meter ground plane, quasi-anechoic)• Dimensions (HxWxD): 18.9″ x 15″ x 19.4″, 48 x 38.1 x 49.3 cm.• Dimensions with grille (HxWxD): 18.9″ x 15″ x 20″, 46.7 x 38.1 x 50.8 cm.• Weight: 46 lbs., 20.9 kgs.• Premium black ash finish• Front-firing SVS 10″ high-performance driver.• Front-firing 3.5″ high-flow port with inner/outer port flares
SB-1000• Frequency Response: 24-260 Hz ± 3 dB (2-meter ground plane, quasi-anechoic)• Dimensions (HxWxD): 13.5″ x 13″ x 14″, 34.3 x 33 x 35.6 cm.• Dimensions with grille (HxWxD): 13.5″ x 13″ x 14.6″, 34.3 x 33 x 37.1 cm.• Weight: 27 lbs., 12.2 kgs.• Premium black ash finish.• Front-firing SVS 12″ high-performance driver.
AMPLIFIER (both PB-1000 & SB-1000)Sledge STA-300D:• 300 watts RMS continuous power (720 watts peak dynamic power).• Efficient and cool-running Class D topology.• Green standby mode with less than 0.5 watts consumption.• Detachable power cord with main power switch.• RoHS compliant, lead-free construction and worldwide safety certifications.• Auto-On / On switch.• DSP control for accurate response and refined behavior under all operating conditions.• Stereo line-level RCA Input & 80Hz High Pass Filtered Output connections.• Stereo speaker level 5-way binding post input connections.• Continuously variable low pass filter frequency with disable/LFE setting.• Continuously variable volume and phase controls.
CLEANING & CABINET CARE
Your SVS Subwoofer may be gently cleaned as follows:• Use a dry microfiber duster to remove any loose surface dust.• Use a water-damp microfiber cloth to remove fingerprints, smudges and other contaminants. Wipe in one direction only, with the grain.• Follow any damp cleaning immediately with a dry microfiber cloth. Again dry wipe in one direction only, with the grain.
WARRANTY
5-YEAR UNCONDITIONAL WARRANTYSVS offers the industry’s most comprehensive warranty on all our products. SVS warrants this subwoofer and all of its products to be free from defects in the workmanship for 5 years from date of purchase. This, and all of the SVS customer Bill of Rights can be viewed online at www.svsound.com/bill-of-rights.
SVS6420 Belmont Ave.Girard, Ohio 44420United States(877) 626-5623www.svsound.com
References
[xyz-ips snippet=”download-snippet”]