Swann Wi-Fi Enabled DVR System User Manual
Startup Wizard Quick Start Guide
- Completed the “Hardware Quick Start Guide” (the blue coloured guide).
- Able to easily access your modem or Wi-Fi.
- Your DVR is connected to your TV and both are turned on and visible.
- Access to a computer to create a new email account for your DVR. Both Gmail and Outlook are supported.
![]()
Step 1
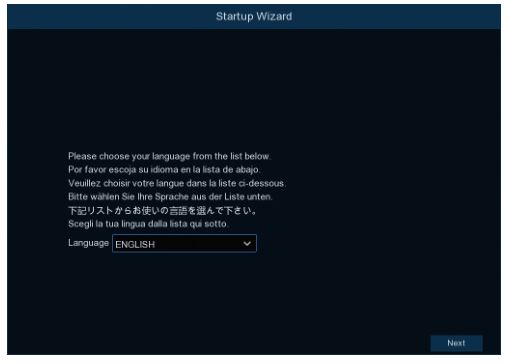
- The first thing you will see on your TV is the language selection screen. Click the drop down menu to select your preferred language then click “Next” to continue.
- If your DVR is connected to your TV using the HDMI cable, a notice will appear on-screen stating that a screen that supports the maximum resolution of your TV has been detected. Click “OK” to continue (if you don’t see this message, you can select a display resolution in step three).
- After a short moment, the resolution will change. Click “OK” to confirm. A welcome screen will appear explaining the options that you can set within the Startup Wizard.
Click “Next” to continue.
Step 2

Password: This step is pretty straight forward, you just have to give your DVR a password. The password has to be a minimum of six characters and can contain a mixture of numbers and letters.
Use a password that you are familiar with, but is not easily known to others. Write down your password in the space provided below for safe keeping.
The “Show Password” checkbox is enabled to reveal your password.
Confirm: Enter your password again to confirm.
Don’t forget to write down your password: __________________________
Email: Enter an email address that can used to receive email alerts and a reset code in case you have lost or forgotten your DVR’s password. Click “Next” to continue.
Step 3
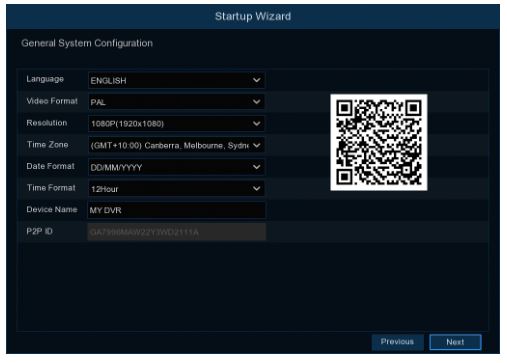
Language: Multiple languages are available, confirm your selection.
Video Format: Select the correct video standard for your country. USA and Canada are NTSC. UK, Australia and New Zealand are PAL.
Resolution: Select a display resolution that is suitable for your TV.
Time Zone: Select a time zone relevant to your region or city.
Date Format: Select a preferred display format.
Time Format: Select a 12-hour or 24-hour time format for display.
Device Name: Give your DVR a relevant name or leave the name displayed.
P2P ID & QR Code: This is a unique ID code for your DVR. You can scan the QR code (on-screen or the sticker on your DVR) when configuring the Swann Security app on your mobile device.
Click “Next” to continue.
Step 4

Email: Leave this enabled to receive email alerts.
Setup: Leave this on the default setting (please consult the instruction manual on how to configure the “Manual” setting).
Sender: Input a sender name or leave the name displayed.
Receiver 1/2/3: The email address that you entered in step 1 will be displayed here. You can input an additional two email addresses to send email alerts to such as a work or family member email.
Interval: The length of time that must elapse after your DVR sends an email alert before it will send another. Adjust accordingly.
Test Email: Click to verify the email/s you entered is/are correct.
Click “Next” to continue.
Step 5
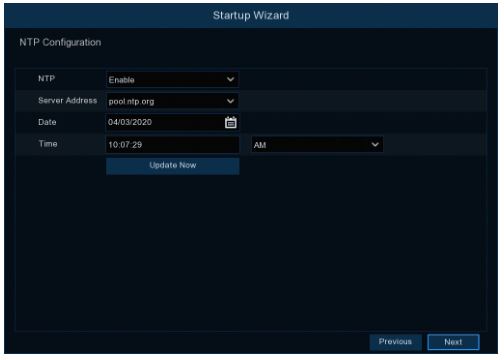
The NTP (Network Time Protocol) function gives your DVR the ability to automatically sync its clock with a time server. This ensures that the date and time are always accurate (your DVR will periodically sync time automatically). Obviously this is very important for a security system and is an integral function of your DVR.
- Click the “Update Now” button to automatically synchronize your DVR’s internal clock with the time server instantly.
- A message will appear on-screen stating that the time has been successfully updated. Click “OK” to continue.
Click “Next” to continue.
Step 6

If Daylight Saving does not apply to your locale, click the “Finish” button then click “OK” to complete the Startup Wizard.
DST: Click “Enable” to apply Daylight Saving to your locale.
Time Offset: Select the amount of time that Daylight Saving has increased by in your time zone. This refers to the difference in minutes, between Co-ordinated Universal Time (UTC) and the local time.
DST Mode: Leave this on the default setting (please consult the instruction manual for information on “Date” mode).
Start Time/End Time: Set when Daylight Saving starts and ends, for example 2 a.m. on the first Sunday of a particular month.
Click “Finish” then click “OK” to complete the Startup Wizard.

[xyz-ips snippet=”download-snippet”]