
![]()
EL RANGE GROUNDBREAKING PRECISION
- ALL-WAYS PRECISE The EL Range can be configured to suit your specific needs and you can transfer your own ballistics data, allowing you to make an accurate assessment of every hunting situation.
- FOCUS ON PERFECTION In every hunting scenario, you can spot the game quickly and accurately thanks to the precision and edge-to-edge sharpness of SWAROVISION technology.
- TRAIL-BLAZING INTELLIGENCE The innovative tracking assistant helps you to narrow down the area where your last shot hit the target.U.S. PRICING72008 EL Range w Tracking Assistant 8×42 MAP $3,52972010 EL Range w Tracking Assistant 10×42 MAP $3,629
BALLISTIC
Three different ballistic curves can be fed into the EL Range TA via a built-in Bluetooth interface. Unlike all the other settings, which can also be adjusted on the binocular itself, configuring the ballistics has to be done via the EL Range TA Configurator App.
- Press and hold the measurement and mode buttons simultaneously for 3 seconds to establish the Bluetooth connection (status LED flashes blue).
- Now select the EL Range TA using the serial number and establish the connection (status LED stays blue).
- Now you can transfer your personal ballistics settings from the app to the EL Range TA. The data from the last three measurements is also transferred from the EL Range to the app. The app always shows you the exact time of the last synchronization.
To switch off Bluetooth, press and hold the mode button for 2 seconds.TIP: For maximum precision, we recommend measuring the muzzle velocity
RANGE MEASUREMENT
 The range measurement of the EL Range TA is based on a travel time measurement using a laser. The range can be measured between 10 meters (10.9 yards) and 2000 meters (2187 yards).ONE-OFF MEASUREMENT
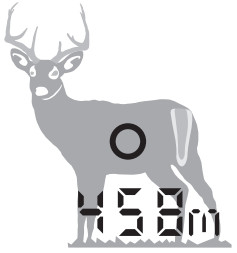 Briefly press the measurement button to display the target mark. After releasing the button, the range measurement is shown in the display.SCAN MODE
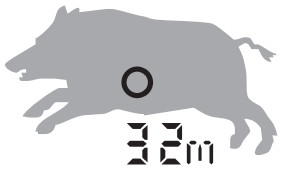 Moving targets are measured continuously in scan mode. The instrument automatically switches to scan mode if you press and hold the measurement button for longer than 3 seconds.Alongside the range measurement, a tilt sensor takes the measured angle into account. Temperature and air pressure readings are also taken, as these parameters can have a major influence on the projectile’s trajectory, particularly at very long distances. However, atmospheric data can only be factored in if your personal ballistics have been transferred to the device.When the second display line is activated, you can display the corrected shooting distance or the correction value to be carried over, along with the number of clicks you need to make this is done by factoring in range, shot angle, temperature, and air pressure, and is calculated using the ballistics entered via the app. Alternatively, the tilt angle or compass direction can be shown on the second line.On the EL Range TA, the target mark and display are in the right optical channel. You can adjust the brightness of the display via the LIGHT menu option (5 levels). The binoculars automatically adjust the brightness of the display based on ambient light levels.
![]()
- Target mark
- Distance measurement display (in meters or yards)
- Display in meters (m) or yards (y)
- Compass symbol
- Angle symbol
- Degree symbol
- Additional function display
- Battery symbol
SWAROVISION FOR OUTSTANDING OPTICAL PERFORMANCEThe new EL Range is offering SWAROVISON technology that means a perfect edge-to-edge sharpness combined with color fidelity and outstanding detail resolution. Even with an integrated rangefinder, it offers 90% light transmission in each tube as well as a wider field of view of 140m. The 10×42 offers 120m/1000m (359ft/1000yds).
UNCOMPROMISING IMAGE DEFINITIONField flattener lenses deliver an almost flat, completely distortion-free image right up to the edges.
ULTIMATE OPTICAL PERFORMANCEPin-sharp contours, high-contrast, and true-to-life images: you can make out every single detail for quick and easy identification.

MAXIMUM COLOR FIDELITYInnovative lens coatings provide excellent color rendering with high light transmission.
TRACKING ASSISTANTThe Tracking Assistant helps the hunter to identify the target area by measuring back to the point where the shot was fired. This can be done in two ways: via the EL Range TA and via the app.
![]()
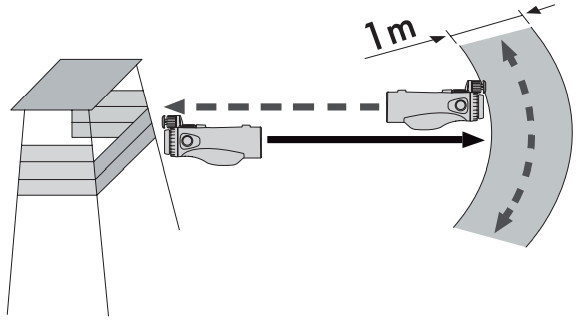
- TRACKING ASSISTANT VIA EL RANGE TAIn the TRACK program, one of the last three measurements is selected and measured back to the point from which it was made. The display shows distance data (m/y) and direction arrows that indicate how far you need to move left and right, front and back, to locate the target area.Measuring range is usually more accurate than measuring direction, so you see an arc-shaped search field. Leave TRACK mode by pressing and holding the mode button for 2 seconds. You have to actively leave the mode, it doesn’t time out.Activate calibration via the measurement button in the COMP program (the LED light on the bottom of the device flashes red). Calibrate the compass by turning the instrument evenly on each axis in a figure of eight. The red LED light turns off once calibration is completed.Metal objects (such as a car or power mast) may affect the direction of the compass and the calibration. If you are taking a measurement near your rifle, we recommend doing it at least 40 cm/16 in away from the barrel. A wristwatch with a magnetic clasp may also significantly affect the measurement.
 TIP: We recommend calibrating the compass regularly to ensure the TA is as accurate as possible particularly when moving to another hunting ground or in the event of major temperature fluctuations.
 - TRACKING ASSISTANT VIA APP After establishing the Bluetooth connection, one of the EL Range TA’s last three measurements is selected. The starting point can be selected manually or displayed automatically. If you do it automatically, it is important that you are still in the exact spot where the measurement was taken. Afterward you can let your phone guide you toward the target area (arc-shaped search field).If you have internet reception, you can display the satellite image. GPS is sufficient for displaying the direction arrows. It is not possible to save offline maps.
 TIP: We recommend calibrating the compass regularly to ensure the TA is as accurate as possible particularly when moving to another hunting ground or in the event of major temperature fluctuations.
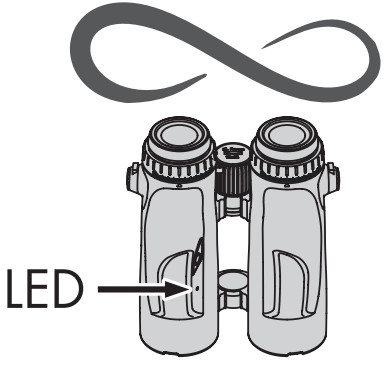 TRACKING ASSISTANT VIA APP After establishing the Bluetooth connection, one of the EL Range TA’s last three measurements is selected. The starting point can be selected manually or displayed automatically. If you do it automatically, it is important that you are still in the exact spot where the measurement was taken. Afterward you can let your phone guide you toward the target area (arc-shaped search field).If you have internet reception, you can display the satellite image. GPS is sufficient for displaying the direction arrows. It is not possible to save offline maps.
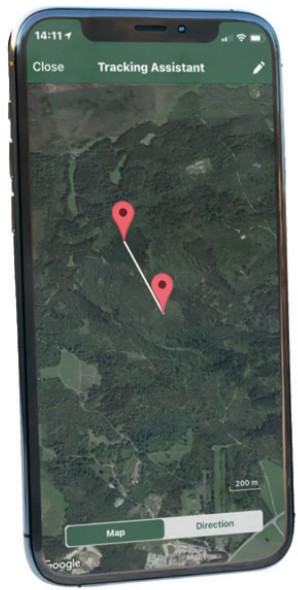
FRR FOREHEAD REST RANGEThe FRR forehead rest Range is available as an accessory and provides stable three-point support to ensure maximum stability and comfort when observing for extended periods. The forehead rest can be adjusted so that your gaze is lined up perfectly. It is mounted on the focusing wheel in place of the battery cover, whose function it replaces TIP: On this model, the magnification can be seen on the battery cover and also on the right side of the strap connector this is important when the forehead rest is mounted, as it replaces the battery cover.
SUPPLIED WITH– UCS universal comfort strap– FSB functional sidebar– Eyepiece covers– Objective lens covers– Soap & brush kit– Microfiber cloth– Strap loop connector– Cover for steel rings (when detaching the objective lens cover)– BT tool
ACCESSORIES
– FRR forehead rest Range– WES winged eyecup set– BGP bino guard pro– BSP bino suspender pro– FSSP floating shoulder strap pro– UTAs universal tripod adapter– CSO cleaning set optics– VPA variable phone adapter andAR-B adapter ring for binoculars
DIOPTER ADJUSTMENT
To ensure optimum image quality, adjust the focus to compensate for any differences between your left and right eye. This is done as follows:STEPS 1-2Keep the right lens cover closed, pull both diopters adjusting the rings upward, and turn them counterclockwise as far as they will go. STEPS 3-5Press and hold the mode button for 4 seconds to access the diopter adjustment setting (display lights up continuously for 60 seconds). Press the measurement or mode button again if you want to leave this mode earlier.Now look through the right eyepiece with your right eye and turn the diopter adjusting ring slowly clockwise until the display is sharp. Then push the diopter adjusting ring back down and open the objective lens cover.
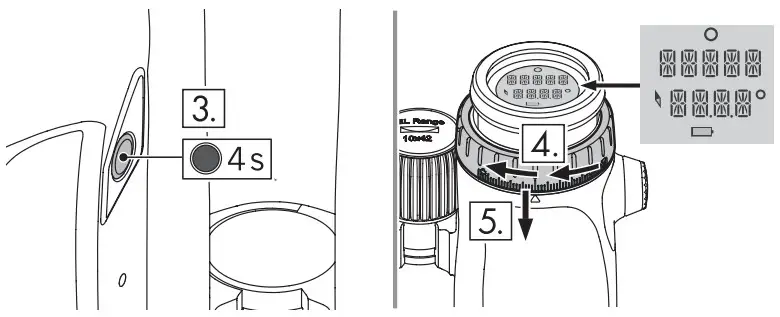 STEP 6Use the focusing wheel to focus the right channel on a distant object (keep your left eye closed).
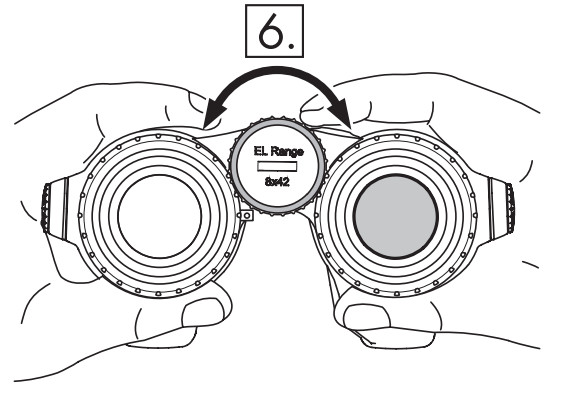 STEPS 7-8Now look at the same distant object with your left eye through the left eyepiece and slowly turn the diopter adjusting ring clockwise until the display is sharp (keep your right eye closed). Then push the left diopter adjusting ring back down.Adjust the twist-in eyecups and eye relief precisely so that the display is more comfortable to view.
LASER MEASUREMENT RANGE
The maximum measuring range of the laser may be influenced by external factors.
BAT T E RYThe battery (type CR2) is located in the focusing ring of the EL Range TA. If the battery capacity is low, this is indicated by a flashing target mark when the EL Range TA is switched on. You now have about 100 measurements left. The battery should be replaced immediately. The lid can be opened using the BT tool supplied.
| RANGE HIGHER | RANGE LOWER | |
| Color of target | Light | Dark |
| Surface | Shiny | Matt |
| Angle to target | At right angle | Acute |
| Size of object | Large | Small |
| Sunlight | Little (cloudy) | A lot (bright sunshine) |
| Atmospheric conditions | Clear | Misty |
| Object structure | Plane (e.g. wall) | Variable (e.g. bush, tree) |
TECHNICAL DATA
| EL RANGE TA8×42 W B | EL RANGE TA10×42 W B | |
| Magnification | 8x | 10x |
| Effective objective lens diameter (mm) | 42 | 42 |
| Exit pupil diameter (mm) | 5.3 | 4.2 |
| Exit pupil distance (mm) | 19 | 19 |
| Field of view (m/1,000 m/ft/1,000 yds)) | 140 / 419 | 120 / 359 |
| Field of view (degrees) | 8 | 6.8 |
| Field of view, eyeglass-wearers (degrees) | 8 | 6.8 |
| Field of view, apparent (degrees) | 61 | 61 |
| Shortest focusing distance (m/ft) | 5 / 16.4 | 5 / 16.4 |
| Diopter adjustment left/right (DPT) | -7 to +5 | -7 to +5 |
| Diopter correction at ∞ (dpt) | > 4 | > 4 |
| Interpupillary distance (mm/in) | 56 – 74 / 2.2 – 2.9 | 56 – 74 / 2.2 – 2.9 |
| Light transmission (%) | 90 | 90 |
| Twilight factor based on ISO 14132-1 | 18.3 | 20.5 |
| Approx. L* x W** x H** (mm/in) | 172 x 126 x 79 / 6.8 x 5.3 x 3.1 | 169x 136 x 79 / 6.6 x 5.3 x 3.1 |
| Weight approx. (g/oz) | 930 / 32.8 | 925 / 32.6 |
| Display | LCD | LCD |
| Measurement range (m/yds) | 10- 2,000 m / 10 – 2,200 yds | 10 – 2,000 m / 10 -2,200 yds |
| Range-finding accuracy (m/yds) | 10 – 1,500 ± 1 m/yds | 10 – 1,500 ± 1 m/yds |
| Measurement duration | 0.5 s | 0.5 s |
| Measured angle | ± 90° | ± 90° |
| Laser | Klasse 1 EN/FDA | Klasse 1 EN/FDA |
| Battery | CR2 | CR2 |
| Operating hours | 2,000x | 2,000x |
| Tracking Assistant Search @ 200 m/yds | 1×30 (m x m/yds x yds) | 1×30 (m x m/yds x yds) |
| Temperature at measurement | °C/°F | °C/°F |
| Air pressure at measurement | hPa/inHg | hPa/inHg |
Optical coatings:
SWAROOP, SWARODUR, P-BELAG
- Functional temperature Electronics-10°C to +55°C (+14 to +131°F) / Mechanics -25°C to +55°C (-13 to +131°F)· Storage temperature: -30°C to +70°C (-22 to +158°F) · Submersion tightness: 4 m (13ft) (inert gas filling) ·* with eyecups twisted-in ·** with an interpupillary distance of 64 mm
EN 01/2021 We reserve the right to make changes regarding design and delivery. We accept no liability for printing errors. All data are typical values.
[xyz-ips snippet=”download-snippet”]