![]()
User Manual (I Rail)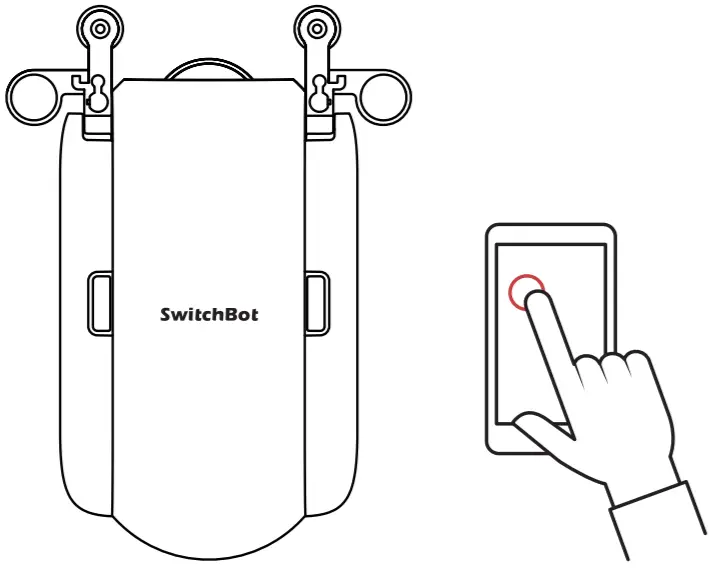
Want to see how it’s done?Go to support.switch-bot.com for installation videos and additional tips.
In the Box

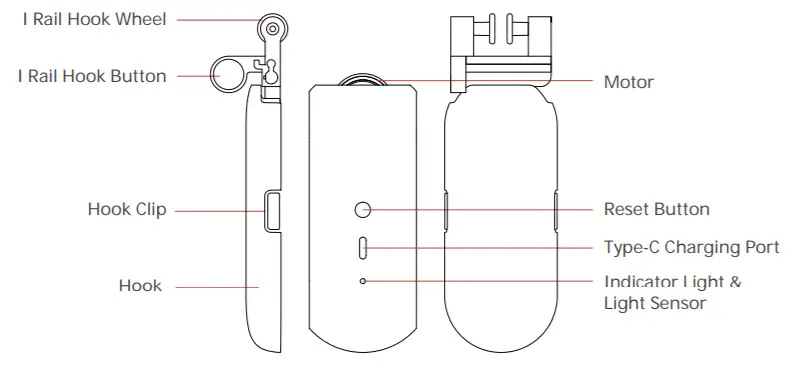
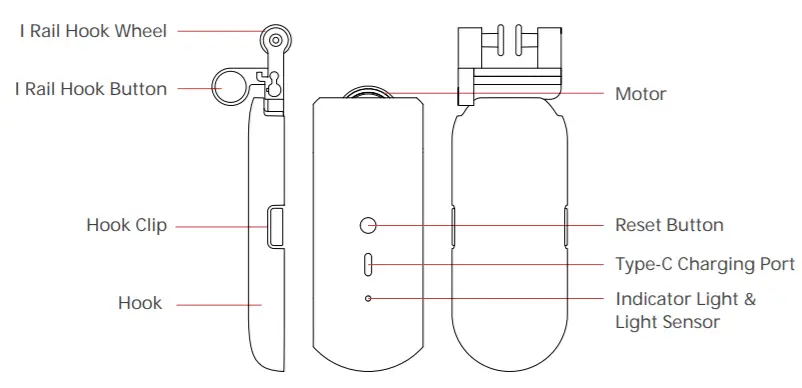
Device Instruction
What You’ll Need before Installation
- A compatible phone or tablet with Bluetooth 4.2 or above
- Download the SwitchBot App
- A SwitchBot Account
- Wi-Fi if you want to enable Cloud Service
- Charge the Curtain for about 4 hours
 |
 |
 |
 |
Installation
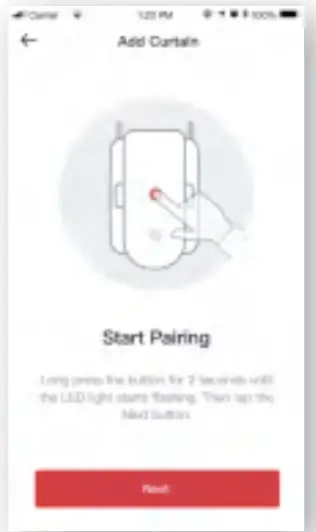
Step 1: Add DeviceAfter downloading the App, go to Add Device from the left side menu. Then select Curtain.Follow the App instruction and add your device.
Select the Right Curtain Track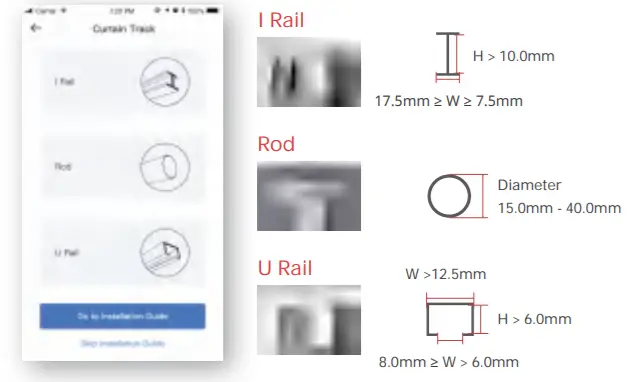
Select the Open Mode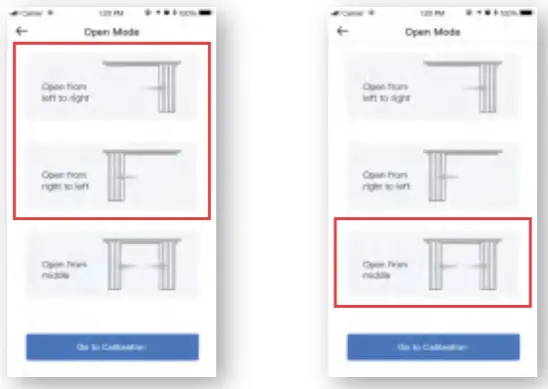
For a single side curtain, tap “Open from right to left” or “Open from left to right” depending on which way you want to open your curtain.For a double side curtain, tap “Open from the middle”.
Step 2: Install on Your Curtain TrackRetrofitting is simple with SwitchBot Curtain. It only takes a few seconds to make your existing curtains smart. It is straightforward and intuitive with our App instruction.
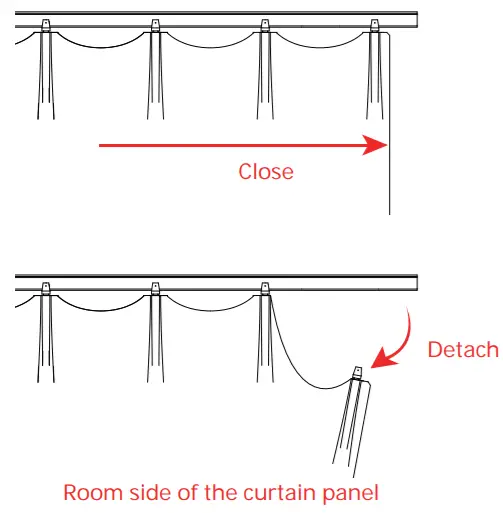
- Please fully close your curtain and then detach the end curtain hook from the track.

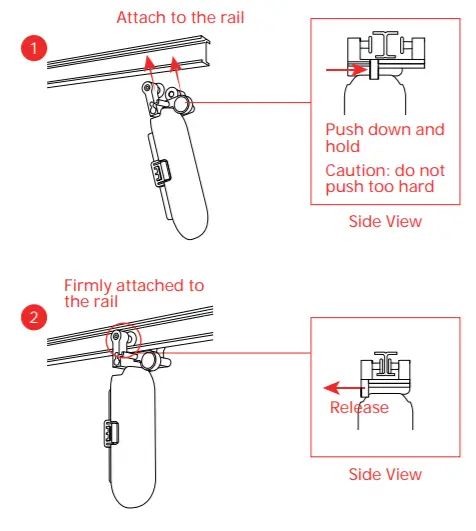
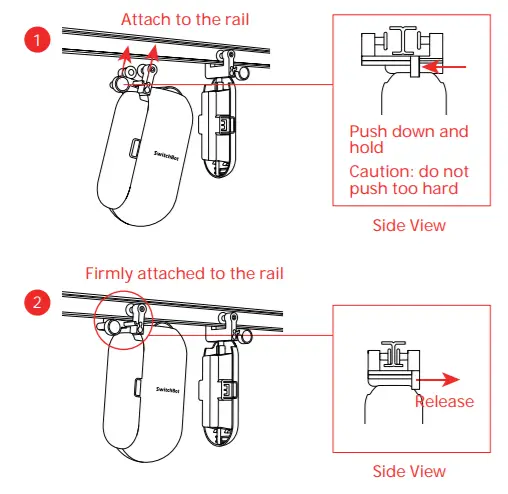
- Take one Hook (I Rail). Push the Hook Button-down and hold. Then attach the Hook onto the curtain rail. When both of the Hook Wheels are aligned with the rail, release the Hook Button so that they are firmly attached.
- Take the Main Body with a Hook (I Rail) installed. Push the Hook Button-down and hold. Then attach the Hook onto the curtain rail. When both of the Hook Wheels arealigned with the rail, release the Hook Button so that they are firmly attached. The SwitchBot LOGO should face your room.
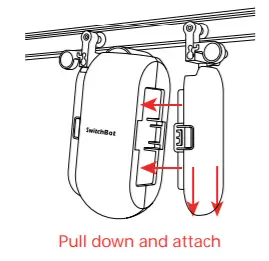
- Pull the single Hook down and attach it back to the Main Body.
- Put the curtain back in place so the Curtain is hidden.

Install the Clip (Optional)If you use a double-sided curtain, you need two SwitchBot Curtains to open it from the middle. Alternatively, you can use the auxiliary Clip we provide to turn it into a single side curtain so that you only need one SwitchBot Curtain.To do that, fully close the curtain so the 2 panels are closest to each other. Connect the upper parts of the two panels by using the Clip. Draw the curtain back and forth to make sure the two panels move as one. Then you can refer to Step 2: Install on Your Curtain Track on how to set the Curtain up.
Step 3: Calibration
Calibration is for your Curtain to adapt to your existing curtain track. You need to calibrate before finishing the Installation or every time you change the Open Mode. Youmay redo the calibration after installing within the Settings.
Control
Lots of convenient ways to control, at your will.App Control
Open and close the curtain at your fingertip. We offer intuitive App control for iOS and Android, with weekly/bi-weekly updates following feedback from you. OTA firmwarethe update is also available for a better user experience.
Touch & Go
Even with SwitchBot Curtain, you’d probably still instinctively draw the curtains by hand sometimes. When it senses you drawing the curtain, the SwitchBot Curtain will kick inand do the work for you. We call this Touch & Go.
 |
 |
Voice Control and Home Automation*Smart living is powered by your voice commands. Wouldn’t it be great to just say it?“Alexa, close the curtain.”“OK Google, close my bedroom curtain.”“Hey Siri, open the living room curtain.”* Require SwitchBot Hub Mini (sold separately).
Control with SwitchBot Remote (Sold Separately)  A wireless remote add-on for you to place anywhere.
App Control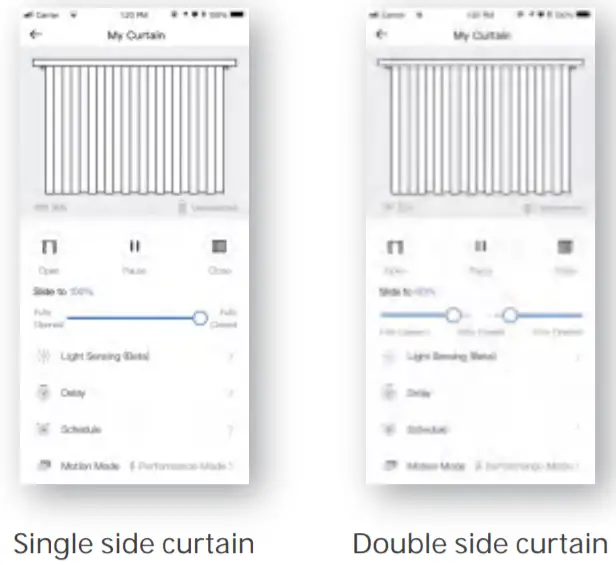
|
|
|
|
Touch & GoEven with SwitchBot Curtain, you‘d probably still instinctively draw the curtains by hand sometimes. When it senses you drawing the curtain by more than 5 cm*, the SwitchBot Curtain will kick in and do the work for you.For double side curtain, drawing on one side of the curtain will trigger both Curtains to open or close simultaneously.“Touch & Go” is turned on by default. To turn off, go to “Advanced Settings”, and turn off “Touch & Go”.* 5 cm is the best threshold we tested because it lowers the possibility of false triggers by your cats and dogs.
Voice Control and Home Automation*You need to turn on Cloud Service in Settings and then connect the respective service. Voice command can trigger fully open and fully close.Alexa, close the curtain.OK Google, close my bedroom curtain.Hey Siri, open the living room curtain.* Require SwitchBot Hub Mini (sold separately).

SwitchBot SceneYou can set up SwitchBot Scene for home automation within the SwitchBot eco-system when you turn on the Cloud Service within the Settings. There are unlimited possibilities.
Control with SwitchBot Remote (Sold Separately)
You can pair a Remote in the Settings. Please place your phone, Remote, and Curtain close to each other before pairing. The rule of thumb for the distance would be within your eyesight. One key on the Remote can trigger one action of your single side curtain or double side curtain. For example, a key can trigger the curtain to close OR open. Please refer to the Remote user manual for the best support.
Settings
Tap the gear icon on the Home Page near the Curtain icon to go to the Settings. Or tap the Curtain icon to go to the Control page.

Light Sensing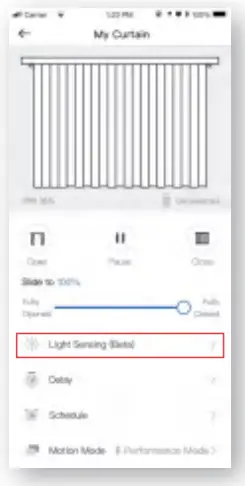
The light-sensing feature allows triggering your device by sunlight.It’s still in the beta stage and upgrading continuously, so please explore the details in the latest app. Please send feedback via the SwitchBot App in the left side menu with the details. Your feedback is very much appreciated.
DelayYou can set up 1 Delay for countdown action. You can set the countdown time, percentage of opening or closing, and Motion Mode.
ScheduleYou can set up 5 Schedules on board, or unlimited Schedules with a Hub. You can set the day, time, percentage of opening or closing, and Motion Mode.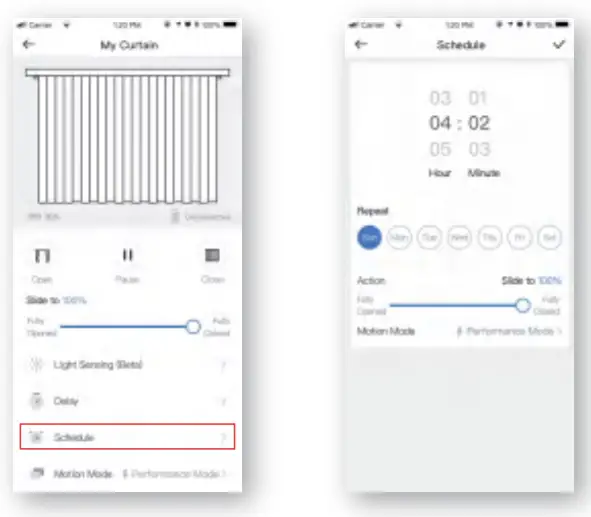
Motion Mode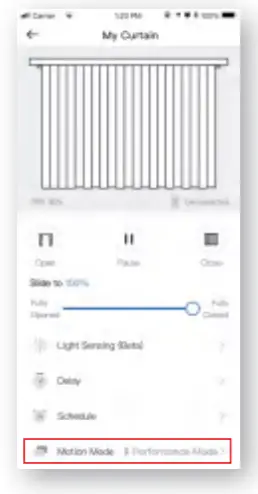
Performance Mode is the default mode with more powerful strength* but a higher noise level.Silent Mode has a lower noise level with less powerful strength. The best use case would be waking up with sunshine.* Up to 8 kg / 17 pounds of the curtain.
Charging, Firmware, and Factory Reset
ChargingIt takes about 10 hours¹ to fully charge the battery and the battery lasts 8 months after a full charge². You may also purchase our Solar Panel to charge by sunlight³.It takes about 10 hours¹to fully charge the battery and the battery lasts 8 months after a full charge². You may also purchase our Solar Panel to charge by sunlight³
- 5V 1A adapter is required to charge with an adapter.
- Battery life is tested under the condition of the runway of 3 meters, loaded with 8 kg of the curtain, opened and closed twice a day, 25℃. Battery life may vary given different conditions.
- Illuminance Level 6 is required to charge with Solar Panel.
FirmwarePlease make sure you have the up-to-date firmware by upgrading in time.
Factory Reset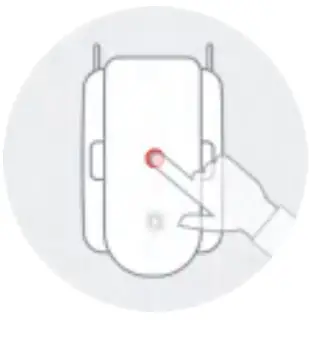
Long press the button for 15 seconds until the LED light lights up. Then release the button. If you are using a double-sided curtain, you will need to redo the calibration on both Curtains.
Caution:You may lose all the settings after Factory Reset and you may need to add the device again and re-calibrate.
Specification
| Model Number: | W0701600 |
| Color: | White / Black |
| Material: | ABS plastic with UV-Resistant coating |
| Product Size (Main Body): | 42mm x 51mm x 110mm |
| Product Net Weight (Main Body): | 135g |
| Power: | Type-C, DC 5V 1A, 3350 mAh Lithium-ion Battery. Or bySolar Panel¹ |
| Battery Life: | 8 months². Or unlimited with Solar Panel |
| Connectivity: | Bluetooth 5.0 Long Range |
| Sensor: | Accelerometer, light sensor |
| Strength: | Up to 8 kg / 17 pounds of curtain |
| Max Runway: | 3 meters |
| Mode: | Silent Mode / Performance Mode |
| Timer: | Up to 5. Or unlimited with a Hub³ |
| Voice Control (Hub Required): | Amazon Alexa, Google Assistant, Siri Shortcuts, SmartThings, IFTTT, and LINE Clova |
- Solar Panel is sold separately.
- Battery life is tested under the condition of the runway of 3 meters, loaded with 8 kg of the curtain, opened and closed twice a day, 25℃. Battery life may vary given different conditions.
- Hub is sold separately.Note: Use under regular temperature only.
Return and Refund Policy
This product has a one-year warranty (starting from the purchasing day).The situations below do not fit the Return and Refund Policy
- Intended damage or abuse.
- Inappropriate storage (drop-down or soaking in water).
- User modifies or repairs.
- Using loss.
- Force majeure damage (Natural disasters).
Contact and Support
 report this ad
Setup and Troubleshooting: support.switch-bot.comSupport Email: [email protected]Feedback: Please send feedback via the SwitchBot App in the left side menu with the details of the issue.
CE WarningManufacturer’s Name: Woan Technology (Shenzhen) Co., Ltd.Sample Description: SwitchBot CurtainTrade Mark: SwitchBotModel number: W0701600Operating Temperature: -20°C~60°CThis product is in a fixed location. To comply with RF exposure requirements, a minimum separation distance of 20cm must be maintained between the user’s body and the device, including the antenna. Use only the supplied or an approved antenna.This device is in compliance with the essential requirements and other relevant provisions of Directive 2014/53/EU. All essential radio test suites have been carried out.
- CAUTION: RISK OF EXPLOSION IF BATTERY IS REPLACED BY AN INCORRECT TYPE. DISPOSE OF USED BATTERIES ACCORDING TO THE INSTRUCTIONS.
- The device complies with RF specifications when the device is used at 20cm from your body.
FCC WarningThis device complies with part 15 of the FCC Rules. Operation is subject to the following two conditions: (1) This device may not cause harmful interference, and (2) this device must accept any interference received, including interference that may cause undesired operation. Any changes or modifications not expressly approved by the party responsible for compliance could void the user’s authority to operate the equipment. This equipment has been tested and found to comply with the limits for a Class B digital device, pursuant to part 15 of the FCC Rules. These limits are designed to provide reasonable protection against harmful interference in a residential installation. This equipment generates uses and can radiate radio frequency energy and, if not installed and used in accordance with the instructions, may cause harmful interference to radio communications.However, there is no guarantee that interference will not occur in a particular installation. If this equipment does cause harmful interference to radio or television reception, which can be determined by turning the equipment off and on, the user is encouraged to try to correct the interference by one or more of the following measures:
- Reorient or relocate the receiving antenna.
- Increase the separation between the equipment and receiver.
- Connect the equipment into an outlet on a circuit different from that to which the receiver is connected.
- Consult the dealer or an experienced radio/TV technician for help.The device has been evaluated to meet general RF exposure requirements. Thethe device can be used in portable exposure conditions without restriction.To maintain compliance with FCC’s RF exposure guidelines, This equipment should be installed and operated with a minimum distance between 20cm the radiator of your body: Use only the supplied antenna.Warning: Changes or modifications to this unit not expressly approved by the party responsible for compliance could void the user’s authority tooperate the equipment.
References
[xyz-ips snippet=”download-snippet”]