
![]()
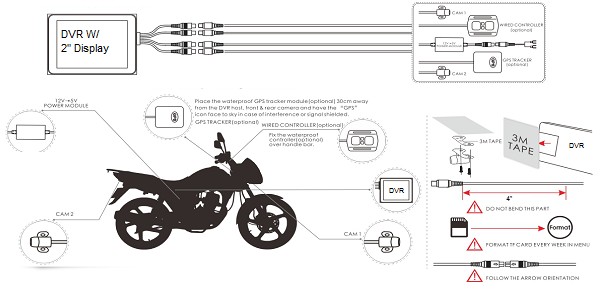
Quick Installation GuideSykik Rider CR1Thank you for choosing Sykik. For more information and complete user manual,please visit www.SYKIK.comQuick Test1. Connect cameras 1 & 2 to DVR host .2. Find the special USB power cable (8″ USB to 6 pin round) and connect the DVR to your power bank or USB adaptor for a quick test before installation.3. Prepare installation if unit powers up, and cameras show up on the display.

Quick Installation Guide
- Locating the proper place to fix the front & rear camera, wired controller (optional), GPS tracker(optional) and DVR unit (Recommended to be placed under the seat).
- Plan the path of camera cables and power cable before installation. (wired controller cable, GPS tracker cable if desired)
- Fix and connect the parts by method of your choice (3M tape, screws, cable ties) on the proper place.
- Standard power module: It is recommended the standard power cable to be connected to ignition, or any point after, such as fuse box, radio, lights…. so the system starts up and shuts down with your bike. However, you can connect to your battery, but you need to make sure to turn the unit off manually after rides to avoid draining the battery.
Smart Park module: Connects directly to your battery, to start recording when your bike has been moved. Stops 3 minutes after no movement. To start and stop with your engine, you can connect to your ignition, or any point after.The position of the DVR unit and lens cables should be away from the high-voltage circuit like xenon lamp, ignition plug etc. If your motorcycle is a traditional carburetor system please try to change a suitable R-value ignition plug.
Quick Adjustment1. Loosen the lens cap, viewing the screen and rotate the lens body to adjust the horizontal view angle.

SYKIK RIDER CR1 Quick Installation Guide – SYKIK RIDER CR1 Quick Installation Guide –
[xyz-ips snippet=”download-snippet”]