![]()
INSTRUCTIONS FOR USE X500FOLDABLE DRONE
![]() +1(718)312-0558(USA)+49 335-4551-9201(Germany)
+1(718)312-0558(USA)+49 335-4551-9201(Germany)![]() [email protected](US)[email protected](EU)
[email protected](US)[email protected](EU)![]() http://www.symatoys.com
http://www.symatoys.com
Accreditation standard: GB/T26701-2011
![]() 1080P HD camera with 250 mImagetransmission range (requires a 5G smartphone)
1080P HD camera with 250 mImagetransmission range (requires a 5G smartphone)
Important safety information
Thank you for purchasing this SYMA product. To ensure that you operate the aircraft correctly, please read these instructions carefully before first use and store them in a safe place for future reference.Safety Guide
- Adult or experienced RC pilot’s supervision is 2.recommend for children.
- Non-rechargeable batteries should not be recharged; Batteries should be inserted with a correct polarity; Different types of batteries, new or used batteries should not be mixing.
- Turn off the drone/transmitter and remove the batteries when not in use.
- The supply terminals are not be short-circuited.
- Keep away from the rotating blades (rotating blades may cause bodily injuries or damage to property).
- Attention:please assemble the aircraft with the guidance of adults.
- Do not look directly into the LED lights of the drone as it can damage your eyes.
- The packing has to be kept since it contains important information.
- Non-rechargeable batteries are not to be recharged.
- Rechargeable batteries are to be removed from the toy before being charged.
- Rechargeable batteries are only to be charged under adult supervision.
- Different types of batteries or new and used batteries are not to be mixed.
- Batteries are to be inserted with the correct polarity.
- Exhausted batteries are to be removed from the aircraft.
- The supply terminals are not to be short-circuited.
Repair and maintenance
- Use a clean and soft cloth to clean the product.
- Keep away the product from heat sources.
- Avoid water exposure to this product. Moisture may cause damages of the aircraft’s electronic parts.
- Transformers used with the aircraft should be examined regularly, such as the cord, plug, enclosure, and other parts, In case of any damages are found, please stop using it unless it is repaired or replaced.
About this product
Specifications
AircraftAircraft weight – 205 g(Not included Propeller protector)Aircraft Size – 360x300x70 mm (Install Propeller protector)Range – 350 mmAltitude – 100 mImage transmission range – 300mFlight time – Hovers indoors for 26-27 minutesOperating conditions – 0°C to 40°CVideo transmission – 5.8 GHzfrequency – 8520Motor – 7.6 V 1700 mAh 10 CBattery – About 3 hoursRemote controlOperating frequency – 2.4 GHzRange – 350 mOperating conditions – 0°C to 40°Ccharging time – About 1 hoursPackage contentsAircraft – 1Remote control – 1USB charging cable – 2Clockwise/anticlockwise propellers – 2Propeller protectors – 4Instructions – 1Download the SYMA AIR app and watch the video tutorialInstalling the SYMA AIR appScan the QR code with your mobile device or download the app from your app store. iOShttps://itunes.apple.com/cn/app/syma-air/id1286588607?mt=8
 Android(Google play)https://play.google.com/store/apps/details?id=com.hy.syma
 Androidhttp://app.hy-chip.com/syma_download.html* Note: For best results, use a device with iOS 8.0/Android 5.0 or later.
Aircraft components
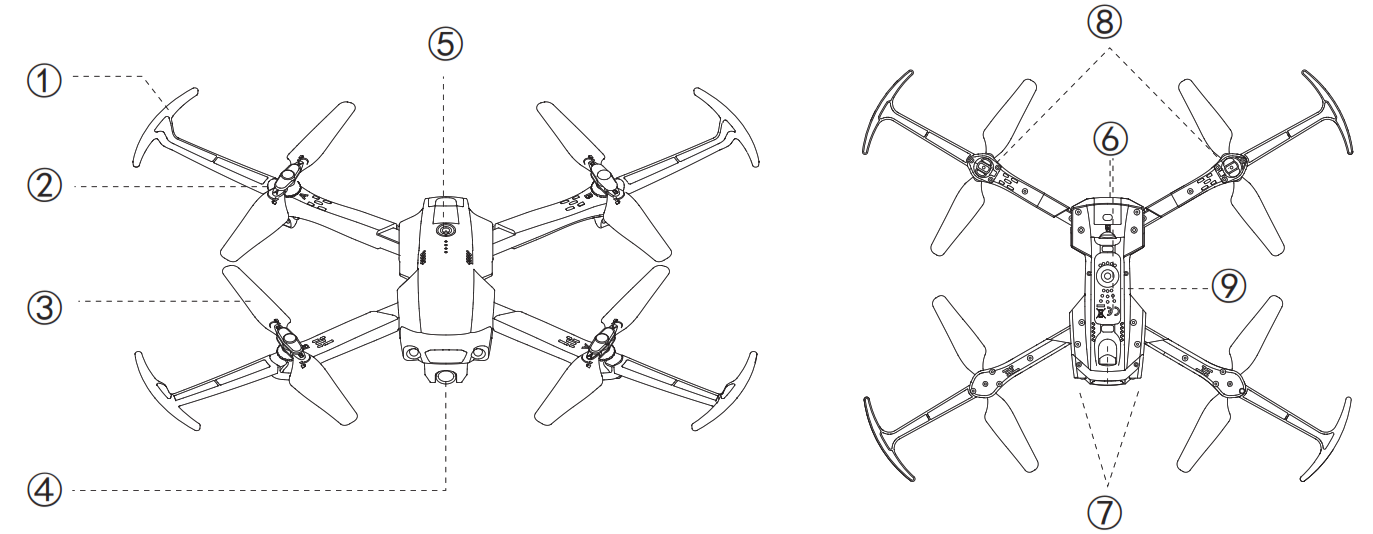
① Propeller protector② Brushless motor③ Propeller blades④ Front camera⑤ Power switch⑥ Battery⑦ Front LED indicator⑧ Rear LED indicator⑨ Bottom camera
Remote control
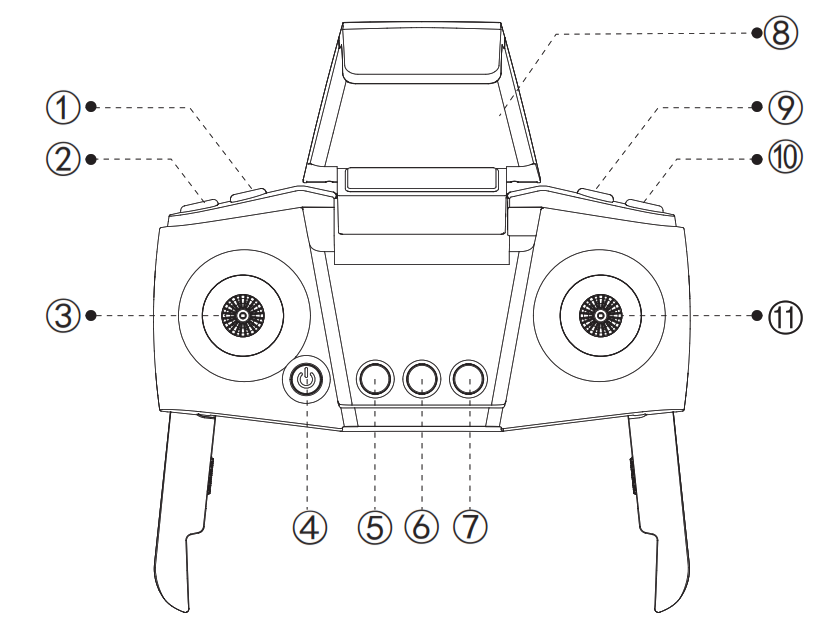
① Photo button② Record button③ Left joystick④ Power switch⑤ One-touch take-off/landing⑥ Calibrating the compass⑦ Return to take-off position⑧ phone holder⑨ Lens up⑩ Lens downRight joystick
Assembling the product
Installing the propellers
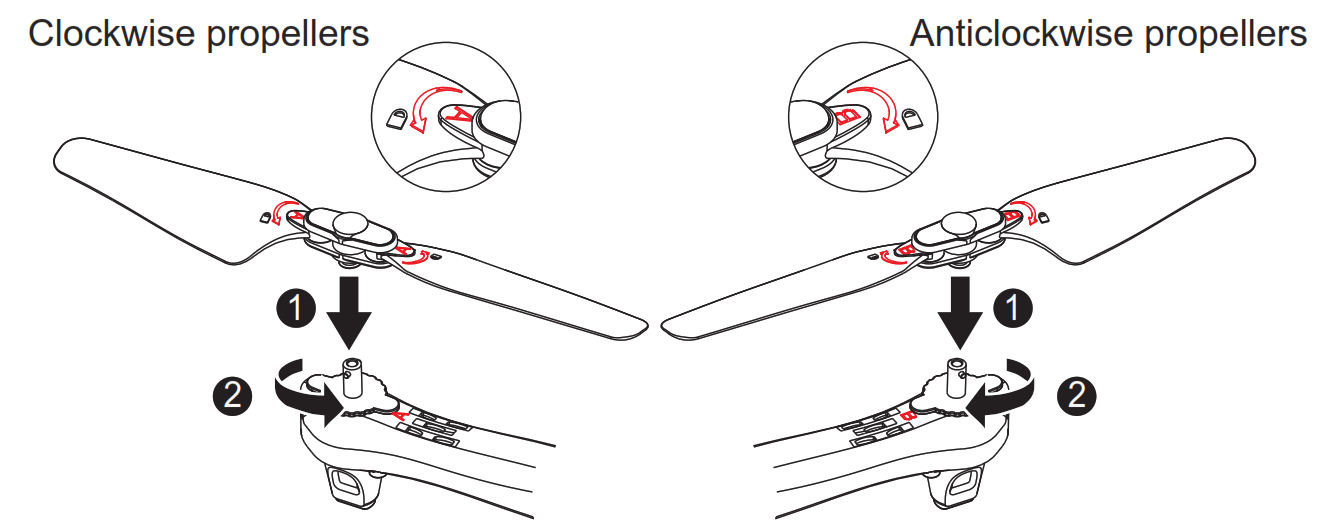
![]() * Attach the propellers as shown in the diagrams above. Ensure that they are attached in the correct orientation.* Ensure that the clockwise and anticlockwise propellers are attached to the correct arms. The aircraft will not fly correctly if the propellers are attached in the wrong position.* The propellers are made from delicate material. Exercise caution when attaching them to the aircraft.* Only use propellers that are supplied by the manufacturer.* The propellers are consumable parts. If necessary, please purchase replacements from the manufacturer.
* Attach the propellers as shown in the diagrams above. Ensure that they are attached in the correct orientation.* Ensure that the clockwise and anticlockwise propellers are attached to the correct arms. The aircraft will not fly correctly if the propellers are attached in the wrong position.* The propellers are made from delicate material. Exercise caution when attaching them to the aircraft.* Only use propellers that are supplied by the manufacturer.* The propellers are consumable parts. If necessary, please purchase replacements from the manufacturer.
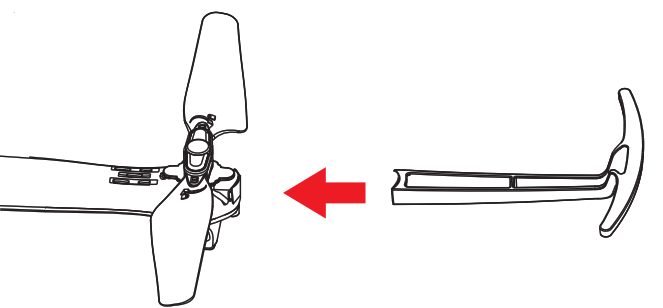
Installing the propeller protectors
Inserting a memory card (optional accessory)

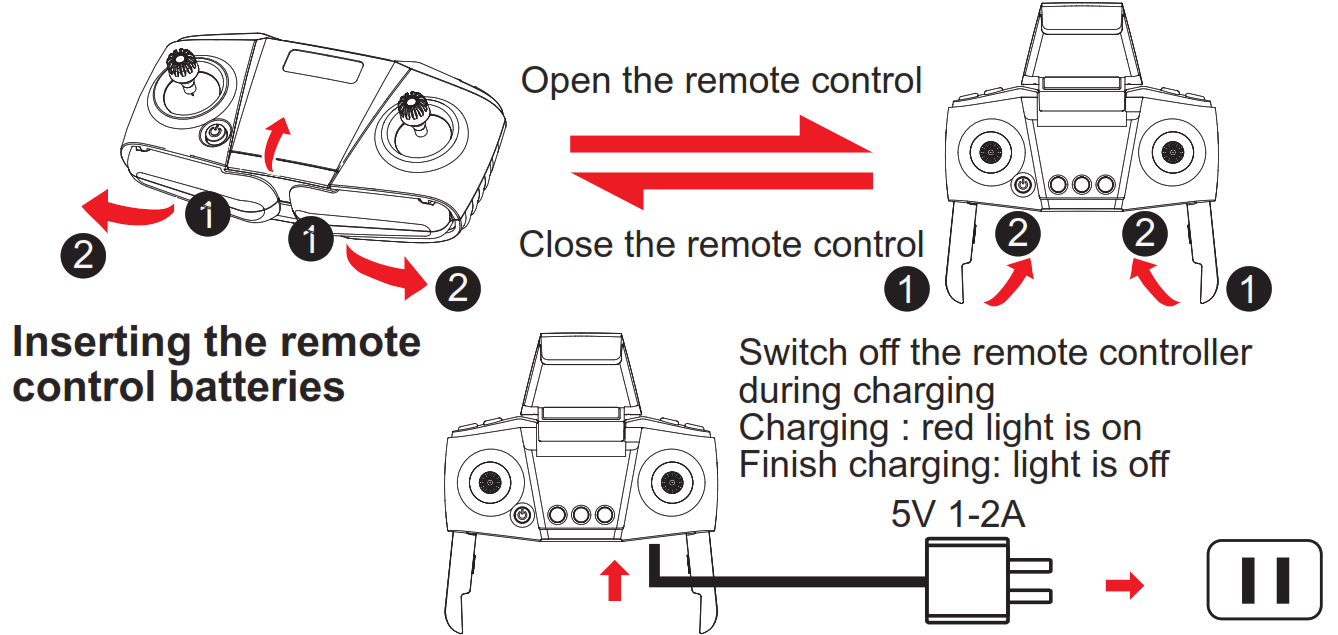
Charging the aircraft battery
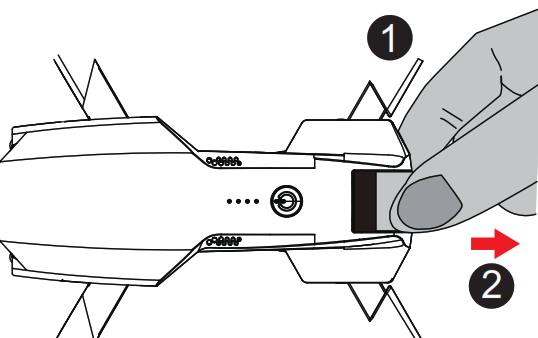
Remove the battery
Charge the battery

* Charge the aircraft with the USB charging cable that came with the product.* The battery will take longer to charge when you use an adapter with a smaller. rated current.Insert the battery

![]() * Ensure that the battery holder clicks into place.* Do not short circuit or compress the battery, as this may cause an explosion.* Do not disassemble the battery or store it in a hot environment.* If you do not plan to use the aircraft for at least 10 days, discharge the battery to 40%-50%. This helps to prolong the lifespan of the battery.* When charging the battery, always provide adult supervision and keep the battery away from flammable materials.* Rechargeable batteries should be removed from the toy before being charged.* Rechargeable batteries should only be charged under the supervision of adults.* Exhausted batteries should be removed from the aircraft.* Caution: Risk of explosion if the battery is replaced with incorrect ones, please install the batteries according to the instructions.
* Ensure that the battery holder clicks into place.* Do not short circuit or compress the battery, as this may cause an explosion.* Do not disassemble the battery or store it in a hot environment.* If you do not plan to use the aircraft for at least 10 days, discharge the battery to 40%-50%. This helps to prolong the lifespan of the battery.* When charging the battery, always provide adult supervision and keep the battery away from flammable materials.* Rechargeable batteries should be removed from the toy before being charged.* Rechargeable batteries should only be charged under the supervision of adults.* Exhausted batteries should be removed from the aircraft.* Caution: Risk of explosion if the battery is replaced with incorrect ones, please install the batteries according to the instructions.
Attaching the phone holder
![]() * When installing the batteries, ensure that you match the + and – ends of the battery with the + and – signs on the controller.* During the battery installation, it must be ensured that the polarities of the batteries are matched with that of the battery box. No battery shall be installed with the opposite polarity.* Please do not use new and old batteries together.* Please do not use different types of batteries together.* Do not use rechargeable batteries.
* When installing the batteries, ensure that you match the + and – ends of the battery with the + and – signs on the controller.* During the battery installation, it must be ensured that the polarities of the batteries are matched with that of the battery box. No battery shall be installed with the opposite polarity.* Please do not use new and old batteries together.* Please do not use different types of batteries together.* Do not use rechargeable batteries.
Flight preparation and turning the aircraft on/offPairing the remote control with the aircraft

![]() * When you switch on the remote control, the indicator will flash rapidly for approximately 20 secs to indicate that the remote control is waiting for a signal. The indicator will then flash slowly to indicate that pairing mode has been disabled.
* When you switch on the remote control, the indicator will flash rapidly for approximately 20 secs to indicate that the remote control is waiting for a signal. The indicator will then flash slowly to indicate that pairing mode has been disabled.
Calibrating the compass
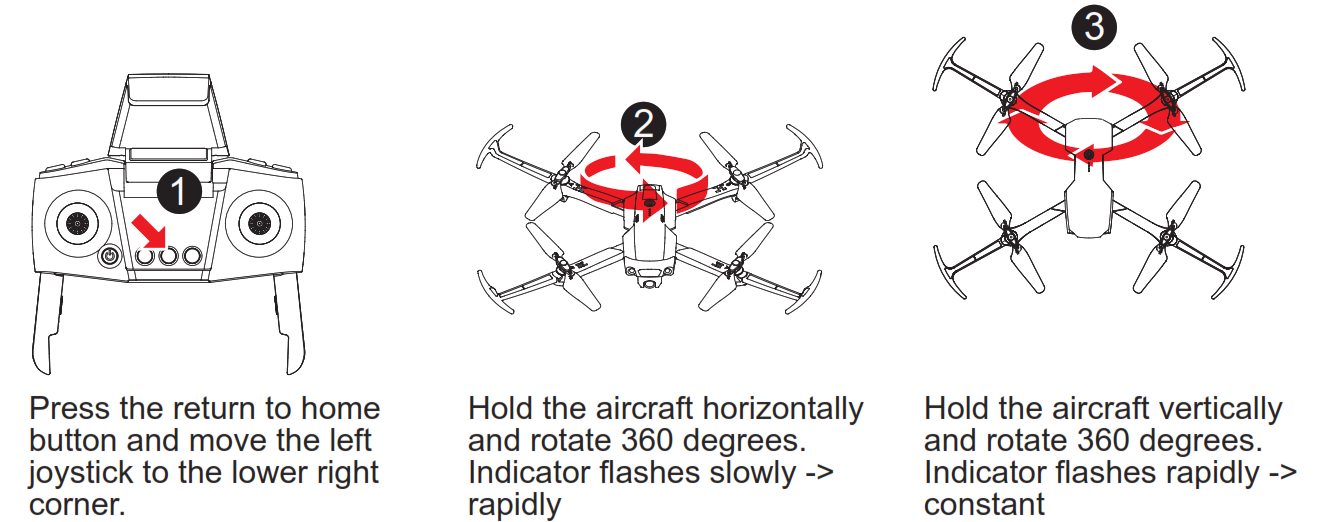
![]() * Do not calibrate the compass near strong electromagnetic fields or large pieces of metal, e.g. magnetite, car parks or buildings with underground steel reinforcements.* When holding the aircraft horizontally, the angle of inclination must not exceed 30 degrees.
* Do not calibrate the compass near strong electromagnetic fields or large pieces of metal, e.g. magnetite, car parks or buildings with underground steel reinforcements.* When holding the aircraft horizontally, the angle of inclination must not exceed 30 degrees.
Searching for satellitesThe rear indicator will change from orange to green when the aircraft has locked onto a satellite and recorded the take-off location. The aircraft is now ready to fly.
![]() * It should take approximately one minute for the aircraft to lock on to a satellite. If the aircraft fails to find a satellite, recalibrate the compass.* Before take-off, place the aircraft in an open space away from obstacles and ensure that GPS mode is enabled.* When the rear green indicator flashes rapidly, this indicates that the GPS signal is weak. If this occurs, land the aircraft manually and restart the satellite search.
* It should take approximately one minute for the aircraft to lock on to a satellite. If the aircraft fails to find a satellite, recalibrate the compass.* Before take-off, place the aircraft in an open space away from obstacles and ensure that GPS mode is enabled.* When the rear green indicator flashes rapidly, this indicates that the GPS signal is weak. If this occurs, land the aircraft manually and restart the satellite search.
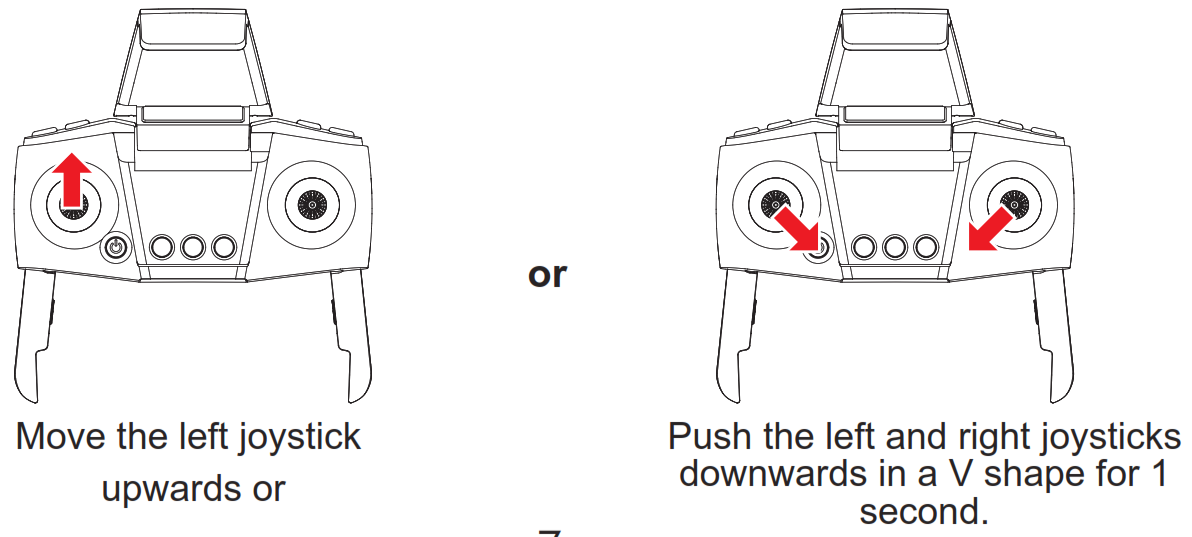
Turning the aircraft on
Turning the aircraft off
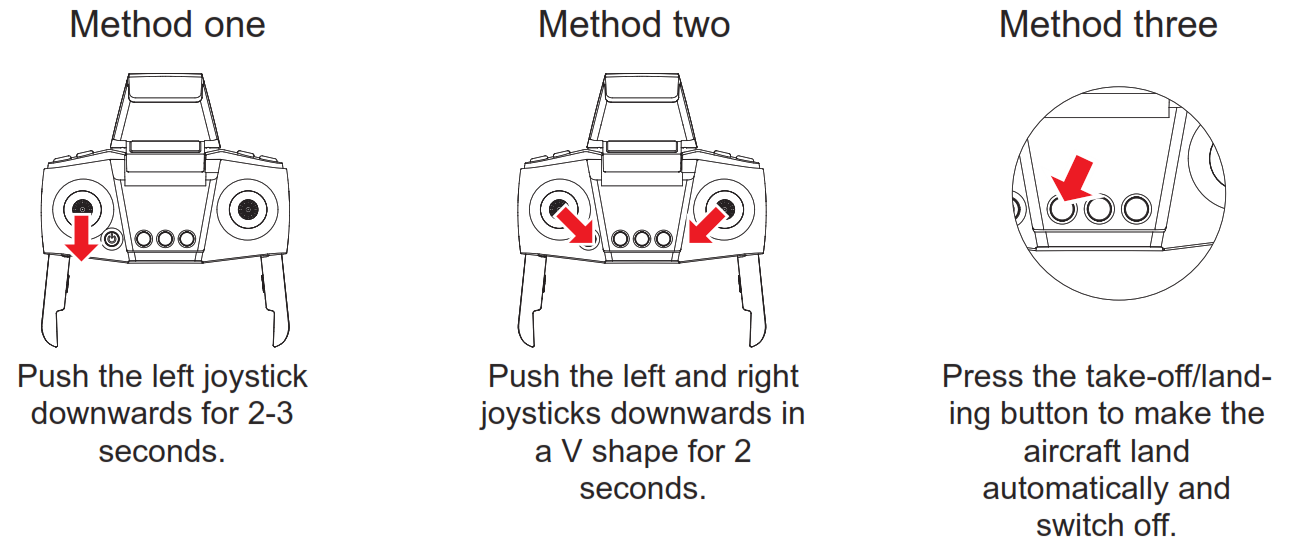
![]() * The aircraft will switch off automatically if its angle of inclination exceeds 90 degrees.
* The aircraft will switch off automatically if its angle of inclination exceeds 90 degrees.
Using the remote control
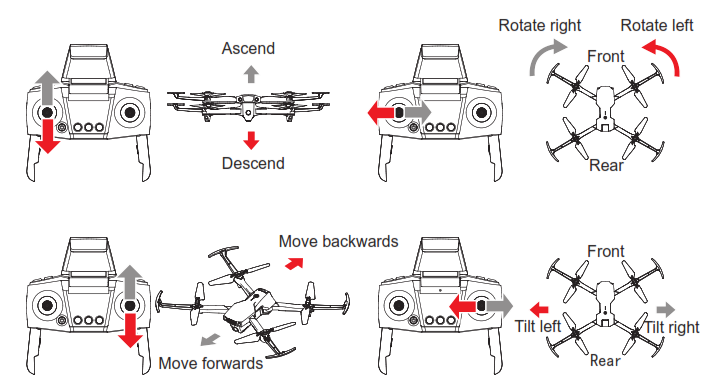
Flight modes
 Optical flow positioningThe front indicator is constant white, the rear indicator is constant yellow.
![]() * If the rear indicator starts to flash rapidly, this indicates that the optical signal is weak and the aircraft cannot determine its position.* Performance may be impaired in dark surroundings, areas with reflective surfaces (e.g. water), or at altitudes of more than 10 m.* Optical flow positioning only supports altitudes of less than 10 m.
* If the rear indicator starts to flash rapidly, this indicates that the optical signal is weak and the aircraft cannot determine its position.* Performance may be impaired in dark surroundings, areas with reflective surfaces (e.g. water), or at altitudes of more than 10 m.* Optical flow positioning only supports altitudes of less than 10 m. GPS modeFront indicator is constant white, rear indicator is constant green.
![]() * When the battery level is normal, the aircraft can fly to a distance of 350 m at a maximum altitude of 100 m.* When the battery level is low, the aircraft can fly to a distance of 20 m at a maximum altitude of 20 m.* If the rear indicator starts to flash rapidly, this indicates that the GPS signal is weak and the aircraft cannot determine its position.* GPS mode cannot be used indoors.
* When the battery level is normal, the aircraft can fly to a distance of 350 m at a maximum altitude of 100 m.* When the battery level is low, the aircraft can fly to a distance of 20 m at a maximum altitude of 20 m.* If the rear indicator starts to flash rapidly, this indicates that the GPS signal is weak and the aircraft cannot determine its position.* GPS mode cannot be used indoors. Headless modeThe indicator on the aircraft will flash once every 4 seconds.
1. Configuring the forward’s directionWhen you switch on the aircraft for the first time, the direction in which the front side of the aircraft is pointing will be set as the forwards direction.2. Enabling headless mode① After pairing the remote control with the aircraft, hold down the right joystick for approximately 3 seconds. The remote control will beep 8 times to indicate that headless mode is enabled. To disable headless mode, hold down the right joystick again for approximately 3 seconds.② In headless mode, you do not need to determine the aircraft’s orientation. You can move the joysticks on the remote control to make the aircraft move in the corresponding direction.

Place the aircraft on a level surface and move the left and right joysticks to the lower right corner for approximately 3 seconds. The indicator will flash rapidly and then stay constant to indicate that the calibration process is complete.

* The aircraft cannot be calibrated if the angle of inclination is greater than 10 degrees.
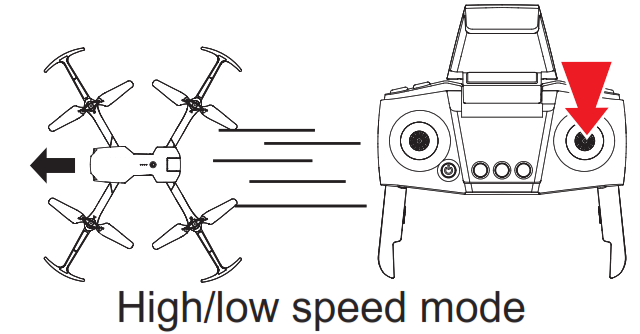
Briefly press the right joystick to switch between high and low-speed mode.1. Low-speed mode is enabled by default when the aircraft is switched on.2. The remote control beeps twice when the high-speed mode is enabled and once when the low-speed mode is enabled.
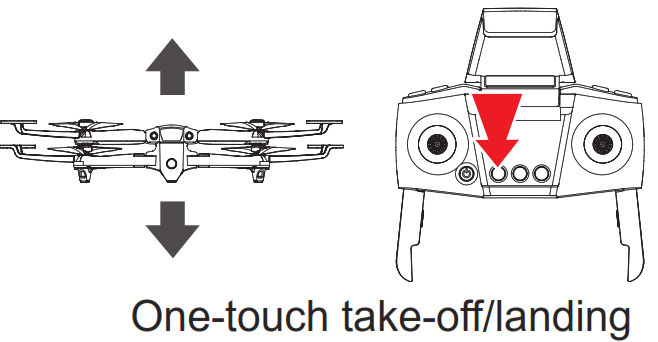
1. When the drone is under standby mode, Press the take-off/landing button to make the aircraft take off automatically and hover at a height of 1.5 m.2. When the aircraft is under active mode, it will automatically land on ground if you press the one key landing
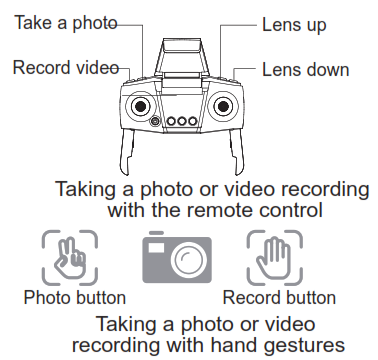
1. Take a photo: Press the photo button. The indicator on the aircraft will flash to indicate that a photo was taken.2. Record video: Press the record button. The indicator on the aircraft will flash twice to indicate that recording is in progress. Press the record button again to end the recording. The indicator on the aircraft will turn on to indicate that the recording is complete.1. Take a photo: Position your hand approximately 1.5 m away from the front lens and hold the![]() hand gesture for 3 seconds.2. Record video: Position your hand approximately 1.5m away from the front lens and hold the
hand gesture for 3 seconds.2. Record video: Position your hand approximately 1.5m away from the front lens and hold the![]() hand gesture for 3 seconds.
hand gesture for 3 seconds.
![]() * Photo and video recording gestures cannot be used when the bottom camera is enabled.* The camera may accidentally take a photo or start a video recording if there are surrounding objects that resemble the or gestures.* If there is no memory card in the aircraft, photos and video recordings will be saved to your phone.* If there is a memory card inserted in the aircraft, photos and video recordings will be saved to the memory card and your phone.* The aircraft supports memory cards with a capacity of up to 64 GB.
* Photo and video recording gestures cannot be used when the bottom camera is enabled.* The camera may accidentally take a photo or start a video recording if there are surrounding objects that resemble the or gestures.* If there is no memory card in the aircraft, photos and video recordings will be saved to your phone.* If there is a memory card inserted in the aircraft, photos and video recordings will be saved to the memory card and your phone.* The aircraft supports memory cards with a capacity of up to 64 GB.

In GPS mode (when the![]() indicator is constant), hold down the return to the home button to automatically return the aircraft to its take-off position. During the return flight, you can use the joystick controls to make the aircraft ascend, descend and move left/right in order to avoid obstacles. To terminate the return flight, hold down the return to the home button.
indicator is constant), hold down the return to the home button to automatically return the aircraft to its take-off position. During the return flight, you can use the joystick controls to make the aircraft ascend, descend and move left/right in order to avoid obstacles. To terminate the return flight, hold down the return to the home button.
* If the aircraft is flying at an altitude of less than 20 m, it will automatically ascend to an altitude of 20 m before returning home.* If the aircraft is flying at an altitude of more than 20 m, it will return home at the same altitude.
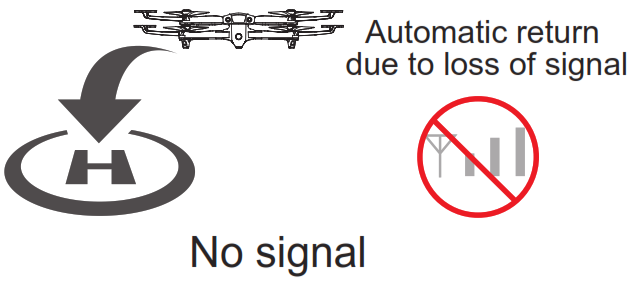
If the remote control signal is lost for more than 6 seconds, the aircraft will automatically return to the take-off position. If the signal is restored during the return flight, you can hold down the return to home button to terminate the return flight.
* The aircraft cannot automatically avoid obstacles during the return flight.* The automatic return to home function is not available when the GPS signal is weak (flashing![]() indicator).* If the aircraft does not receive a GPS signal and loses contact with the remote control for more than 6 seconds, it will not be able to return to home and land automatically.
indicator).* If the aircraft does not receive a GPS signal and loses contact with the remote control for more than 6 seconds, it will not be able to return to home and land automatically.

When the aircraft battery is low, the aircraft will automatically return to the take-off position. During the return flight, you can use the joystick controls to make the aircraft ascend, descend and move left/right in order to avoid obstacles.
* If the aircraft is further than 20 m from the landing position, the return flight cannot be terminated.* If the aircraft is less than 20 m from the landing position, the return flight can be terminated.Landing position: The initial unlock/take-off position.
Smart app features
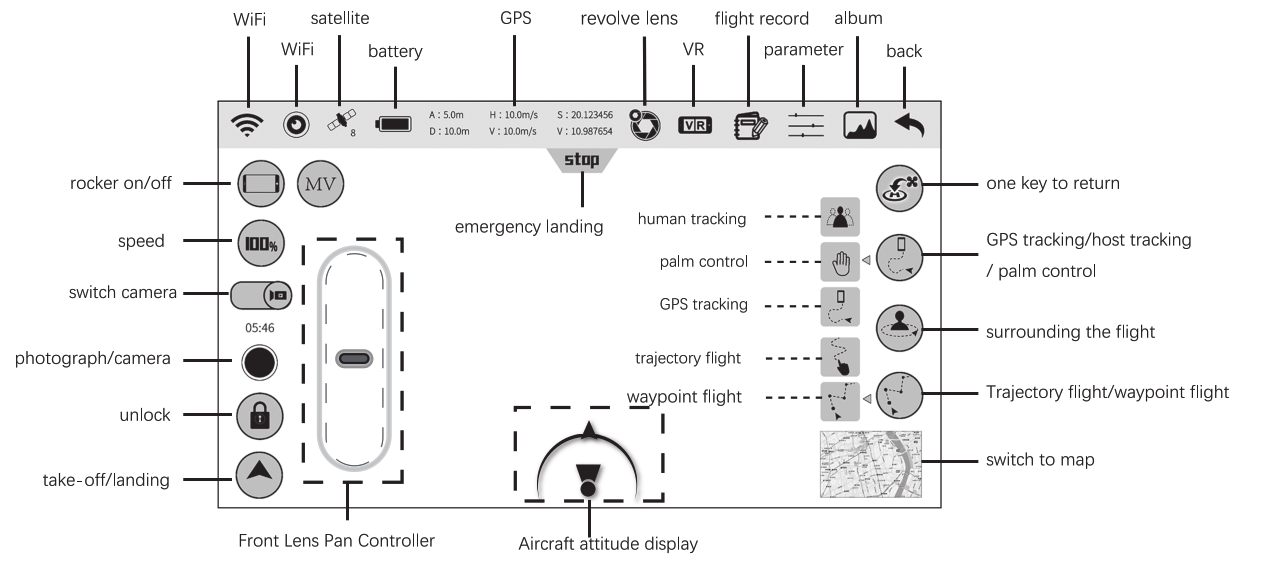

* Before using the smart app features, watch the video tutorial in the SYMA AIR app or on the SYMA website.* Ensure that you pre-configure the flight altitude and distance in the SYMA AIR app.
Understanding the aircraft LED indicators
|
No. |
Indicator status |
Meaning |
| 1 | Front indicator = constant white, rear indicator = constant yellow | Optical flow positioning |
| 2 | Front indicator = constant white, rear indicator = constant green | GPS mode |
| 3 | Front and rear indicators flash once every 4 seconds | Headless mode |
| 4 | Front and rear indicators flash twice every 1.5 seconds | Recording in progress |
| 5 | Front and rear indicators flash rapidly | Pairing or level calibration in progress |
| 6 | Front and rear indicators flash twice every second | Low battery |
| Front and rear indicators flash once every second | Signal lost | |
| 8 | Front indicator = constant, rear indicator = flashing slowly | GPS fault |
| 9 | Front indicator = constant, rear indicator = flashing rapidly | Poor GPS reception |
Troubleshooting
| Problem | Cause | Cause Solution |
| The aircraft does not respond. | 1.Undervoltage protection was enabled.2.The remote control battery level is low and the power indicator is flashing. | 1.Charge the aircraft battery.2.Change the batteries in the remote control. |
| The aircraft’s response is intermittent. | 1.The remote control batteries are nearly empty.2.There is interference from remote control on the same frequency. | 1.Change the batteries.2.Move to a different area where there is no interference. |
| The aircraft drifts to one side whilst hovering. | The aircraft is not calibrated level to the ground. | Calibrate the aircraft. |
| The aircraft does not travel in a forwards direction in headless mode. | The aircraft was involved in a collision. | Reconfigure the forward’s direction. |
| The aircraft does not hover properly/the aircraft keeps moving up and down. | 1.The aircraft is not calibrated level to the ground.2.The air pressure is unstable due to poor weather conditions.3.A violent collision corrupted the gyroscope’s data. | 1.Calibrate the aircraft.2.Avoid flying in poor weather.3.Calibrate the aircraft. |
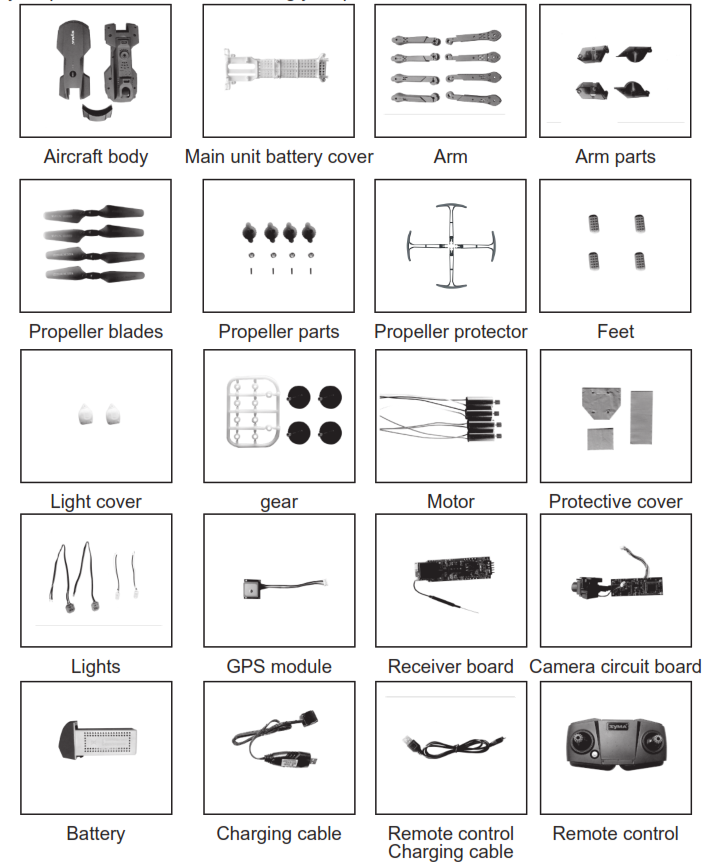
Accessories (available separately)
The following section contains a list of optional accessories that are available to purchase. Accessories can be purchased from your local retailer. Please indicate your preferred colour when making your purchase.
Warning: Changes or modifications to this unit not expressly approved by the party responsible for compliance could void the user’s authority to operate the equipment.NOTE: This equipment has been tested and found to comply with the limits for a Class B digital device, pursuant to Part 15 of the FCC Rules. These limits are designed to provide reasonable protection against harmful interference in a residential installation. This equipment generates, uses, and can radiate radio frequency energy and, if not installed and used in accordance with the instructions, may cause harmful interference to radio communications. However, there is no guarantee that interference will not occur in a particular installation. If this equipment does cause harmful interference to radio or television reception, which can be determined by turning the equipment off and on, the user is encouraged to try to correct the interference by one or more of the following measures:●Reorient or relocate the receiving antenna.●Increase the separation between the equipment and receiver.●Connect the equipment into an outlet on a circuit different from that to which the receiver is connected.●Consult the dealer or an experienced radio/TV technician for help.“This device complies with FCC radiation exposure limits set forth for general population (uncontrolled exposure).This device must not be collocated or operating in conjunction with any other antenna or transmitter.”
RF frequency band:2409-2475MHZTransmitter power : -3.73dBm (Max.)Sold to EU countryproduct name: [FOLDABLE DRONE]model number: [X30]Brand name:SYMAContact person: IvanTel:+86-0754-86381701
Hereby, [GUANGDONG SYMA MODEL AIRCRAFT INDUSTRIAL C“O., LTD], declares that this [VIECHLE ] is in compliance with the essential requirements and other relevant provisions of Directive 2014/53/EU.The full test of the EU declaration of conformity is available at the following internet address: http://www.symatoys.com/down/declaration-of-conformity.htmlSIMPLIFIED EU DECLARATION OF CONFORMITY
Manufacturer:Guangdong SYMA Model Aircraft Industrial Co., Ltd.Address: 2 West Xingye Rd, Laimei Industrial Area,Chenghai, Shantou, ChinaPostal Code: 515800Sales department:+86 0754 86980668After-sales service: +86 0754 86395095Fax: +86 0754 86395098Website: www.symatoys.comEmail: [email protected]The company has the right of final interpretation of this user manual.
References
[xyz-ips snippet=”download-snippet”]