
SYNERGEE Gymnastic Wood Rings User Manual

IMPORTANT
Please check all the required components are included in the package before assembling. Also check for defects. If any piecesare missing or defective, please contact us at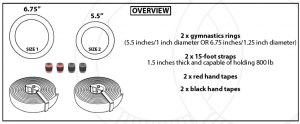
BEFORE MOUNTING
- Check all components for any defects before assembly.
- Ensure the mount you will hang your rings from can hold the rings (Note: the rings can hold 800 lbs and the support must be capable of holding that amount, too).
- Ensure the surface you are mounting the straps on is smooth. A rough surface can cause friction and early deterioration of the straps.
- Our wooden rings are sanded by hand. There may be a few unintended flaws. We appreciate your understanding in advance; and please reach out if you have any concerns or issues.
- When installing the hand tape, do NOT throw out the black tape! It is needed for the final step
MOUNTING INSTRUCTIONS
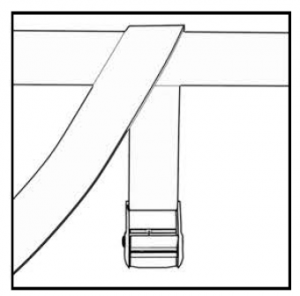
- Feed the straps through the rings and over the anchor point (Pull-up bars, power cages, etc
- Press the lever on the cam buckle and thread the strap through the underside of the buckle. Release the lever to secure the rings
- Adjust the amount of strap fed through the buckle to adjust the height of the rings from the ground
Note
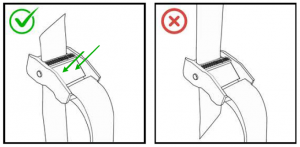
- Make sure you are feeding the straps in the right direction. There is an arrow that says “Feed Web” on the side of the buckle to direct you.
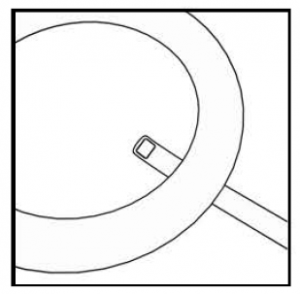
- The buckle should not make contact with mounting structure or the rings..

HAND TAPE STEPS
- Select your preferred color, red or black. Aside from the color, both Hand Tapes are the same.
- Start by removing the Black Sticker. Do not throw it away! It will be needed to secure the hand tape in place in the final step.
- Unravel the Hand Tape and remove the plastic lining. Start with the end that has the piece of paper on the underside. Remove this piece of paper to reveal the section of tape. Place this end on the wooden ring to stick it into place. Wind the Hand Tape over it once to help secure it in place.
- Wind the rest of the Hand Tape around the ring, wrapping it tightly (but not too tight such that it stretches) so that there is no bunching, and it won’t loosen. Each new wrap of the Hand Tape should travel diagonally up the ring, covering 1 /3 of the tape before it.
- When you almost reach the end of the Hand Tape, use the last bit to wrap it once straight around the wooden ring and Hand Tape. Thi swill end the taped section with a clean horizontal (rather than diagonal) line. Hold this Hand Tape in place as you grab the Black Sticker for the final step.
- Wrap the Black Sticker over this last wrap of Blue Tape (again, tightly; but not too tight). Remove the piece of paper on the underside of the Black Sticker to expose thesticky-tape and secure the Black Tape in place. Be sure to stick the Black Sticker to itself.

Read More About This Manual & Download PDF:
[xyz-ips snippet=”download-snippet”]