Systemline SE0512/SE0550 E50/E50w Hi-Fi amplifier/touch panel
Important Safety Instructions
CAUTION: To reduce the risk of electric shock, do not remove the cover. No user-serviceable parts inside. Refer to qualified personnel.WARNING: To reduce the risk of fire or electric shock, do not expose this appliance to rain or moisture.
The lightning flash with arrowhead within an equilateral triangle is intended to alert the user to the presence of an uninsulated “dangerous voltage” within the product’s enclosure, that may be of sufficient magnitude to constitute a risk of electrical shock to persons. The exclamation mark within an equilateral triangle is intended to alert the user to the presence of important operating maintenance (servicing) instructions in the guide accompanying this device.
Read Instructions: All the safety and operating instructions should be read before the unit is operated.Retain Instructions: The safety and operating instructions should be retained for future reference.Heed Warnings: All warnings on the unit and in the operating instructions should be followed.Follow Instructions: All operating instructions should be followed.Cleaning: Unplug the unit from the wall outlet before cleaning. The unit should be cleaned only with a lint free dry cloth.Attachments: Only use attachments recommended by the manufacturer as non-recommended attachments may cause hazards.Water and Moisture: Do not use the unit near water–for example, near a bath tub, wash bowl, kitchen sink, or laundry tub; in a wet basement; or near a swimming pool.Accessories: Do not place the unit on an unstable surface, stand, tripod, bracket, or table. The unit may fall, causing serious injury to yourself or others, and serious damage to the unit.Ventilation: Do not place in a location or position that will interfere with the unit’s ventilation. Do not operate on a bed, sofa, rug, or other similar surface.Power Sources: The unit should be operated only from the type of power source indicated on the marking label. If you are not sure of the type of power supplied to your home, consult your local power company.Power-Cord Protection: Power-supply cords shouldbe routed so that they are not likely to be walked on or pinched by items placed upon or against them, paying particular attention to cords where they enter a plug, or exit from the unit.Lightning: For added protection for the unit during a lightning storm, or when it is left unattended and unused for long periods of time, unplug it from the wall outlet and disconnect from other devices. This will prevent damage to the unit due to lightning and power-line surges.Overloading: Do not overload wall outlets, extension cords, or integral convenience receptacles as this can result in a risk of fire or electric shock.Object and Liquid Entry: Never push objects of any kind into the unit through openings as they may touch dangerous voltage points or short-out parts that could result in a fire or electric shock. Never spill liquid of any kind on the unit.Servicing: Do not attempt to service the unit yourself as opening or removing covers may expose you to dangerous voltage or other hazards. Refer all servicing to qualified service personnel.Damage Requiring Service: Unplug the unit from the wall outlet and refer servicing to qualified personnel under the following conditions:
- When the power-supply cord or plug is damaged,
- If liquid has been spilled, or objects have fallen into the unit,
- If the unit has been exposed to rain or water,
- If the unit does not operate normally by following the operating instructions,
- If the unit has been dropped or damaged in any way.
- When the unit exhibits a distinct change in performance– this indicates a need for service.
Replacement Parts: When replacement parts are required, be sure the service technician uses replacement parts specified by the manufacturer or which have the same characteristics as the original parts. Unauthorized substitutions may result in fire, electric shock, or other hazards.Heat: The unit should be situated away from heat sources such as radiators, heat registers, stoves, or other units (including amplifiers) that produce heat.
This product complies with the Radio Equipment Directive (2014/53/EU) when used and installed according to the instruction manual.
NOTE: This equipment has been tested and found to comply with the limits for a Class B digital device, pursuant to part 15 of the FCC Rules. These limits are designed to provide reasonable protection against harmful interference in a residential installation. This equipment generates, uses and can radiate radio frequency energy and, if not installed and used in accordance with the instructions, may cause harmful interference to radio communications. However, there is no guarantee that interference will not occur in a particular installation. If this equipment does cause harmful interference to radio or television reception, which can be determined by turning the equipment off and on, the user is encouraged to try to correct the interference by one or more of the following measures:
- Reorient or relocate the receiving antenna.
- Increase the separation between the equipment and receiver.
- Connect the equipment into an outlet on a circuit different from that to which the receiver is connected.
- Consult the dealer or an experienced radio/TV technician for help.
The user is cautioned that changes or modifications not expressly approved by Armour Home Electronics could void the user’s authority to operate the equipment.
Connections and Controls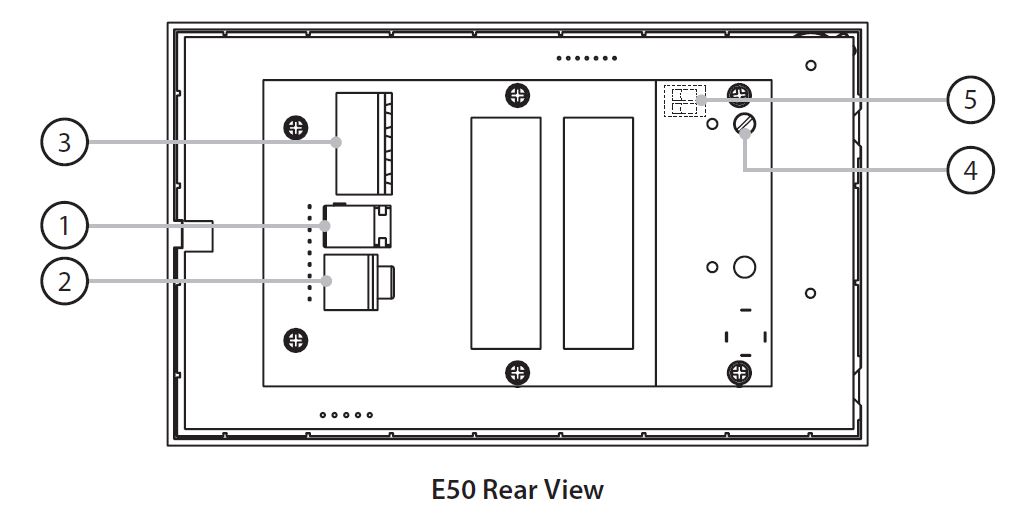
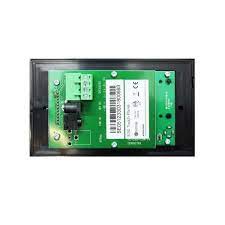
Rear panel connections
- Power inputUse ONLY the power supply provided. Failure to do so may cause irreparable damage to the unit. DO NOT alter the length of the supplied DC extension cable.
- Analogue audio – line inConnect an analogue audio input here using a stereo 3.5mm jack cable such as QED Performance J2J. A green LED means this input is active.
- Speaker outputsUse the green terminal blocks provided to attach left and right stereo speakers.Rear panel installer controls
- Max volume adjustmentSee installer adjustments for details (page 11).
- Stereo/Mono & EQ DIP switchesSee installer adjustments for details (page 11).
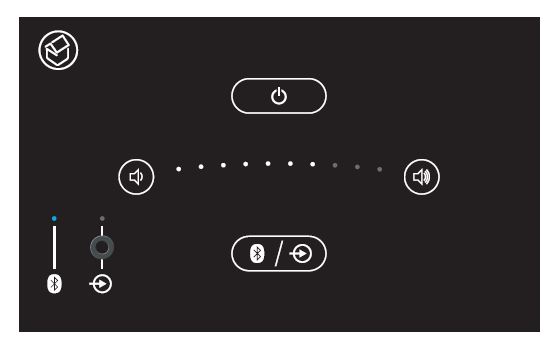
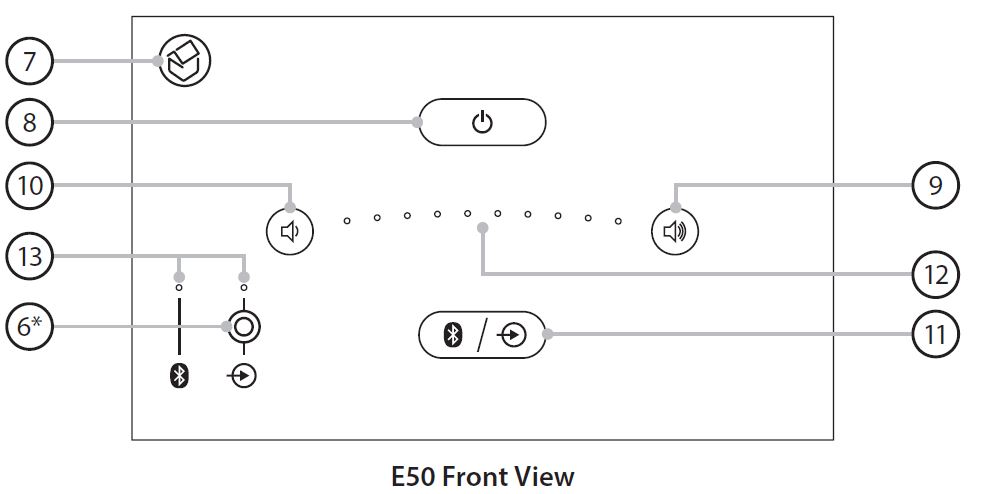
 Front panel connections
 - Analogue audio – line inConnect an analogue audio input here using a stereo 3.5mm jack cable such as QED Performance J2J. A green LED means this input is active.Front panel controls
- Standby indicatorIlluminates red to indicate the unit has entered standby.
- Standby/on keyTouch here to toggle the unit on or off.
- Volume up keyTouch here to increase the volume.
- Volume down keyTouch here to decrease the volume.
- Source keyTouch here to toggle between Bluetooth and line-in sources.
- Volume position arrayProvides a visual indication of current volume setting. A single pulsing LED means mute. Auto dims after 10s. Touch here to toggle play/pause when in Bluetooth mode.
- Indicator LEDsBlue = Bluetooth, Green = Analogue In
 Front panel connections
Operating Instructions
Pairing/connecting a Bluetooth music source
- The E50 is always in pairing mode. Navigate to the Bluetooth devices list on your phone or other Bluetooth transmitter device. Select Systemline E50(_n) from the device list. If the phone has not previously been paired a Bluetooth pairing request will be displayed on the phone. On the E50 the blue LED will flash.
- Press and hold the source key on the E50 until the blue LED stops flashing.
- Press pair on the phone. The unit will now pair and connect. The E50 will wake up, the blue LED will be illuminated and the default volume level will be displayed.
- If the phone has previously been paired it will connect straight away, without the need for steps 2 and 3.
Listening to a Bluetooth music source
- If not already done, pair or connect with the Bluetooth device (see above).
- Navigate to the media player on your phone or other Bluetooth transmitter device and press play. The Bluetooth source will be selected and music will play through the E50.
- Check that the blue source LED is illuminated, if not press the source key on the E50. The LED will turn from green to blue and the default volume level will be displayed.
To skip track forwards in Bluetooth mode
- Use your four outstretched finger tips to flick from left of the volume down key to right of the volume up key in a single consistent sweeping motion from left to right at a distance of up to 70mm from the front panel. Do not actually touch the front panel. The track will skip forward.

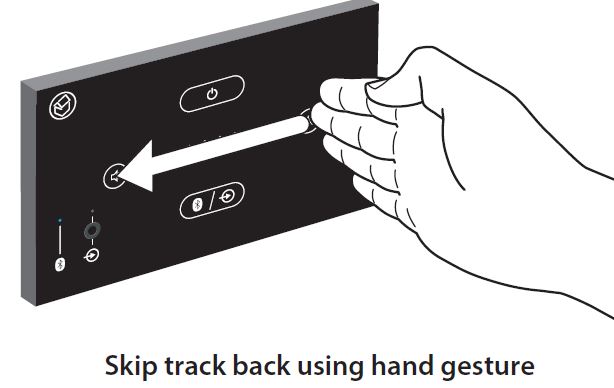
To skip track back in Bluetooth mode
- Use your four outstretched finger tips to flick from right of the volume up key to left of the volume down key in a single consistent sweeping motion from right to left at a distance of up to 70mm from the front panel. Do not actually touch the front panel. The track will skip back.
To pause/play in Bluetooth mode
- Touch the centre of the touch panel where the volume LEDs are positioned to pause playback while in Bluetooth mode.
- Touch the centre of the touch panel again to resume playback.
Listening to an analogue music source
- Make sure that a compatible analogue music source is connected to either the front or rear input jack (not both) using a 3.5mm stereo audio jack cable. Do not connect audio sources to the front and rear line inputs at the same time.
- Check that the green source LED is illuminated. If not, press the source key. The green LED will be illuminated and the default turn on volume level will be indicated.
To adjust the volume
- Touch the volume up key to increase the level of the music, and touch the volume down key to reduce it.
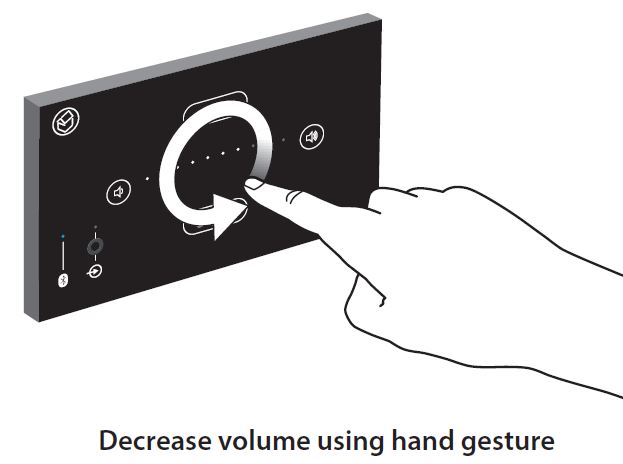
- The same functionality can be achieved using a convenient gesture control.
- Use your index finger to describe a circular pattern within the confines of the four touch key symbols at a distance of up to 70mm from the front panel. Do not actually touch the front panel. A clockwise rotation will increase the volume level and an anti-clockwise rotation will decrease the volume level.

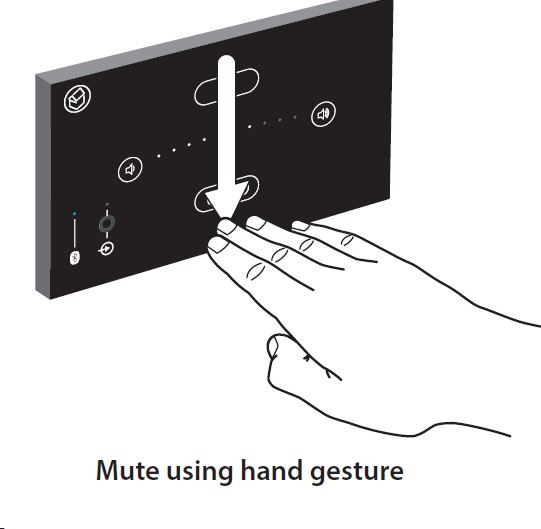
To mute the volume
- Use your four outstretched finger tips to flick from above the standby key to below the source key in a single consistent sweeping motion from top to bottom at a distance of up to 70mm from the front panel. Do not actually touch the front panel.
- The music will mute and the white volume LED will gently pulse. In Bluetooth mode the music will also be paused.
To unmute the volume
- Use your four outstretched finger tips to flick from below the source key to above the standby key in a single consistent sweeping motion from bottom to top at a distance of up to 70mm from the front panel. Do not actually touch the front panel.
- The music will unmute and the volume display will return to the previous setting. In Bluetooth mode the music will also be unpaused.

To put the E50 into standby
- Press the standby key. The E50 will turn off and the red LED will illuminate. In this mode the amplifier is turned off and the Bluetooth connection is dropped. The E50 is still in Bluetooth pairing mode and will wake instantly when the standby key is pressed or when paired.
To put the E50 into deep standby
- Press and hold the standby key until the red LED is extinguished. In this mode the amplifier and the Bluetooth pairing are turned off and the unit will consume only 0.5W of power.
- When the standby key is pressed the unit will reboot to standby mode as above.
Installer Adjustments
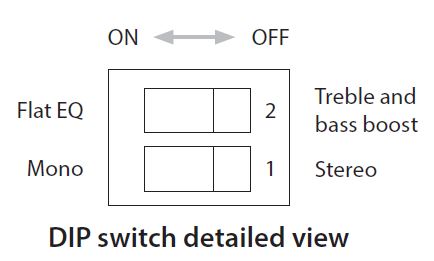
Maximum volume settingTo restrict the maximum volume level of the E50, adjust the preset screw (labelled below) with a small flat blade screw driver. Turning anti-clockwise will reduce the maximum volume level and turning clockwise will increase it. The maximum output level of the speakers will be altered accordingly but the range of volume indication on the front of the unit will not be affected.Mono/Stereo settingTo set the amplifier output to mono, use a ball point pen or small screw driver to move the DIP switch #1 (labelled below) to the ON position. The default position for this switch is OFF (stereo).EQ adjustmentTo adjust the EQ to a flat response, use a ball point pen or small screw driver to move the DIP switch #2 to the ON position. The default position for this switch is OFF (treble and bass boost for Qi 65CB speakers).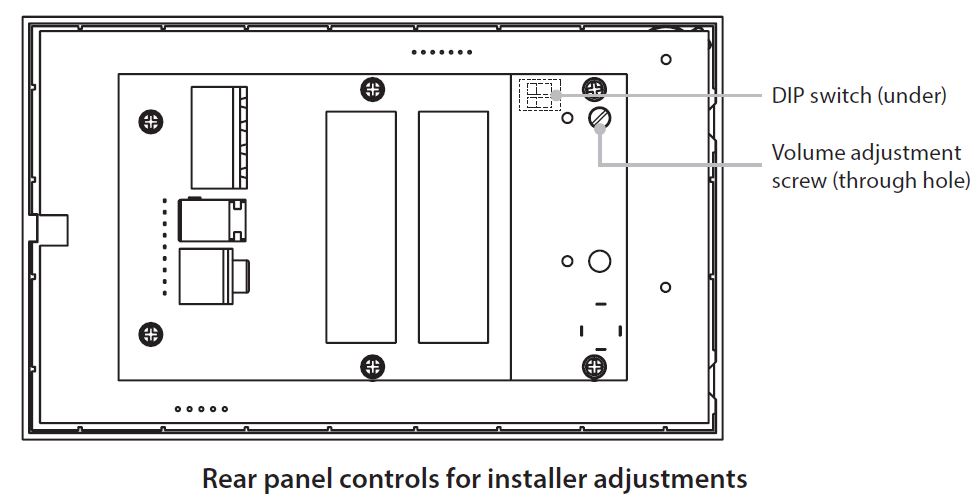
Changing the Bluetooth name
The E50 is shipped with the default Bluetooth name “Systemline E50”. For installations where multiple E50s are within range of the same Bluetooth source, each E50 can be renamed in order to distinguish one from another.
- Make sure that the E50 is in standby mode. Press and hold the standby and source keys at the same time until the white volume LEDs are illuminated and the green source LED is flashing. DO NOT PRESS ANY BUTTONS. WAIT 2 SECONDS.
- Press the source key once. The blue source LED will flash.
- Using the volume up and down keys on the E50 and the chart below, illuminate the corresponding number of white volume LEDs to select a new Bluetooth name.
- Press the standby key once to set the new Bluetooth name. The E50 will reboot with the new Bluetooth name.
To disable gesture controlThe E50 is shipped with gesture control enabled. In some installations gesture control may not be required. In order to enable/disable gesture control:
- Make sure that the E50 is in standby mode. Press and hold the standby and source keys at the same time until the white and green LEDs are illuminated. DO NOT PRESS ANY BUTTONS. WAIT 2 SECONDS.
- To disable gestures press the volume down key to extinguish all the white LEDs.
- To enable gestures press the volume up key to light all the white LEDs.
- Press the standby key to save the current setting.
Troubleshooting
There is no soundCheck that the correct input is selected using the source key.
There is no sound when using the Bluetooth inputCheck that the Bluetooth device is correctly paired (blue LED). Make sure the Bluetooth source is playing.
There is no sound when using the analogue inputCheck that the analogue source device is correctly connected (front or rear jack). Check that the analogue source is playing and that any volume on the device is set to maximum. Check that the Bluetooth device is not connected (green LED).
Technical Specification
Power Supply: 18-19V , 2.5-3.5A DCFrequency Response: 10Hz – 20kHz ±1dBSignal to Noise Ratio: 80dBCross-talk @ 1kHz: better than 60 dBTotal Harmonic Distortion@1kHz Bluetooth input 0.1%@1kHz Line input 0.2%
Maximum output level: Speakers 18W/ch continuousMinimum speaker inpedance: 4Ω
Sensitivity
Analogue Digital: 550mV rms Line in 0dBFSDimensions (W x H x D): 150 x 90 x 47mmWeight: 830g
The Bluetooth® word mark and logos are registered trademarks owned by Bluetooth SIG, Inc. and any use of such marks by Armour Home Electronics Limited is under licence. Qualcomm® aptX™ is a product of Qualcomm Technologies International, Ltd. Qualcomm® and aptX™ are registered trademarks of Qualcomm Incorporated, registered in the United States and other countries, used with permission. Systemline and Q Acoustics are registered trademarks of Armour Home Electronics Limited. All other product names are trademarks or registered trademarks of their respective owners.
Stortford Hall Industrial Park Dunmow RoadBishops Stortford HertfordshireCM23 5GZUnited Kingdomwww.systemline.co.uk![]()
References
[xyz-ips snippet=”download-snippet”]