User Manual

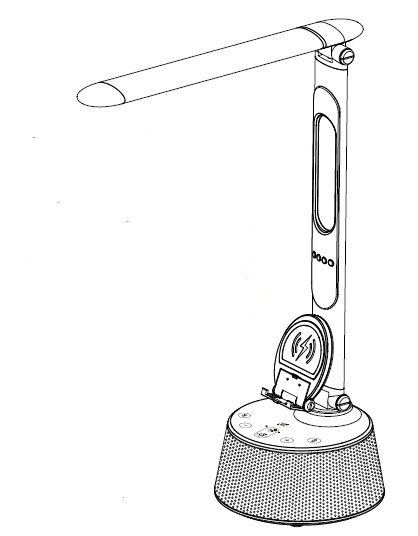
T2W Wireless Charging Smart LED Lamp + Bluetooth Wireless Speaker
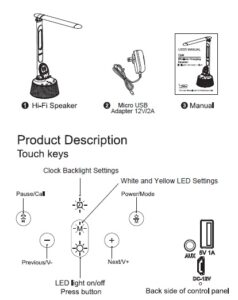
Packing list
Connection Mode
How to connect the wireless connection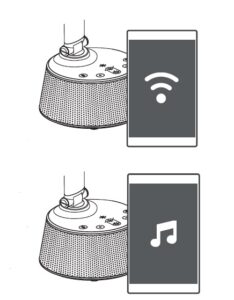 with T2W foldable desklamp wirelessspeaker
Firstly, connect the power to T2W, then long pressbutton to turn on the desklamp and active BT mode.Secondly, turn on the BT mode of smartphone or anyother Android or iOS device. Then search the pairingname of our model “T2W”, and by confirming thepairing name the connetiong is completed and canstart the music playing.
Soft press(-)previous song & Long press (-) volume downSoft press (+),next song & Long press(+) , volume u
AUX-IN FUNCTION : By connecting 3.5 mm
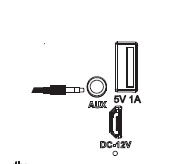
audio jac from other external music source into the AUX
socket of T2W , it can play music when turned to AUX mode

How to opeate the LED lighting
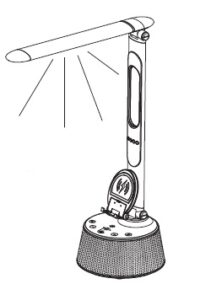
Regulate light LED light intensity
Regulate light LED light intensityThe press button -:¢:- can be usedfor switching on or switching off the LEDlight and the user can light press the button -9.- to shift into 3 different light intensities(brighter light, moderate light, dimmer light)
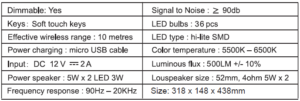
Technical specification
 Features
- A unique practical 3 in 1 household gadtet, with desklamp & wireless speaker & clock.
- CRI > 80
- Illumination intensity > 500 lux, very bright illumination
- Digital cicok with alarm, reminder and temperature display.
- Versatile music play function, can be compatible to play any songs or music from smartphones, tablets, PC, or any other external audio sound sours
- Romantic soft light effect and innovative design
- Suitable for bedrooms or dining rooms as the glowing desk lamp
- Eye-protection reading lamp
Only for Smart Lamp with Wireless Charger
Wireless Charging: Touch/Tap the wireless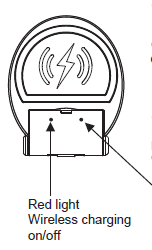 charging button, the red light is turned on,Place the mobile device with wirelesscharging function on the charging mat tocharge your phone.Green light is turned on when the phone isconnected.PLEASE MAKE SURE YOURPHONE/DEVICE Can support wirelesscharging.PS: Wireless charging may need the cellphone cover/case to be removed dependingon the case thickens and material
LED Display Operation

LED Screen Functions
- Time DisplayShows time of the day, date(Month and Day), day of the week, andtemperature. The timedisplay can be set for 12 or 24 hour view.
- Alarm Clock/Event ReminderThe alarm clock can be set so sound is played at the time that thealarm is set for. you can also set a day and time so you can bereminded of an important date like a birthday or anniversary.
- TimerA timer can be set for as much as 24 hrs. Once the timer is done,Lumicharge will play a tone notifying the user that the time has expired.
- TemperatureAmbient temperature is displayed. When the lamp is idle, pressing theSET button on the back of the display will change the display betweenCelsius & Fahrenheit.
Operating and S etting the LED Screen
When powering on your Lumicharge you are put into “Standby” mode.From here you can set Time, Alarm, Timer, Eventreminder, Date and Day.In Standby mode, press the Mode button to cycle through the availablefunctions:Standby Mode>12/24 Hour Select>Alarm Set>Event Reminder Set>Timer SetTo change the time standard between 12/24 hours, cycle through to the12/24 Select Screen and press UP or DOWN buttonsTo change the temperature reading from C to F, go into Standby mode andpress SET buttonSetting the Time
- In Standby mode, press the MODE button 1 time. Select either 12 Houror 24 Hour display by pushing the UP or DOWN button then push SETselect USA, Europe or OFF for daylight saving time.
- Press UP or Down to select the Hour then press set. Repeat steps forminutes press SET.
- Press UP or Down to select the year. Press SET
- Press UP or Down to set the month. Press Set. Select the day of themonth. Press SET.
- When Time and Date are set, press MODE 5 times to reachStandby mode.
Setting the Alarm
- In Standby mode, press the MODE button 2 times. Press SET and selectThe Hour. Press SET again and set the Minutes. Press SET.
- Press Up or DOWN to select the tone that will play when the alarmSounds. Press SET when you find the tone that you would like from 8different tones. The time is now set.
- When the time is set, the LumiCharge gives you 4 options for how theAlarm will function.
- The Snooze alarm function can be set by pressing UP button. TheSnooze
- To cancel the alarm, press SET one more time. The display will showthree dots to indicate that the alarm is not set. Return to the Standbyscreen by pressing MODE 3 times will return to Standby screen.
- The number 1 indicates Monday, 2 is Tuesday ,3 is Wednesday, etc. Bypressing the up button will remove the day from the alarm and when youpress set, it will put back the days to the alarm.
- First option number 1 indicate the alarm will be set just for one day. Thesecond option is for the alarm to be set for multiple days, and this can beset by clicking mode 3 times when you are on the standby mode
Setting the Event Reminder
- In Standby mode, press MODE 3 times. This will bring up the EventReminder.
- Press SET one(1) time and set the Hour. Press SET again to set theminutes. Press set again to set the Month and day.
- Press SET one last time to set the Event Reminder. Pressing SETagain will cancel the Event
Setting the Timer
- In Standby mode, press MODE 4 times. This will bring up the Timer.
- Press SET one time and set the Hour. Press SET again to set theminutes. Press SET again to begin the Timer.when the timer is done, an alarm will sound. To stop the timer press theMODE button.The timer can be set anywhere from 1 minute up to 24 hours.Reminder and the screen will display dots in place of the Hour, Minutes,and Date.
Adjustment Capabilities
The Lumicharge lamp head and bodycan be adjusted for wide Angle lighting 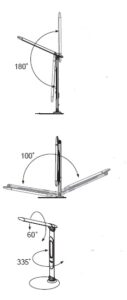 area coverage.
Lamp Head Angle Adjusment
- The lamp head has a 180 range of motion
- When adjusting the lamp head, be sure toholdthe base of the lamp for stability.
Lamp Body Forward andBackward Rotation
- The lamp body has a forward andbackward range of motion of 100
- When adjusting the lamp body, besure to hold the base of the lampfor stability.
Lamp Head & Body Side Rotation
- The lamp body has a left and right range ofmotion of 60
- When adjusting the lamp body, be sure tohold the base of the lamp for stability.
Read More About This Manual & Download PDF:
T2W Wireless Charging Smart LED Lamp Bluetooth Wireless Speaker User Manual – T2W Wireless Charging Smart LED Lamp Bluetooth Wireless Speaker User Manual –