
TOOLS REQUIRED
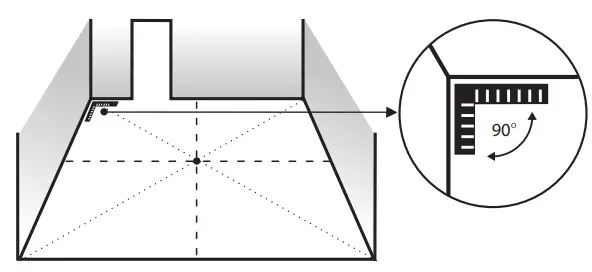
ESTABLISH STARTING CORNER IN THE ROOM
PLANK POSITIONING

TAB PLACEMEN
INSTALLATION METHOD
TAB INSTALLATION SYSTEMResidential and commercial applicationsTAB INSTALLATION SYSTEM is a glue-free method that allows the installation of carpet planks without using adhesive, creating a durable “floating” floor.The major advantages of this system include:– Quicker installation and decreased downtime (no need to wait for the glue to dry, easier floor preparation, and no mess)– Ease of removal when changing or replacing your carpet planks– Flexible installation and superior performance in all areas and environments– Can be installed below, on, or above grade
TAB INSTALLATION SYSTEM works as easy as peel and stick!Floor & Subfloor preparation: Before installing the carpet planks, your floor must be clean, smooth, leveled, and be within the required temperature of 50º F to 90º F (10º C to 32ºC). The carpet planks can only be installed over a hard surface (such as plywood, concrete, hardwood, or tile). No under padding should be used between your carpet plank and the hard surface.
EASY TO INSTALL (3 STEPS)
- ESTABLISH THE CORNER STARTING POINT You must choose a corner that has a 90° angle, then select your installation method. The planks can be positioned: Classic or Herringbone.
- POSITION THE PLANKS From your corner start point, lay the first plank along the wall. For a Classic installation, lay the second plank after the first plank. For a Herringbone installation, lay the second plank perpendicular on the opposite wall. You may need to shift or cut your first row from your base wall to ensure proper fitting and avoid any short plank strips against each wall.
- TAB PLACEMENT Each carton contains two different tabs, the T-TAB and the I-TAB. Abut/connect the T-TAB and I-TAB together to create a TAB to be used in the installation of your carpet planks. After planks are positioned, start from one side of the wall and place the TAB (sticky side up) underneath the plank as in the diagram. For tiles next to a wall, you may vertically cut the TAB in half.For additional installation instructions please refer to the packaging insert.
ADHESIVE – PRESSURE SENSITIVE/ RELEASABLE (OPTIONAL)Residential or Commercial installation, if the product applies — Use a universal acrylic base adhesive formulated for vinyl back carpet tiles and follow installation instructions provided by the adhesive manufacturer.
ROOM SIZE CHART*
* Package quantities provided above include a minimum of 10% extra planks.
[xyz-ips snippet=”download-snippet”]