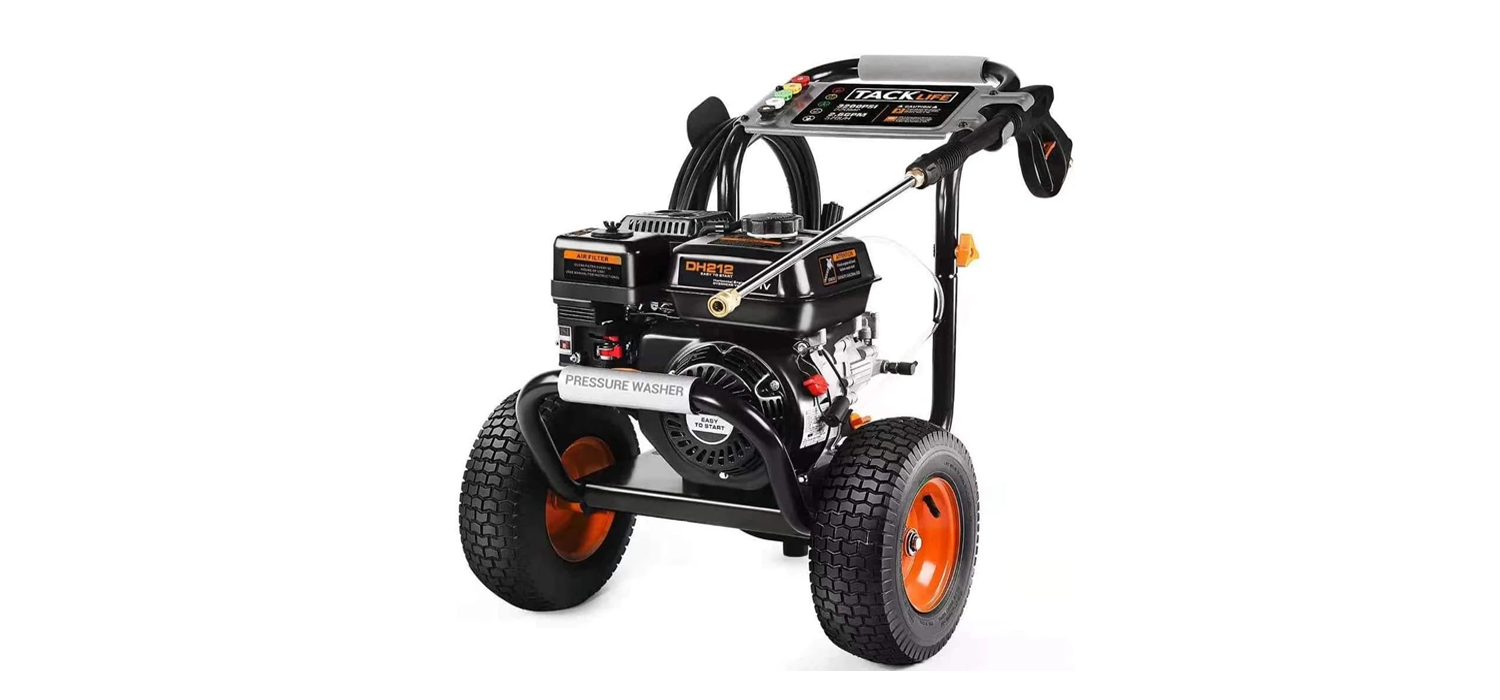
TACK LifeGas Pressure WasherUser Manual
Model: GSH01B

Warranty Registration
We are glad to invite to register the warranty information at www.tacklifetools.com. After registration, you may kindly enjoy the exclusive service
Please read and comply with these original instructions prior to the initial operation of your appliance and store them for later use or subsequent owners.
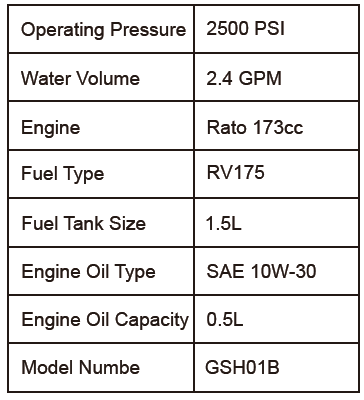
Specifications
TACKLIFE 3200PSI
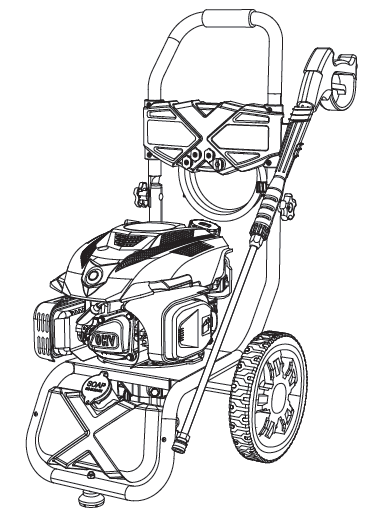
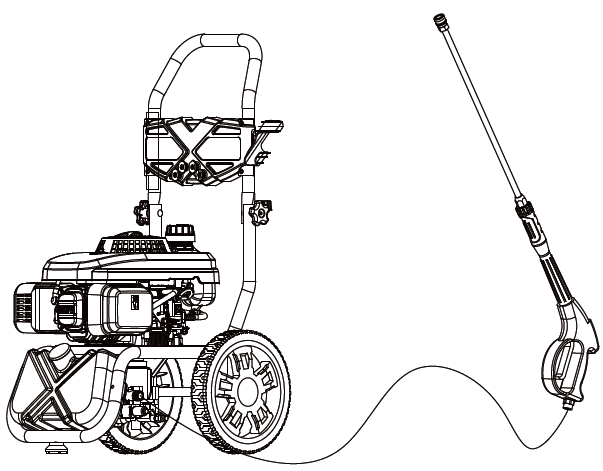
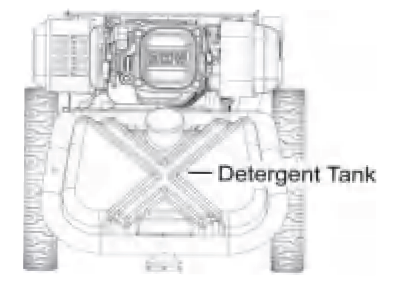
Overview
- Spray Gun
- Nozzles
- Pressure Hose
- Engine
- Wheels
- Pump
- Detergent Tank
- Rubber Foot
Hazard Levels
DANGER: Indicates “an imminently hazardous situation which, if not avoided, will result in death or serious injury.”
WARNINGS! Indicates “a potentially hazardous situation which, if not avoided, could result in death or injury.”
CAUTION: Indicates “a potentially hazardous situation which, if not avoided, may result in minor or moderate injury or in property damage incidents.”
Safety Instructions
WARNINGS: When using this product, basic precautions should always be followed, including the following:
- Read the operating instructions of the engine manufacturer before start-up and follow the safety instructions carefully.
- Read all instructions before using product.To reduce the risk of injury, close supervision is necessary when the product is used near children.
- Know how to stop the product and bleed pressures quickly. Be thoroughly familiar with the controls.
- Stay alert – watch what you are doing.
- Do not operate when fatigued or under the influence of alcohol or drugs.
- Keep operating area clear of all persons.
- Do not overreach or stand on unstable support. Keep good footing and balance at all times.
- Wear safety goggles and ear protection.
- Follow the maintenance instructions specified in the manual.
- To avoid risks, all repairs and replacement of spare parts should only be carried out by trained personnel.
- Tire pressure should not exceed max. 25 psi.
WARNING: Risk of injection or injury – Do not direct discharge stream at persons.
- High pressure jets can be dangerous if misused. The jet must not be directed at persons, animals, electrical devices, or the unit itself.
DANGER: Do not spray electrical connections, electrical outlets or fixtures.
- Do not use acids, solvents, or any alkaline or flammable material in this product. These products can cause physical injuries to the operator and irreversible damage to the machine.
WARNING: Gun kicks back
- Hold with both hands The trigger gun safety lock prevents the trigger from accidentally being engaged. This safety feature must be engaged when replacing nozzles or not in use.
- The engine exhaust from this product contains chemicals known to the State of California to cause cancer, birth defects or other reproductive harm. Operation of this equipment maycreate sparks that can start fires around dry vegetation. A spark arrestor may be required. Operator should contact local fire agencies for laws or regulations.
CAUTION: Risk of asphyxiation
- Use this product only in a well ventilated area. Do not operate indoors or in any confined area.
- Operate and fuel machine in a well ventilated area, free of devices featuring an open pilot or flame such as boilers, water heaters, etc.
CAUTION: Risk of fire/explosion
- Do not add fuel when the machine is operating or still hot.
WARNING: Risk of fire/explosion
- Operate only where open flame or torch is permitted.
- Do not spray flammable liquids.
- Do not operate if fuel has been spilled. Instead, move machine to different location and avoid creating sparks.
- This machine has hot surfaces which can cause burns. Operate in a safe environment and away from children.
- Do not touch hot surfaces or allow accessories to contact hot surfaces.
- Do not leave machine running unattended.
- Avoid tipping machine on its side.
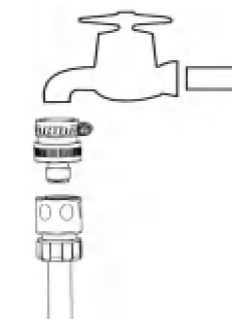
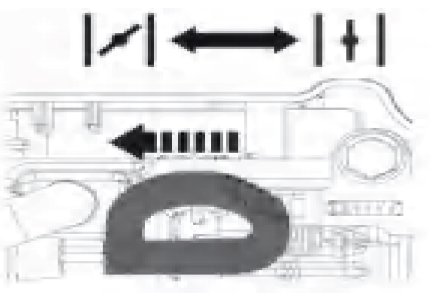
Water Supply (Cold Water Only)
CAUTION: When connecting to water supply mains, local regulations of your municipal water company must be observed. In some areas connecting directly to public drinking water supply may require a back flow prevention device. This is to ensure that there is no feedback of chemicals into the water supply. Use a water filter to avoid potential damage from dirt in the water supply.
- Garden hose must be at least 5/8 inch diameter.
- Flow rate of water supply must not fall below 2.6 GPM(gallons per minute)Flow rate can be determined by running the water for one minute into an empty 5-gallon container.
- The water supply temperature must not exceed 122°F/50°C. Never use the pressure washer to draw in water contaminated with solvents, e.g. paint thinners, gasoline, oil, etc.
- Always prevent debris from being drawn into the unit by using a clean water source.
- Use additional water filter.
- Do not operate pressure w
Assembly Instructions
Part List
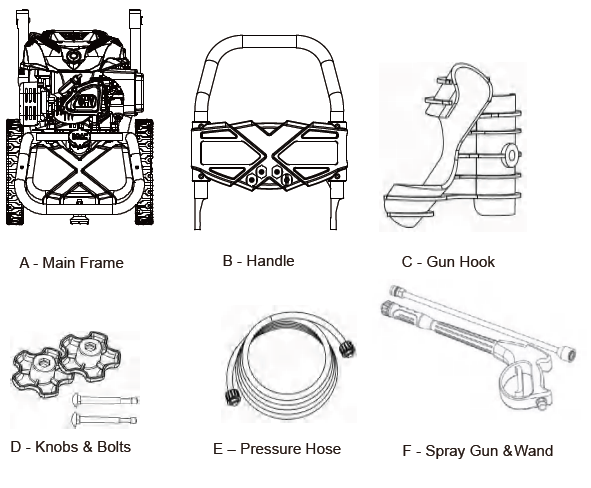

Parts not shown:
- Manual
- Nozzle Cleaner
- Spark Plug Wrench
- O-Ring Set(2 for pressure hose, 1 for spray gun)
- Funnel For Adding Engine Oil
Assembling
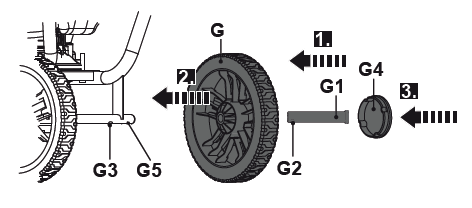
Wheel
- Squeeze the locking pin (G2) and insert the wheel axle (G1) into the hole of the wheel (step 1).
- Squeeze the locking pin and insert the wheel axle into the wheel support (G5)(step 2).Ensure the locking pin snaps in the locking hole (G3) properly.
- Put the wheel hubcap (G4) onto the wheel. (step 3). Ensure it snaps in place properly.
- Repeat with the other wheel.
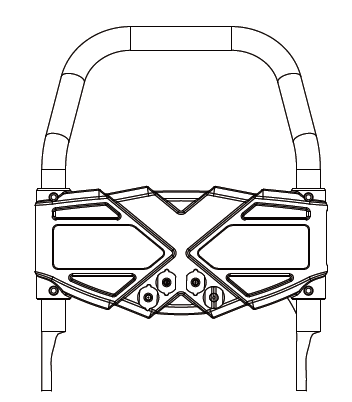
Handle
- Align the holes and attach the upper handle bar (B) onto the lower handle bar (A).
- Secure the connection with bolts (D2) and knobs (D1). Ensure the bolts (D2) are engaged into the square hole properly.

Gun Holder
- Secure the spray gun holder (C) onto the upper hand bar (B) with flat gasket (H), elastic gasket (I) and screw (J) using the provided screwdriver (K).

Preparation
Oil Level
WARNING: Engine shipped without oil in crankcase. Before starting engine, fill with oil with funnel provided. Do not over-fill. Do not run the engine with a high or low oil level as this can cause engine damage.
- Turn the oil gauge dipstick counter clockwise; remove it and clean it with a clean cloth.
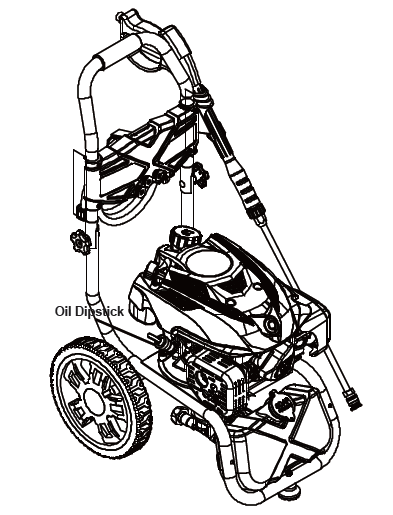
- Fully reinsert the oil gauge dipstick and pull it out to check the oil level.
- If the oil level is halfway up the dipstick or below, refill with SAE
10W -30 oil through the dipstick hole until the oil level reaches 3/4 up the dipstick or until it reaches the bottom lip of the dipstick hole as shown.
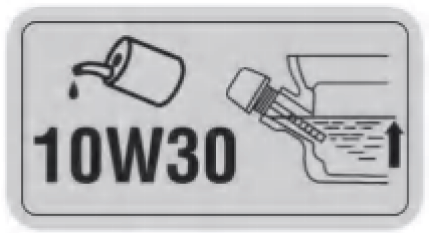
Always use SAE 10W-30 oil.
Oil crankcase capacity: 0.5L.
- Reposition the oil gauge dipstick and tighten it by turning clockwise.
- Engine oil should be changed after the first 5 hours, then every 50 hours.
Fuel Level
WARNING: Make sure there is enough fuel in the fuel tank before operating. This is a 4-cycle engine and does not require a gas/oil mixture. There is a separate reservoir for gas and a separate reservoir for oil.

- If it is necessary to add fuel, first make sure the engine is OFF, and then remove the fuel cap by turning it counter clockwise.
- When refueling, make sure the fuel filter is in place and keep in mind all safety precautions.
- Use clean unleaded gasoline with a minimum of 87 octane. DO NOT use old gas. DO NOT mix oil with gasoline.
Fuel tank capacity: .1.5L
Air Filter
WARNING:
- Never run the engine without an air cleaner, or severe wear of the engine may be resulted in.
- Replace the air filter element every 50 hours
- Press the two clips on the top of the air filter cover to remove the cover.
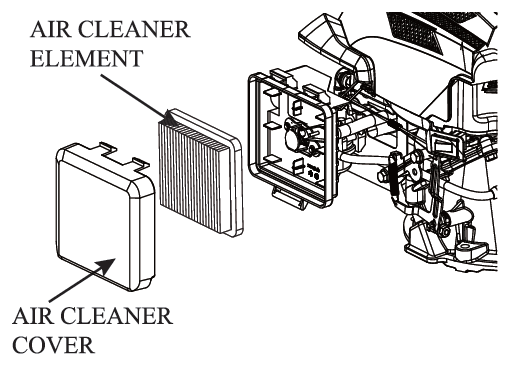
- Remove foam element or paper element, paying attention to prevent dust and foreign matter entering into air cleaner.
- Check, clean or replace damaged air cleaner parts.
- Reinstall the air cleaner parts back
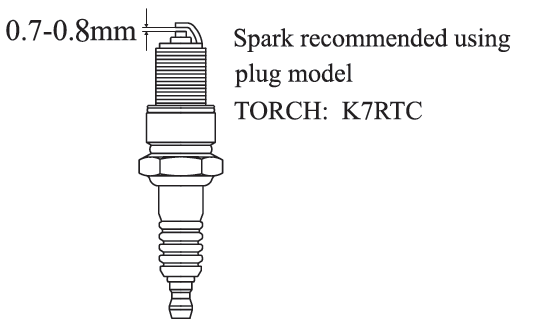
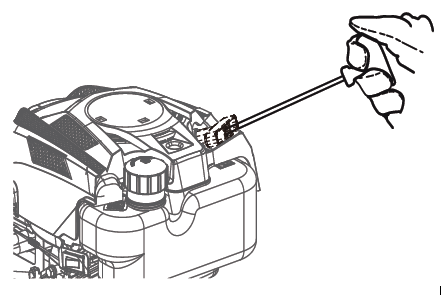
Spark Plug
Operating Instructions
Starting Procedure:
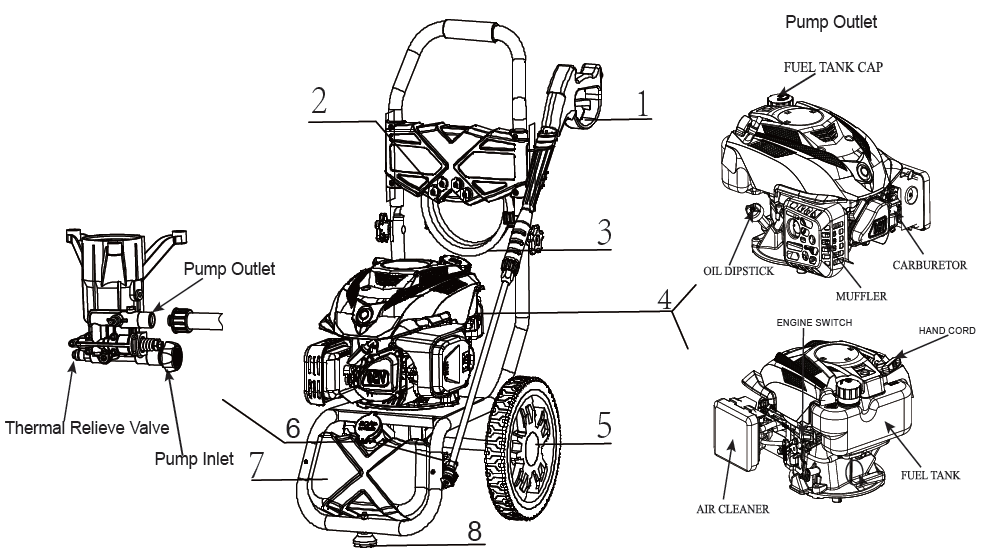
- Insert the water inlet filter(L) into L-Water Inlet Filter pump intlet (step 1).
- Connect garden hose onto pump intlet (step 2).
- Connect pressure hose onto pump outlet (step 3).

- Connect spray gun and pressure hose.
- Open water source.
- Start the Engine
- Turn the engine switch to “ON” position.

2. Pull the choke lever towards the CLOSE position
3. Pull trigger on spray gun to release pressure.
4. Locate recoil cord and pull slowly until resistance is felt. At this point, pull rapidly to start engine.
5. Pull the choke lever towards the OPEN position

NOTE: If unable to start the engine, repeat the above operation one or two times.
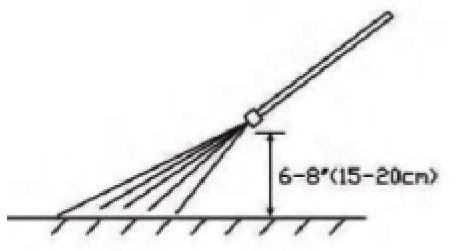
Cleaning Procedure:
- Position the tip of the wand 6-8” (15-20 cm) away from the surface to clean at a 45°angle
Using the Accessories
Quick Connect Nozzles
The color-coded quick connect nozzles provide a wide array of spray widths from 0° to 40° and are easily accessible when placed in the convenient nozzle holder.
0° spray angle = Red nozzleFor particularly stubborn accumulation of grime. Not recommended for soft materials like sidings, decks, painted surfaces, cars.
15° spray angle = Yellow nozzle For dirt accumulation over a surface For dirt accumulation over a large surface.
25° spray angle = Green nozzleFor moderate dirt accumulation over large surface.
40° spray angle = White nozzleFor moderate dirt accumulation over a large surface.
Soap = Black nozzleFor operating with detergents or cleaning with low pressure.
CAUTION: High pressure in nozzle area. Risk of injury caused by improperly locked nozzle.
- Make sure you hear the “click” when inserting the nozzle tip into the quick connection.
- Pull the nozzle to make sure it is seated properly before operating your unit.
WARNING: To avoid serious injury never point spray nozzle at yourself, other persons or animals.
Working with Detergents
Detergents can only be applied with the black detergent nozzle.
- Install the black detergent nozzle for detergent application at low pressure.
- Fill the detergent tank with Detergent.
- With the engine running, pull trigger to operate unit.
- Liquid detergent is drawn into the unit and mixed with water.
- Apply detergent to work area.
- Do not allow detergent to dry on surface.
- Always flush the detergent tank with fresh water when the cleaning job is done, to rinse/flush any remaining detergents from the injection system.
NOTE: For best results see Cleaning Tips for specific information on how to clean different surfaces.
CAUTION:
Never use:
- Bleach, chlorine products or other corrosive chemicals.
- Liquids containing solvents (i.e., paint thinners, gasoline, oils.)
- Tri-sodium phosphate products.
- Ammonia products.
- Acid-based products.
These chemicals will harm the unit and will damage the surface being cleaned.
Use of these items will void the warranty.
Taking a Break five minutes or more
- Move the engine stop switch to the OFF position.
- Release trigger and engage safety lock.
Shutting Down & Clean Up
- If detergents have been used, insert 1 gallon of fresh water into Detergent Tank.
- Siphon water at low pressure for one minute to clear the line of residual detergent.
- Move the engine stop switch to the OFF position. Close the fuel valve.
- Turn off the water source.
- Press trigger to release water pressure.
- Release trigger and engage gun safety lock.
- Disconnect the garden hose from the water inlet on the unit.
- Disconnect the high pressure hose from the high pressure outlet. Store the high pressure hose in the gun holder assembly.
Winterizing & Long-Term Storage
small amount of antifreeze before winter storage and during the cleaning season to protect the pump from freezing and premature wear.
- Turn engine switch to the OFF position Disconnect all hoses.
- Unscrew cap from Pump Guard bottle.
- Remove internal seal.
- Reattach cap to Pump Guard bottle and remove black protective cap.
- Screw bottle into water inlet on pressure washer pump and squeeze.
- With ignition OFF, pull starter rope until fluid starts to exit.
- Unscrew bottle. Store or dispose properly properly.
- If Guard is unavailable, perform the following:
- Disconnect all water connections.
- Turn on the machine for a few seconds, until the water which remained in the pump exits. Turn off engine immediately.
AUTION:Failure to follow the above directions may result in damage to the pump assembly and accessories and void the warranty.
Do not allow high pressure hose to become kinked.
Store machine and accessories in a room which does not reach freezing temperatures. DO NOT store near furnace or other sources of heat as it may dry out the pump seals.
Maintenance Instructions
Pump
Pump InspectionYou should routinely make a visual inspection of the pressure washer’s pump.(You can locate a service center in your area online at: www.tacklife.com)
Engine
Carry out maintenance tasks for the engine according to the specifications provided in the operating instructions provided by engine manufacturer.
Cleaning Tips
Deck Cleaning
With or Without DetergentPre-rinse deck and surrounding area with fresh water. For best results, limit your work area to smaller sections of approximately 25 square feet. Allow Deck Wash to remain on surface 1-3 minutes. Do not allow detergent to dry on surface. Rinse at high pressure in a long sweeping motion keeping the spray nozzle approximately 3-6 inches from the cleaning surface. Always clean from top to bottom and from left to right. When moving on to a new section of the cleaning surface, be sure to overlap the previous section to eliminate stop marks and ensure a more even cleaning result.
Cars, Boats& Motorcycles
With or Without DetergentPre-rinse vehicle with fresh water. For best results, clean one side of vehicle at a time and always apply detergent from bottom to top, do not allow detergent to dry on surface. If needed, use special wash brush attachment (not Rinse at high pressure in a sweeping motion keeping the spray nozzle approximately 6-8 inches from the cleaning surface (distance should increase when rinsing pin-striping or other sensitive surfaces).Always clean from top to bottom and from left to right. For best results, wipe surface dry with a chamois or soft dry cloth.
House Siding
With or Without DetergentPre-rinse cleaning surface with fresh water. For best results, limit your work area to sections of approximately 6 feet and always apply detergent from bottom to top). Allow detergent to remain on surface 1-3 minutes. Do not allow detergent to dry on surface, if surface appears to be drying, simply wet down surface with fresh water. If needed, use special wash brush attachment (not included) to remove stubborn dirt. Rinse at high pressure from top to bottom in an even sweeping motion keeping the spray nozzle approximately 6 inches from the cleaning surface.
Cement Patios, Brick & Stone
With or Without DetergentPre-rinse cleaning surface with fresh water. For best results, limit your work area to smaller sections of approximately 25 square feet. Allow Pressure Wash or Degreaser to remain on surface 1-3 minutes. Do not allow detergent to dry on surface. Rinse at high pressure in a sweeping motion keeping the spray nozzle approximately 3-6 inches from the cleaning surface. Always clean from top to bottom and from left to right. For removing extremely stubborn stains, use a DirtBlaster® Spray Nozzle (sold separately).
Barbecue Grills, Outdoor Power Equipment & Gardening Tools
With or Without DetergentPre-rinse cleaning surface with fresh water. Allow Pressure Wash to remain on surface 1-3 minutes. Do not allow detergent to dry on surface. Rinse at high pressure keeping the spray nozzle approximately 3-6 inches from the cleaning surface. For removing extremely stubborn dirt, it may be necessary to move the spray nozzle even closer to the surface for greater dirt cutting action.
Patio & Lawn Furniture
With or Without DetergentPre-rinse furniture and surrounding area with fresh water. If using Pressure Wash, apply to surface at low pressure. Allow Pressure Wash to remain on surface 1-3 minutes. Do not allow detergent to dry on surface. If needed use special Wash Brush Attachment (not included) to remove stubborn dirt. Rinse at high pressure in a sweeping motion keeping the spray nozzle approximately 3-6 inches from the cleaning surface. For best results, clean from top to bottom and from left to right.
Recommendations
- Before cleaning any surface, an inconspicuous area should be cleaned to test spray pattern and distance for maximum cleaning results.
- If painted surfaces are peeling or chipping, use extreme caution as pressure washer may remove the loose paint from the surface.
- When using on surfaces which might come in contact with food, flush surfaces with plenty of drinking water.
- For additional cleaning tips, visit our website at www.tacklife.com
Optional Accessories
Optional accessories are available to further enhance your cleaning capabilities. These accessories are accurate as of the printing date of this manual. Please check our website: www.tacklife.com for pricing and up to date information.
- Extension Hose
- DirtBlaster® Spray Nozzle
- Universal Wash Brush Kit
Troubleshooting
CAUTION: Remove the spark plug cable to prevent accidental ignition of the engine before making any repair.
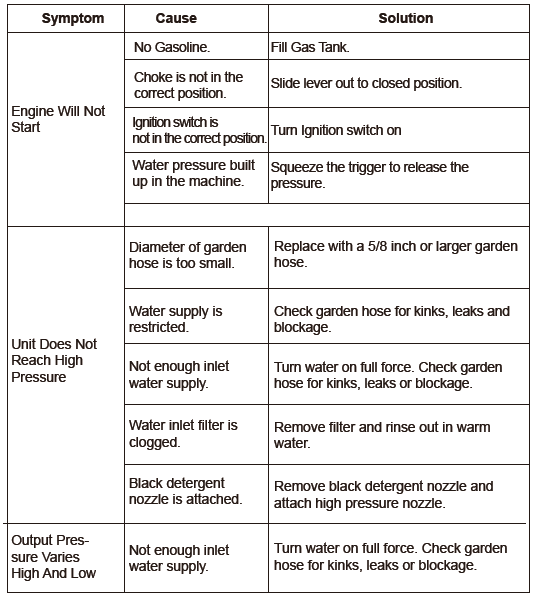
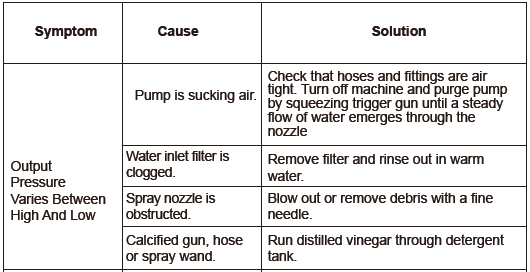

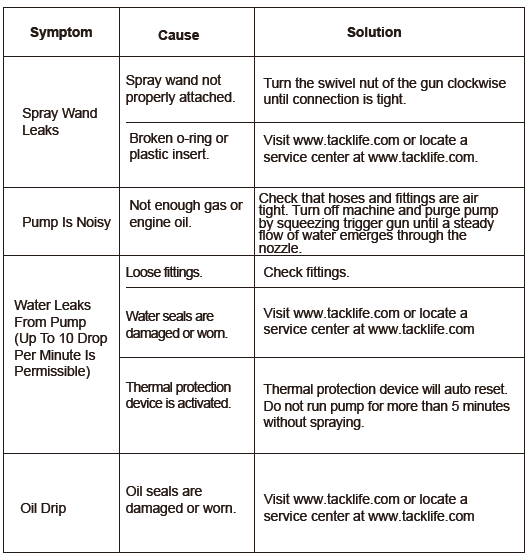
If the symptom you are experiencing is not listed above, or if the provided solutions donot solve your issue, please visit our extensive online troubleshooting database at:www.tacklife.com
High Pressure WashersLimited 24 month warrantyCold water gas pressure washersThis Tacklife product is warranted by Tacklife to be free of defects in workmanship andmaterials under normal use.
Specific warranty applies to:
- Rato 173cc engines are warranted for two (2) years on parts and labor.
- Pumps and engines are warranted for two (2) years on parts and labor.
- Frames, handles and detergent tanks, as well as other structural components, carry a one (1) year parts and labor warranty.
- Standard accessories and attachments are warranted for a ninety (90) day period.
- Any commercial, industrial or rental use of this equipment will reduce the warranty to ninety (90) days.
The warranty period is calculated from the date of purchase by the end user and covers cost for replacement parts / equipment and warranty labor per-formed. A copy of the original purchase receipt or gift receipt from the original retailer must also accompany the war-ranty claim. To locate the nearest authorized Tacklife service center, please visit our website at www.tacklife.com
Tacklife’s obligation under this warranty shall strictly be limited, at Tacklife’s option, either to replace or repair, through Tacklife direct or through an Authorized TacklifeService Dealer without charge during the warranty period any part, which in the opinion of the manufacturer, shows defect in workmanship or material. Service will be scheduled according to the normal work flow and business hours at the service center, and availability of replacement parts. All decisions of Tacklife with regard to this limited warranty shall be final.
This warranty does not cover:
- Merchandise sold as reconditioned, used, demonstration or floor models.
- Merchandise purchased on eBay and other online auction web sites.
Tel : 929-533-7707Shenzhen Take Tools Co., Ltd.www.tacklifetools.comwww.facebook.com/Tacklife.USNo.B714,Niulanqian Building, Minzhi Road, LonghuaDistrict, Shenzhen, Guangdong, China 518000
References
[xyz-ips snippet=”download-snippet”]