![]() Quick Start Guide
Quick Start Guide
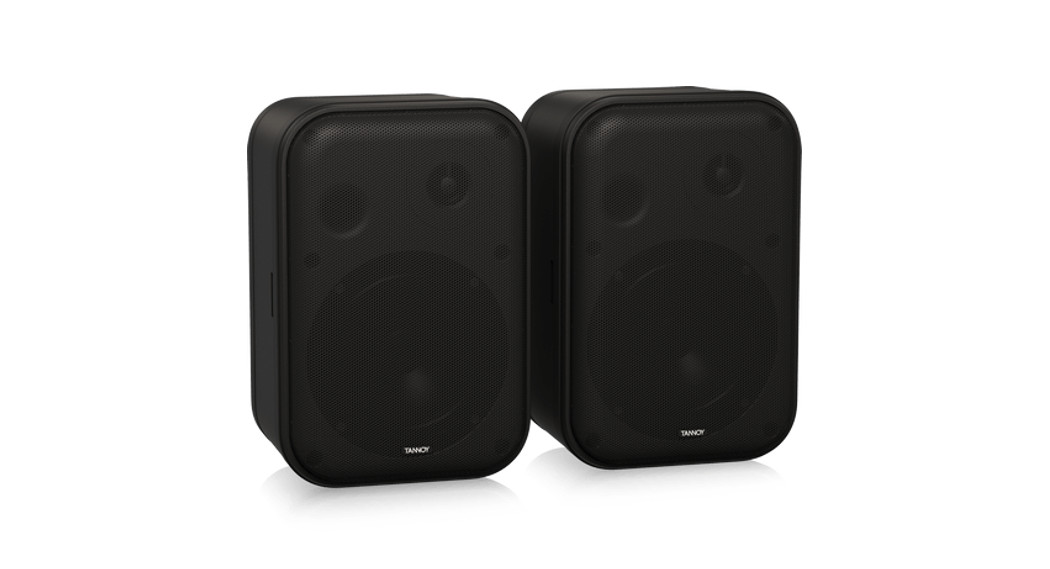
VMS 1 / VMS 1-WH5″ Versatile 2-Way Compact Monitor for Installation Applications
Important Safety Instructions
| CAUTIONRISK OF ELECTRIC SHOCK!DO NOT OPEN! |
![]() Terminals marked with this symbol carry an electrical current of sufficient magnitude to constitute a risk of electric shock. Use only high-quality professional speaker cables with ¼” TSor twist-locking plugs pre-installed. All other installation or modifications should be performed only by qualified personnel.
Terminals marked with this symbol carry an electrical current of sufficient magnitude to constitute a risk of electric shock. Use only high-quality professional speaker cables with ¼” TSor twist-locking plugs pre-installed. All other installation or modifications should be performed only by qualified personnel.
![]() This symbol, wherever it appears, alerts you to the presence of uninsulated dangerous voltage inside the enclosure- voltage that may be sufficient to constitute a risk of shock.
This symbol, wherever it appears, alerts you to the presence of uninsulated dangerous voltage inside the enclosure- voltage that may be sufficient to constitute a risk of shock.
![]() This symbol, wherever it appears, alerts you to important operating and maintenance instructions in the accompanying literature. Please read the manual.
This symbol, wherever it appears, alerts you to important operating and maintenance instructions in the accompanying literature. Please read the manual.
![]() CautionTo reduce the risk of fire or electric shock, do not expose this appliance to rain and moisture. The apparatus shall not be exposed to dripping or splashing liquids and no objects filled with liquids, such as vases, shall be placed on the apparatus.
CautionTo reduce the risk of fire or electric shock, do not expose this appliance to rain and moisture. The apparatus shall not be exposed to dripping or splashing liquids and no objects filled with liquids, such as vases, shall be placed on the apparatus.
![]() CautionThese service instructions are for use by qualified service personnel only. To reduce the risk of electric shock do not perform any servicing other than that contained in the operation instructions. Repairs have to be performed by qualified service personnel.
CautionThese service instructions are for use by qualified service personnel only. To reduce the risk of electric shock do not perform any servicing other than that contained in the operation instructions. Repairs have to be performed by qualified service personnel.
- Read these instructions.
- Keep these instructions.
- Heed all warnings.
- Follow all instructions.
- Do not use this apparatus near water.
- Clean only with a dry cloth.
- Do not block any ventilation openings. Install in accordance with the manufacturer’s instructions.
- Do not install near any heat sources such as radiators, heat registers, stoves, or other apparatus (including amplifiers) that produce heat.
- Do not defeat the safety purpose of the polarized or grounding-type plug. A polarized plug has two blades with one wider than the other. A grounding-type plug has two blades and a third grounding prong. The wide blade or the third prong are provided for your safety. If the provided plug does not fit into your outlet, consult an electrician for the replacement of the obsolete outlet.
- Protect the power cord from being walked on or pinched particularly at plugs, convenience receptacles, and the point where they exit from the apparatus.
- Use only attachments/accessories specified by the manufacturer.

- Use only with the cart, stand, tripod, bracket, or table specified by the manufacturer, or sold with the apparatus. When a cart is used, use caution when moving the cart/apparatus combination to avoid injury from tip-over.
- Unplug this apparatus during lightning storms or when unused for long periods of time.
- Refer all servicing to qualified service personnel. Servicing is required when the apparatus has been damaged in any way, such as power supply cord or plug is damaged, liquid has been spilled or objects have fallen into the apparatus, the apparatus has been exposed to rain or moisture, does not operate normally, or has been dropped.
- The apparatus shall be connected to a MAINS socket outlet with a protective earthing connection.
- Where the MAINS plug or an appliance coupler is used as the disconnect device, the disconnect device shall remain readily operable.
- Correct disposal of this product: This symbol indicates that this product must not be disposed of with household waste, according to the WEEE Directive (2012/19/EU) and your national law. This product should be taken to a collection center licensed for the recycling of waste electrical and electronic equipment (EEE). The mishandling of this type of waste could have a possible negative impact on the environment and human health due to potentially hazardous substances that are generally associated with EEE. At the same time, your cooperation in the correct disposal of this product will contribute to the efficient use of natural resources. For more information about where you can take your waste equipment for recycling, please contact your local city office or your household waste collection service.
- Do not install in a confined space, such as a bookcase or similar unit.
- Do not place naked flame sources, such as lighted candles, on the apparatus.
- Please keep the environmental aspects of battery disposal in mind. Batteries must be disposed of at a battery collection point.
- This apparatus may be used in tropical and moderate climates up to 45°C.
LEGAL DISCLAIMER
Music Tribe accepts no liability for any loss which may be suffered by any person who relies either wholly on or in part upon any description, photograph, or statement contained herein. Technical specifications, appearances, and other information are subject to change without notice. All trademarks are the property of their respective owners. Midas, Klark Teknik, Lab Gruppen, Lake, Tannoy, Turbosound, TC Electronic, TC Helicon, Behringer, Bugera, Oberheim, Auratone, Aston Microphones, and Coolaudio are trademarks or registered trademarks of Music Tribe Global Brands Ltd. © Music Tribe Global Brands Ltd.2021 All rights reserved.
LIMITED WARRANTY
For the applicable warranty terms and conditions and additional information regarding Music Tribe’s Limited Warranty, please see complete details online at musictribe.com/warranty.
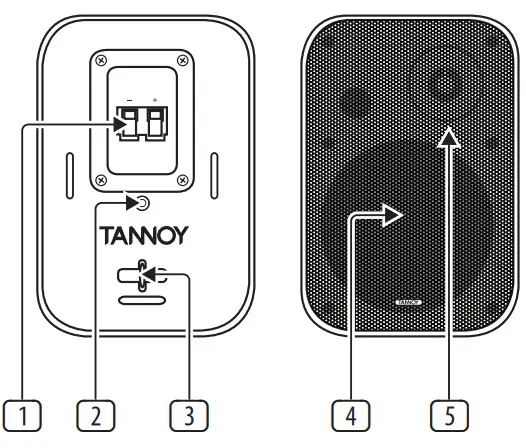
- SPRING CLIPS – Connect the bare speaker wire to these connections.
- BRACKET INSERT – Use this threaded insert for use with mounting brackets.
- SAFETY BAR – Connect an additional safety cable for mounting.
- WOOFER
- HIGH-FREQUENCY DRIVER
Operation
Amplifier ConsiderationsThe VMS 1 should be driven by high-quality power amplifiers designed for professional use. Power amplifiers should be capable of delivering long-term broadband power equal to half the loudspeaker’s peak power rating at its stated nominal impedance.The use of underpowered amplifiers must be avoided as heavily clipped signals can cause permanent loudspeaker damage. Correct amplifier power will ensure optimum sound quality and long-term reliability as well as protection from damage.
Connections
VMS 1 connects to the amplifier by using spring clips that connect bare speaker wire.
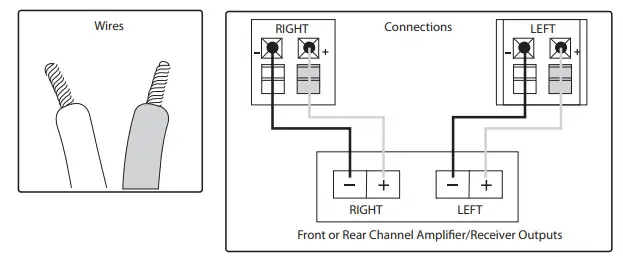
Speaker and amplifier terminals have corresponding (+) and (-) terminals. Terminals on the speaker and amplifier should both be connected identically, i.e., the (+) terminal on the speaker corresponds to the (+) on the amplifier, and the (-) terminal on the speaker corresponds to the (-) terminal on the amplifier. If the terminals are not connected properly the resulting “out of phase” sound will be thin, with the weak bass response and poor stereo imaging.
Connecting speaker wire to spring clips
To connect bare speaker wire directly to the spring clips, follow this procedure:
- Cut your speaker wire to the desired length, with a little extra.
- If your speaker wire consists of two wires inside a conjoined jacket, first separate the two wires so you have approximately two inches to work with for each wire.
- Use a wire stripper to remove about ½ inch of jacket and insulation from the end of each separated wire segment.
- Twist the bare wire strands between thumb and forefinger so the individual strands wrap tightly and compactly around each other.
- Press downward on the spring clips’ plastic tabs so the spring clips open to accept the speaker wire.
- Insert each wire directly into the opened holes in the spring clips. Make sure to observe correct polarity.
- Release the plastic tabs so that the wires are held tightly and securely in the spring clips.
Positioning your speakers
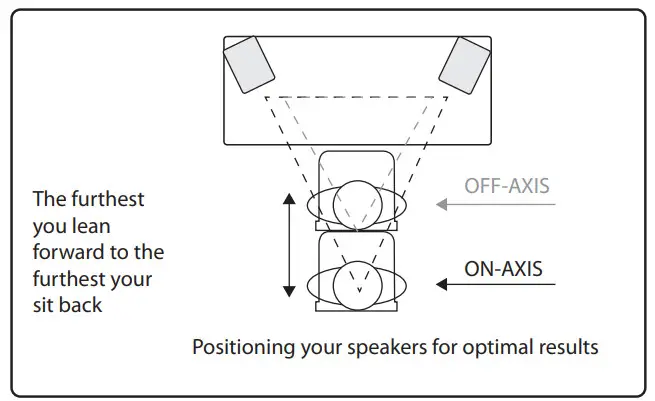
These monitors are designed as near-field monitors, positioned typically 0.75 to 3 meters from the listener. They will typically be placed on the mixer metering bridge or on a table on either side of a smaller mixing desk or control surface. They may also be mounted on appropriate loudspeaker stands or brackets, which will yield the best results in terms of stability and vibration. In all cases, these speakers should be angled towards the listener, with the tweeter approximately at ear height.
Cabinet care
The cabinet may be cleaned with a soft lint-free cloth. The use of solvents or abrasive cleaners should be avoided.
Specifications
| Performance | |
| Frequency response | 70 Hz to 20 kHz (-10 dB) |
| Sensitivity | 86 dB (1 W @ 1 m) |
| Power handling (IEC) | |
| Continuous | 25 W |
| Peak | 100 W |
| Recommended amplifierpower | 50 W |
| Nominal Impedance | 4 Ω |
| Maximum SPL | 100 dB (25 W @ 1 M) |
| Crossover point | 5.2 kHz |
| Nominal dispersion @2 kHz | 150° H x 115° V @ -6 dBpoints |
| Transducers | |
| Diameter / material /type (LF) | 135 mm (5.3″), black papercone |
| Diameter / material /type (HF) | 13 mm (0.5″), black PEIdome |
| Physical | |
| Enclosure material | ABS 757 |
| Grille material | Steel |
| Connectors | Bare wire clip terminal |
| Dimensions (H x W x D) | 235 x 159 x 142 mm(9.25 x 6.25 x 5.6″) |
| Net weight | 1.8 kg (3.96 lbs) |
| Accessory pack (included) | |
| Wall mount bracket |
 Hereby, Music Tribe declares that this product is in compliance with Directive 2011/65/EU and Amendment 2015/863/EU, Directive 2012/19/EU, Regulation 519/2012 REACH SVHC and Directive 1907/2006/EC, and this passive product is not applicable to EMC Directive 2014/30/EU, LV Directive 2014/35/EU.Full text of EU DoC is available at https://community.musictribe.com/EU Representative: Music Tribe Brands DK A/SAddress: Ib Spang Olsens Gade 17, DK – 8200 Aarhus N, Denmark
Other important informationImportant information
- Register online.Please register your new Music Tribe equipment right after you purchase it by visiting musictribe.com. Registering your purchase using our simple online form helps us to process your repair claims more quickly and efficiently. Also, read the terms and conditions of our warranty, if applicable.
- Malfunction. Should your Music Tribe Authorized Reseller not be located in your vicinity, you may contact the Music Tribe Authorized Fulfiller for your country listed under “Support” at musictribe.com. Should your country not be listed, please check if your problem can be dealt with by our “Online Support” which may also be found under “Support” at musictribe.com. Alternatively, please submit an online warranty claim at musictribe.com BEFORE returning the product.
- Power Connections.Before plugging the unit into a power socket, please make sure you are using the correct mains voltage for your particular model. Faulty fuses must be replaced with fuses of the same type and rating without exception.
 report this ad
![]()
References
[xyz-ips snippet=”download-snippet”]