
Taotique WIFI Trail Camera
Warmly tips: Our Taotique trail camera have 365-days quality warranty, If you have any questions, please contact 24H after-sales with [email protected]
Warranty
Dear customer,Thanks for you「 9「eat support of Victure HC810 trail cameras. This product has a 12- MONTH warranty from the date of the purchase.
We persist in pursuing customer satisfaction as our purpose and make customers become our friends with high quality and excellent customer service. Since the trail camera sophisticated electronic product, if there is any QUESTION or SUGGESTION about this product, please feel free to contact.If you are satisfied with our products, we sincerely invite you to share some beautiful photos and videos to other consumers for reference.We hope this product can meet your needs and serve you for a long time!Best regards,Taotique Customer Support Team
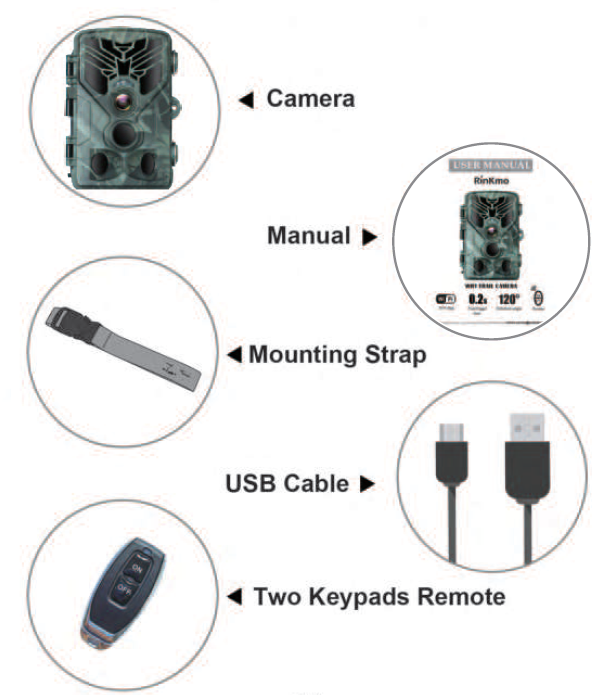
Packaging Including
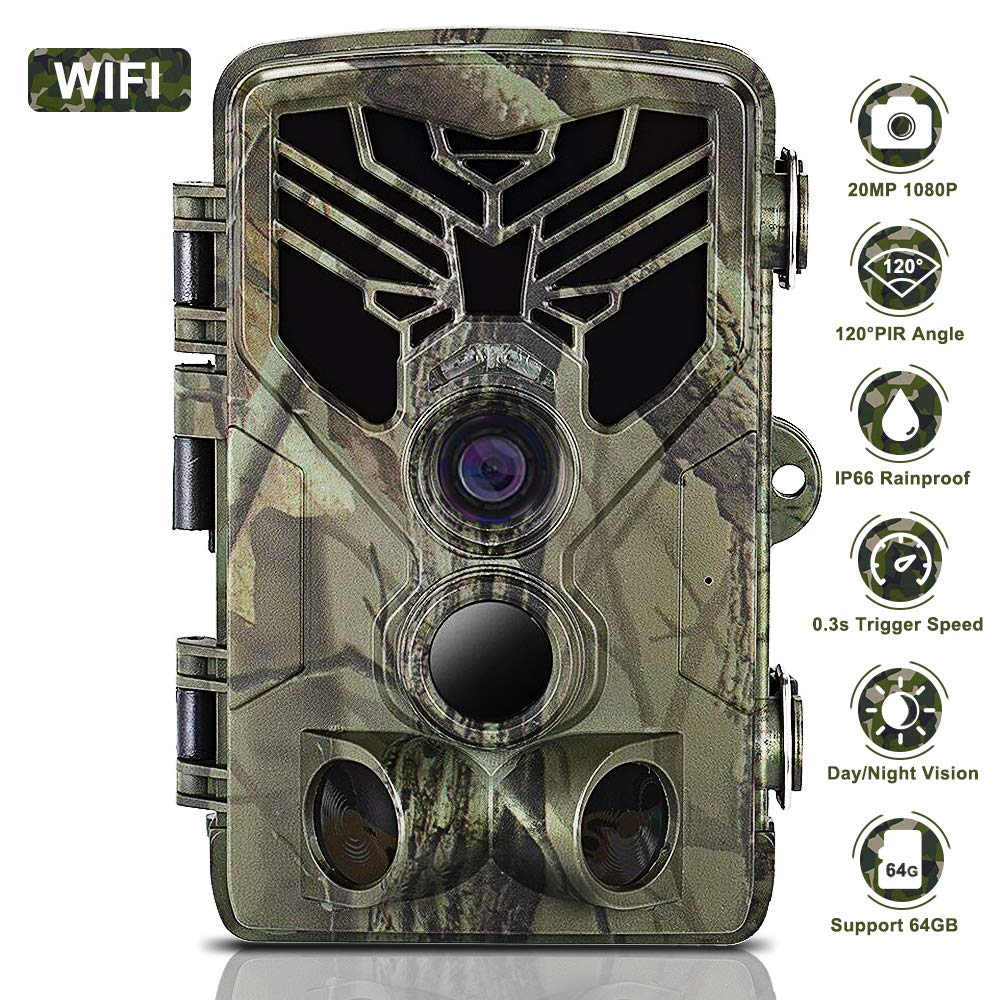
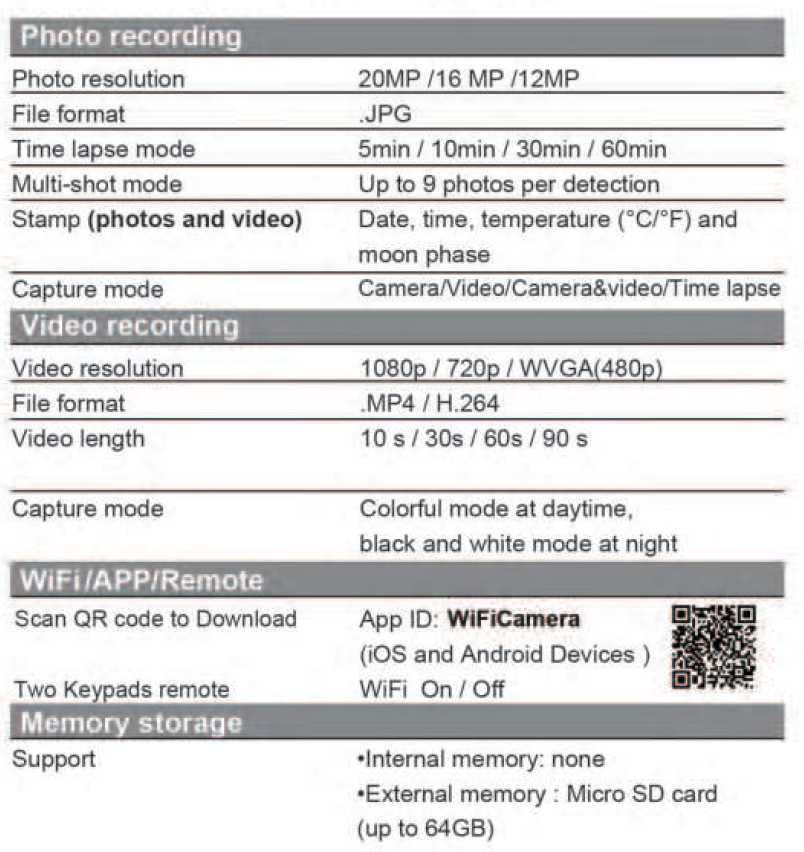
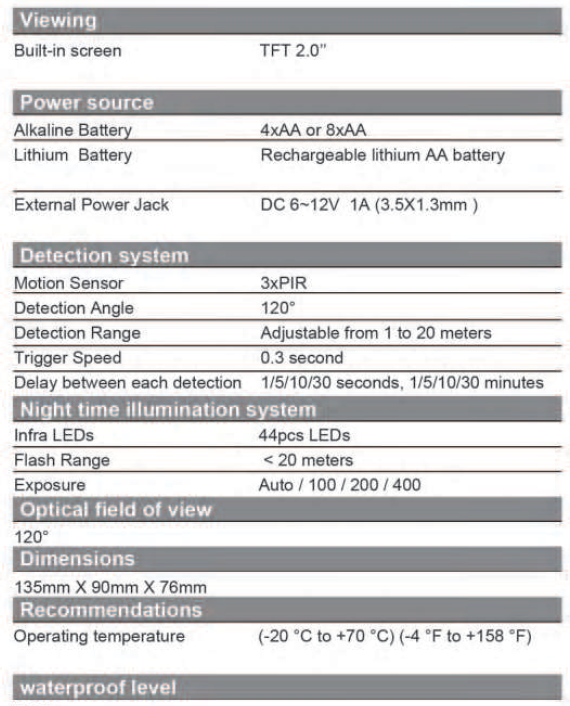
Specifications
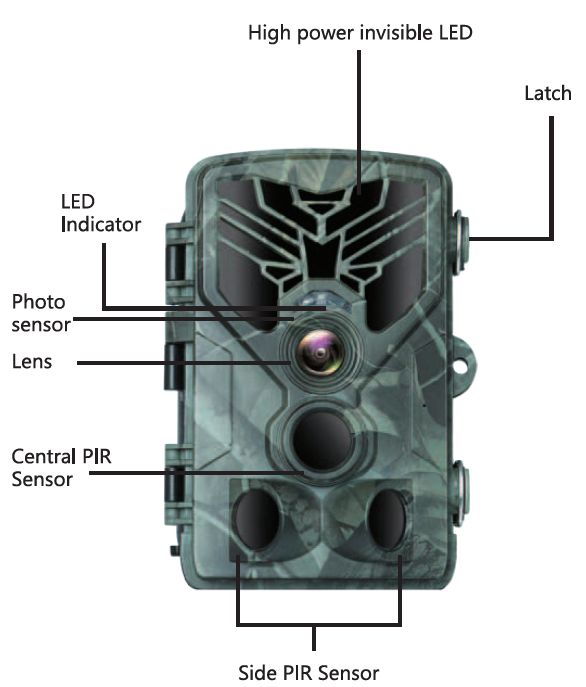
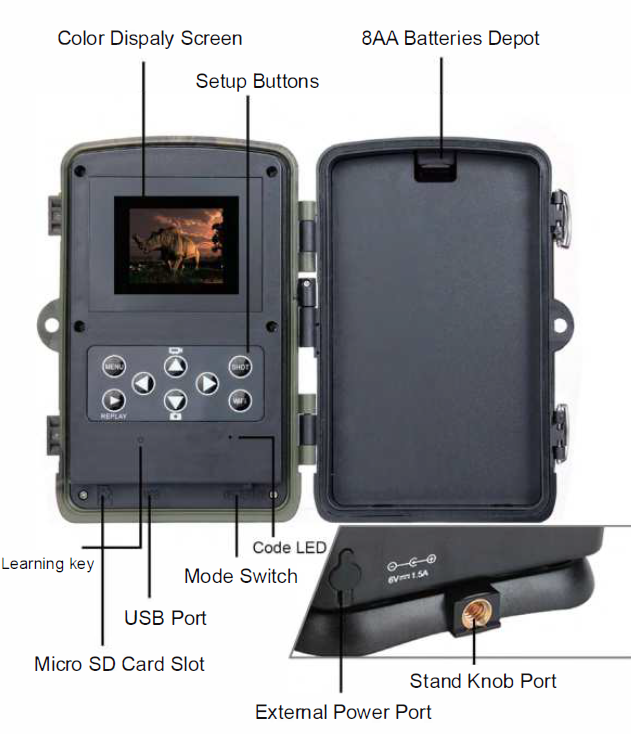
Overview
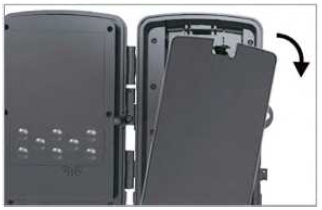
INSTALLING BATTERIES
If Using Batteries
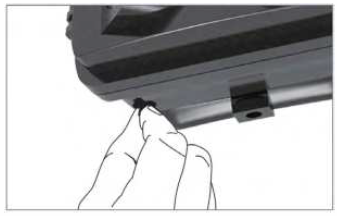
- Pull the gap lightly and open battery compartment.
- Reference the battery icons located on the inside of the battery compartment. inside of the batteries according to the positive and negative battery icons.
- Close the battery compartment to resist water and dust.
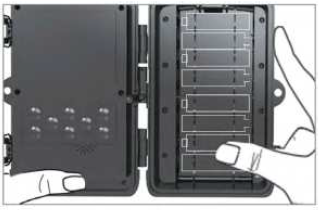 Close the battery compartment to resist water and dust.
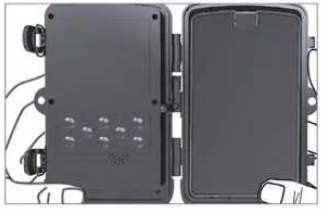
NOTE: Installing any of the 8-AA batteries in the wrong direction may cause the batteries to leak acid and could possibly explode, causing camera failure and damage to the battery compartment.
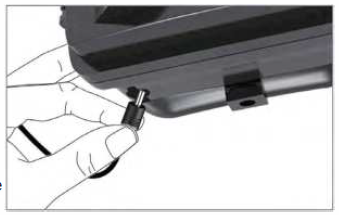
IF USING 6V DC POWER SOURCE
- Remove the rubber port cap at the bottom of the camera . Using a universal 6V DC cord, plug in to the bottom port option.
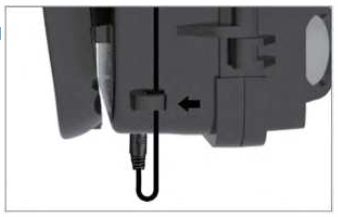
- Run the cord to the side of the camera where there is a hook provided behind the hinge of the camera door. This will support the power cord and take pressure off of the connection point
- When not in use, replace the rubber port cap at the bottom of the camera to protect the 6V DC universal plug-in port.
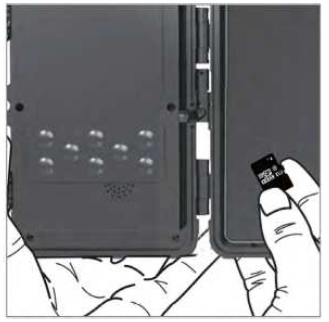
MEMORY CARD INSTALL
- Insert the Micro SD card with the contacts facing away. The Micro SD card should slide in freely with little resistance. Continue pressing the card inward until you hear a click. This means the Micro SD card is locked in place and ready for use.
- To remove Micro SD card, press the card inwards to release.

Enter to TEST mode
Slide the mode switch from OFF to TEST position to activate the camera and view the user setup screen.
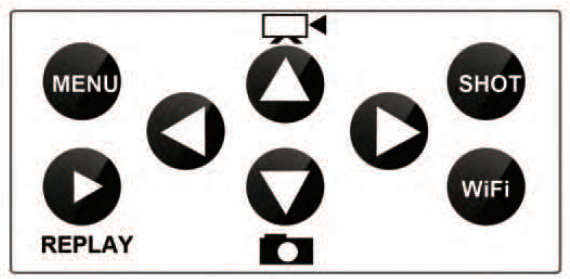
There is a control panel with 8 keys when you open the camera.
Operating Button
| Setup | Sub menu | Description |
|
Mode |
Camera, video, camera& video,Timelapse | Taking picture, video, picture and video, taking picture regular |
|
Resolution |
1080P,720P,WVGA(480P) |
Video Resolution |
|
Video Length |
10/30/60/90 Seconds |
Each Video max 90 sec, default 1Osec |
|
Record Audio |
Off, On |
Video With Sound |
| Setup | Sub Menu | Description |
| Image Size | 20MP/16MP/12MP | Image resolution |
| Interval | 1/5/10/30sec, 1/5/10/30Min | Max 30 minutes delay |
| Time Lapse
Sequcence |
5/10/30/60 minutes
1/3/6/9 pictures |
Take pie every 5min
Max 9 pies one shot |
| ISO | Auto/100/200/400 | Exposure level |
| PIR Sensitivity | High/Medium/Low | Adjust PIR sensitivity |
| Language | UK/FR/ES/RU/POR/IT/DE | languages |
| Frequency | 50Hz /60Hz | Screen refresh rate |
| Camera ID | CAMOOO | 6 numbers or letters |
| Password
Working Timer |
0仔/On
00:00:00 to 23:59:59 |
4 numbers
N/L |
| Date /Time | DD/MM/YY | N/L |
| For盯1at | Cancel I OK | Format memo叩card |
| Default Setting | Cancel I OK | Back to default |
| Version | V2.0 | Firmware Version |
QUESTION & ANSWER
1. How to download application?A: Open phone to scan the QR code then you can download the application.
2. How do I play the video on my phone in real time?A: Open application(Wificam) on your phone and launch wifi of your camera, connect the camera’s WI-FI and operate on your mobile app then you can play the video on your phone.
3. How to correctly use Micro-SD card when first open the camera?A: Micro SD card and battery are not included in the package. It is recommended to use a Micro SD card (Class 10, up to 64GB).When first use Rinkmo WI-FI trail camera, you need to insert the Micro-SD card(Not included) then open setting on your camera to format your Micro-SD card so that the camera can correctly recognizes the SD card.
4. How does the remote control pairing the camera?A: There is a small remote control key in the box, which is used to turn on/off camera’s WI-FI. Move the power switch to ‘TEST’ to turn on the camera, press the camera’s ‘learning key’ button(‘learning key’ can be seen from manual page-5), there will be a red flash light. At the same time press ‘ON’ on your remote control key till its red light appear same as the camera’s, that means the remote control key has connected to your camera successfully.
5. How is WI-FI works on Taotique WI-FI trail camera?A: Taotique WIFI A: First you need turn on WI-FI(press ‘WI-FI’ button on your trail camera or press ‘ON’ on your remote control key) Taotique WI-FI trail camera will generate WI-FI, just need open WI-FI setting on your phone to find that WIFI signal and connect it, default password is 12345678.
6. How to adjust camera photo/video resolution?A: You can adjust the photo/video resolution on both camera itself or on your Wificam application, you can find them in setting.
7. What system is this camera suitable for?A: Taotique WI-FI trail camera application(Wifi cam) suitable for all IOS/Android terminal.
8. What to do when the SD card is full?A: When Micro-SD card (Not included) is full, camera will re-record from the earliest. It will cover previous data. Please check the memory card in time to avoid miss important data.
9. Does this camera take photos and videos in the same series?A: Taotique WI-FI trail camera provide 4 shooting mode: Camera, Video, Camera and Video, Time lapse. You can choose from setting on camera itself. Only in camera and video model, they could work in the same time.
10. How to understand the 3 mode in PIR sensitivity?A: PIR sensitivity provide 3 mode: High, Medium, Low. When you choose ‘High’, sensing distance up to 20 meters, ‘Medium’ sensing distance up to 12 meters, ‘Low’ sensing distance up to 8 meters. Sensitivity will also be reduced.
11. What type of SD card suitable for this camera?A: Taotique WI-FI trail camera use Micro-SD card(Not included), maximum capacity is 64GB.
12. What format is the video saved?A: Video is in MP4 form, you can play it in most players.
13. What’s the maximum photos / videos can a 64GB memory card hold?A: 64GB SD card can maximally hold about 14000 20MP photos or 12 hours 1080P Video.
14. is the night video clear? How far will it work with the IR function?A: Yes, it is clear with night vision. Taotique trail camera equips 44 infrared flash beads, will be able to see animals clear in the range of 65ft / 20m, and the recording trigger speed is 0.2s. Make night time photos and videos clearer.
15. Is bluetooth available or wifi only ? how is it work?A: Taotique wifi trail camera is connect with phone’s wifi(hotspot), not wifi from router. WiFi only, no Bluetooth. You can adjust setting and check the photo /video on the phone directly.
16. Will video upload via wifi or need to collect from the sd card each time?A: Both ways are available, You can just download all videos on the camera app after your phone/ipad connect that wifi signal, and you can also take out the sd card and download through computer.
17. How close does your phone have to be to the camera to see the pics on it?A: Camera Wi-Fi connect with your phone effective distance: indoor about 10m, outdoor 12m.
18. Does the camera support external power source?A: Yes, you can use 6 volt DC for this camera, there is a power connector at the bottom, dedicated to the external power supply.Recommend using 8*1.5V AA (LR6) Alkaline batteries in this hunting camera to obtain maximum battery life.(Not included)
19. What scene is the camera suitable for?A: TaotiqueW I-FI trail camera mainly suitable for 4 scenes: Hunting, Wildlife monitoring, Farm monitoring, Home security. It is waterproof so you could use it outdoors.
20. How long is the camera warranty?A: Taotique WI-FI trail camera offers 30-day money back guarantee and a 12-month warranty. As our valued customer, you could now send your ODER ID to the following mail address: [email protected] to extend the warranty to 24-month.
[xyz-ips snippet=”download-snippet”]