TASCAM Multitrack Recording Console User Manual
Overview
The Model 12 has DAW control functions. By setting it to DAW control mode, its controls can be used for basic operation of the DAW application. This includes fader operation, muting, panning, soloing, recording, playing, stopping and other transport functions. Mackie Control and HUI protocol emulation are supported, soCubase, Digital Performer, Logic, Live, Pro Tools, Cakewalk and other major DAW applications can be controlled.
Trademarks
- TASCAM is a registered trademark of TEAC Corporation.
- Microsoft and Windows are either registered trademarks or trademarks of Microsoft Corporation in the United States and/or other countries.
- Apple and Mac are trademarks of Apple Inc. in the United States and other countries.
- Avid and Pro Tools are either registered trademarks or trademarks of Avid Technology, Inc. or its subsidiaries in the United States and/or other countries.
- Cubase are registered trademarks of Steinberg Media Technologies GmbH.
- Cakewalk is a registered trademark are trademarks of BandLab Technologies Inc.
- Other company names, product names and logos in this document are the trademarks or registered trademarks of their respective owners.
Preparing the unit
Audio when in DAW control mode
When in DAW control mode, only audio input through Model 12 channels 1-2 can be heard. Make the following settings as necessary.
- To control the DAW while listening to the DAW master audio through this unit, set the MODE switch for channels 1-2 on the Model 12 to “PC” and set the DAW master audio output to these channels.
- On the MTR/USB SEND POINT screen, set to any setting other than “PRE COMP” (default value). To send channel 1-2 LIVE input from this unit to the computer, set the MODE switch to “LIVE” (this disables monitoring of sound from the DAW).NOTE The state of the audio sent to the computer differs according to the MTR/USB SEND POINT screen setting. See “MTR/USB SEND POINT screen settings” on page 4 for details.
Connecting with a Computer
Refer to “Connecting a computer” in “3 – Preparation” of the Model 12 Owner’s Manual, and connect to a computer. Refer also to “12 – USB audio interface functions” and make settings.
Starting DAW control mode
- Set the channel 1-2 MODE switch on the Model 12 according to use.
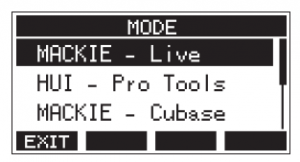
- When the Model 12 recorder is stopped, select DAW CONTROLLER on the MENU Screen, and open the MODE Screen. For operation instructions, see “Menu operation procedures” in “2 – Names and Functions of Parts” of the Owner’s Manual.
- Select the control mode for the DAW being used. For details about settings, see the manual of the DAW application being used. Options: MACKIE – Live, HUI – Pro Tools, MACKIE – Cubase, MACKIE – Cakewalk, MACKIE – Logic, MACKIE – DP
- Press the MULTI JOG dial. A confirmation message will appearNOTEPress the F1 NO button to return to the MODE Screen.
- Press the F4 button. This opens the DAW CONTROLLER screen and enables DAW operation.
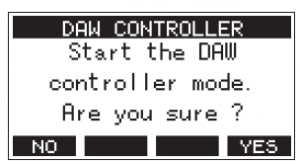 NOTEPress the F1 NO button to return to the MODE Screen.
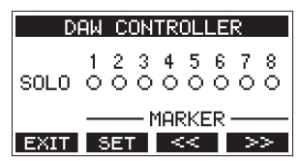
NOTE
- Immediately after connecting with the DAW as well as after settings have been made in the DAW, the DAW settings and the state and positions of the Model 12 buttons, knobs and faders will not match. In this case, adjust the DAW settings to match the Model 12 settings, or use the Model 12 buttons, knobs and faders to match the DAW settings.
- If the unit is turned off while in DAW control mode, it will still be in DAW control mode when restarted. To use it in ordinary mode, end DAW control mode with the F1 button.
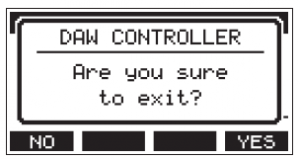
Ending DAW control mode
- Press the F1 EXIT button to open the following message.
- Press the F4 YES button to end DAW control.
MTR/USB SEND POINT screen settings
The audio sent by USB depends on the Model 12 MODE switch settings and the MTR/USB SEND POINT screen settings. For details about the MTR/USB SEND POINT screen settings, see “Selecting the positions that recording signals are sent from each channel” under “Mixer functions” in the “9 – Other functions” chapter of the Owner’s Manual.
MTR/USB SEND POINT |
COMP |
EQ |
MODE switch |
Audio sent to computer |
| PRE COMP | Disabled | Disabled | LIVEPCMTR | Sound from input jacks is sent.Sound from input jacks is sent.Sound from input jacks is sent. |
| POST COMP | Enabled | Disabled | LIVEPCMTR | Sound from input jacks is sentSound from computer is sent.No sound is sent. |
| POST EQ | Enabled | Enabled | LIVEPCMTR | Sound from input jacks is sent.Sound from computer is sent.No sound is sent. |
NOTERegardless of the above settings, COMP/EQ is enabled for sound from the computer.4 TASCAM
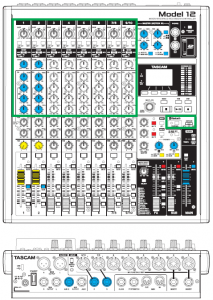
Mixer controls that can be used when in DAW control mode
The following Model 12 controls can be used when in DAW control mode.
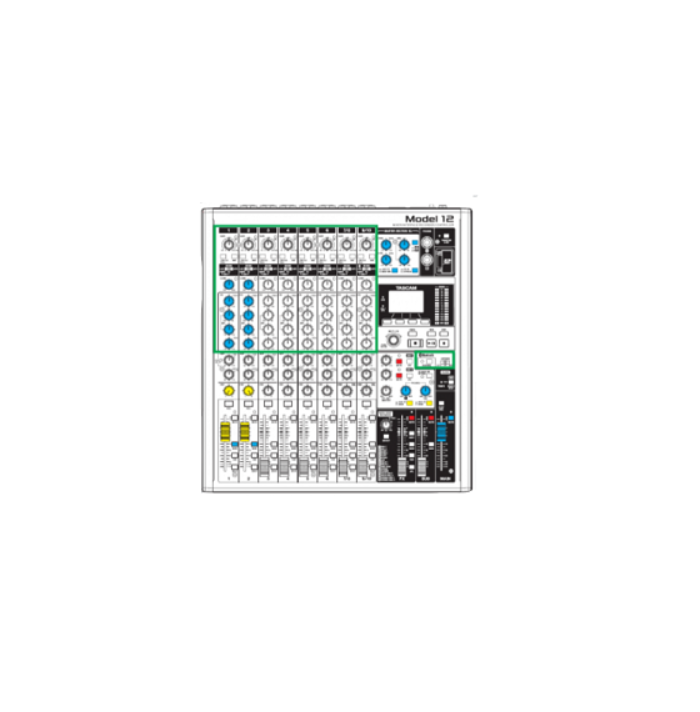
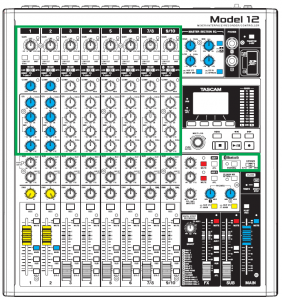
- The blue knobs, switches and faders in the illustration below are enabled.
| FX fader | This operates the DAW master fader. |
| MULTI JOG dial | This can be used for locating. |
| Function buttons | Their functions depend on what is shown on the DAW CONTROLLER screen.Press the MENU button to switch function button operations. |

DAW CONTROLLER MARKER screen

- Use the F2 SET button to set markers.
- Use the F3 << and F4 >> buttons to move between markers.
NOTE
The status of the DAW application SOLO switch is shown bythe SOLO item on the DAW CONTROLLER screen.–: SOLO switch off0: SOLO switch on
DAW CONTROLLER TRACK screen

- Press the F2 button to change the DAW repeat function.
- Use the F3 and F4 buttons to move among tracks that can be controlled.
ATTENTION
After changing the tracks that can be controlled, the DAW settings and the state and positions of the Model 12 buttons, knobs and faders will not match. In this case, adjust the DAW settings to match the Model 12 settings, or use the Model 12 buttons, knobs and faders to match the DAW settings.
Model 12 operations
USB audio input and output when in DAW control mode
When in DAW control mode, only audio input through Model 12 channels 1-2 can be heard. By setting Model 12 channels 1-2 as the outputs for the DAW master audio, the sound can be monitored with the Model 12 while operating the DAW. The following Model 12 controls can be used when in DAW control mode.
- The knobs, switches and buttons inside the green frame in the illustration below are enabled for sound sent to the computer.
- The blue knobs, switches and faders in the illustration below are enabled for sound from the computer.
- Regardless of operation, the red switches in the illustration below are always on
- Regardless of operation, the yellow knobs, switches and faders in the illustration below are fixed to the following settings for sound from the computer
| PAN knob (1-2) | Regardless of knob operation, channels 1 and 2 are always L and R, respectively. |
| Channel faders (1-2) | Regardless of fader operation, these are always 0 dB. |
| AUX 1/2/MAIN switches | Regardless of switch operation, these are always MAIN. |
NOTE
- If the unit is turned off while in DAW control mode, it will still be in DAW control mode when restarted.
- To use it in ordinary mode, end DAW control mode with the F1 EXIT button.
Making various DAW application settings
To enable the reception of messages from the DAW application, first put the Model 12 into DAW control mode and then set theDAW application.
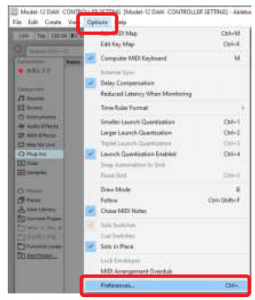
Live
WindowsThe following screens are from Live version 10.1.6.
- Click “Options” > “Preferences…”
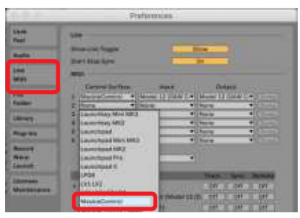
- Select the “Link MIDI” tab, and set the Control Surface to “Mackie Control”.
- Set the input to “Model 12 MIDI (Port2)”.
- Set the output to “Model 12 MIDI (Port2)”.
- The 8 button on the Model 12 will light, showing that remote control is enabled.


Making various DAW application settings
Mac
The following screens are from Live version 10.1.7.
- Click “Live” > “Preferences…”
- Select the “Link MIDI” tab, and set the Control Surface to “MackieControl”
- Set the input to “Model 12 MIDI (DAW Control IN)”.
- Set the output to “Model 12 (DAW Control OUT)”.The 8 button on the Model 12 will light, showing thatremote control is enabled.


 The 8
The 8 Making various DAW application settings
Pro Tools
The following screens are from Pro Tools12 Ultimate version 2019.12.
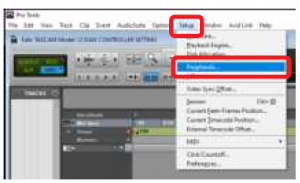
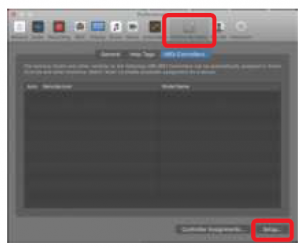
- Click “Setup” > “Peripherals…”
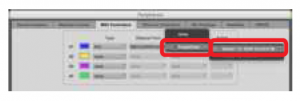
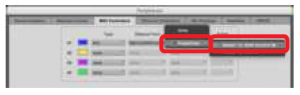
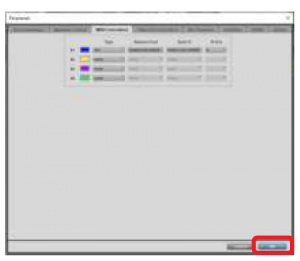
- Select the “MIDI Controllers” tab, and set the Type to “HUI”.
- Set Receive From to “MIDIIN2 (Model 12 MIDI)”. On a Mac, set it to “Model 12 MIDI DAW Control IN”.
- Set Send To to “MIDIOUT2 (Model 12 MIDI)”. On a Mac, set it to “Model 12 DAW Control OUT”.
- Click “OK”.The 8 button on the Model 12 will light, showing that remote control is enabled.

 The 8
The 8 Controls that can be used with the DAW
The following Model 12 controls can be used to operate the DAW application.
- F2 button (DAW CONTROLLER MARKER screen)
- F2 button (DAW CONTROLLER TRACK screen)
- F3 button (DAW CONTROLLER TRACK screen)
- F4 button (DAW CONTROLLER TRACK screen)
- MULTI JOG dial (locate function)
- buttons
- button
- button
- button
- PAN knobs (1-6, 7/8-9/10)
- REC buttons (1-6, 7/8-9/10)
- MUTE switches (1-6, 7/8-9/10)
- SOLO switches (1-6, 7/8-9/10)
- Channel faders (1-6, 7/8-9/10)
ATTENTION
Immediately after connecting with the DAW as well as after settings have been made in the DAW, the DAW settings and the state and positions of the Model 12 buttons, knobs and faders will not match. In this case, adjust the DAW settings to match the Model 12 settings, or use the Model 12 buttons, knobs and faders to match the DAW settings.TASCAM
Making various DAW application settings
Cubase
The following screens are from Cubase 10.5.
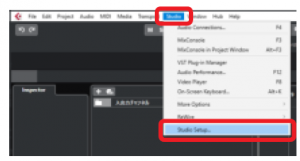
- Click “Studio” > “Studio Setup…”
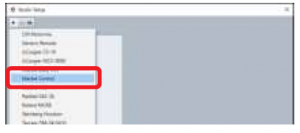
- Select Remote Devices and click the + at the top left of the window.
- Select “Mackie Control”.
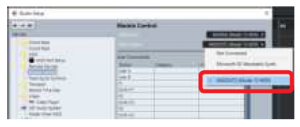
- Set the MIDI Input to “MIDIIN2 (Model 12 MIDI)”. On a Mac, set it to “Model 12 MIDI DAW Control IN”.
- Set the MIDI Output to “MIDIOUT2 (Model 12 MIDI)”. On a Mac, set it to “Model 12 DAW Control OUT”.
- Click “OK”.

 .
.

The ![]() button on the Model 12 will light, showing that remote control is enabled.
button on the Model 12 will light, showing that remote control is enabled.
Controls that can be used with the DAW
The following Model 12 controls can be used to operate the DAW application.
- F2 button (DAW CONTROLLER MARKER screen)
- F3 button (DAW CONTROLLER MARKER screen)
- F4 button (DAW CONTROLLER MARKER screen)
- F2 button (DAW CONTROLLER TRACK screen)
- F3 button (DAW CONTROLLER TRACK screen)
- F4 button (DAW CONTROLLER TRACK screen)
- MULTI JOG dial (locate function)
- buttons
- button
- button
- button
- PAN knobs (1-6, 7/8-9/10)
- REC buttons (1-6, 7/8-9/10)
- MUTE switches (1-6, 7/8-9/10)
- SOLO switches (1-6, 7/8-9/10)
- Channel faders (1-6, 7/8-9/10)
- FX fader (master fader control)
ATTENTION
Immediately after connecting with the DAW as well as after settings have been made in the DAW, the DAW settings and the state and positions of the Model 12 buttons, knobs and faders will not match. In this case, adjust the DAW settings to match the Model 12 settings, or use the Model 12 buttons, knobs and faders to match the DAW settings.
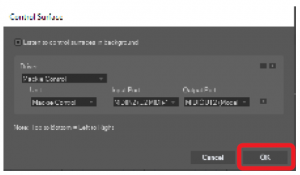
Cakewalk
The following screens are from Cakewalk version 2020.01.
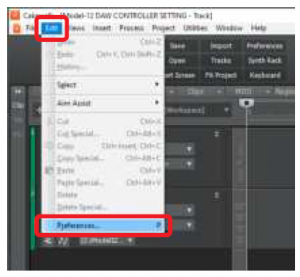
- Click “Edit” > “Preferences…”
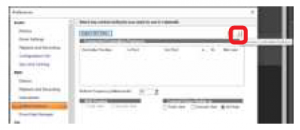
- Select “Control Surfaces”.
- Click the star mark at the top right of the window.
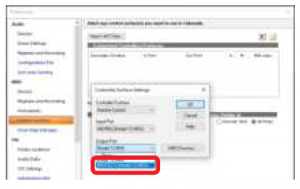
- Set the Controller/Surface to “Mackie Control”.
- Set the Input Port to “MIDIIN 2 (Model 12 MIDI)”.
- Set the Output Port to “MIDIOUT2 (Model 12 MIDI)”.
- Click “OK”.The button on the Model 12 will light, showing that remote control is enabled.


 The
The Making various DAW application settings
Controls that can be used with the DAW
The following Model 12 controls can be used to operate theDAW application.
- F3 button (DAW CONTROLLER MARKER screen)
- F4 button (DAW CONTROLLER MARKER screen)
- F2 button (DAW CONTROLLER TRACK screen)
- F3 button (DAW CONTROLLER TRACK screen)
- F4 button (DAW CONTROLLER TRACK screen)
- MULTI JOG dial (locate function)
- , buttons
- button
- button
- button
- PAN knobs (1-6, 7/8-9/10)
- REC buttons (1-6, 7/8-9/10)
- MUTE switches (1-6, 7/8-9/10)
- SOLO switches (1-6, 7/8-9/10)
- Channel faders (1-6, 7/8-9/10)
ATTENTION
Immediately after connecting with the DAW as well as after settings have been made in the DAW, the DAW settings and the state and positions of the Model 12 buttons, knobs and faders will not match. In this case, adjust the DAW settings to match the Model 12 settings, or use the Model 12 buttons, knobs and faders to match the DAW settings.
Logic Pro
The following screens are from Logic Pro X version 10.4.8.
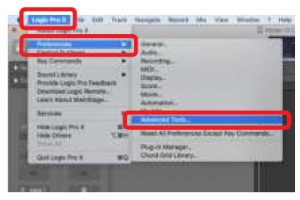
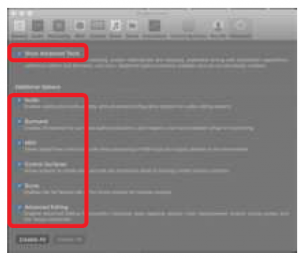
- Click “Logic Pro X” > “Preferences…” > “Advanced Tools…”
- Put checks in all the boxes.
- Select the “Control Surfaces” page, and click “Setup…”Making various DAW application settings
- Click “New” > “Install…”
- Select “Manufacturer: Mackie Designs” and “Model: Mackie Control”, and click “Add”.
- For Device: Mackie Control, set the Output Port to “Model 12 DAW Control OUT”.
- For Device: Mackie Control, set the Input Port to “Model 12 DAW Control IN”.
- The button on the Model 12 will light, showing that remote control is enabled.
 Making various DAW application settings


Controls that can be used with the DAW
The following Model 12 controls can be used to operate the DAW application.
- F2 button (DAW CONTROLLER TRACK screen)
- F3 button (DAW CONTROLLER TRACK screen)
- F4 button (DAW CONTROLLER TRACK screen)
- MULTI JOG dial (locate function)
- buttons
- button
- button
- button
- PAN knobs (1-6, 7/8-9/10)
- REC buttons (1-6, 7/8-9/10)
- MUTE switches (1-6, 7/8-9/10)
- SOLO switches (1-6, 7/8-9/10)
- Channel faders (1-6, 7/8-9/10)
- FX fader (master fader control)
ATTENTION
Immediately after connecting with the DAW as well as after settings have been made in the DAW, the DAW settings and the state and positions of the Model 12 buttons, knobs and faders will not match. In this case, adjust the DAW settings to match the Model 12 settings, or use the Model 12 buttons, nobs and faders to match the DAW settings.
DP (Digital Performer)
The following screens are from Digital Performer 10.1.
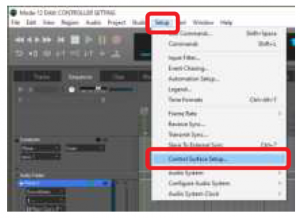
- Select “Setup” > “Control Surface Setup…”
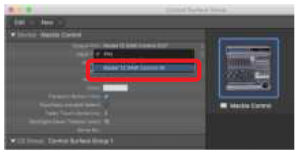
- Click the + at the right side of the window
- Set the Unit to “Mackie Control”.
- Set the Input Port to “MIDIIN2 (Model 12 MIDI)”. On a Mac, set it to “Model 12 MIDI DAW Control IN”.
- Set the Output Port to “MIDIOUT2 (Model 12 MIDI)”. On a Mac, set it to “Model 12 DAW Control OUT”.
- Click “OK”.


The ![]() button on the Model 12 will light, showing that remote control is enabled.
button on the Model 12 will light, showing that remote control is enabled.
Controls that can be used with the DAW
The following Model 12 controls can be used to operate the DAW application.
- F3 button (DAW CONTROLLER MARKER screen)
- F4 button (DAW CONTROLLER MARKER screen)
- F2 button (DAW CONTROLLER TRACK screen)
- F3 button (DAW CONTROLLER TRACK screen)
- F4 button (DAW CONTROLLER TRACK screen)
- , buttons
- button
- button
- button
- REC buttons (1-6, 7/8-9/10)
- MUTE switches (1-6, 7/8-9/10)
- SOLO switches (1-6, 7/8-9/10)
- Channel faders (1-6, 7/8-9/10)
- FX fader (master fader control)
ATTENTION
Immediately after connecting with the DAW as well as after settings have been made in the DAW, the DAW settings and the state and positions of the Model 12 buttons, knobs and faders will not match. In this case, adjust the DAW settings to match the Model 12 settings, or use the Model 12 buttons, knobs and faders to match the DAW settings.
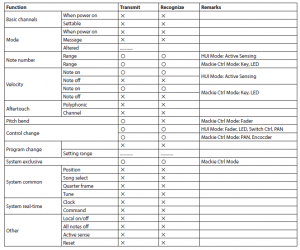
MIDI Implementation Chart DAW Control ports
TASCAM
TEAC CORPORATIONPhone: +81-42-356-91431-47 Ochiai, Tama-shi, Tokyo 206-8530 Japan https://tascam.jp/jp/
TEAC AMERICA, INC.Phone: +1-323-726-030310410 Pioneer Blvd. Suite #1 Santa Fe Springs, California 90670, U.S.A. https://tascam.com/us/
TEAC UK Ltd.Phone: +44-1923-797205Meridien House, Ground Floor,69 – 71, Clarendon Road, Watford, Hertfordshire, WD17 1DS, United Kingdom https://www.tascam.eu/en/
TEAC EUROPE GmbHPhone: +49-611-71580Bahnstrasse 12, 65205 Wiesbaden-Erbenheim, Germany https://www.tascam.en/de/
TEAC SALES & TRADING(SHENZHEN) CO., LTDPhone: +86-755-88311561~2Room 817, Xinian Center A, Tairan Nine Road West, Shennan Road, Futian District, Shenzhen, Guangdong Province 518040, China https://tascam.cn/cn/
Read More About This Manual & Download PDF:
References
[xyz-ips snippet=”download-snippet”]