tc electronic NONLIN2 NATIVE Stereo Effect Reverb

Important Safety Instructions
|
|
 Terminals marked with this symbol carry electrical current of sufficient magnitude to constitute risk of electric shock.Use only high-quality professional speaker cables with ¼” TS or twist-locking plugs pre-installed. All other installation or modification should be performed only by qualified personnel.
This symbol, wherever it appears, alerts you to the presence of uninsulated dangerous voltage inside the enclosure – voltage that may be sufficient to constitute a risk of shock.
 This symbol, wherever it appears, alerts you to important operating and maintenance instructions in the accompanying literature. Please read the manual.
CautionTo reduce the risk of electric shock, do not remove the top cover (or the rear section). No user serviceable parts inside. Refer servicing to qualified personnel.
CautionTo reduce the risk of fire or electric shock, do not expose this appliance to rain and moisture. The apparatus shall not be exposed to dripping or splashing liquids and no objects filled with liquids, such as vases, shall be placed on the apparatus.
CautionThese service instructions are for use by qualified service personnel only. To reduce the risk of electric shock do not perform any servicing other than that contained in the operation instructions. Repairs have to be performed by qualified service personnel.
- Read these instructions.
- Keep these instructions.
- Heed all warnings.
- Follow all instructions.
- Do not use this apparatus near water.
- Clean only with dry cloth.
- Do not block any ventilation openings. Install in accordance with the manufacturer’s instructions.
- Do not install near any heat sources such as radiators, heat registers, stoves, or other apparatus (including amplifiers) that produce heat.
- Do not defeat the safety purpose of the polarized or grounding-type plug. A polarized plug has two blades with one wider than the other. A grounding-type plug has two blades and a third grounding prong. The wide blade or the third prong are provided for your safety. If the provided plug does not fit into your outlet, consult an electrician for replacement of the obsolete outlet.
- Protect the power cord from being walked on or pinched particularly at plugs, convenience receptacles, and the point where they exit from the apparatus.
- Use only attachments/accessories specified by the manufacturer.
- Use only with the cart, stand, tripod, bracket, or table specified by the manufacturer, or sold with the apparatus. When a cart is used, use caution when moving the cart/apparatus combination to avoid
 injury from tip-over
 - Unplug this apparatus during lightning storms or when unused for long periods of time.
- Refer all servicing to qualified service personnel. Servicing is required when the apparatus has been damaged in any way, such as power supply cord or plug is damaged, liquid has been spilled or objects have fallen into the apparatus, the apparatus has been exposed to rain or moisture, does not operate normally, or has been dropped.
- The apparatus shall be connected to a MAINS socket outlet with a protective earthing connection.
- Where the MAINS plug or an appliance coupler is used as the disconnect device, the disconnect device shall remain readily operable.
- Correct disposal of this product: This symbol indicates that this product must not be disposed of with household waste, according to the WEEE Directive (2012/19/EU) and your national law. This product should be taken to a collection center licensed for the recycling of waste electrical and electronic equipment (EEE). The mishandling of this type of waste could have a possible negative impact on the environment and human health due to potentially hazardous substances that are generally associated with EEE. At the same time, your cooperation in the correct disposal of this product will contribute to the efficient use of natural resources.For more information about where you can take your waste equipment for recycling, please contact your local city office, or your household waste collection service.
- Do not install in a confined space, such as a book case or similar unit.
- Do not place naked flame sources, such as lighted candles, on the apparatus.
- Please keep the environmental aspects of battery disposal in mind. Batteries must be disposed-of at a battery collection point.
- This apparatus may be used in tropical and moderate climates up to 45°C
 injury from tip-over
 Correct disposal of this product: This symbol indicates that this product must not be disposed of with household waste, according to the WEEE Directive (2012/19/EU) and your national law. This product should be taken to a collection center licensed for the recycling of waste electrical and electronic equipment (EEE). The mishandling of this type of waste could have a possible negative impact on the environment and human health due to potentially hazardous substances that are generally associated with EEE. At the same time, your cooperation in the correct disposal of this product will contribute to the efficient use of natural resources.For more information about where you can take your waste equipment for recycling, please contact your local city office, or your household waste collection service.
LEGAL DISCLAIMER
Music Tribe accepts no liability for any loss which may be suffered by any person who relies either wholly or in part upon any description, photograph, or statement contained herein. Technical specifications, appearances and other information are subject to change without notice. All trademarks are the property of their respective owners. Midas, Klark Teknik, Lab Gruppen, Lake, Tannoy, Turbosound, TC Electronic, TC Helicon, Behringer, Bugera, Oberheim, Auratone, Aston Microphones and Coolaudio are trademarks or registered trademarks of Music Tribe Global Brands Ltd. © Music Tribe Global Brands Ltd. 2021 All rights reserved.
LIMITED WARRANTY
For the applicable warranty terms and conditions and additional information regarding Music Tribe’s Limited Warranty, please see complete details online at musictribe.com/warranty.
Introduction
Congratulations on the purchase of your NONLIN2 NATIVE stereo effects reverb.Originally launched in 1999 and available in Music, Mastering, Broadcast and Film variants, TC Electronic’s Flagship System 6000 processor is recognized as an industry standard for mix, mastering and post-production applications. You will find the System 6000 in literally thousands of world-leading recording, film, post and mastering studios all over the world, and in quite a few OB vans and broadcast production studios as well. The platform has won no less than three of the prestigious TEC Awards over the years: in 2000 for the original System 6000, in 2005 for Mastering 6000 and in 2010 for System 6000 MKII. No longer the preserve of the recording elite, these native DAW plugins will deliver all of the performance of the iconic original unit combined with modern day convenience.TC Electronic set about re-imagining the legendary System 6000 as native DAW plug-ins, without sacrificing any performance, character or useability. The Danish engineers, including many from the original System 6000 team, refined audio quality whilst staying faithful to the original hardware version. The development team fastidiously re-engineered these new native plug-ins to offer full support for standard DAW automation and project recall with new optimized user interface ergonomics.
NONLIN2 NATIVE Main Features
- Envelope functionality for generating untriggered gated reverb
- Unique ‘twist’ feature can radically alter the sound
NONLIN2 NATIVE is a unique effected reverb with controllable envelope, attack and release. Capable of generating compact vocal ambience, dramatic larger-than-life 80’s drum and percussion sounds, reverse reverb, and completely Twisted effects, and that famous classic – the gated reverb! Are you looking for signature sound, this is it!
Compared to typical effect reverbs from the past, NONLIN2 NATIVE features a longer and more diffused response with higher resolution, and classic low density processing is also available, but the fun really starts with the Twist parameter. Twist radically alters the sound often in weird ways. Adding twist may not always be pretty but the parameter truly is a new spice included to spark imagination, add character and completely transform any source sound. Proceed with caution!
From mono to stereo and anywhere in between, you have full control of NONLIN2 NATIVE output, fully adjustable Hi and Low-cut filters help sculpture unique sounds, especially useful for keeping heavily Twisted processing under control. Independent input and output levels also help contain headroom to avoid overloading the outputs if extreme Style and Twist settings are used.
NONLIN2 NATIVE is perfectly suited for a wide range of reverb styles from vocals to Special FX, especially when extreme character is required. NONLIN2 NATIVE is also equally suitable for use with a wide variety of content material in music and post-production, ideal for single sources and buses.
TC Electronic wishes you all the best, and we hope that you will enjoy the NONLIN2 NATIVE in your audio projects.
About this manualRead this manual to learn how to install and use your TC Electronic NONLIN2 NATIVE plug-in. This manual is only available in PDF format from the TC Electronic website. To get the most from this manual, please read it from start to finish, or you may miss important information.
To download the most current version of this manual, visit the web page: www.tcelectronic.com/Categories/c/Tcelectronic/Downloads
If you still have questions about your TC Electronic product after reading its manual, please get in touch with TC Support: www.tcelectronic.com/brand/tcelectronic/support
Plug-in Installation
The NONLIN2 NATIVE plug-in installer can be downloaded from the following page: https://www.tcelectronic.com/p/P0ED7
The NONLIN2 NATIVE plug-in requires an active PACE iLok license to work. See Chapter 3.
Save the installer file (.pkg or .msi file) in a convenient location on your hard drive.
Installation on a PC
Double click the installer (.msi file). If you get a security warning, click ‘Run’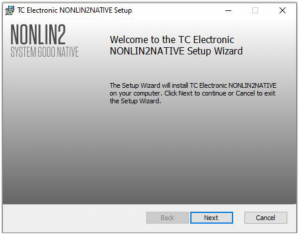
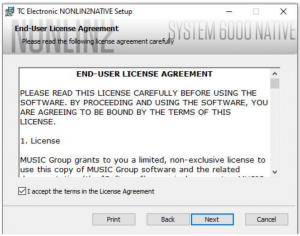
Accept the license agreement and click ‘Next’.
Select which VST and/or AAX components you want to install. Pro Tools uses AAX and most other DAW programs use VST. The installer will offer a default location to save the file, but you can choose another location by clicking the ‘Browse’ button.
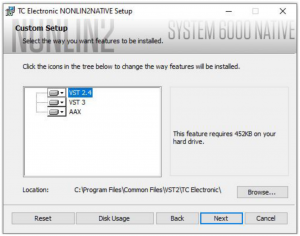
Click ‘Next’ to begin the installation. When installation is complete, click ‘Finish’.
Note: If your DAW fails to detect the newly installed plugin, this can often be fixed by adding the following paths to the Plug-in Manager (or similar) of the DAW. The default paths on a PC are “C:\Program Files\Common Files\VST2” and “C:\Program Files\Common Files\VST3” for VST2 and VST3, respectively.
Installation on a Mac
Double click the installer (.pkg) file.
Proceed through the prompts to begin installation.
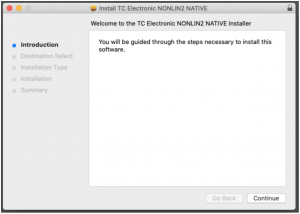
Click ‘Continue.’
A default location will be selected for installation, or you can select another folder manually. If you have administrator authorization in place, you will need to enter your password before beginning installation.
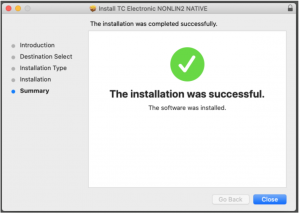 Click ‘Close’ when done.
Activate the NONLIN2 NATIVE iLok license
Activation
Step 1: Install iLokThe first step is to create an iLok user account at www.iLok.com and install the PACE iLok License Manager on your computer if it’s your first time using iLok.
Step 2: ActivationIn the received mail when buying the NONLIN2 NATIVE, you will find your personal Activation Code. To activate your software, please use the “Redeem an Activation Code” feature in the PACE iLok License Manager.
Get a Free Demo License
Make use of this hassle-free offer to try out our plug-ins before you buy
- 14-Day Trial Period
- Fully Functional
- No Feature Limitations
- No Physical iLok Key Needed
Step 1: Install iLokThe first step is to create a free iLok user account at www.iLok.com and install the PACE iLok License Manager on your computer if it is your first time using iLok.
Step 2: Get your free trial licenseGo to: https://www.tcelectronic.com/brand/tcelectronic/free-trial-nonlin2-native and enter your iLok User ID.
Step 3: ActivationActivate your software in the PACE iLok License Manager.
Connection and Setup
Inserting the NONLIN2 NATIVE plug-in into your DAW project
Once you have downloaded the plug-in, you can now apply it to a channel in your DAW to begin using the effect. This process may vary slightly depending on your software, but generally should require these steps:
- Select a channel or bus in your DAW to which you would like to add the effect. Access the mixer page where you should see a section dedicated to effect slots.
- Open the menu where you can select from a list of effect types, which probably includes many stock plug-ins that are included with the DAW. There should be submenu to view general VST/AU/AAX options.
- The plug-in will likely be found in a dedicated TC Electronic folder. Select the NONLIN2 NATIVE and it will now be added to the signal chain.
Double click on the effect slot that contains NONLIN2 NATIVE to view the plug-in UI.
Operating the NONLIN2 NATIVE
After you have installed the plug-in, and activated the iLok license, you can begin working with the plug-in on your tracks.
Adjustments to the effect are done using the plug-in user interface:

Most DAWs offer the ability to move or drag plug-ins from one track/bus to another, and NONLIN2 NATIVE supports this as well.
Most DAWs also feature an on/off switch for plug-ins, accessible inside the plug-in window and/or the track itself.
Insert vs Aux Effect
The NONLIN2 NATIVE can be used as an insert directly on a channel, sub mix bus or master bus, or as a send/return effect on an auxiliary bus.
When using the send/return method, make sure to remove the dry signal by turning the Dry Gain all the way to OFF. Note that all of the factory presets are made for the insert case, so we recommend using the lock button on the Dry Gain parameter to avoid adding the Dry signal when loading presets.
Mono/Stereo Operation
In the case of a mono out instance, the output signal is made by outputting the left plug-in channel only. In this case, panning should not be used.
For a mono-to-mono instance, the Width parameter will not change the signal.
Bypass
Press the BYPASS button at the top to bypass or engage the NONLIN2 NATIVE.
Automation
Please be aware that automation of certain parameters, can cause audible artifacts.
In case you need to automate these parameters, you should take care that changes only take place in parts where no audio is sent to the plug-in.
Parameter Overview
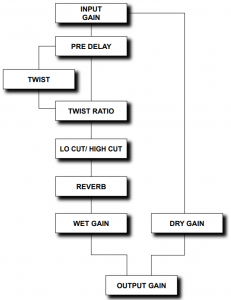
The NONLIN2 NATIVE is a stereo effects reverb algorithm. The algorithm contains:
- Amplitude envelope
- Unique style and ‘twist’ modification options
- The NONLIN2 NATIVE will run at sample rates up to 192kHz
Signal flow through the algorithm
User Interface
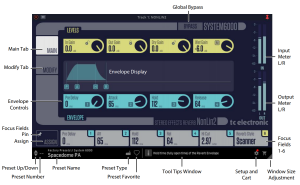
Overview
There are two tabs along the left edge of the interface, that bring up the two pages of controls. As a general note, the parameters, controls, and graphs are color-coded as shown below:
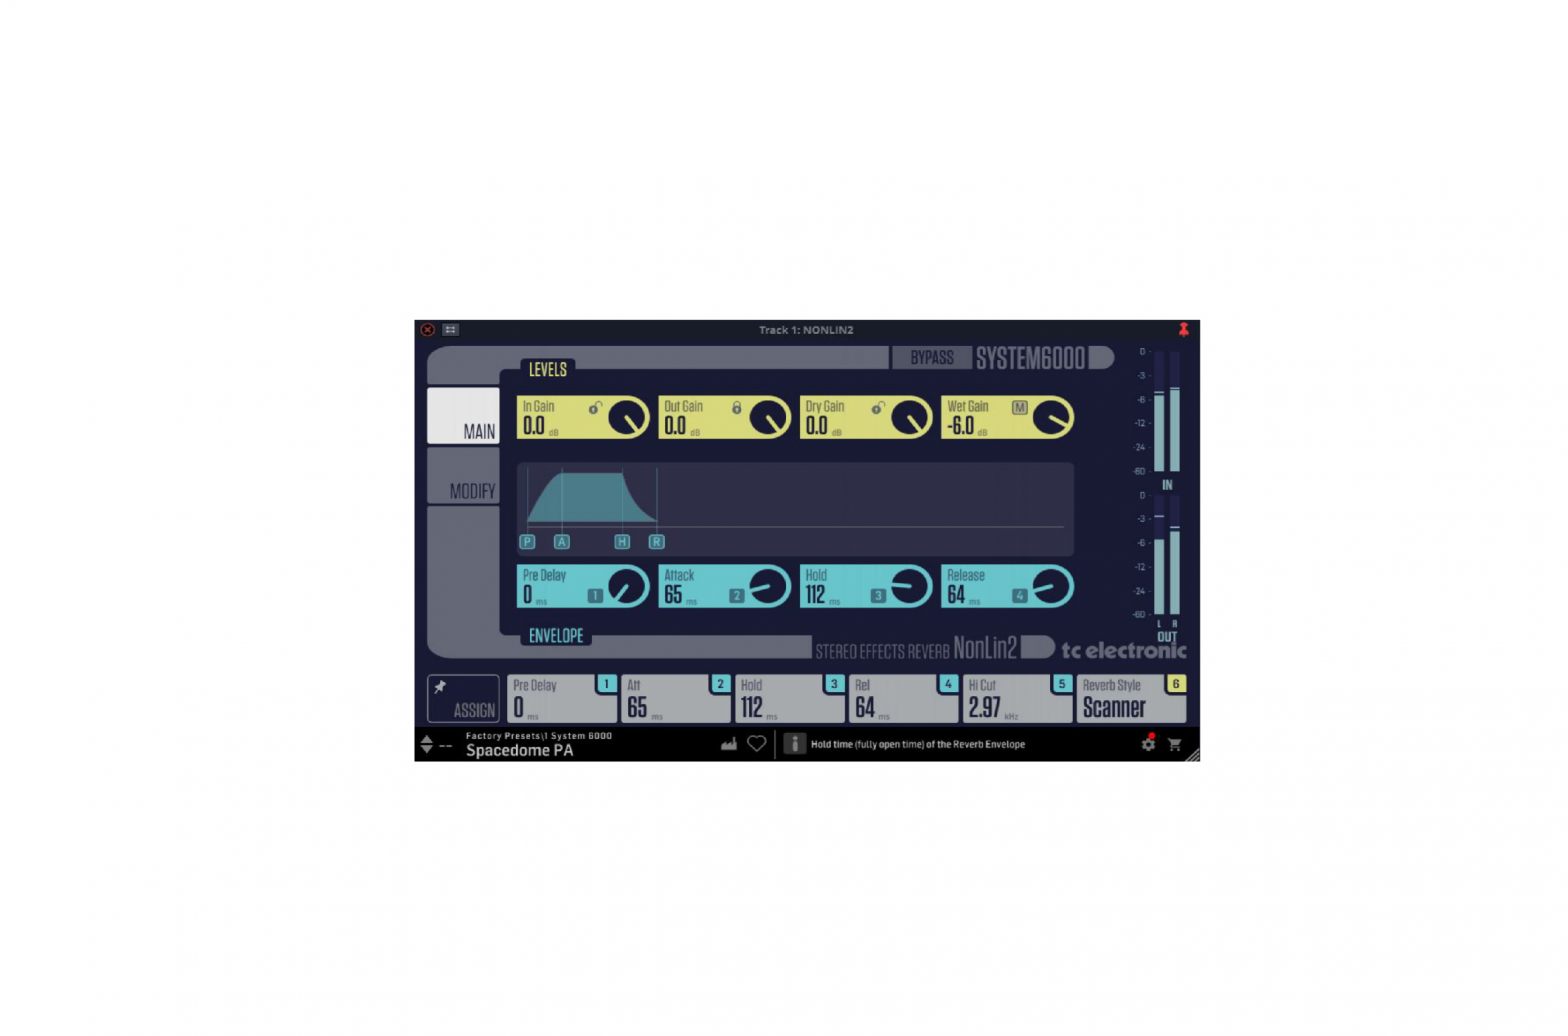
The top part of the display:
- Bypass: Press this to bypass or engage the NONLIN2 NATIVE. This makes it easy for you to listen and compare the overall effect of your awesome work
Tabs on the Left
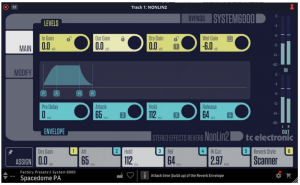
- Main: This brings up controls (yellow) for the input gain, output gain, dry gain, wet gain (yellow), and controls (blue) and graphic envelope display for the release envelope
- Modify: This brings up controls (yellow) for reverb/twist , and controls (blue) for filter/width
Controls
- Any of the circular controls can be adjusted either by dragging on the dials or numeric value in the box, or by double-clicking and entering a numeric value.
Meters
- Input L/R meters (0 to -60 dB range)
- Output L/R meter (0 to -60 dB range)
- Use the input and output gain controls in the MAIN page to adjust the levels if required.
Near the Bottom
- Assign Focus Fields: You can place your own favorite set of parameters in the 6 focus fields. (See section 5.2.1 for more details)
Along the Bottom Left
- Preset number, preset name, preset type, preset favorite, preset up/down
Along the Bottom Middle
- Tool Tips shows useful information about the current selection
Bottom Right Corner:
- Setup
- Shopping cart
- User Interface size adjustment
The controls and features are described in more detail in the following pages
Main Page
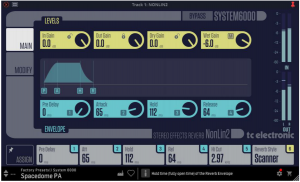
Levels (yellow controls) In GainRange: OFF, -119.5 to 0 dB<-60 dB in 0.5 dB steps>-60 dB in 0.1 dB stepsThe Input Gain is the first gain stage in the plugin, used to adjust the overall level of the input signal.
The small “lock” icon allows you to keep the setting, even when new presets are loaded. The lock icon also appears on the Out Gain, and Dry Gain.
Out GainRange: OFF, -119.5 to 0 dB<-60 dB in 0.5 dB steps>-60 dB in 0.1 dB stepsThe Output Gain is the last gain stage in the plugin, used to adjust the overall level of the output signal.
Dry GainRange: OFF, -119.5 to 0 dB<-60 dB in 0.5 dB steps>-60 dB in 0.1 dB stepsAdjust the gain level of the unprocessed signal as it enters the output stage.
Wet GainRange: OFF, -119.5 to 0 dB<-60 dB in 0.5 dB steps>-60 dB in 0.1 dB stepsAdjust the gain level of the processed signal as it enters the output stage. Adjust this relative to the Dry Gain.The small “M” icon allows you to quickly mute the Wet signal for comparison.
Envelope (blue controls)Pre DelayRange: 0 to 500 ms in 1 ms stepsPre Delay time of the reverb envelope. Pre Delay offsets the timing of the reverb relative to the dry signal. It is typically used to obtain depth and definition in a mix, or align the effect with a musical beat. Delays in the 10 to 40 ms range can be considered for percussive sounds, while dense vocal slap effects could use 70 to 150 ms of Pre Delay.
AttackRange: 0 to 490 ms in 1 ms stepsAttack time (build up) of the reverb envelope.The build up time is the time the reverb tail needs to get to the maximum level.NOTE: The maximum attack time depends on the Hold and Release settings: The total time for Attack, Hold and Release cannot be higher than 500ms
HoldRange: 10 to 500 ms in 1 ms stepsHold time (fully open time) of the reverb envelope. The “fully open” time is the time the reverb tail maintains its maximum level. For a typical eighties style response, Hold should be set at 60-120 ms.NOTE: The maximum Hold time depends on the Attack and Release settings.
ReleaseRange: 0 to 490 ms in 1 ms stepsRelease time (decay) of the reverb envelopeThis is the time the reverb tail needs to disappear and is causing the “gated” effect. For a typical eighties style response, Release should be set at 0-100 ms. The most gated and unnatural effect is obtained at short Release settings.NOTE: The maximum Release time depends on the Attack and Hold settings.
Envelope Display
The envelope display shows a graphical representation of the reverb envelope, with time on the horizontal axis, vs amplitude on the vertical axis. The envelope shape will vary as the four controls are adjusted. Each of the four parameters can also be adjusted using the small square handles below the graph.
Note that the limit for Attack time + Hold time + Release time is 500 ms maximum, so if any adjustments are made that would tend to make this longer, the time of the other controls is automatically decreased.
Pre DelayAs the pre delay control is adjusted, the envelope is delayed in time, and the graph appears to move to the right. The envelope is shaded, but an outline of its original position is left behind.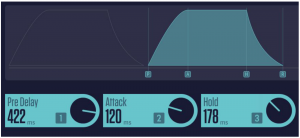
Attack TimeThe attack time is the time it takes to reach the Hold level.The slope at the start of the reverb envelope is steep for small attack times.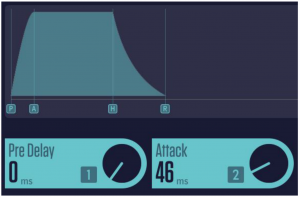
Hold TimeAs the Hold time is increased, the length in this area of the graph increases.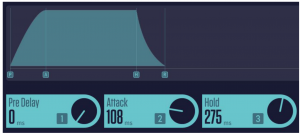
Release TimeAs the Release time is increased, the slope at the end of the envelope decreases.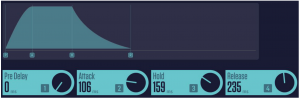
Focus Fields
Each of the six Focus Fields along the bottom can be assigned to any of the available controls. These useful assignments remain visible when you switch to a different page. For example, you can adjust the release envelope controls while you are on the Modify page.![]()
Click on ASSIGN in the lower left, and you will notice that the control knobs will become blank. (This is a good reminder that you are in ASSIGN mode.) Click and drag any of the controls and drop it down onto the desired Focus Field 1 to 6. You can also click the desired focus field and then click the control to assign to it.When finished assigning, select the ASSIGN button again.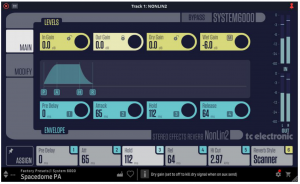
Click on the PIN Icon inside the ASSIGN button, and the Assigned Focus Fields will remain when presets are changed. The numeric values within the Focus Fields will change to the new preset values.

In the example below, Focus Field 1 has become Dry Gain level by dragging the control down and releasing it over the Focus Field 1 button. It will stay like this, even when you move to the Modify page.
When a control is assigned to a Focus Field, its number will appear within the control. In this example, there is a “1” in Dry Gain, as it is assigned to Focus Field 1.

Modify Page
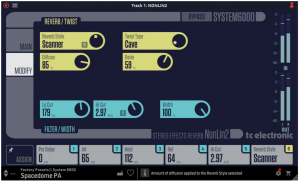
Reverb/Twist (yellow controls)
Reverb StyleOptions: NonLin Classic, NonLin A, Nonlin B, Nonlin Wide, Mono to Stereo,Sustained, Smooth A, Smooth B, Panner, Scanner, Box, Hollow, Wild, Live, Small Ambience, Air Ambience, Rough, Gated, Explode, NonLin Decayed
This selects the main reverb style, which you can modify using Twist Type and the reverb envelope controls.
Different Styles have different features with regards to density, diffusion type, spectral response, stereo image etc. Choose one that suits your program material.
Differences are more pronounced with low Diffuse settings and Twist Ratios.
Twist TypeOptions: Aircon, Box, Cave, Chicken, Digital, Guts, Hot Air, Kazoo, Levitate, Moony, Mouth, Muffled, Next Door, Radiator, Spaceship, Synthetic, Tunnel, Ventilation, Woody, Woolly
This selects the type of effects treatment to be used on the reverb. (These titlesare arranged in alphabetical order.)
The Twist Type should be regarded as a spice capable of sparking imagination in the mix process. Try the effect on all sorts of different sources to add character or make them stand out.
If spectral shaping using the Twist parameters get out of control, the Lo and Hi cuts can be used to stay within limits.
When the Twist Ratio is set at 0 %, Twist Type has no effect.
DiffuseRange: 0 to 100% in 1% stepsThis is the amount of diffusion applied to the selected reverb style.
RatioRange: 0 to 100% in 1% stepsThis is the amount of twist applied to the selected reverb style. When the Twist Ratio is set at 0 %, Twist Type has no effect.
Filter/Width (blue controls)Lo and Hi Cut can be used to keep heavily-Twisted processing under better control.
Lo CutRange: 20 Hz to 2 kHz in variable stepsThis is the frequency of the low cut filter applied to the reverb
Hi CutRange: 800 Hz to 19.74 kHz in variable steps, OFFThis is the frequency of the high cut filter applied to the reverb.Setting the two filter cut off frequencies is not limited in range: It is possible to set a higher low cut frequency than the high cut frequency. Due to the design of these filters, the output of the reverb will in this case be phase-reversed. Setting Low Cut and Hi Cut filters to exactly the same frequency will not give any reverb signal!
WidthRange: 0 to 100% in 1% stepsThis is the output stereo width. Adjusts the Output Stereo Width. 0 % denotes mono, while 100 % is maximum width.The perceived width of the effect is also affected by the Reverb Style and Diffuse parameters. The width difference between Styles is most obvious at low Diffuse Ratios.
Presets
The NONLIN2 NATIVE offers a collection of factory presets, as well as the option to create and save your own custom settings as user presets and favourites.Note that most DAWs have a built-in preset function that appears on every plugin, which is often found at the top of the plug-in window.It is not recommended to use this as your primary method of saving presets, as it has limited functionality and does not allow the saved presets to be transferred easily to other DAWs. Instead, we suggest using the Preset section at the bottom corner of the user interface window.Note: the following illustrations are from a different plug-in, but the main features are the same.

A single click on this PRESET window brings up a menu with several preset related options. You can recall a factory or user preset from the libraries, save the current preset, or create a new user preset with the ‘Save as’ option
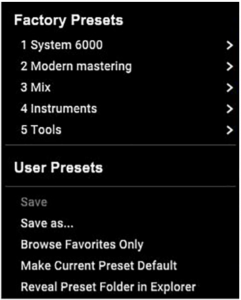
The presets menu is divided into Factory Presets and User Presets
Factory Presets
Factory presets are built into the plug-in and cannot be overwritten, so if a factory preset is modified and you want to keep the changes, you need to save it as a User preset. User presets can be edited and organized as you like.When recalling a Factory preset or saved User preset, the name will appear in plain text as shown below.It will have a number to the left of the title, if it has been assigned as a favourite (see later), otherwise it will show “–” next to it. Do not be alarmed.

User Presets
If you make an alteration to any of the parameters in the current preset, thepreset name changes to italics as a reminder that something has changed fromthe original factory preset.

To save this new setting as a User preset, click in the PRESET window, then select the Save As option. Save it with an appropriate name.To discard the changes without saving, simply navigate away from that preset.
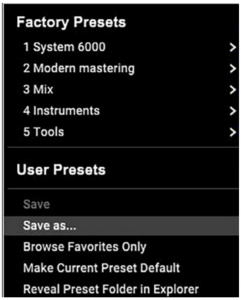
The altered preset will be saved as a user preset, with your new name for it, andits name will appear in the presets window.

If you modify a saved user preset, you have the option to “Save” (overwriting over the existing user preset) or “Save As” (save as a new user preset).
If you modify a factory preset, then only “Save As” is available (to save as a newuser preset). Factory presets cannot be overwritten.
User presets are not given a number unless you assign them as favourites (see below).
Favorite Presets
Creating your own presets will make them accessible from the Preset menu, but they will only appear in the list of 100 favorite presets in the plug-in if you set them as a favorite. This is done by assigning a favorite slot number to the preset using the Favorite menu.Click the FAVORITE (heart-shaped) button at the right edge of the preset window, then select one of the 10 banks. Assign one of your custom presets to a favorite slot, then save the preset.

When a preset is assigned a favorite slot number:

- The preset is part of the 100 presets that can be recalled
- The favorite number will be locked so that two presets cannot be assigned to the same favorite slot number. This is shown in the Favorite menu by graying-out the number in question
- The favorite number will be displayed in brackets when you browse the presets menu
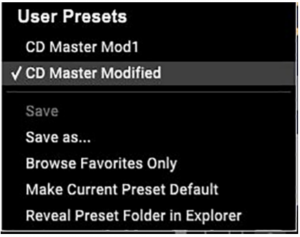
You can remove the favorite assignment by selecting the “Remove Assignment” feature in the Favorite menu, then saving the preset.
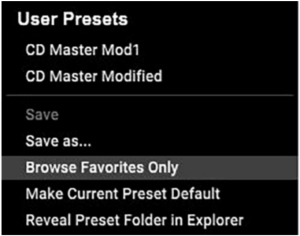
Browse Favorites Only
The ‘Browse Favorites Only’ option in the preset menu allows the UP/DOWN arrows in the bottom bar of the plug-in. Otherwise, scrolling goes through all presets.
Make Current Preset Default
Selecting ‘Make current preset default’ will cause this preset to appear every time a new instance of the plug-in is created.
Reveal User Preset Folder in Explorer
To change the name of a preset, select ‘Reveal User Preset Folder in Explorer’ and modify the file name. This will open a Finder (Mac) or Explorer (PC) window where the user presets are stored. You can rename as well as delete, copy and paste presets. This allows you to share presets with other users online, simply pasting the new ones in this folder.
Software Updates
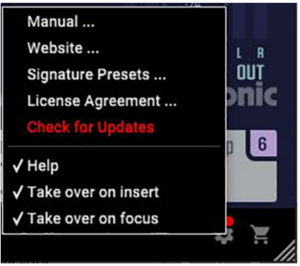
New versions of the software may be released to add new features and improve performance. Updates can be detected from the plug-in directly and can be installed after download from the website. See Chapter 2 for plug-in installation.If the ’Automatically check for updates’ option is checked inside the update menu, the red dot will appear on the settings icon when a new plug-in is available.

Click the gear icon and select “Check for Updates” to perform a scan.
Specifications
Sound
| Processing | Stereo effects reverb |
| Sample rates | 44.1, 48, 88.2, 96, 176.4, 192 kHz |
Software Support
| Operating systems | Mac OS X 10.13 High Sierra or above,Windows 7 or above |
| Plugin formats | AAX-native, Audio Units, VST2.4,VST3. 64 bit |
![]()
References
[xyz-ips snippet=”download-snippet”]