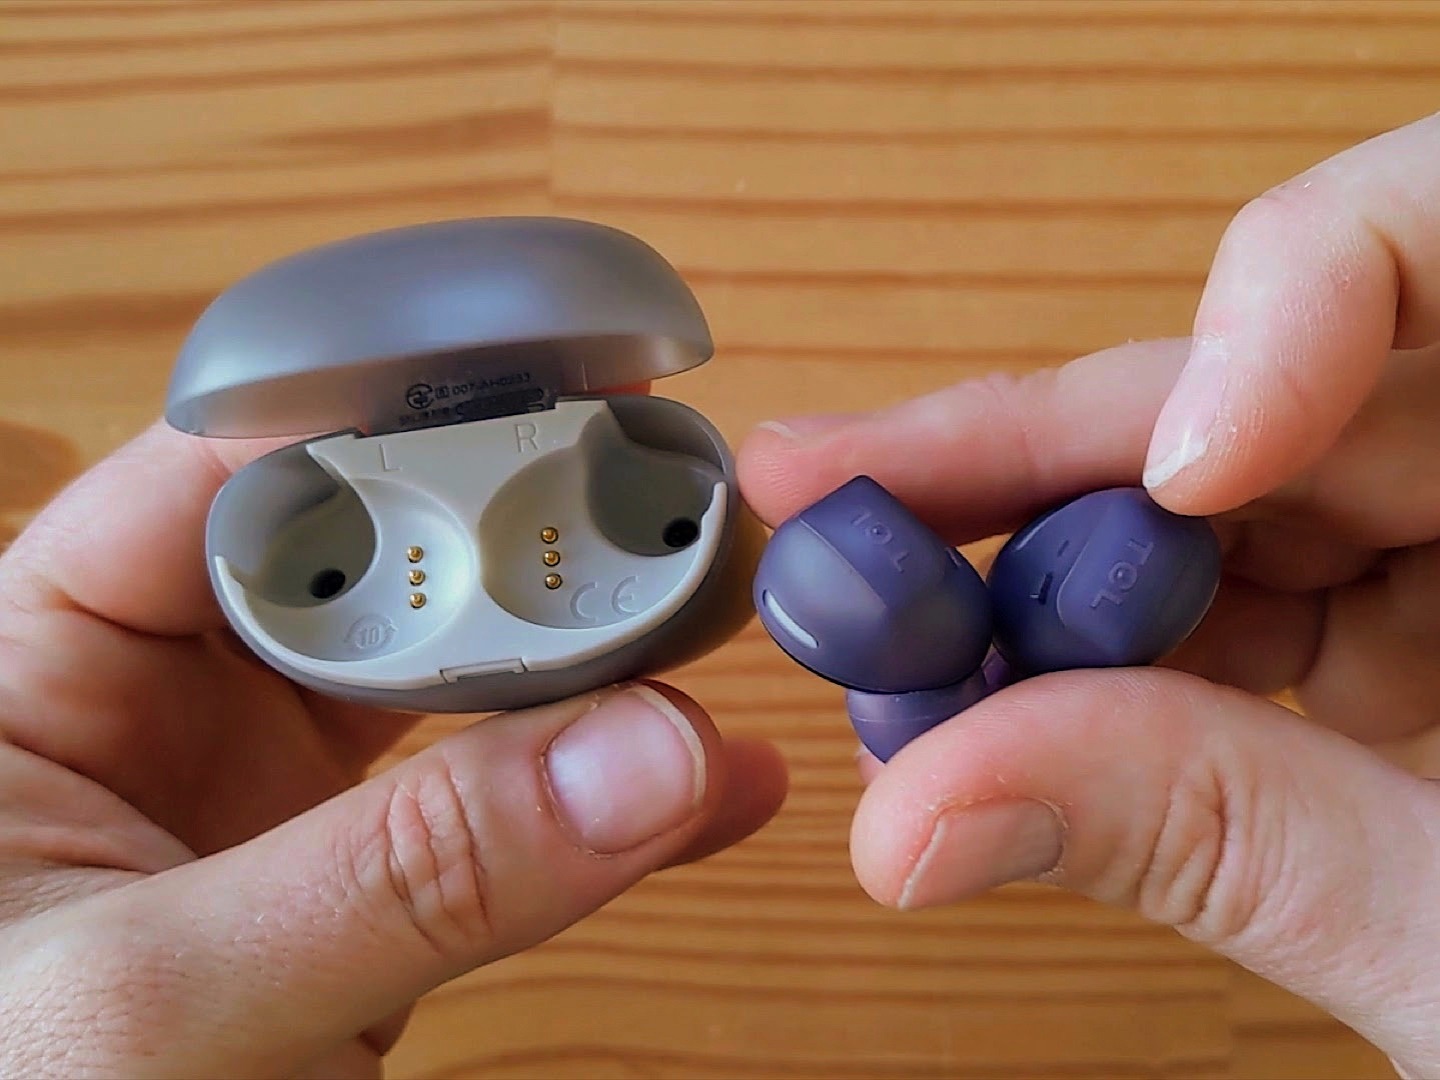
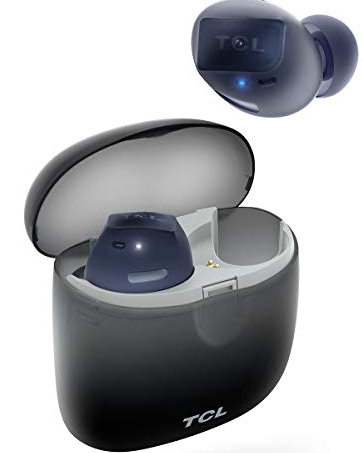
TCL True Wireless Earbuds Pumping Bass 
A quick look
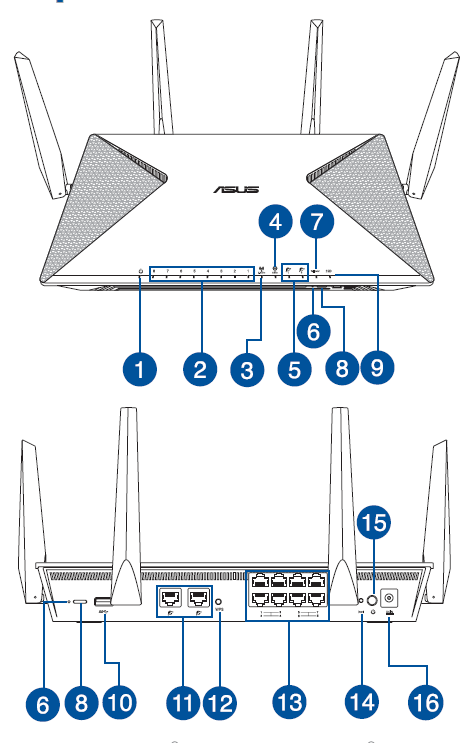
- Power LED
- LAN 1~8 LED
- 2.4GHz LED
- 5GHz LED
- WAN (Internet) 1/2 LED Red: No IP or no physical connection. On: Has physical connection to a wide area network (WAN).
- USB LED / Eject LED
- Failover LED
- USB eject button
- SSD LED
- USB 3.0 port
- WAN (Internet) 1/2 ports
- WPS button
- LAN 1 ~ 8 ports*
- Reset button
- Power button
- Power (DC-IN) port
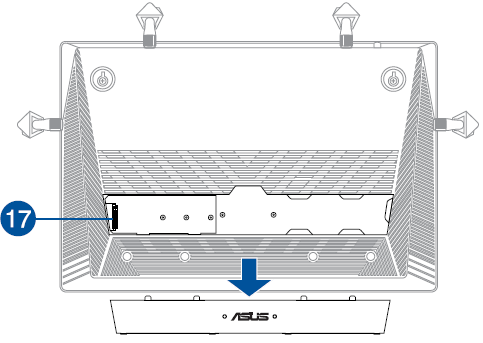
- M.2 SSD socket
NOTES:
- Use LAN ports 1 to 4 for IPTV connection.
- Only LAN ports 5 to 8 can be configured to function as WAN ports
Package contents
- BRT-AC828 Wireless Router
- Network cable (RJ-45)
- Support CD (User Manual)
- AC adapter
- Quick Start Guide
NOTES:
- If any of the items is damaged or missing, contact your retailer.
- USB External HDD/SSD/Flash disk:
- The wireless router works with most USB HDDs/SSDs/Flash disks up to 4TB and supports read-write access for FAT16, FAT32, EXT2, EXT3, EXT4, NTFS, and HFS+.
- To safely remove the USB HDDs/Flash disks:
- Press the USB eject button on the rear of the router.
- Launch the web GUI (http://router.asus.com), then in theNetwork Map page’s upper right corner, click the USB icon and click Eject USB 3.0 / USB 2.0.
- To safely remove the USB SSDs, launch the web GUI (http://router.asus.com), then in the Network Map page’s upper right corner, click the USB icon and click Eject USB 3.0 / USB 2.0. Do not use the USB eject button to remove M.2 SSD.
- Incorrect removal of the USB disk may cause data corruption.
- For the list of file system and hard disk partitions that the wireless router supports, visit http://event.asus.com/networks/ disk support.
- For the list of printers that the wireless router supports, visit http://event.asus.com/networks/printersupport
Installing your router
IMPORTANT: Before installing the router, ensure that Internet connection is available.
Position your wireless router.For optimal wireless transmission between the wireless router and connected wireless devices, ensure that you:
- Place the wireless router in a centralized area for a maximum wireless coverage for the network devices.
- Keep the wireless router away from metal obstructions and away from direct sunlight.
- Keep the wireless router away from 802.11g or 20MHz only Wi-Fi devices, 2.4GHz computer peripherals, Bluetooth devices, cordless phones, transformers, heavy-duty motors, fluorescent lights, microwave ovens, refrigerators, and other industrial equipment to prevent signal interference or loss.
- Always update to the latest firmware. Visit the ASUS website at http://www.asus.com to get the latest firmware updates.
- To ensure the best wireless signal, orient the four detachable antennas as shown in the drawing below.

Prepare your modem.
- Unplug the AC adapter from the power outlet and disconnect it from your cable/ADSL modem.
- Disconnect the network cable from your cable/ADSL modem.
- Reboot your computer (recommended).

WARNING! Before disconnecting the wires/cables, ensure that your cable/ADSL modem has been turned off for at least two minutes. If your modem has a backup battery, remove it as well.
Set up your wireless environment

- Insert your wireless router’s AC adapter to the DC-IN port and plug it to a power outlet.
- Using another network cable, connect your modem to your wireless router’s WAN1 port.
- Insert your modem’s AC adapter to the the DC-IN port and plug it to a power outlet.
- Using the bundled network cable, connect your computer to your wireless router’s LAN port. Ensure that the WAN and LAN LEDs are blinking
Disable some settings on your computer.
- Disable the proxy server, if enabled.
- Set the TCP/IP settings to automatically obtain an IP address.
- Disable the dial-up connection, if enabled.NOTE: For more details on disabling your computer settings, refer to Frequently Asked Questions (FAQs
Mounting options
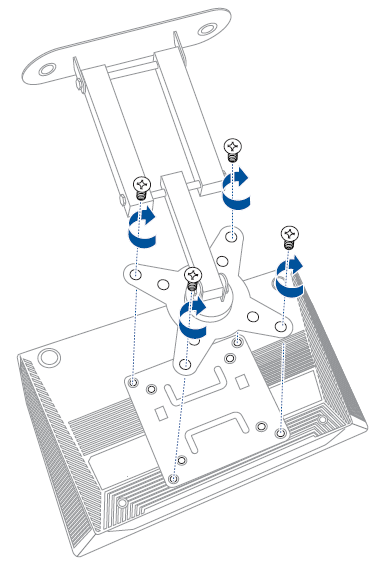
VESA mountTo mount your router to a wall using a VESA mount:NOTES:
- The VESA mount is purchased separately.
- Only VESA mount with hole spacing of 10x10cm is supported.
- Using a screwdriver (torque value: 4kg), secure the VESA mount to the bottom of your router with M3xL9 / M4xL9 screws.
- Mount the assembly to a wall.
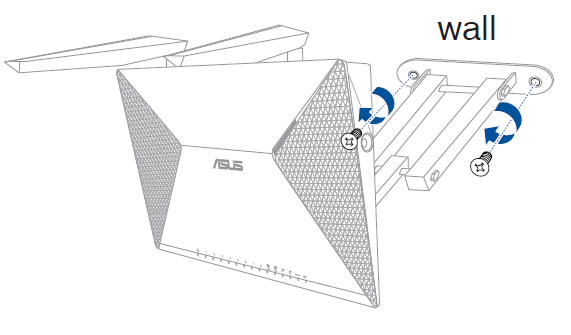
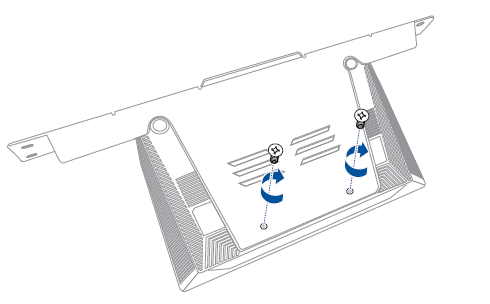
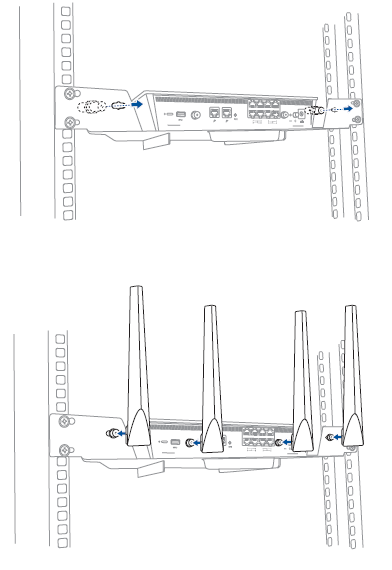
Aluminum stand mount
To mount your router to a server rack using an aluminum stand:
NOTE: The aluminum mount is purchased separately
- Slide your router into the aluminum stand.
- Using a screwdriver (torque value: 4kg), secure the aluminum stand with two M3xL9 / M4xL9 screws.
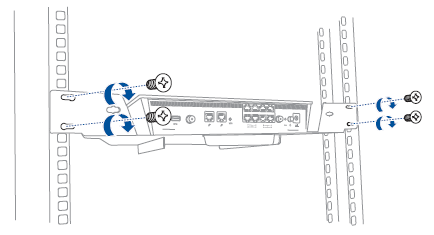
- Use four screws from your server package to secure the router assembly to the server rack.
- Insert the extended antenna cables into the two holes on the aluminum stand.
- Install the bundled antennas to the router assembly.

Installing the antennas
To install the antennas:
- Align the screw end of the antenna to the screw hole on the rear or side of your router, and turn clockwise to tighten the screw.NOTE: Do not overtighten the screws.
- Align the projecting point on the bush to the notch on the sliding sleeve, and push the bush into place. This design is to prevent the antenna from falling off when adjusting its position.


To adjust the bush:
- Pull out the bush from the sliding sleeve.
- Adjust the bush to your desired position and push it into the notch on the sliding sleeve.

Quick Internet Setup (QIS) with Auto-detection
The Quick Internet Setup (QIS) function guides you in quickly setting up your Internet connection.NOTE: When setting the Internet connection for the first time, press the Reset button on your wireless router to reset it to its factory default settings.
To use QIS with auto-detection:
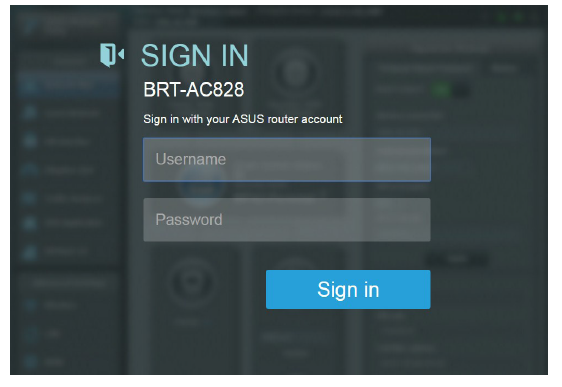
- Log into the Web GUI. The QIS page launches automatically.NOTES:
- By default, the login username and password for your wireless router’s Web GUI is admin.
- The wireless router’s login username and password is different from the 2.4GHz/5GHz network name (SSID) and security key. The wireless router’s login username and password allows you to log into your wireless router’s Web GUI to configure your wireless router’s settings. The 2.4GHz/5GHz network name (SSID) and security key allows Wi-Fidevices to log in and connect to your 2.4GHz/5GHz network.
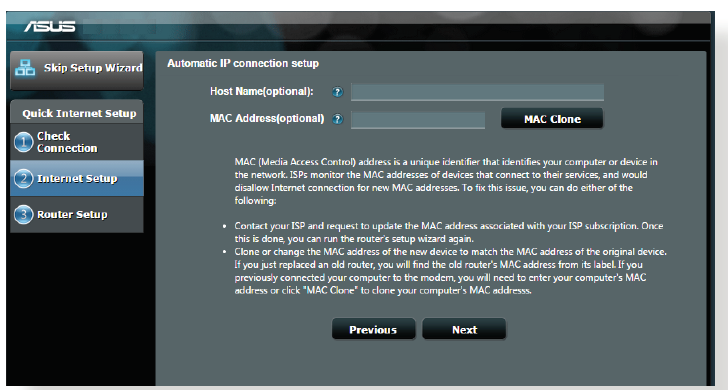
- The wireless router automatically detects if your ISP connection type is Dynamic IP, PPPoE, PPTP and L2TP. Key in the necessary information for your ISP connection type.IMPORTANT! Obtain the necessary information from your ISP about the Internet connection type.for Automatic IP (DHCP)for PPPoE, PPTP and L2TPNOTES:
- The auto-detection of your ISP connection type takes place when you configure the wireless router for the first time or when your wireless router is reset to its default settings.
- If QIS failed to detect your Internet connection type, click Skip to manual setting and manually configure your connection settings.
- Assign the wireless network name (SSID) and security key for your 2.4GHz and 5 GHz wireless connection. Click Apply when done.
- Your Internet and wireless settings are displayed. Click Next to continue.
- Read the wireless network connection tutorial. When done, click Finish.
 NOTES:
 for PPPoE, PPTP and L2TP
 NOTES:


Connect to the wireless network
There are two ways for your wireless clients (notebook, tablet PC, smartphone and so on) to connect to BRT-AC828’s wireless network.
Connect to the wireless network manually
To connect to the wireless network manually:
- Enable the Wi-Fi function on your wireless client to scan for available wireless networks.
- Select the SSID or network name that you assigned to your BRT-AC828’s network.
- Enter the password and click Connect.
Connect to the wireless network through WPS
BRT-AC828 has a WPS (Wi-Fi Protected Setup) button for you to connect your wireless client to BRT-AC828’s network without entering password. To connect to the wireless network through WPS:
- Press the WPS button at the back of BRT-AC828. Refer to the section A quick look for the location of the WPS button).
- Press the WPS button of your wireless client within two minutes or follow the WPS instructions that came with the wireless client. When connecting via WPS, the WPS LED on your router blinks fast.
- Wait until your router’s WPS LED turns into a solid light indicating a successfully connection between your router and your wireless client.
Managing the router via the ASUSWRT web GUI
Your wireless router comes with the intuitive ASUSWRT web graphical user interface. ASUSWRT allows you to easily configure its various features through a web browser such as Internet Explorer, Firefox, Safari, or Google Chrome.NOTE: Use the search bar on the bottom of the interface to get more information from ASUS technical support site http://support.asus.com.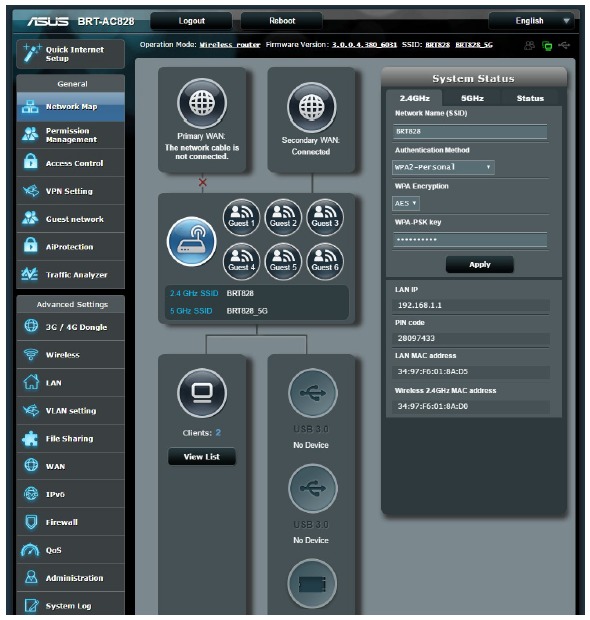
IMPORTANT:
- For more details on using your router’s Web GUI, refer to the user manual.
- Always check and upgrade firmware to the latest version for better experience.
- Visit ASUS Networking video channel for tutorial videos on featured functions.
Frequently Asked Questions (FAQs)
After following the steps, I still cannot access the wireless router’s web graphics user interface (web GUI) to configure the wireless router settings.Ensure that your PC’s proxy settings are disabled and your PC’S IP address is obtained from the DHCP server automatically. for details on disabling the proxy settings, visit the ASUS Support site at http://support.asus.com. For details on using the DHCP server to obtain IP addresses automatically, refer to your Windows® or Mac operating system’s help feature.
The client cannot establish a wireless connection with the router.
Out of Range:
- Put the router closer to the wireless client.
- Try to change the channel settings.
Authentication:
- Use wired connection to connect to the router.
- Check the wireless security settings.
Press the Reset button at the rear panel for more than five seconds.Cannot find the router:
- Press the Reset button at the rear panel for more than five seconds.
- Check the setting in the wireless adapter such as SSID and encryption settings.
Cannot access the Internet via wireless LAN adapter.
- Move the router closer to the wireless client.
- Check whether the wireless adapter is connected to the correct wireless router.
- Check whether the wireless channel in use conforms to the channels available in your country/area.
- Check the encryption settings.
- Check if the ADSL or Cable connection is correct.
- Retry using another Ethernet cable.
If the ADSL “LINK” light blinks continuously or stays off, Internet access is not possible – the Router is unable to establish a connection with the ADSL network.
- Ensure that all your cables are all properly connected .
- Disconnect the power cord from the ADSL or cable modem, wait a few minutes, then reconnect the cord.
- If the ADSL light continues to blink or stays OFF, contact your ADSL service provider.
Network name or encryption keys are forgotten.
- Try setting up the wired connection and configuring the wireless encryption again.
- Press the Reset button of the wireless router for more than five seconds.
- Factory default settings:
User name / Password: admin / adminLogin address: router.asus.com2.4 GHz network SSID: ASUS5 GHz network SSID: ASUS_5G
Where can I find more information about the wireless router?
- User Manual in the support CD
- Online FAQ site: http://support.asus.com/faq
- Technical Support site: http://support.asus.com
- Customer Hotline: Refer to the Support Hotline in this Quick Start Guide.
References
[xyz-ips snippet=”download-snippet”]