


USER’S MANUALGB NL FR D
—-Manual/StereoboommWood-box Plus/11-2019/V02—-
![]()
-2-
DECLARATION OF CONFORMITY
Hereby,Company: TE-GROUP nvAddress: Kapelsestraat 61, 2950 Kapellen – BELGIUMdeclare that the following equipment:Product name: Stereoboomm WOODBOX PLUSProduct type: Wireless Bluetooth Speaker with DAB(+)/FM Radio
conforms with the following safety requirements of the directives 2014/53/EU, 2011/65/EU, 2015/863/EU. Conformity is guaranteed by the CE-symbol. This product has been tested against following standards and specifications, applying versions valid on the date is was issued.

EN 62479:2010, EN 60065:2014EN 301489-17 V3.2.0:2017, EN 301 489-1 V2.2.0:2017EN 55032:2015, EN 55035:2017EN 61000-3-2:2014, EN 61000-3-3:2013EN 300328 V2.2.0:2017, EN 303345 V1.1.7:2017

Authorized signatureJ. Van Os, TE-Group NVProduct ManagerKapellen, November 2018
-3-
GB HOW TO USE THE STEREOBOOMM WOOD-BOX PLUS?
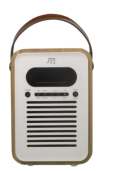
How to use the Stereoboomm Woodbox Plus?
The SB Woodbox Plus can be used in 3 ways:– With adapter (not included)– Stand-alone, using the rechargeable battery
The SB Woodbox Plus is:
– DAB / DAB+ / FM Radio– Bluetooth ® Speaker– Music player with AUX / USB / TF-Input– Alarm Clock & Calendar
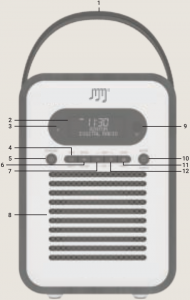
- Handle
- LED Display
- MicrophoneFor Handsfree calling
- Info / MenuShort press: Show informationPress and hold: Enter the menu and settingsPress and hold again to exit the menu and settings
- StandbyStandby status:Short press: Enter into working mode / standby mode Press and hold: Power ON or Power OffAlarm status:Short press: Cancel the alarm to enter standby mode
- Enter / SnoozeFM Mode: Press and hold for Auto-Station-SearchUSB/TF/BT Mode: Short press: Play / PauseDAB Mode: Short Press: Select station - Press and hold: Automatic Station SearchAlarm Mode: Short press: Enter snooze settings & snooze time
- Previous Track / Skip – / Volume –
- Speaker
- IR Receiver (for use with remote control – not included)
- Mode / LightShort press switches between DAB / FM / BT / USB / SD / AUX Press and hold to change display brightness
- Sleep / PresetDAB/FM Mode: Short Press: open presets menu - Press and hold to store current station as a preset
- Next Track / Skip + / Volume +
- AUX Audio Input
- Reset button
- FM / DAB Radio Antenna
- USB OUT charging port / USB Player
- LED Charging indicator
- Micro USB IN Charging Port
- Micro SD Card Slot
-4-

-5-
CHARGING THE BATTERY
! We recommend you to fully charge the SB Woodbox Plus before its first use !
- Plug the Micro USB Cable into the micro USB Charging Port (18) and plug the other end of the cable into a USB adapter with minimum 1A Power charge. Plug the adapter into a power socket.
- The red LED indicator (17) will light up indicating that the Woodbox Plus is now charging
- When the LED indicator (17) turns green, the device is fully charged.
When the device is in need of charge, the battery icon on the LED Display (2) will be illuminated. If you do not plug in the device, “Low Power, Please Charge!” will be displayed on the LED Display (2).
! ATTENTION: The SB Woodbox Plus has a power saving function in Bluetooth mode: When there is no music playing and no buttons have been pressed for 15 minutes, the device will automatically enter Standby mode. !
TURNING THE DEVICE ON/OFF
You can turn the device ON or OFF by long pressing the Standby button (5). When the device is ON and you want to go to Standby Mode, short press the Standby button (5). When the device is in Standby Mode and you want to turn it ON again, short press the Standby Button (5).
MODE SELECTION
There are 6 available modes: DAB / FM / BT / USB / SD / AUX. To switch between the modes, short press the Mode button (10).
1. DAB Mode:
Select the DAB Mode by short pressing the Mode button (10). Press and hold the Enter button (6) to start an automatic station search. Once this search is complete, all found stations will be saved. Short press the Preset button (11) to display the saved stations, use Skip - (7) or Skip + (12) to choose between stations and the Enter button (6) to select and play the station.Short press the Menu / Info button (4) for information about the station. To adjust the volume, long press the Volume - (7) or Volume + (12) buttons.
2. FM Mode:
Select the FM Mode by short pressing the Mode button (10). Press and hold the Enter button (6) to start an automatic station search. Once this search is complete, all found stations will be saved. Short press the Preset button (11) to display the saved stations, use Skip – (7) or Skip + (12) to choose between stations and the Enter button (6) to select and play the station.For finetuning: Short press Skip - (7) or Skip + (12) to increase or decrease the current frequency with 0.05MHZ.Short press the Menu / Info button (4) for information about the station. To adjust the volume, long press the Volume - (7) or Volume + (12) buttons.
3. Bluetooth ®
Select the Bluetooth® Mode by short pressing the Mode button (10). Open the Bluetooth®-settings of your Bluetooth® device (Smartphone, Tablet, MP3 player,…) and scan for nearby devices. Select “SB W-box Plus” in the list and press connect on your Bluetooth® device. Once the devices are paired the display on the SB Woodbox Plus will show “Connected”.
-6-
Press Skip - (7) or Skip + (12) to skip between your songs. Short press the Enter button (6) to pause or play your music. To adjust the volume, long press the Volume - (7) or Volume + (12) buttons.
In the Bluetooth® Mode, you can also make handsfree calls. When receving a call, short press the Enter button (6) to answer or hang up. To reject a call, short press the Preset button (11).
To cancel the Bluetooth® connection, you can cancel the connection on your Bluetooth® device or by long pressing the Enter button (6).
4. USB Mode
Select the USB Mode by short pressing the Mode button (10). Insert a USB Stick with audio-files in MP3 format into the USB OUT charging port / USB Player (16).
Short press the Enter button (6) to start playing the music. Press Skip - (7) or Skip + (12) to skip between your songs. Short press the Enter button (6) to pause or play your music. To adjust the volume, long press the Volume - (7) or Volume + (12) buttons.
To choose a different play mode, long press the Preset button (11) to switch between: REPEAT ALL – (ALL) REPEAT SINGLE (SING) - RANDOM (RAND).
5. SD / TF Mode
Select the SD / TF Mode by short pressing the Mode button (10). Insert a Micro SD Card with audio-files in MP3 format into the Micro SD Card Slot (19).
Short press the Enter button (6) to start playing the music. Press Skip - (7) or Skip + (12) to skip between your songs. Short press the Enter button (6) to pause or play your music. To adjust the volume, long press the Volume - (7) or Volume + (12) buttons.
To choose a different play mode, long press the Preset button (11) to switch between: REPEAT ALL (ALL) - REPEAT SINGLE (SING) - RANDOM (RAND).
6. AUX Mode
Select the AUX Mode by short pressing the Mode button (10). Connect the 3.5mm AUX cable to the AUX Input (13) and the other end to your music device.We suggest you to keep the volume on your music device around half volume, as the SB Woodbox Plus has its own volume controls. To adjust the volume, long press the Volume - (7) or Volume + (12) buttons.
DATE & TIME SETTINGS
1. Setting the timeMake sure that the device is ON in any play mode. Press and hold the Info / Menu button and use the Skip - (7) or Skip + (12) button to select “Main Menu”. Press Enter (6) to enter the menu and press enter again to enter the “Time Setup” submenu. Press Enter (6) When “Set Clock” is on the display and use the Skip - (7) or Skip + (12) to set the hour, press Enter (6) again and use Skip - (7) or Skip + (12) to set the minutes. Confirm with the Enter button (6).
-7-
2. Setting the dateIn the “Time Setup” submenu you can use Skip - (7) or Skip + (12) to go to “Set Date”. Press Enter (6) to set the date by using the Skip - (7) and Skip + (12) buttons. To switch between day, month & year; use the Enter button (6). Confirm with the Enter button (6).
3. Auto UpdateYou can have the date and time updated automatically with the transmitted radio-data. You can also adjust the setting to receiving no updated time and date. Confirm with the Enter button (6).
4. 12/24 hourIn the “Time Setup” submenu you can use Skip - (7) or Skip + (12) to go to “12/24 hour”. Press Enter (6) to change the time notation by using the Skip - (7) and Skip + (12) buttons. Confirm with the Enter button (6).
ALARM CLOCK FUNCTION
The SB Woodbox Plus can have up to 4 alarms. Make sure that the device is ON in any play mode. Press and hold the Info / Menu button and use the Skip - (7) or Skip + (12) button to select “Main Menu”. Press Enter (6) to enter the menu and press enter again to enter the “Alarm” submenu.
Choose which alarm you want to set (1, 2, 3 or 4) and press Enter (6) to confirm.You can now set the hour for the alarm by using the Skip - (7) and Skip + (12) buttons, to confirm or switch from hour to minutes, use the Enter button (6).
You can also change the duration (15, 30, 60, 90, 120). Confirm by using the Enter button (6).
You can also select the desired sound notification:USB/SD: plays music from your USB or SD cardBuzzer: “Beep Beep” sound notificationFM: plays music from FM radioDAB: plays music from DAB radio
You can now select the alarm calendar:Once: Your alarm will go off once, set the date of alarm by using the the Skip - (7) and Skip + (12) buttons. Press Enter (6) to confirm.Weekends: Alarm will go off every weekend day (Saturday, Sunday). Press Enter (6) to confirm.Weekdays: Alarm will go off every weekday (Mo, Tu, We, Thu, Fr). Presse Enter (6) to confirm.Daily: Alarm will go off every day. Press Enter (6) to confirm.
After setting the alarm calendar, you can also change the alarm volume by pressing the Skip - (7) and Skip + (12) buttons and using Enter (6) to confirm.
After adjusting the volume settings, you can choose to enable or disable the alarm. Use the Skip - (7) and Skip + (12) buttons to switch between ON / OFF and use Enter (6) to confirm.
! Attention, if your alarm is set to the same source as the current play mode; the alarm sound will automatically be “Buzzer” ! To snooze the alarm (for 5, 10, 15 or 30 minutes), shortly press the Snooze button (6). To stop the alarm go back into the menu and disable the alarm (such as described in the steps above).
-8-
SYSTEM SETTINGS
To enter the System Settings, long press the Info/Menu button (4). Short press Skip - (7) or Skip + (12) to choose the function sub-menu and short press the Enter button (6) to open the selected sub-menu. Confirm with the Enter button (6).
- Time setupThe time setup function allows you to set the correct time & date.
- SleepThe device has an automated Sleep function (Auto-OFF). You can choose between:OFF - 15 - 30 - 45 - 60 - 90 minutes. Confirm with the Enter button (6).
- DRCDRC = Dynamic Compression. You can choose between: OFF – LOW – HIGH
- LanguageYou can choose your preferred language here.
- Prune stationThis function lets you delete the scanned stations indicated with “?”.
- Factory resetYou can bring the device back to factory settings with this function.
- SW versionYou can check your software version here.
- EQYou can adjust your Equalizer preferences here.
- AlarmThe Alarm function has four groups of alarms with 5 Sound options that you can choose from here:
– USB (plays music from USB)– SD (plays music from SD Card)– Buzzer (buzzer sound)– DAB (plays music from DAB Radio)– FM (plays music from FM Radio
RESET
To reset the device, use a paperclip or small pin to press the Reset Button (14).Please note that when resetting the device, all saved stations will be deleted and automatic scans need to be repeated.
CUSTOMER SUPPORT
For more information, technical questions and return requests concerning this product, you should contact: [email protected].
GUARANTEE
Copyright® Stereoboomm. Stereoboomm® is a registered trademark of TE-Group NV. Stereoboomm® brand stands for superior quality products and excellent customer service. Therefore Stereoboomm® warrants this product to be free from defects in materials and workmanship for a period of two (2) years from the original purchase date of the product. The terms of this guarantee and the extent of responsibility of Stereoboomm® under this warranty can be downloaded from the website: www.stereoboomm.com.
-9-

References
[xyz-ips snippet=”download-snippet”]