
Product Specifications
Bluetooth version: 5.0Frequency: 2.40 GHZ – 2.48 GHZReceiver sensitivity: -92dBmWorking temperature: -10 – 50°CWorking distance: Up to 10-12M
Charging case battery voltage/capacity: 3.7V / 600mAhHeadphones battery capacity: 2 X 3.7V / 55mAhHeadphones charging time: about 1 hourPlaying time: about 5-6 hours x 5 timesSupported protocols: HFP / AIDP / AVRCP
- Earbuds are set to stereo mode before leaving the factory.
- The earbuds will turn off if they are not connected to anydevice within 5 minutes.
- The iPhone displays the earbuds power in real time.
- When not use, please store the charging case and earbuds ina dry well ventilated place, and charge it every 3 months.
- Waterproof grade is IPX4. Please do not put the earbuds orcharging case into water.
Accessories

Headphones Usage
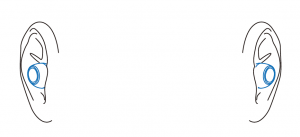
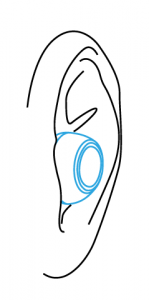
In order to get the best audio experience, please wear the leftand right headphones correctly and choose the ear cap that ismost suitable for your ears. When using outdoors, please putyour mobile phone on the same side as your left ear.Medium-sized ear caps will produce a better bass effect.
Power-on
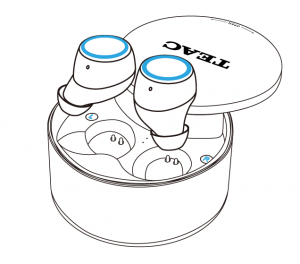
Method 1Auto Power On: Earbuds will power on after beingtaken out of the charging case.Voice prompt: “Power On” one earbud breathinglight on while the other off
Power-on
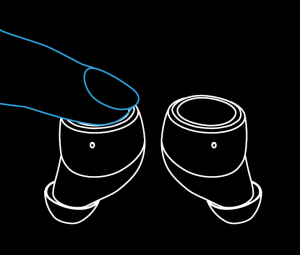
Method 2Manual Power On: Whenthe earbuds are switched  off, short pressing themultifunctional touch keyfor two seconds can startthe earbuds, and theindicating light will flashwith a “power on” tone.
Press themultifunction touchbutton for 2seconds
Power-off
Long press the touch key for 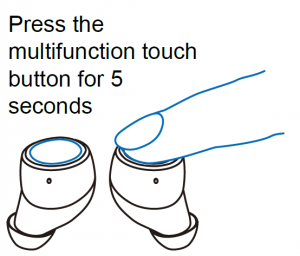 about five seconds, theindicating light will flash andthe headphones will poweroff with a “Power off” tone.
 Note: When the two earbuds are paired and workingtogether, only one of them needs to be powered off;the other will be powered off automatically.
Binaural Mode
 1. Open the Settings on your mobile and turn on Bluetooth2. Open the charging case, remove theearbuds, and wear them properly (left inleft ear and right in right ear)
First Connection
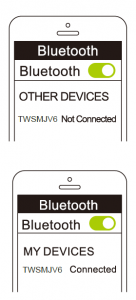 3. You will hear “Power on” after wearing earbuds. Left and right earbuds are paired automatically. You will hear “Connected”.4. Open your mobile phone Bluetooth settings, find“TWSMJV6” in “OTHER DEVICES” and press to connect.5. Wait for 1-2 seconds for the Bluetooth to connect, onceconnected you will hear the “Connected” indicating tone. Once connected your mobile device will also show that the “TWSMJV6” is connected under Bluetooth settings.
Non-First Connection
3. When correctly wearing  the earbuds, the left andright earbuds will pair upautomatically when the userhears a “Power on” tone.4. Wait for 1-2 seconds forthe Bluetooth to connect,once connected you will hearthe “Connected” indicatingtone. Once connected yourmobile device will also showthat the “TWSMJV6” is connected under Bluetooth settings.
Monaural connection of earbud
The below settings apply for forboth the left and right earbuds
- Find “Settings” of
 mobile phone– start the “Bluetooth
 - Open the chargingcase, take out the left orright earbud, andcorrectly wear it on thecorresponding ear.
- After wearing the earbud you will hear the “Poweron” prompt. Access your mobile phone Bluetoothsettings, find “TWSMJV6” in other devices and pressto connect. Wait for 1-2 seconds for the Bluetooth toconnect, once connected you will hear the“Connected” voice prompt. Once connected yourmobile device will also show the “TWSMJV6” asconnected under Bluetooth settings.
 mobile phone– start the “Bluetooth
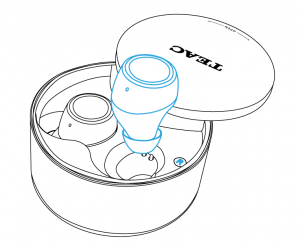
Non-First Connection
4. After wearing the earbud you will hearthe “Power on” prompt, and it will be pairedsuccessfully automatically. Hearing the tone”connected” indicates the connection issuccessful.
Voice Assistant
Clicking the multifunctional touch key continuously forthree times can start the Siri voice commands.

Revert toBinaural mode
If the user wants to start the binaural mode but the earbudsare still in the single-earbud mode, simply put both earbudsback into the charging case and take them out again, theearbuds will go back to binaural function. This can also bedone by manually restoring to default settings.
Restore to default settings
- With a single earbud off, press and hold for5 seconds until the breathing light flashes quickly.
- Tap the earbud 5 times rapidly until no light to reset it tofactory settings.
- Put the earbuds into the charging case to enter thecharging mode. Then take out the earbuds and holdthem close together. The 2 earbuds will get pairedautomatically. Or press the 2 earbuds at same time for2 seconds to power on.
 NOTE: The above steps need to be done to bothearbuds at the same time. The 2 earbuds arepaired before leaving the factory. The earbuds willautomatically reconnect after being turned onwhen they are connected to the same device.
Charging Case Power
The number of flashingindicator lights indicates theremaining power level:4 lights: 75%-100% power 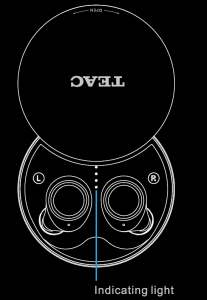 3 lights: 50-74% power2 lights: 25-49%1 light: 1%-24% (the casewill need to be recharged)
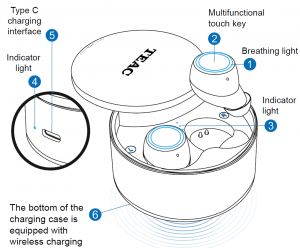
Charging the CaseThe breathing lights will flash constantlywhen charging and automatically turnoff when fully charged.Use either a type Ccable or wirelesscharger to charge – theindicator light is redwhen charging and bluewhen fully charged
Charging the Earbuds
The breathing lights will flash constantlywhen charging and automatically turnoff when fully charged.
Playing Music
- Click multi-touch key to play/pause
- Press and hold the multi-touch key for 2-3seconds (L previous song, R next song)
- Double tap the multi-touch key toincrease or decrease the volume.
Phone Call
When there is an incoming call, click theearbud multi-touch key to answer or pressand hold for 2-3 seconds to reject. 2.During acall, clicking the earbud multi-touch key willend the call and return to the previous state
 In stereo mode, L to decrease volume and Rto increase volume. When volume reaches itsminimum or maximum a beep will sound. Inmono mode, you will hear a beep whenvolume reaches maximum and then volumewill decrease.
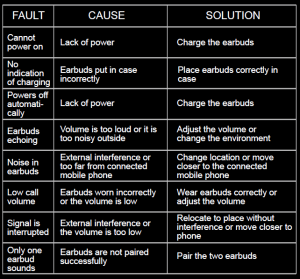
Troubleshooting
TERMS AND CONDITIONS
Our goods come with guarantees that cannot beexcluded under the Australian Consumer Law. Youare entitled to a replacement or refund for a majorfailure and for compensation for any other reasonablyforeseeable loss or damage. You are also entitled tohave the goods repaired or replaced if the goods failto be of acceptable quality and the failure does notamount to a major failure.
- TEAC warrants that this product is free fromdefects in material and workmanship under normaldomestic use with reasonable care and skill.Maintenance and cleaning (i.e. laser head) is notcovered by this warranty. The TEAC warranty onlyapplies to TEAC products purchased NEW from a TEAC Authorised Retailer in Australia. This warranty onlyapplies to the original purchaser and cannot betransferred.
- The benefits to the consumer given by this Warranty arein addition to other rights and remediesof the consumer under a law in relation to goods orservices to which the warranty relates, beingthe Australian Consumer Law.
- Refund or replacement via your TEAC AuthorisedRetailer is available for a period of 14 days after purchasefor goods that have been inspected and determined tohave a major failure.Refund and exchange is not applicable for change ofmind.
- Subject to the terms herein, this warranty effectivelycovers TEAC products under the 12 Month ReplacementWarranty Scheme, 12 months from the date of originalpurchase.
- 5. The warranty is void and warranty claims may berefused, subject to the Australian Consumer Law, if:a) The product was not transported, installed, operated ormaintained according to manufacturerinstruction, orb) The product was abused, damaged, tampered, alteredor repaired by any unauthorised persons,orc) Product failure is due to accidents during use,installation or transit, power surges, use of defective orincompatible external devices, exposure to abnormalconditions such as excessivetemperatures or humidity, or entry of liquids, objects orcreatures into the product, cockroach infestations, ord) The customer is unable to provide proof of purchase ofthe product for verification, ore) The serial number of the product is missing or has beentampered with.
- No one is authorised to assume any liability on behalfof TEAC or impose any obligation on it, in connection withthe sale of any equipment other than as stated in thiswarranty and outlinedabove.
- TEAC and/or its Authorised Service Centres reservethe right to inspect and verify whether theproduct is exhibiting a major failure as claimed bycustomers/retailers.
TEAC Warranty Service Hotline1300 553 315
Call us between Monday to Friday – 8.30AM to 5PMAEST*Please have your purchase receipt and the product’sserial number readyFor other enquiries and support please visitwww.teac.com.au

Read More About This Manual & Download PDF:
TEAC True Wireless Earbuds with Wireless Charging TWSMJV6 User Manual – TEAC True Wireless Earbuds with Wireless Charging TWSMJV6 User Manual –
[xyz-ips snippet=”download-snippet”]