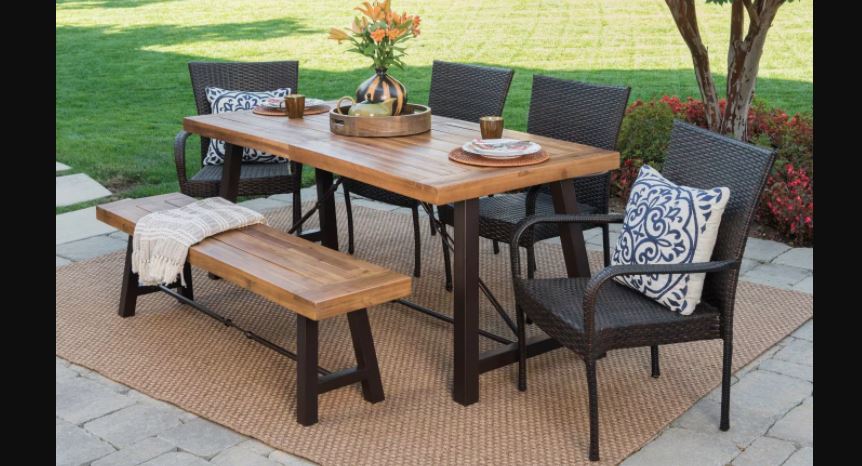
6Pc Teak Dining Set IT-610610T
Instruction Manual

CUSTOMER SERVICE INFORMATION
Please email us at [email protected] for assembly tips, report damage, or request parts.
For faster response, please write down item number, code for missing parts, attach the purchase receipt and picture of damaged parts.
Toll free number: 1-888-287-4275 from 9:00 am to 5.00pm CST (Monday to Friday).
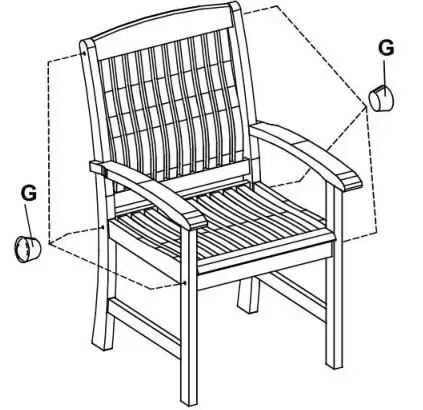
GENERAL INFORMATION & TIPS FOR Chair
- Please read the assembly instructions prior to assembling the chair.
- To avoid damage, assemble the chair on a non-abrasive surface such as carpet.
- Make sure all bolts tightly fastened before the chair is used.
- This chair is not for commercial use.
Please make sure you have all parts before beginning assembly. Please wait until all steps are completed before tightening bolts.
TOOLS REQUIRED
- 8″ Philips screwdriver (Not provided) – For tightening all bolts.
- Rubber Mallet – For tapping in the wooden caps.

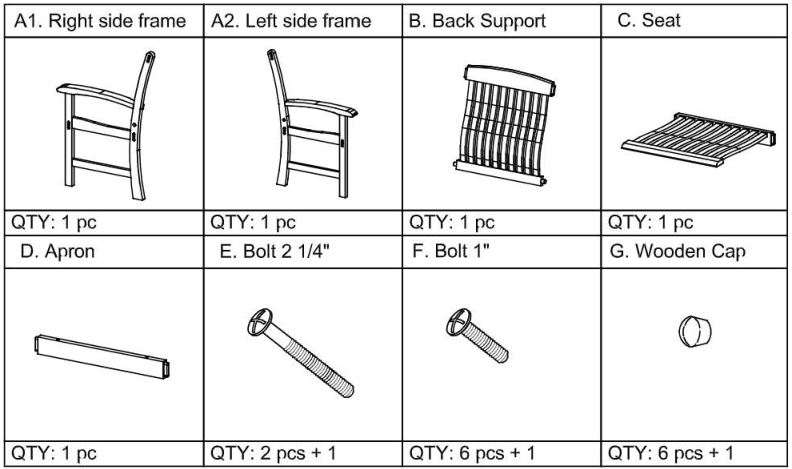
PARTS AND HARDWARE LIST FOR CHAIR
CHAIR INSTALLATION
STEP 1
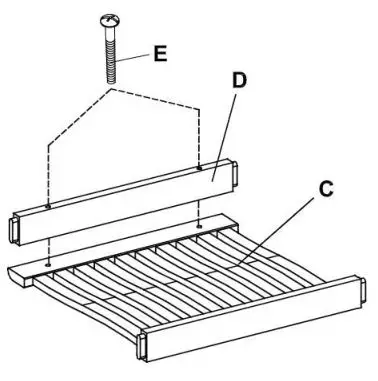
Attach the apron (D) into bottom of seat (C) and secure using 2 1/4″ bolts (E).
** DO NOT TIGHTEN BOLTS YET.
STEP 2
Attach right and left side frames (Al & A2) into b ack support (B). Secure using l” bolts (F).
** DO NOT TIGHTE N BOLTS YET.
STEP 3
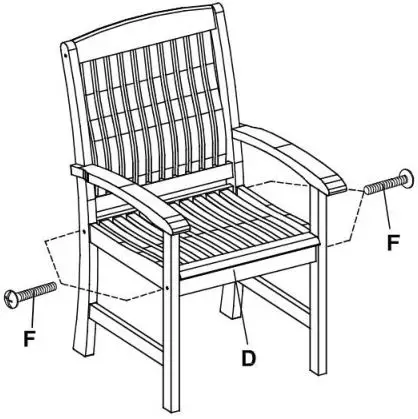
Next, attach the pre-assembled seat into right and left side frames (Al & A2). (The seat with apron must be attached in front). Secure seat using l” bolts (F) as shown. Tighten all bolts using screwdriver.
STEP 4
– Make sure all parts are correctly connected and tighten all bolts completely using screwdriver.
– Tapping in the wooden caps (G) to cover bolts head using rubber mallet.
THE CHAIR IS NOW READY FOR USE.
GENERAL INFORMATION & TIPS For Bench
- Please read the assembly instructions prior to assembling the bench.
- To avoid damage, assemble the bench on a non-abrasive surface such as carpet.
- Make sure all nuts tightly fastened before the bench is used.
- This bench is not for commercial use.
Please make sure you have all parts before beginning assembly. Please wait until all steps are completed before tightening nuts.
 TOOLS REQUIRED
Wrench (Provided) – For tighten all Nuts.
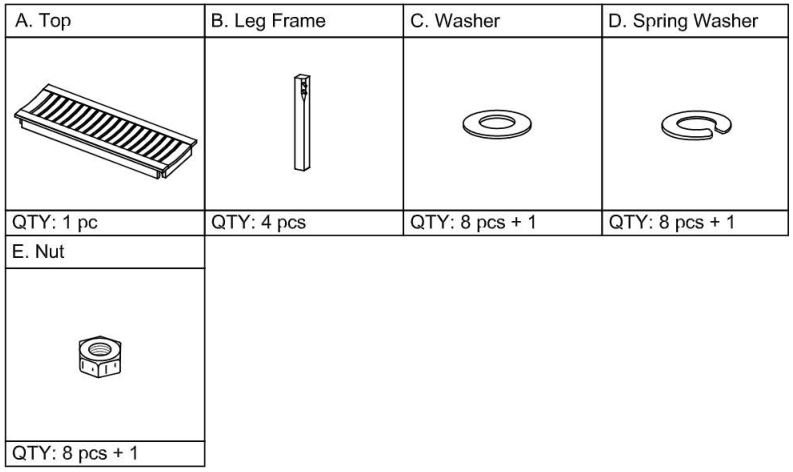
PARTS AND HARDWARE LIST FOR Bench
BENCH INSTALLATION
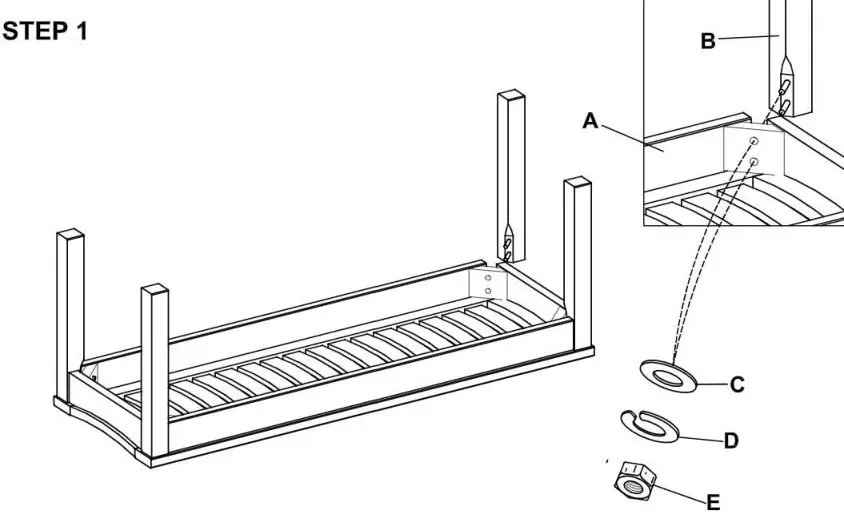
Attach the leg frames (B) into each comer of the top (A).
Assemble the washers (C), spring washers (D) and nuts (E) to leg frames (B). Tighten the nuts using wrench.
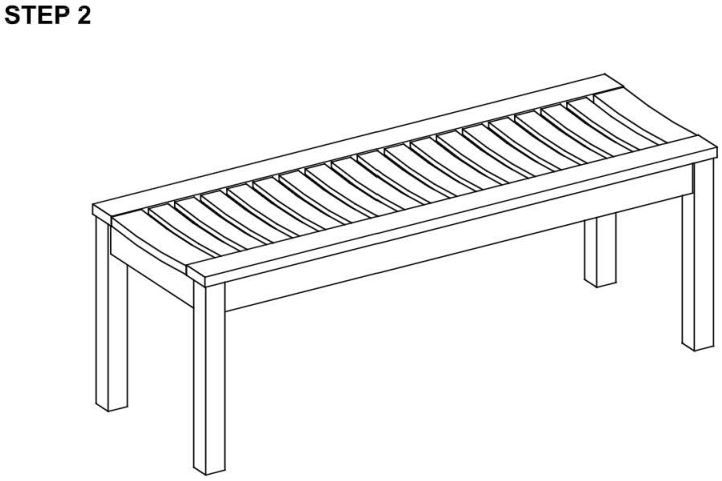
Turn the bench up. Make sure all parts are fully connected and tighten all the nuts completely using wrench.
THE CHAIR IS NOW READY FOR USE.
GENERAL INFORMATION & TIPS FOR TABLE
- Please read the assembly instructions prior to assembling the table.
- To avoid damage, assemble the table on a non-abrasive surface such as carpet.
- Make sure all bolts tightly fastened before the table is used.
- This table is not for commercial use.
Please make sure you have all parts before beginning assembly. Please wait until all steps are completed before tightening bolts.
 TOOLS REQUIRED :
Allen key (Provided). – For tightening all bolts.
PARTS AND HARDWARE LIST FOR Table
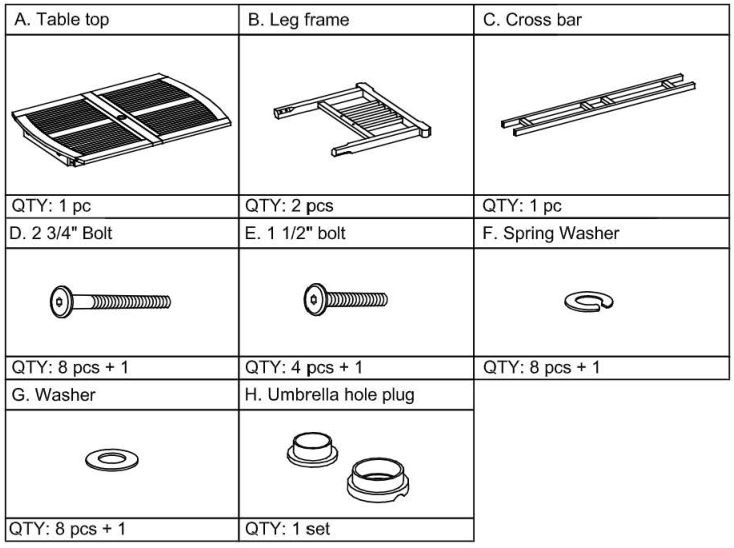
Table Installation
Step 1
- Put the table (A) face down on a flat non-abrasive surface.
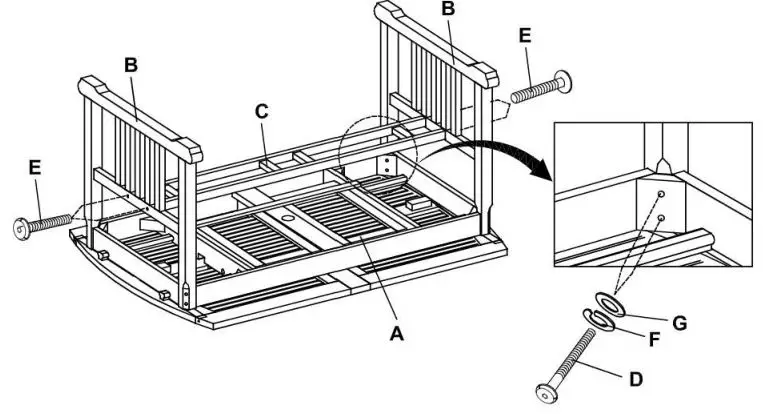
- Attach the leg frames (B) into table top (A) and secure using washers (G), spring washers (F) and 2¾” bolts (D) as diagram shown.
** DO NOT TIGHTEN ALL BOLTS YET.
- Next, attach the cross bar (C) into pre-assembled leg frames (B) and insert 1½” bolts (E) into predrilled holes as shown.
- Make sure all parts are correctly connected and tighten all bolts completely using alien wrench.
- Turn the table upright.
Step 2
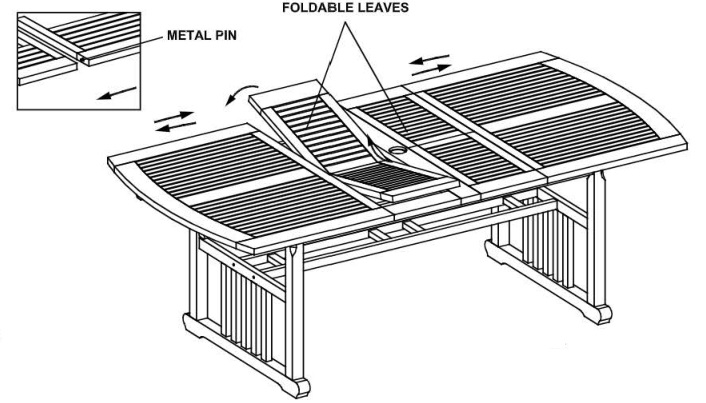
To extend:
- Pull the table top from each end.
- Unfold the leaves.
- Push both ends of table top together. Make sure metal pins are matched with holes as diagram shown.
STEP 3
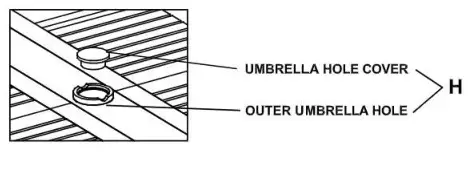
Put the umbrella hole plug (H) into hole of table top (A) as diagram shown.
THE TABLE IS NOW READY FOR USE
MAINTENANCE
Due to teak wood’s natural characteristics, wood color and grain variations ma y be present. This is a symbol of the originality of each unit and gives each finished piece a distinctive look and inherent charm.
Care Instruction :Teak wood, when left bare and unsanded, will naturally fade to a silver-gray color. This silver-gray color transformation does not in any way affect the durability of the furniture.
To maintain the smooth finish and golden brown color of your teak furniture, you will need to sand the furniture regularly. To prolong t he period of time needed be tween sanding, teak oil may also be applied.
If you choose to apply teak oil, apply every 6 months, or follow the teak oil container directions. Again, if you choose to maintain the smooth brown finish of your teak furniture, this method requires some regular maintenance, such as sanding and reapplication of teak oil. Teak oil, along with sanding, will help maintain the golden brown color.
Staining:Please note, once you stain your teak, it will not return to the natural golden brown or weathered silver-gray color without sanding off the stain. Staining is intended to be permanent. If yo u choose to stain your furniture after it has turned silver-gray, you must first sand it before applying the stain.
Cushions:Outdoor fabrics are designed to be breathable; t he y are water repellent but are not waterproof. It is recommended that you store the cushions during rainy weather.
The best way to keep your fabrics looking good is to simply clean them as needed. Rinse off dust and dirt, wipe spills as soon as they occur, or spot clean soon after stains occur. Removable cushion covers may be machine-washed in cold water with mild laundry soap and air dried.
Do not leave your teak wood furniture in puddles of water or on wet ground.
Cover your teak wood furniture during winter months or move into covered storage, if in wet climates.
The manufacturer supports protection of the world’s forest resources and is diligent in sourcing legally harvested wood.
Thank youThe manufacturer
1 year Limited Warranty
The furniture is warranted to be free from defects in material and workmanship of the original product when purchased from one of our authorized dealers. If a product fails and is under the terms of our limited warranty, the item will be replaced, usually for a small fee. In the case of discontinued models, an item of similar quality and style will be offered to the customer.
- 1 year limited frame warrantyFrames are warranted to be free from defects in material and workmanship. Fading or discoloring caused by putting the product under sunlight or rain is not covered by this limited warranty. Damage to the frame due to improper assembly or exposure to water and sub-freezing temperatures is not covered. (Do NOT allow water to accumulate inside frame)
- FinishThe finish is warranted against peeling, cracking, or blistering for a period of 1 year, provided the unit has not been scratched or abraded. Scratches and chips resulting from normal wear and use are not covered. Peeling resulting from exposure to elements is not covered.
- FabricFabrics / cushions are warranted against separation at the seams and fading under normal usage and exposure conditions for a period of 1 year. Mildew and fading or discoloration resulting from exposure to the elements, chemicals, or from spills is not covered. (Please refer to care and maintenance for proper cleaning instructions)
Warranty Exclusions : Furniture used for commercial, contractor or any non-residential purposes, clearance items, display models or items purchased “as is”, freight damage, furniture damaged by acts of nature, vandalism, fire, abuse, lack of proper care and maintenance, or improper assembly, straps and fabric against fading or discoloration from exposure to element-., oil spills, fluids or chemicals; glass against breakage; hardware against corrosion or rusting; buckling or splitting of tubing resulting from exposure to water and freezing temperatures. Al so excluded: loss of use or time, inconvenience, money , travel, packaging or any other consequential or incidental damages. In no event shall the manufacturer’s responsibility exceed the value of the replacement product.
Warranty is to the original purchaser when it ems are purchased from one of our authorized retailers and is not transferable. All warranty claims must be submitted with a dated register receipt within the warranty period. Should replacement of the warranty item be unavailable, the manufacturer reserves the right to substitute items of our choice that are of similar style and quality. For quality control purposes and verification, we reserve the right to request photography of the damage item(s). The terms of this warranty are subject to change without notice.
[xyz-ips snippet=”download-snippet”]