
![]()
Patio® FR SeriesSterling Patio® FR Series
OWNER’S MANUAL
THERMAL ENGINEERING CORPORATIONP.O. Box 868, Columbia, South Carolina 29202-08682741 The Boulevard, Columbia, South Carolina, 29209Telephone: (803) 783-0750 Toll-free (800) 331-0097Fax: (803) 783-0756 Toll-free fax (888) 581-0286
![]()
INSTALLATION, USE, AND CARE GUIDELINESFor the Patio FR Series Grills
INSTALLER: Leave these instructions with Owner.OWNER: Retain for future reference.
IMPORTANT: READ THESE INSTRUCTIONS CAREFULLY BEFORE INSTALLATION, USE, OR SERVICING OF THIS PRODUCT.
![]() DANGER:
DANGER:
IF YOU SMELL GAS:
- Shut off the gas to the appliance.
- Extinguish any open flame.
- Open lid.
- If odor continues, keep away from the appliance and immediately call your gas supplier or the fire department.
CODE AND SUPPLY REQUIREMENTS:
This grill must be installed in accordance with local codes and ordinances, or in the absence of local codes, with either the National Fuel Gas Code, ANSI Z223.1/NFPA 54, Natural Gas and Propane Installation Code, CSA B149.1, or Propane Storage and Handling Code, B149.2.This grill and its individual shutoff valve must be disconnected from the gas supply piping system during any pressure testing of that system at test pressures in excess of 0.5 psi (3.5 kPa).This grill must be isolated from the gas supply piping system by closing its individual manual shutoff valve during any pressure testing of the gas supply piping system at test pressures equal to or less than 1/2 psi (3.5 kPa).
WARNING: FAILURE TO FOLLOW THESE INSTRUCTIONS CAN RESULT IN A FIRE CAUSING DEATH OR SERIOUS INJURY OR PROPERTY DAMAGE.

NATIONALLY REGISTERED TESTING LABRATORY
Certified to:ANSI Z21.58b-2012CSA 1.6b-2012
![]() WARNING:
WARNING:
Improper installation, operation, adjustment, alteration, service, or maintenance can cause injury property damage or death. For assistance or additional information, consult a qualified professional installer, service agency, or gas supplier.
![]() WARNING:
WARNING:
- Do not store or use gasoline or other flammable vapors and liquids in the vicinity of this or any other appliance.
- An LP cylinder not connected for use shall not be stored in the vicinity of this or any other appliance.
CERTIFICATION RESTRICTIONS
This grill is designed and certified for outdoor use only and shall not be used in a building, garage, or another enclosed area. The grill is not intended to be installed in or on a boat or recreational vehicle.Do not use the grill under overhead combustible construction.Always maintain the proper clearances to combustible construction to the sides and back of the grill.
U.S. Patents, 6114666, 7726967B2, 7853129; Canadian Patents 2571545, 2571395, 2336036; European Patent (Austria, Germany, Denmark, France, Great Britain, Netherlands, Sweden) 99932203.5; and Patents Pending©Thermal Engineering Corporation, Issued 10/15 rev.2
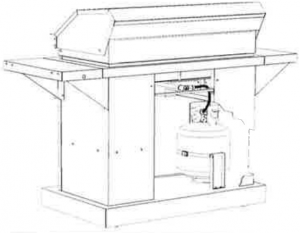
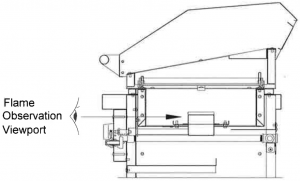
CROSS SECTION VIEWPATIO® SERIES GRILLS
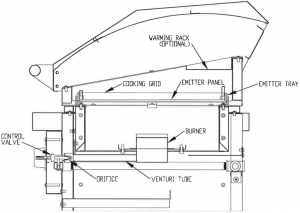
FIGURE 1
For Parts – Contact your dealer or Thermal Engineering Corporation.
Thermal Engineering Corporation
P.O Box 868 2741 The BoulevardColumbia, SC 29202 Columbia, SC 29209Tetephone: (803) 783-0750 Toll-free: (803) 331-0097Fax: (803) 783-0756 Toll-free fax: (888) 581-0286
MODEL: ______________________________DATE OF PURCHASE: __________________SERIAL #: ____________________________DEALER NAME: ______________________DEALER TELEPHONE: ________________
IMPORTANT SAFETY PRECAUTIONS
Please review these important safety precautions before you use your grill and read the Owner’s Manual fully and carefully. Failure to follow the instructions, guidelines, and restrictions in the manual can result in a fire or other injury causing death or serious personal injury or property damage.
In General
- Never leave the grill unattended while cooking.
- Make sure you have an ABC fire extinguisher accessible when you grill. Do not attempt to extinguish a grease fire with water or liquids.
- Place your grill away from areas where children play and never leave children alone or unattended in an area where a grill is located.
- Keep the area in which your grill is located clear and free from combustible material, gasoline, and other flammable vapors and liquids.
- Always maintain the required clearances from the sides and back of your grill to combustible construction. Do not operate the grill under overhead combustible construction.
- Your grill should only be used outdoors and should not be used in a building, garage, or any other enclosed area.
- Your grill is not design or certified for, and should not be installed in or on, recreational vehicles or boats.
- Never operate your grill while under the influence of alcohol or drugs.
- Do not use your grill unless a leak test has been performed on all gas connections. If the gas hose shows excessive abrasion or wear or if it is cut, it must be replaced prior to using your grill.
- Keep any electrical supply cords and the fuel supply hose away from any heated surfaces.
- Follow the lighting and operation instructions in this manual explicitly.
- Always keep the hood of your grill open while lighting the grill. Releasing gas into a closed grill before lighting will increase the risk of an explosion which could lead to property damage, serious injury, or death.
- If a burner does not light or goes out while you are using your grill, turn off all the burner control knobs, open the hood, and wait 5 minutes before attempting to relight.
- Do not block the flow of combustion and ventilation air to your grill and keep the ventilation opening(s) of the cylinder enclosure free and clear from debris.
- Do not touch the grill grates, hood or immediate surrounding metal surfaces before, during, and after grilling until you have allowed your grill to cool.
- Never move your grill while it is hot.
- Always open the grill hood slowly to allow heat and smoke to escape gradually.
- Check the orifices and burner venturi tubes regularly for insects and insect nests. A clogged tube can lead to a fire beneath the grill. To check for insect nest, remove the control knobs and the front control panel of your grill (see figure 1). Disconnect the electrode wires from the igniter. Check the orifices and venture tubes for debris.
- All TEC grills require a TEC specified regulator that is provided with your grill. If replacement parts are necessary, use only TEC specified regulators that have been pre-adjusted to the required gas pressure of the grill.
- Use only the gas type designated for your grill. Failure to use the correct gas type can cause your grill to over fire or under fire. The designated gas type (LP or Natural) is specified on the serial number plate of the grill.
- If you smell gas, turn off your grill and the gas supply valve immediately and contact a qualified technician.
- To avoid excessive temperatures (over 1000°F) do not operate the grill on high with the hood closed in excess of 10 minutes. After 10 minutes, either cook with the hood open or adjust the heat to medium or low.
When Using Portable LP Cylinders
- Inspect the gas hose prior to using your grill each time. If there is evidence of excessive abrasion or wear-and-tear or if the hose is cut, it must be replaced with a TEC specified regulator/hose assembly before using the grill.
- Use only approved LP cylinders that have a collar to protect the cylinder valve and are in good condition. The dimension of the approved cylinder is 17.75 inches to the top of the collar and the diameter is 12 inches.
- Keep the ventilation openings of the cylinder enclosure (i.e. cabinet, island, etc) free and clear from debris.
- Be sure to set the cylinder upright (so that the cylinder valve is at the top) and fasten it securely inside the grill cabinet or island using the provided tank strap restraints.
- Follow the procedure in the manual carefully for connecting and disconnecting the cylinder to your grill.
- Always turn off the gas at the valve of the cylinder when your grill is not in use.
- Never fill the cylinder beyond 80% full.
- Never store additional or empty propane cylinders in the grill cabinet or island or in the vicinity of your grill or other appliances.
- If the information in items 7 & 8 are not followed exactly, a fire causing death or serious injury may occur.
- Do not store your grill indoors unless you disconnect and remove the cylinder.
- Cylinders must be stored outdoors, out of reach of children, and must not be stored in an enclosed area.
- Place the dust cap that is provided with the cylinder on the valve of the cylinder when not in use.
When Using Natural Gas or Bulk LP Gas Tank
- For Natural Gas or LP Bulk Tank installations, use only a qualified technician to perform the required plumbing.
- Make sure the technician has performed a leak test on all fittings that supply gas to your grill and has purged the gas line of air prior to using your grill.
- Ask the technician to show you where your gas supply shut-off is located before he leaves. All gas lines must have a shut-off that is easily accessible.
2
INSPECTING YOUR GRILL FOR SHIPPING DAMAGE
IMPORTANT: Freight carriers require that shipping damage be reported within 15 days of delivery. Therefore, you must unpack and carefully inspect your grill as soon as it arrives. On occasion, concealed damage cannot be detected visually. TEC recommends that you assemble and use your grill within the required 15 day reporting period to ensure that your grill has not been damaged internally during shipping. Please keep all packaging material in case you discover any damage or defects after delivery so that you can repackage the grill for return and immediately report any damage or defect by contacting TEC’s Customer Service Department.
CHOOSING THE PROPER LOCATION FOR YOUR GRILL
Outdoor Use Only
Your TEC grill is designed and certified for outdoor use only. It should not be operated in a building, garage, or other enclosed area, and it is not intended for use on recreational vehicles or boats.
Level Foundation
Place your grill on a level foundation to prevent it from shifting or tipping over during use.
Setting Your Cabinet Brake (Free Standing Grills)
The cabinet brake located inside the cabinet on the floor should be engaged by turning the knob clockwise until there is sufficient pressure to lock the grill in place.
Clearance To Combustibles
Do not use your grill under overhead combustible construction.
Clearances Above The Top Of The Grill
Minimum clearance from the sides and back of the grill to adjacent combustible construction extending above the top of the grill are 24″ from the sides and back.
INSTALLING THE RADIANT GLASS PANELS & COOKING GRATES
Grilling Surface
- The cooking grates and radiant glass panel(s) are shipped inside the interior of the grill (see figure 1). Take the glass panel(s) out of the grill and remove the bubble wrap.
- Remove the cooking grates from the metal tray (that they are shipped in). Check to see if that the clips located on each side of the tray hold the tray firmly in place. If you detect any movement front to back or side to side, adjust the clips by bending them inward with pliers.
- Place the glass panel(s) in the tray with the smooth side up. Place the cooking grates directly on top of the glass with the open channels facing downward and the taller end of the grates at the back of the grill.
Warming Rack
If a warming rack is purchased as an option, it can be easily attached to the grill (No hardware required). Simply hang the warming rack over the back wall of the hood body.
Ignition SystemThe Patio Series grills use an electric igniter that is completely installed. The igniter provides a voltage to the spark electrode located at each burner. The system is battery operated, and the battery must be changed when the spark appears to weaken. To change the battery, unscrew the igniter button adjacent to the viewing hole for each burner and install a new battery with the positive end of the battery inserted into the igniter. When screwing the igniter button back onto the grill, take care not to use too much pressure which will strip the plastic threads.
SIDE SHELF INSTALLATION
Freestanding models only
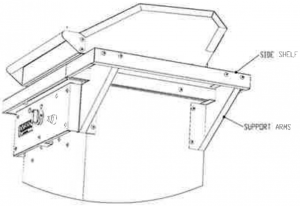
(Required tool: 7/16″ open or boxed end wrench or socket, and #3 Phillips head screw driver)
- Each side shelf is shipped with two support arms. Remove the truss head screws installed in the left and right sides of the grill cabinet and put them aside. These will be used to mount the stainless shelf to the support arms.
- Mount the support arms to the side of the cabinet using the 4 hex head bolts (HW0514) included in the side shelf hardware package.
BUILT-IN GRILL INSTALLATION
The built-in model of the Patio grill is shipped completely assembled and is ready to be placed into the cut-out of a custom cabinet or island. No fasteners are required because the weight of the grill will hold it securely in place. However, the counter top must be made of a non-combustible material, such as metal, tile on cement board, stucco, stone, granite, marble, brick or polished cement. If the cabinet enclosure is built of non combustible materials, no ventilation beneath the countertop is required.
Clearances to Combustible Materials Above the Countertop
When installing the Patio built-in grill, clearances to combustible materials must be observed. The grill should not be placed closer than 24″ from the side and back of the grill head to combustible construction or other combustible materials located above the countertop.
Patio FR Built-In Cutout Dimensions
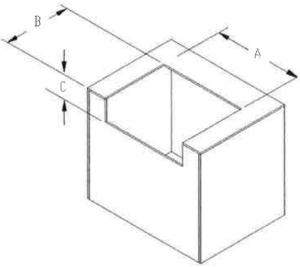
| GRILL | A
CUTOUT WIDTH |
B
CUTOUT DEPTH |
C
CUTOUT HEIGHT |
| PATIO FR 26” | 23,125 | 20 | 7,125 |
| PATIO FR 44” | 41,500 | 20 | 7,125 |
FIGURE 2
Ventilation Requirements And Clearances For Grill Enclosures Built With Combustible Materials
When a cabinet or island for a built-in Patio grill is constructed of combustible materials, the floor of the enclosure must be at least 25.5″ below the bottom of the grill. The cabinet itself must be vented in two places, front and back, whether or not an LP tank is contained within the enclosure. Each vent should provide 35 sq. inches of unobstructed ventilation. The front cabinet vent should be centered below the grill at the bottom of the cabinet. It can be concealed by cutting the vent opening into the floor on the inside of the enclosure, just behind the cabinet doors. This will allow the grill to vent directly to the outside of the cabinet above the toe kick. The back cabinet vent should be positioned behind the grill, at the top of the cabinet. A ventilation cover can be placed over the vent openings as long as it provides at least 35 sq. inches of open area.If the LP gas cylinder is to be contained in the enclosure, the enclosure must be built in accordance with the specifications under “Enclosures for Self-Contained LP Gas Cylinders.”
5
Enclosures for Self-Contained LP Gas Cylinders
For Built-In grill applications designed for use with an LP gas cylinder, the cylinder enclosure within your cabinet or island must be constructed in accordance with the following guideline restrictions:
Location: The access opening into the cylinder enclosure within your cabinet or island must be located directly below the grill. This will allow you to remove the cylinder from the enclosure (if necessary) without disconnecting the gas hose. The access opening for the cylinder should be on the center line of the grill. Inside the enclosure, the cylinder can be mounted at the center of the grill, or the center line of the cylinder can be adjusted 14″ to the right or left of center. The countertop surface onto which the grill will be mounted should be at least 35″ high so that the gas hose will not touch the floor or ground when it is not connected to the LP cylinder. Otherwise, your gas hose will not be long enough to allow you to remove the cylinder while it is still connected to your grill.
Dimensions: The enclosure must be a minimum of 20″ wide and 20″ deep and should be at least 35″ high in order to accommodate a 20 lb. LP cylinder and allow access to the cylinder valve.
Floor Height: There must be a minimum clearance of 2″ and a maximum of 5″ between the floor of the cylinder enclosure and the ground.
Door Opening: The door opening of the enclosure must be a minimum of 15″ wide and 20″ tall to accommodate a 20 lb. LP cylinder. If a door is installed. it must be ventilating and capable of being opened without the use of tools.
Ventilation: For your safety: All enclosures for LP gas cylinders must have ventilation holes to prevent gas build-up in the event of a leak. To properly ventilate a built-in enclosure for an LP cylinder.
- Leave one side of the cylinder enclosure completely open. The side left open must be directly exposed to the outside air.
- Provide at least two unobstructed ventilation openings (upper and lower) in an exterior side of the cylinder enclosure to achieve direct ventilation to the outside air. Important: Openings cannot vent into other enclosed areas within the island or cabinet. The upper vent openings must be located within 5 inches of the top of the enclosure and shall have a total free area of not less than 1 in²/lb. of stored fuel capacity. The lowest vent opening(s) must be located within 1 inch of the floor of the cylinder enclosure but can extend no higher than 5 inches above the floor. This opening must have a total free area of not less than 1/2 in²/lb. of stored fuel capacity.
- Every opening shall have a minimum dimension so as to permit the entrance of a 1/8″ (3.2mm) rod.
- It should be noted that the above minimum ventilation is for the purpose of not allowing excessive propane gas to accumulate in the event of a leak. The enclosure for a Patio grill requires a greater amount of ventilation because the flow of air pro vides some cooling and the secondary air for combustion.
GAS SUPPLY REQUIREMENTS
General Overview
Converting Your Grill To a Different Type Gas: To convert your grill from LP to Natural or Natural to LP gas use, a TEC conversion kit is required and must be installed by a qualified technician.
Regulator: WARNING: NEVER CONNECT A GAS LINE DIRECTLY TO A GRILL. FOR YOUR SAFETY ONLY USE THE REGULATOR PROVIDED WITH YOUR GRILL, or if replacements parts are necessary use only TEC specified replacement parts as these parts have been pre-adjusted to the required gas pressure of the grill. A pressure regulator must be installed on all grills and failure to do so can result in fire or serious personal injury, property damage, and/or death. The regulator for Natural gas units is permanently attached to the grill at the factory prior to shipping, and only a qualified technician should perform the required plumbing. Bulk Tank Application: The regulator/ hose assembly included with TEC LP Gas grills cannot be used with a LP Bulk Tank.A TEC specified bulk tank regulator must be purchased separately and attached to the grill (by a qualified technician) and used in conjunction with the regulator that is installed on the bulk tank.
Gas Supply Pressure Requirements (Inches of Water Column)
Your grill has been factory set to use either Propane (LP) or Natural Gas. Use only the gas type designated for your grill. Failure to use the correct gas type can cause your grill to over fire or under fire. The designated gas type is specified on the serial number plate of the grill.
| Fuel | Max. Inlet Pressure | Min. Inlet Pressure | Burner Operating Pressure |
| Natural Gas | 13.5 IN. WC | 5.0 IN. WC | 4.0 IN. WC |
| LP (20 lb tank) | 125 psi | 12 IN.WC | 10.0 IN. WC |
| LP (Bulk tank) | 13.5 IN. WC | 12 IN.WC | 10.0 IN. WC |
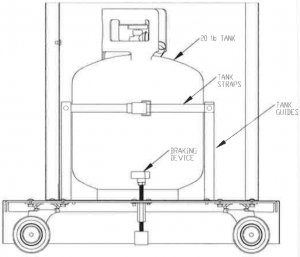
SECURING THE LP GAS CYLINDER
Place the LP cylinder inside the grill cabinet between the tank supports and secure its upright position by strapping it into place with the tank straps that are attached to the tank supports.
7
MAKING YOUR LP GAS CYLINDER CONNECTION
Warning: Do not use any other regulator/hose assembly other than the one supplied with your grill. If the regulator/hose assembly needs replacing, use only TEC specified replacement parts.
Warning: Always check for leaks after every LP cylinder change. IMPORTANT: See “Leak Test” for proper procedure.
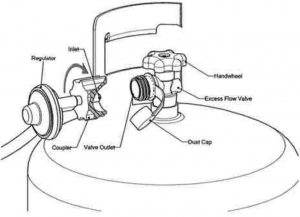
IMPORTANT: LP gas cylinders are equipped with an excess flow valve that is designed to shut down the flow of gas from the cylinder when a gas leak is detected. To prevent triggering the excess flow valve, it is important that all of the control knobs are turned off prior to opening the cylinder valve and that you open the valve slowly.
Procedure:
- Make sure that the valve of the LP gas cylinder is fully closed by turning the hand wheel at the top of the tank clockwise until it stops.
- Place the LP cylinder inside the grill cabinet and secure its upright position by strapping it into place with the tank straps that are attached to the interior of the cabinet.
- Check to see that all of the burner control knobs are in the “OFF” position and that the hood of the grill is open.
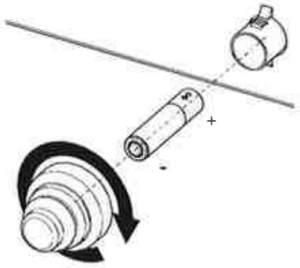
- Insert the regulator inlet into the cylinder valve making sure that the nipple is centered in the valve outlet, then turn the coupler clockwise until the coupler is hand tight. Do not over-tighten this connection.
- To purge the gas line of air, open the valve of the cylinder slowly by turning the hand wheel at the top of the cylinder counter-clockwise until it stops.
- Depress the igniter button (see Igniting Your Grill). Push in and turn the burner control knob of the burner being ignited to its high position. If the burner does not ignite within 5 seconds, turn the control knob to its “OFF” position. It is likely that the lines were not completely purged of air. Wait 5 minutes with the hood open and repeat the above procedure.
- After you have successfully purged the gas lines and ignited the burner, test for gas leaks following the procedure found below.
Important: The regulator hose assembly is connected at the factory before shipping. If the regulator ever needs to be replaced, the work must be done by a qualified technician.
8
LP GAS CYLINDER SAFETY
When Using Portable LP Cylinders:
Connector must comply with the Standards for Connectors for Outdoor Gas Appliances and Manufactured Homes, ANSI Z21.75 /CSA 6.27, and suitable for outside installation.
- Inspect the gas hose prior to using the grill each time. If there is evidence of excessive abrasion or wear and tear or if the hose is cut, it must be replaced before using the grill with a TEC specified regulator/hose assembly.
- Use only approved 20 lb LP cylinders that have a collar to protect the cylinder valve and are in good condition.
- Never fill the cylinder beyond 80% full.
- Keep the ventilation openings of the cylinder enclosure (i.e. cabinet, island, etc) free and clear from debris.
- Be sure to set the cylinder upright (so that the cylinder valve is at the top) and fasten it securely inside the grill cabinet or island using the provided tank strap restraints.
- Follow the procedure in the manual carefully for connecting and disconnecting the cylinder to the grill.
- Ensure visibility of and support for the connector.
- Maximum length of the LP gas hose shall be 6 ft (1.82 m).
- Always turn off the gas at the valve of the cylinder when the grill is not is use.
- Never store additional or empty propane cylinders in the grill cabinet or island or in the vicinity of this or other appliances.
- Do not store your grill indoors unless you disconnect and remove the cylinder.
- Cylinders must be stored outdoors, out of reach of children, and must not be stored in an enclosed area.
- Place the dust cap that is provided with the cylinder on the valve of the cylinder when not in use.
LP GAS CYLINDER REQUIREMENTS
Your LP Gas Cylinder Must Be:
- Constructed and marked in accordance with the Specifications for LP-Gas Cylinders of the U. S. Department of Transportation (D.O.T.) or the National Standard of Canada, CAN/CSA-8339, Cylinders, Spheres and Tubes for Transportation of Dangerous Goods; and Commission, as applicable.
- Equipped with a listed overfill protection device as well as a standard Type 1 valve connection compatible with the LP regulator/hose assembly provided with the grill.
9
MAKING YOUR NATURAL GAS OR BULK TANK CONNECTION
Caution: GAS PIPING TO YOUR GRILL MUST BE IN ACCORDANCE WITH LOCAL CODES. IN ABSENCE OF LOCAL CODES, USE THE NATIONAL FUEL CODE ANSI Z223.1/NFPT 54 (LATEST EDITION) or CAN/CGA B-149.1, NATURAL GAS AND PROPANE INSTALLATION CODE.
Important: For connections to natural gas or remote self-contained LP gas supply systems (Bulk Tanks), use a qualified technician to install the gas line.
Notice to Installer
- Natural Gas Installation: The regulator on this grill was installed at the factory prior to shipping. If it needs to be replaced, use only a TEC specified regulator that has been pre-adjusted to the required gas pressure of the grill. LP Bulk Tank Installation: The regulator/hose assembly included with TEC LP gas grills cannot be used with a Bulk Tank. A TEC specified regulator must be purchased separately and attached to the grill and used in conjunction with the regulator that is installed on the Bulk Tank.
- To ensure satisfactory performance, the gas supply line must be sized to accommodate the total BTU/HR requirements of all the gas fired equipment that will be connected to the line. In no case should pipe or tubing be less than 1/2 inch (inside) diameter.
- For Built-In installations, use rigid metal pipe or semi-rigid metal tubing to run your gas supply line. Important: Do Not Use a Rubber Hose Within a Built-In Grill Enclosure. For cart installations, use a flexible hose that will allow for movement in the event that the cart shifts. Attach an approved flex connector to the piping hose that complies with the Standard for Connectors for Outdoor Gas Appliances and Manufactured Homes, ANSI Z21.75.CSA 6.27
- Perform a gas leak test on the plumbing fittings after you have installed the gas line.
- The grill and shut-off valve must be disconnected from the gas supply piping system during any pressure testing of the system at test pressures in excess of 1/2 PSIG (13.5 in. w.c.).
- The grill must be isolated from the gas supply piping system by closing its individual manual shut-off valve during any pressure testing of the system at test pressures equal to or less than 1/2 PSIG (115 in. w.c.).
- Make sure that the owner knows where the gas supply shutoff valve is located before you leave.
- Leave this manual with the Owner and advise them to read it thoroughly and keep it for future reference.
10
GAS LEAK TESTING
Important: Test for leaks every time the gas is reconnected.Warning: Do not smoke while performing a leak test or allow any potential source of ignition in the area. Never conduct a leak test using fire.
Procedure:
- Confirm that all burner control knobs are in the “OFF” position.
- Slowly open the LP Cylinder Valve or gas shut-off valve (for permanent installations).
- Generously apply a soapy water solution to all connections and fittings. If bubbles can be seen around a connection, you have a gas leak. Immediately close the cylinder valve or shut-off valve. Call a qualified technician to repair the leak.
- For grills fueled by a 20 lb. LP cylinder, if the gas leak is located at the cylinder valve outlet, check to see that the regulator/cylinder valve connections are hand tight, then repeat the leak test. If bubbles continue to appear around the connection, the valve of the cylinder may be defective. Replace the cylinder and repeat the leak test. If bubbles appear, call a qualified technician.
Important: Use only TEC specified replacement parts.
LIGHTING YOUR GRILL
WARNING: Do not light your grill or attempt to use it if you smell gas. Check to see that all of the burner control knobs are in the “OFF” position and turn off the gas at its supply source, then call a qualified technician to check for gas leaks.
IMPORTANT: NEVER OPERATE YOUR GRILL WITHOUT THE RADIANT GLASS PANELS PROPERLY INSTALLED.
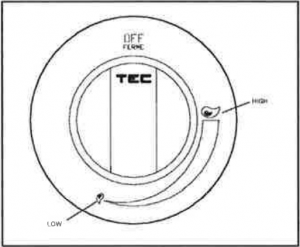
Electronic Ignition:
- Open the hood of your grill.
- Confirm that all of the burner control knobs are in the “OFF” position.
- Press the igniter button for the burner you wish to light. You should hear a clicking sound. If you do not, the battery probably needs to be replaced with a new one.
- While pressing the igniter button, depress and turn (to the left) the control knob of the burner (that you wish to light) to its high position.
- Check to see that the burner has been lit, and then release the igniter button. You can view the burner flame through the round viewpoint opening located adjacent to the igniter button and can generally hear the burner ignite and then feel warm air rising from around the cooking surface. You can also see the flame through the glass plate. Immediately after ignition, the flame will be luminous enough to view.
- If the burner does not ignite in 5 seconds, turn the control knob to “OFF” and wait 5 minutes before you attempt to light the grill again.
- After ignition, you will hear a fluttering sound coming from the burner. This is normal.
- Repeat this procedure for each burner that you wish to light.
CAUTION: If you have tried but have been unable to light your grill using the spark igniter system, you can light your grill manually following the procedure below. Make sure that you allow 5 minutes for any accumulated gas to dissipate before attempting to match light a burner.
Match Lighting:
- Open the hood of your grill.
- Confirm that all of the burner control knobs are in the “OFF” position.
- Reach beneath the countertop surface and remove the match holder. Insert a match into the clip at the end of the rod.
- Light the match, then guide it through the round viewpoint opening located to the left of the control knob of the burner that you are lighting. You will need to peer through the viewpoint opening as you guide the flame of the match through the interior of the grill to the burner. The rod of the match holder will be fully extended inside the grill when the flame reaches the burner.
- Keeping your eyes on the flame, turn the control knob to the left to its high position. When the burner is lit, remove the match holder.
- If the match flame goes out before the burner is lit, turn off the gas immediately, remove the match holder, and wait 5 minutes before attempting to light the grill again.
CLEANING AND MAINTAINING YOUR TEC GRILL
Warning: Always Allow Your Grill to Cool Before Removing the Grates and Ash.
TEC’s Self-Cleaning Cooking Surface:
The Radiant Glass Panels in your TEC Grill, located beneath the cooking grates, incinerate food drippings and debris when cooking on medium to high temperatures. These high temperature, ceramic glass panels are designed to withstand temperatures of up to 1200°F without breaking; however, the food debris and ash that accumulate on the panels during grilling act as an insulator and may cause the panels to overheat and crack if allowed to accumulate.
12
It is important to clean your cooking surface regularly following the simple burn off procedure listed below. However, We Strongly Recommend That You Do Not Remove The Glass Panels From Your Grill. The beveled edges of the panels are easily chipped when you take them out of the grill, which compromises the strength of the glass under heat causing it to break. Also, when removing the cooking grates during cleaning, take special care not to drop them or any other object on top of the glass panels.
Excessive Grease Build-up that Occurs When Smoking / Barbequing Low & Slow
Your Patio Grill is designed to incinerate food drippings and grease when grilling at medium to high temperatures. When cooking at lower temperatures, grease will accumulate on the radiant glass and may drip into the interior of your grill cabinet. To avoid problems with excessive grease build up, use a pan (on top of the grates) in conjunction with a TEC barbeque or roasting rack to collect grease that accumulates when cooking on lower temperatures. CAUTION: Always remove the grease from the roasting pan after cooking when the grill cools. Operating your grill at medium to high temperatures with excessive grease build up may cause a grease fire.
Burn-Off Procedure: TEC Grills use the same self-cleaning concept as residential ovens, so they are easy to clean.
- Light all of the burners in your grill and turn the burner control knobs to high.
- Close the hood and wait 10 minutes to ensure that all food drippings and debris are incinerated.
- Turn off the burners and allow your grill to completely cool.
- Once the grill has cooled, carefully remove the grates and scoop out the ash and remaining debris with a spatula. Except for appearance, it is not necessary or required to remove every particle from the glass surface.
- You may also wipe the glass with a dry or damp cloth as well as the cooking grates although this is not necessary. Do Not Take The Glass Panels Out Of Your Grill To Clean Them.
Important: Do Not Operate Your Grill On High With Excessive Grease Build Up. When slow cooking, remove the roasting pan before beginning the self cleaning burn-off procedure.
No other cleaning of the glass is necessary to ensure proper function. However, to improve the cosmetic appearance of the glass, additional cleaning may be done following the instructions below.
Using Approved Glass Cleaners:
After you have scraped the ash off of the glass panels and wiped them with a damp cloth, you may wish to do additional cleaning of the glass using a ceramic cleaning cream. The following are the creams approved by the glass manufacture: ELCO/Weimann Cooktop CleaningCreme, Golden Ventures Cerama Bryte, Whirlpool Cooktop Cleaner.
Important: Do Not Use Abrasive Sponges Or Scouring Pads Of Any Type. Do Not Use Corrosive Cleaners Such As Oven Sprays, Stain Removers, or Cleaners Containing Chlorine Or Ammonia.
13
Outer Stainless Structure
Important: Do not leave objects on the grill such as iron and non-stainless steels that will cause oxidation, discoloration or surface rust of the stainless. This is not covered under your warranty.
TEC grills are built using the finest material and craftsmanship. To preserve the appearance and ensure the long life of your grill, it is important that you clean it regularly. We recommend that you wipe down the exterior of your grill after each use. Some household cleaning products are not suitable for stainless steel. Be sure to read the label before using any cleaning product. Ammonia based glass cleaners such as Windex work well to remove grease and splatter. Commercially available stainless steel cleaners can also be used to clean and polish the exterior surfaces. Do not use metallic abrasives and always rub in the direction of the grain.
Black Painted Pedestal
While factor-applied finishes are so durable that they will last many years longer than ordinary paints, it is desirable to clean them thoroughly on a routine basis. Apparent discoloration of the paint may occur when it has been exposed to dirt-laden atmospheres for long periods of time. Slight chalking may also cause some change in appearance in areas of strong sunlight. A good cleaning will generally restore the appearance of these coatings, and an occasional light cleaning will help maintain an aesthetically pleasing appearance. Mild solutions of detergents or household ammonia will aid in the removal of most dirt, and the following are recommended levels:
One cup of Tide, or other common detergents, which contain less than 0.5% phosphate, dissolved into five gallons of warm water
NOTE: The use of detergents containing greater than 0.5% phosphate is not recommended for use in general cleaning.
Chemicals Used to Clean Concrete and Masonry
Chemicals used to clean concrete and masonry can be very corrosive and will pit and permanently discolor stainless steel. Do not allow the use of these type chemicals near your grill unless it is well protected.
Fertilizer, Chlorine, and Salt Air
The 304 stainless steel used in the construction of your TEC grill is one of the most corrosive resistant grades of stainless available today. However, it is not corrosion proof. Chlorine in the air from swimming pools and salt in the air in coastal areas can cause surface rust to appear and even create pitting on the stainless surface if left on the grill. Chemicals such as yard fertilizers can also degrade stainless. We recommend that you wipe down the outer surface of your grill regularly if it is located on or near a pool or coast and protect it with a grill cover when it is not in use. Also, do not store chemicals such as chlorine or fertilizer near your grill.
14
TEC GRILLING TIPS
PREHEATING YOUR GRILL
IMPORTANT: Patio series grills are capable of reaching temperatures in excess of 1000°F when preheated on high with the hood closed. Do not preheat on high longer than 10 minutes.
When Cooking with the Hood Open
- Light your grill, turn the control knob(s) to high, and close the hood.
- After 10 minutes, open the hood and set the control to the desired temperature. Important: Do not preheat on high longer than 10 minutes.
When Slow Cooking with the Hood Closed (see instructions below)
SMOKING, ROASTING, AND BARBEQUING LOW AND SLOW
Many people associate infrared grilling with high temperature searing because TEC’s original infrared technology employs a ceramic burner that can only be turned down to about 650°F. But TEC’s new Patio has a patented stainless steel burner with an unprecedented turn down of about 200°F with the hood open (350°F with the hood closed), allowing you to roast, smoke, and barbeque low and slow.
Slow Cooking With Wood Chips or Pellets
Whether you use wood chips or pellets or how much you use is a matter of personal preference. The more wood you put on the grates, the stronger the smoky flavor will be. But just a few chips scattered across the grates can add a rich, charbroiled flavor to meat that does not taste smoky.
Slow Cooking Instructions
- Your Patio grill is designed to incinerate food drippings and grease when cooking at medium to high temperatures. When cooking at lower temperatures, grease will accumulate on the radiant glass and may drip into the interior of your grill cabinet. To avoid problems with excessive grease build up, you must place a roasting pan or TEC barbeque tray on the grates to collect the grease. Place a TEC barbeque or roasting rack on top of the pan and put your meat on the rack. If you are using wood chips or pellets, place them directly on the grates.
- With your hood closed, preheat your grill on high for 4-5 minutes or until your chips begin to smoke. Then turn the burner(s) down to low.
- We recommend using a meat thermometer to check the internal temperature of the meat. For smoking and roasting, refer to the Grilling Time/Temperature Chart on pages 16 and 17. True Southern barbequing, where the meat is pulled rather than sliced, requires 8-14 hours depending on the size of the meat you are cooking.
15
SAMPLE COOKING METHODS AND TIMES
![]()
Actual cooking times may be affected by variations in altitude, ambient temperatures at the time of cooking, fat content or thickness of the food, or other factors. Use this chart to develop your own cooking approaches.
| Meat & Poultry | CONTROL SETTING | TOTAL COOKING TIME |
| Steak or Lamb Chop
3/4“-1” Thick (Hood Open) |
High Fire, 3 minutes each side
High Fire, 3 1/2 minutes each side High Fire, 4 minutes each side High Fire, 4 1/2 minutes each side High Fire, 5 minutes each side, then turn meat 90° and cook 1 minute each side (to prevent charred scoring) |
6 minutes – Rare
7 minutes – Medium Rare 8 minutes – Medium 9 minutes – Medium Well 10 minutes – Well Done |
| Pork Chops
1/2″ Thick
1″ Thick |
High Fire, 3-4 minutes each side.
Medium-Low Fire, 4 minutes each side, then turn meat 90° and cook 1-2 minutes each side (to prevent charred scoring) |
6 – 8 minutes, Medium to Medium Well
10 – 12 minutes, Medium to Medium Well |
| Hamburgers (Hood Open)
1/2” Thick 1″ Thick |
High Fire, 4 minutes each side
High Fire, 5 minutes each side |
8 minutes (160°F core temp.)
10 minutes (160°F core temp.) |
| Hot Dogs (Hood Open) | Medium Fire, 2 minutes each side | 4 minutes |
| Fresh Brats (Hood Open) | High Fire, turn every 3-4 minutes | 12 – 16 minutes |
| Whole Chicken (Hood Closed) | Low Fire, Place chicken on vertical roasting stand or can of beer. | 50 – 60 minutes (160°F core temp.) |
| Half Chicken (Hood Closed) | Low Fire, turn once after 25 minutes | 45 – 60 minutes (160°F core temp.) |
| Boneless Chicken Breast (Hood Open)
1/2” Thick 3/4” Thick 1+” Thick |
High Fire, 5 minutes each side
High Fire, 3 minutes each side High Fire, 4 minutes each side High Fire, 4 minutes each side, then turn meat 90° and cook 1-2 minutes each side (to prevent charred scoring) |
10 minutes
6 minutes 8 minutes 10-12 minutes |
| Boneless Chicken Parts (Hood Closed) | Low to Medium-Low Fire, turn every 5-6 minutes (times vary for different parts) | 15 – 24 minutes |
| Baby Back Ribs (Hood Closed)
Meaty Spare Ribs (Hood Closed)
Bacon (Hood open) |
Medium-Low Fire, turn once after 15-20 minutes
Low Fire, turn once after 20-30 minutes High Fire, 2 minutes each side |
30 – 45 minutes
45 minutes – 1 hour
4 minutes |
16
GRILLING LARGER CUTS OF LARGER MEATS
Larger cuts of meat continue to cook even after they have been removed from the grill. In fact the interior temperature will continue to rise 8°-15° at the core depending on the size of the cut, so you should remove your meat from the grill prior to reaching your target temperature. Otherwise, it will be overcooked.
| Meat & Poultry | CONTROL SETTING | TOTAL COOKING TIME |
| Beef Tenderloin or Roast (Hood Closed) | Medium Low Fire, 20-30 minutes each side. Remove when core temperature reaches 125°F. Rest 10 minutes before cutting. | 45-60 minutes depending on wt. – Rare to Medium Rare. Core temperature should reach 135°F on resting. |
| Pork Tenderloin or Roast (Hood Closed) | Medium Low Fire, 15-22 minutes each side. Remove when core temperature reaches 140°F to 155°F. Rest 10 minutes before cutting. | 30-45 minutes depending on wt. – Medium to Well Done. Core temperature should reach 150° to 165°. |
| Seafood | ||
| Fish Fillet
1/2” Thick (Hood Open) 1″ Thick |
High Fire, 2-3 minutes each side
Medium-Low Fire, 4-5 minutes each side |
4 – 6 minutes
8 – 10 minutes |
| Shrimp Shelled (Hood Open) | Medium Fire 2-3 minutes each side | 4 – 6 minutes |
| Vegetables and Fruits | ||
| Potatoes and Whole Onions (Hood Closed) | Medium Low Fire, turn 4 times; every 15 minutes | 60 minutes |
| Corn on the Cob, husk on (Hood Closed) | Medium Fire, turn every 4 minutes | 12 – 16 minutes |
| Sliced Squash, Zucchini, Eggplant, Asparagus (Hood Open) | Medium Fire, 2-3 minutes each side | 4 – 6 minutes |
| Whole strawberries, sliced apples and pineapple (Hood Open) | High Fire, 1 1/2 – 2 minutes each side | 3 – 4 minutes total |
| Roasting, Smoking, and Barbequing, Low and Slow – *Hood Closed* | ||
| Chicken – Whole | Low to Medium Fire | 45-60 minutes (160° Core Temperature) |
| Beef Roast | Medium Fire | 15 minutes per pound – Rare
20 minutes per pound – Medium 25 minutes per pound – Well Done |
| Pork Roast | Low to Medium Fire | 25 minutes per pound – Medium to Well Done (160°F core temperature) |
| Turkey 10-15 pounds | Low Fire | 1 1/2 – 2 hours (160°F core Temperature) |
THESE ARE SUGGESTED COOKING TIMES. Use the above chart to develop your own cooking style. Please consult your favorite cookbook for proper internal temperatures of meat.
17
Patio® FR Series Grill Warranty
LIFETIME LIMITED WARRANTY The structural integrity of all exterior stainless steel body housings Is warranted to be free from defects in matenal and workmanship when subjected to normal household use and service for the lifetime of the original purchaser. This warranty excludes surface corrosion, scratches, and discoloration, which may occur during regular use and is limited to the replacement of the defective parts, with the owner paying all other costs, including shipping and labor.
LIMITED 10 YEAR WARRANTY The structural integrity of the interior stainless steel grill parts, including the cooking grates and burners, is warranted to be free from defects in material and workmanship when subjected to normal household use and service for 10 years from the original date of purchase This warranty is limited to the replacement of the defective parts, with the owner paying all other costs, including shipping and labor. Surface rust, corrosion, and discoloration will occur during regular use and is not included under this warranty.
LIMITED 1 YEAR WARRANTY All other grill components, including the ignition system and radiant glass panels, are warranted to be free from defects in material and workmanship for a period of 1 year from the original date of purchase. TEC will replace or repair parts found to be defective at no cost to the original purchaser.
LIMITATIONS AND EXCLUSIONS
- This warranty extends only to the original purchaser of the product, may not be transferred, and does not apply to commercial usage.
- This warranty does not apply to and TEC is not responsible for damage resulting from normal wear-and-tear, misuse, abuse, alteration of or tampering with the appliance, improper operation, installation, set-up, or service, failure to follow instructions in the Owner’s Manual or local code requirements, negligence, accident, and natural disaster.
- Discoloration, oxidation, and surface rust of grill components, which in the normal course of grill operation are exposed to high levels of heat, are not covered by this warranty.
- Some objects and substances that come In contact with the grill may cause changes to its outward appearance These changes in appearance are not covered under this warranty.
- This warranty is limited to the replacement of defective parts only, with the owner paying all other costs including parts and labor.
MAKING A WARRANTY CLAIM To support the repair or replacement of this grill or any component part under this warranty, the owner must first (1) Provide TEC or the dealer with proof of purchase of the grill, including the original purchase date and the serial number, and (2) Obtain Return Authorization from the dealer or TEC within the warranty period. If the part is deemed by TEC to have a defect in material and/or workmanship, TEC will reimburse the owner for the cost of the part. TEC reserves the right to determine the warranty status of a part and shall have the option to repair or replace the product or any component part deemed by TEC to be defective. Parts returned to the factory for warranty determination will not be returned to the customer. IMPORTANT: RETAIN PROOF OF ORIGINAL PURCHASE TO ESTABLISH WARRANTY PERIOD. The repair or replacement of the product or any of its component parts under this warranty shall be made by TEC free of charge for the part itself, with the owner paying all other costs, including labor and shipping.
DISCLAIMER OF IMPLIED WARRANTIES TEC is not responsible for incidental and consequential damages whether arising out of breach of warranty (express or implied), breach of contract, or otherwise. Some jurisdictions do not allow the exclusions or limitations of incidental or consequential damages so the above limitation or exclusion may not apply to you. Any implied warranty of merchantability and fitness applicable to the product and its component parts are limited in duration to the period of coverage of the applicable expressed written limited warranties set forth above. Some jurisdictions do not allow limitations on how long an implied warranty lasts so the above limitations may not apply to you. ThIs warranty is in lieu of all other warranties, expressed or implied, and all other obligations or liabilities in connection with the sale, use and ownership of this product.
04/24/15
18
[xyz-ips snippet=”download-snippet”]