
![]() User ManualPaint SprayersModel : TAPS02P
User ManualPaint SprayersModel : TAPS02P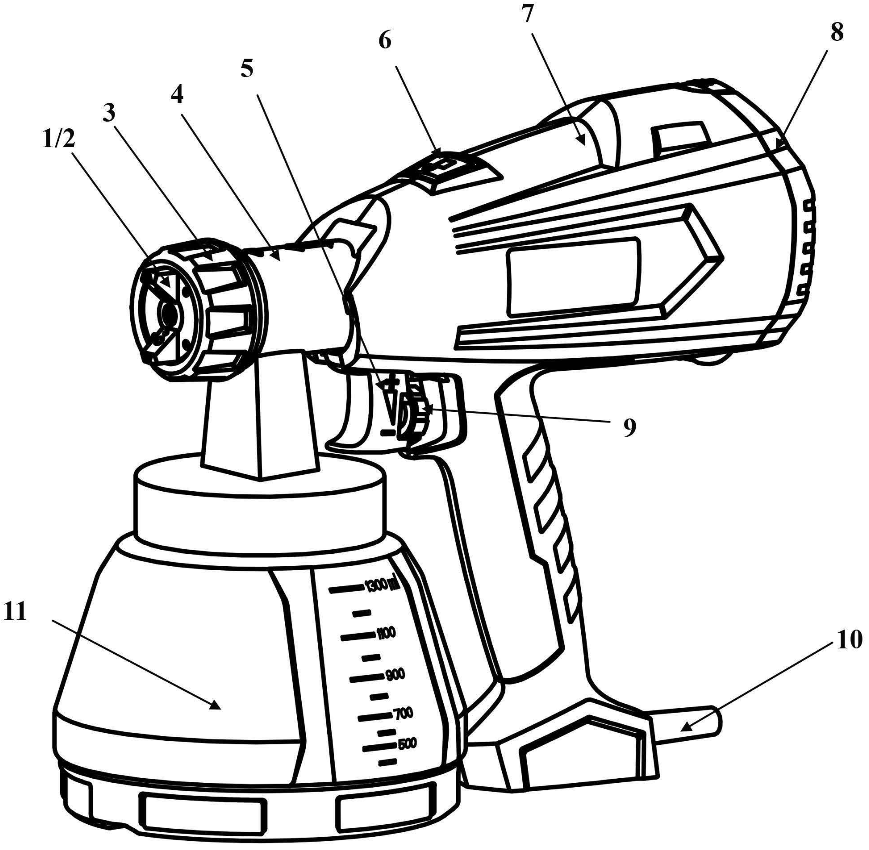
TECCPO is committed to providing the best After-sale Service, we strive for your FIVE STAR satisfaction![email protected][email protected]
TROUBLESHOOTING
|
PROBLEM |
CAUSE |
REMEDY |
| Sags or runs | A. Too much paintB. Gun moving to slowly.C. Paint too thinD. Gun held at an incorrect angle or too close to the painting surface.E. Spray overlaps too much. | A.Turn paint control knob counterclockwiseB. Move gun fasterF. Add unthinned paint to achieve correct time through viscosity test cup.G. Hold gun at a right angle to the painting surface at a distance of 4-10 inches.H. Overlap sprays by approximately 1/3 width of spray pattern. |
| Dry spray | A. Insufficient paint coming from the spray gun.B. Gun held too far from the surface.C. Overspray from a preceding section when the gun is not held at right angle to the painting surface.D. Spray patterns not well overlapped. | A. Turn the paint control knob clockwise.B. Hold a gun at a distance of 4-10 inches or closer for small objects.C. Hold the gun at the right angle to the painting surface.D. Overlap sprays by approximately 1/3 width of spray pattern. |
| Striped or uneven coverage | A. Gun tilted or not held at right angle to painting surfaceB. Dirt or burrs on air-cap or paint tip cause heavy top and bottom patternC. Spray patterns not well overlapped. | A. Hold the gun at right angles to painting surfaceB. Clean or replace air cap or paint tip.C. Overlap sprays by approximately 1/3 width of the spray pattern. |
| Spitting or spraying lumps | A. Solid particles in paintB. Loose paint tube.C.Seal is dry | A. Strain paint.B. Ensure the paint tube is firmly pushed into place.C. Lubricate seal by applying a thin film of petroleum jelly to rim of the container. Reattach to the sprayer. |
| Weak or no spray | A. Low volume of paint from container due to blocked air passageway in spray gun body. (Figure E, Page 9)B. Paint not thin enough.C. Lid washer missing/dirty | A. Clean passageway (3 mm vent holes in the container id).B. Add the appropriate amount of solvent to the paint. Add only a small amount of solvent to the paint at one timeC. Replace/clean lid washer |
| Top-or bottom-heavy pattern or heavy right or left side pattern | A. Air cap holes partially blockedB. Obstruction on paint tip or dirt on air cap seat or paint tip seat | A. Determine if an obstruction is on air cap or paint tip by making a test pattern, rotating air cap half-turn, and spraying another test pattern. If a defect is inverted, obstruction is on the air capB. Clean air cap with the non-metallic instrument. If the obstruction is on paint tip, check for fine burring which can be removed with 600 wet or dry sandpaper. For dried paint inside, open and wash. |
| Fluttering spray | A. Lack of paint.B. Blocked paint passages.C. Damaged paint nozzle or needle. | A. Refill container.B. Clean.C. Clean needle set or replace if necessary. |
| Paint leaking from guide nut | A. Loose guide nut.B. Worn guide washer. | A. Tighten guide nut.B. Replace guide washer. |
| Paint leaking from front of gun. | Needle not seated properly due to:A. Worn or damaged paint nozzle.B. Dirt or dried paint in nozzle.C. Guide washer too tight preventing needle from seatingD. Broken springE. Scored or damaged needle. | A. Replace nozzle.B. Clean nozzle.C. Loosen guide washer.D. Replace spring.E. Replace needs. |
| Paint leaking from the container when . | A. Seal is dry | Lubricate seal by applying a thin film of petroleum Jelly to the rim of the container. Reattach to the sprayer. |
Safety
To reduce the risks of fire or explosion, electrical shock, and injury to persons, read and understand all instructions included in this manual. Be familiar with the controls and proper usage of the equipment.
 HAZARD: EXPLOSION OR FIRESolvent and paint fumes can explode or ignite. Property damage and/or severe injury can occur.
PREVENTION:
- Provide extensive exhaust and fresh air introduction to keep the air within the spray area free from the accumulation of flammable vapors.
- Avoid all ignition sources such as static electric sparks, open flames, pilot lights, electrical appliances, and hot objects. Connecting or disconnecting power cords or working light switches can make sparks.
- Do not smoke in the spray area.
- A fire extinguisher must be present and in good working order.
- Use only in a well-ventilated area. Flammable vapors are often heavier than air and can accumulate along the floor or ground.
- Follow the material and solvent manufacture ft warnings and instructions.
- Do not use materials with a flashpoint below 100°F (38°C). Flashpoint is the temperature at which a fluid that can produce enough vapors to ignite (see coating supplier).
- Plastic can cause static sparks. Never hang plastic to enclose the spray area. Do not use plastic drop cloths when spraying flammable materials.
HAZARD: EXPLOSION HAZARD DUE TO INCOMPATIBLE MATERIALSWill causes property damage or severe injury.
PREVENTION:
- Do not use materials containing bleach or chlorine.
- Do not use halogenated hydrocarbon solvents such as bleach, mildewcide, methylene chloride, and 1,1,1–trichloroethane. They are not compatible with
- Contact your coating supplier about the compatibility of the material with aluminum.
![]() HAZARD: HAZARDOUS VAPORSPaints, solvents, insecticides, and other materials can be harmful if inhaled or come in contact with the body. Vapors can cause severe nausea, fainting, or poisoning
HAZARD: HAZARDOUS VAPORSPaints, solvents, insecticides, and other materials can be harmful if inhaled or come in contact with the body. Vapors can cause severe nausea, fainting, or poisoning
PREVENTION:
 Use a respirator or mask if vapors can be inhaled. Read all instructions supplied with the mask to be sure it will provide the necessary protection.
- Wear protective eyewear.
- Wear protective clothing as required by the coating manufacturer.HAZARD: electric shock hazard May cause severe injury.
 Use
Use  Wear protective eyewear.
PREVENTION:
- Keep electrical cord plug and spray gun trigger free from paint and other liquids. Never hold the cord at plug connections to support the cord. Failure to observe may result in an electrical shock.
![]() CAUTION: To reduce the risk of electric shock, do not expose to rain. Store indoors
CAUTION: To reduce the risk of electric shock, do not expose to rain. Store indoors
HAZARD: GENERALCan cause severe injury or property damage.
PREVENTION:
- Read all instructions and safety precautions before operating equipment.
- Follow all appropriate local, state, and national codes governing ventilation, fire prevention, and operation.
- The United States Government Safety Standards have been adopted under the Occupational Safety and Health Act (OSHA). These standards, particularly part 1910 of the General Standards and part 1926 of the Construction Standards should be consulted.
- Use the only manufacturer-authorized parts. User assumes all risks and liabilities when using parts that do not meet the minimum specifications and safety devices of the turbine manufacturer.
- Do not spray outdoors on windy days.
- Wear protective clothing to keep paint off skin and hair.
- Never aim a spray gun at any part of the body.
![]() WARNING: Risk of Explosion – Do not spray flammable liquids
WARNING: Risk of Explosion – Do not spray flammable liquids
Household Use Only
SERVICING OF A DOUBLE-INSULATED PRODUCTIn a double-insulated product, two systems of insulation are provided instead of grounding. No grounding means is provided on a double-insulated product, nor should a means for grounding be added to the product. Servicing of a double-insulated product requires extreme care and knowledge of the system. and should be done only by qualified service personnel. Replacement parts (or a double-insulated product must be identical to those parts in the product.
WARNING: WHEN A COMBUSTIBLE LIQUID IS SPRAYED THERE MAY BE A DANGER OF FIRE OR EXPLOSION, ESPECIALLY IN A CLOSED AREA. READ THE INSTRUCTION MANUAL BEFORE OPERATING.
WARNING: DO NOT SPRAY ELECTRICAL APPARATUS AND WIRING. DO NOT IMMERSE IN WATER OR SOLVENT.
PARTS LIST
Fig: 1
| Description (Fig. 1) | |
| 1) Air Cap | 2) Nozzle |
| 3) Union nut | 4) Spray gun front part |
| 5) Trigger guard | 6) unlock button |
| 7) Spray gun rear part | 8) Air filter cover |
| 9) Material volume adjustment | 10) Mains lead |
| 11) Container |
Technical data
| Model | TAPSO2P |
| Rated voltage | 100-120 V – 50/60Hz for us 1220-240 V – 50/60Hz for UK |
| Rated input | 3.0A for US, 500W for UK |
| Double insulation | |
| Container capacity | 1300mL |
Coating Materials Suitable for UseWater- and solvent-based paints, finishes, primers, 2-component paints, clear finishes, automotive finishes, staining sealers, and wood sealer-preservatives.
Coating Materials Not Suitable for UseWall paints (emulsion paints) etc., alkali and acidic paints. Coating materials with a lash point below 38°C.
Preparation of the Coating Material
The enclosed spray attachment can be used to spray paints, varnishes, and glazes that are undiluted or slightly diluted.Remark: Thinning advice can always be found on the paint canister.
- Stir the material up and put the required amount into the paint container
| Thinning recommendation | |
| Sprayed material | Dilution |
| Glazes | undiluted |
| Wood preservatives, mordants, oils, disinfection agents, plant protective agents | undiluted |
| Paints containing solvents and water-soluble paints, primers, vehicle coating paints, brick-film glazes | dilute by 5-10% |
- If the conveying capacity is too low, add 5 – 10% dilution step-by-step until the conveying capacity fulfills your requirements.
Start-up
Before connecting to the mains supply, be sure that the supply voltage is identical to the value given on the rating plate.
- Unscrew the container from the spray gun.
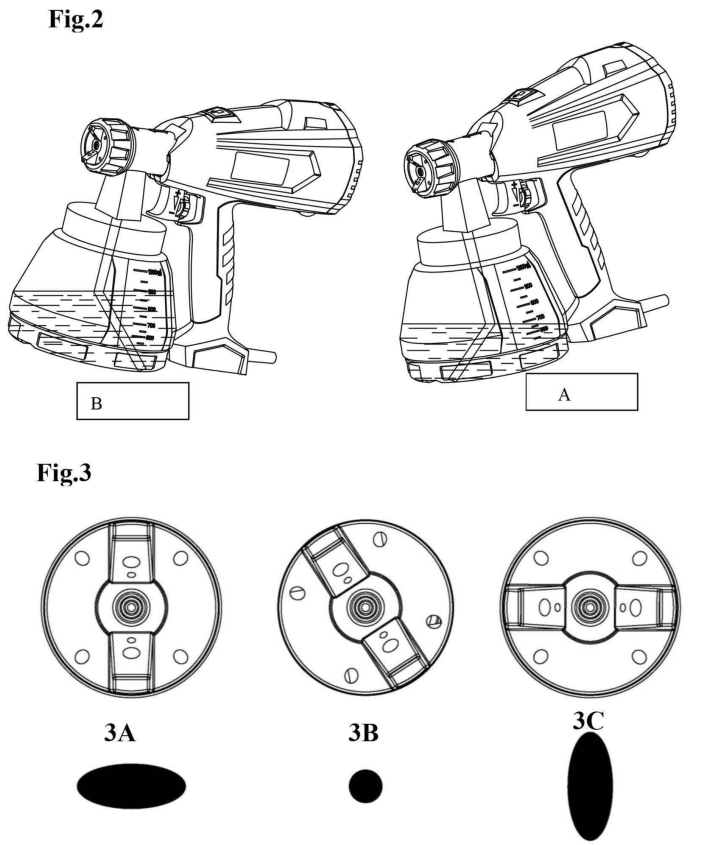
- Aligning suction tube. (Fig. 2)If the suction tube is positioned correctly, the container contents can be sprayed without almost any residue.When working on lying objects: Turn the suction tube forwards. (Fig. 2A)Spraying work when working on overhead objects: Turn the suction tube rearwards. (Fig. 2 B)
- Set the container on a sheet of paper, pour in the prepared coating material, and screw the container tightly onto the spray gun.
- Put the machine on a level, clean surface. Otherwise, the machine could tip over!
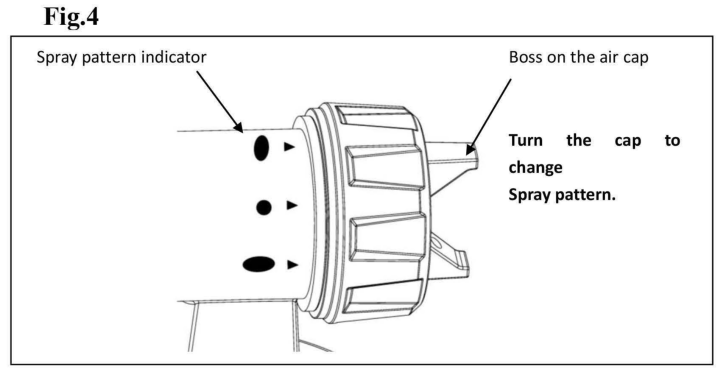
- Adjust the spray setting on the spray gun.Three different spray jet settings can be chosen on the spray gun, depending on the application and target object. Selecting the Spray SettingFig. 3 A = horizontal fat jetFig. 3 B = vertical fat jetFig. 3 C = circular jetAdjusting the desired Spray Setting (Fig. 4)Turn the air cap to the desired spray setting position.The spray pattern indication can be found on the front part of the sprayer. With the arrowhead towards the boss on the tip. ( Fig. 4) IMPORTANT! The air cap only can be turned at an angle. Do not force WARNING! The danger of injury! Never pull the trigger guard while adjusting the air cap.
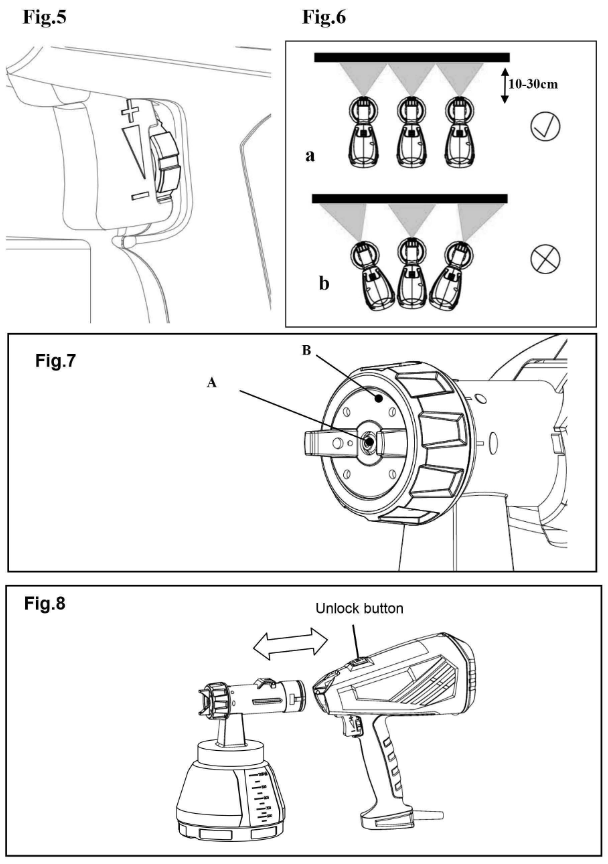
Adjusting the Material Volume (Fig. 5)
- Set the material volume by turning the regulator on the trigger guard of the spray gun.– turn to downside → lower material volume+turn to upside → higher material volume
Spray Technique
- The spray result depends heavily on the smoothness and cleanliness of the surface to be Therefore the surface should be carefully prepared and kept free of dust.
- Cover all surfaces not to be sprayed.
- Cover screw threads or similar parts of the target object.
- It is advisable to test the spray gun on cardboard or a similar surface to find the correct
Important: Begin spraying outside of the target area and avoid interruptions inside the target area.
- Correct (Fig. 6a). Be sure to hold the spray gun at an even distance of approx. 10 — 30 cm to the target object.
- Incorrect (Fig. 6b). Heavy spray fog build-up, uneven surface quality.
- Move the spray gun evenly cross-wise or up-and-down, depending on the spray pattern
- An even movement of the spray gun results in even surface quality.
- When coating material builds up on the nozzle (A) and air cap (B) (Fig. 7), clean both parts with a solvent or water.
Taking Out of Operation and Cleaning
Proper cleaning is the prerequisite for the problem-free operation of the paint application device. No warranty claims are accepted in case of improper or no cleaning.
- Unplug the power plug. Turning open the canister and pulling the trigger guard and letting the paint into the original paint container.
- Divide the spray gun. Press the unlock button (Fig. 8) downwards. Pull out the front part of the spray gun.
- Unscrew the container. Empty any remaining coating material back into the material tin.
- Preclean the container and suction tube with a brush.
- Pour solvent or water into the container. Screw the container back on. Use only solvents with a flashpoint over 38°C .
- Assemble the gun again.
- Insert the power plug, turn on the machine and spray the solvent or water into a container or a cloth.
- Repeat the above procedure until the solvent or water emerging from the nozzle is clear.
- Turn off the machine and remove the plug.
 CAUTION! Never clean seals, nozzle, or air holes of the spray gun with metal objects. The seal parts are only solvent-resistant to a limited extent. Do not immerse insolvent, only wipe.
![]() WARNING! Never hold the spray gun rear part underwater or immerse it in liquids. Clean the housing only with a moistened cloth.
WARNING! Never hold the spray gun rear part underwater or immerse it in liquids. Clean the housing only with a moistened cloth.
- clean the outside of the spray gun and container with a cloth soaked in solvent or water.
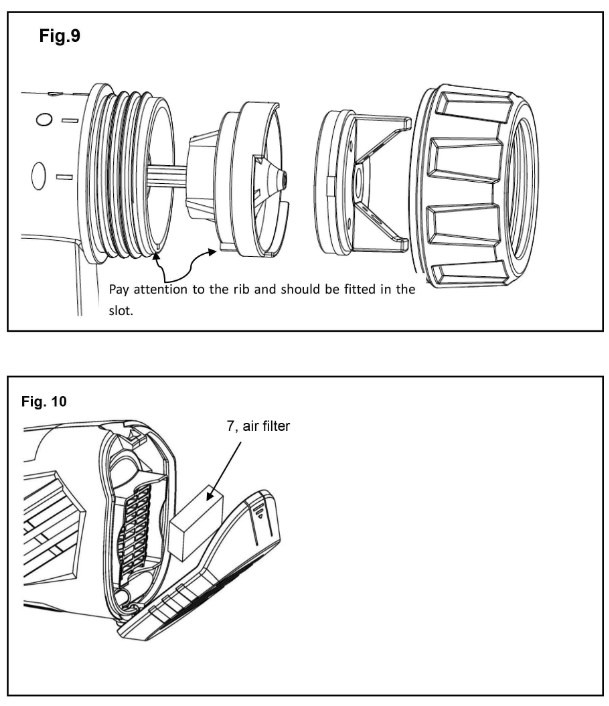
- Unscrew the union nut and remove the air cap and nozzle. Clean the air cap and nozzle with a brush and solvent or water and assemble back. Pay attention to the rib and should be fitted in the slot on the base (Fig 9).
Maintenance
- Change the air filter if it is soiled (Fig. 10, item 7).WARNING! Never operate the machine without the air filter; dirt could be sucked in and interfere with the function of the machine.Correction of Malfunctions
| Problem | Cause | Remedy |
| No coating material emerges from the nozzle | Nozzle cloggedFeed tube cloggedMaterial volume setting turned too far to the downside(-)Feed tube loseNo pressure build-up in containerThe viscosity of the coating material too high | Clean Turn to the upside (+)InsertTighten container Thin the paint |
| Coating material drips from the nozzle | Nozzle loseNozzle wornCoating material assembly at air cap, nozzle or needle | Tighten nozzle Change nozzle Clean |
| Atomization to coarse | The viscosity of coating material too high Material volume too largeMaterial volume adjusting screw turned too far to the upside (+)Nozzle contaminatedAir filter heavily soiledToo little pressure build-up in the container | ThinTurn material volume adjusting screw to the downside (-)CleanChangeTighten container |
Environmental protection The appliance and accessories should be recycled in an environmentally friendly way. Do not dispose of the appliance with household waste.Support environmental protection by taking the appliance to a local collection point or obtain information from a specialist retailer.
Shenzhen Allsight E-business Co., LtdWeb: www.teccpotools.comFacebook: www.facebook.com/Teccpo.USE-mail: [email protected]ADD: Room 104, Building P09, south China City Electronic trading Center, Longgang District, Shen Zhen,CHINA Made in China

References
[xyz-ips snippet=”download-snippet”]