
Operation Manual

TECHKO S187D Safe Pool Area Entry Alarm
INTRODUCTION
Congratulations on your purchase of the TECHKO Safe Pool model S187D safety alarm. The Safe Pool can be used to provide a high volume alarm alert when children have entered a pool or spa area. The S187D can be used outdoors on wood or metal gates, or indoors on doors and window leading directly to potentially dangerous areas.
OPERATION
The Safe Pool is designed to sound a loud alert when children enter through a Safe Pool protected door/gate. When properly installed, the Safe Pool will allow adults to pass through the protected door/gate and immediately shut off the sounding alarm.
When powered, the Safe Pool is always in protection mode. The alarm will activate the instant when the door/gate opens by more than 1/2 inch (when the magnetic sensors are apart by more than 1/2 inch). Once the alarm activates, it will sound continuously until the BYPASS button is pressed.
When passing through the door/gate press the BYPASS button, then open the doorgate, pass through and close the door/gate within 8-12 seconds and the alarm will not activate.
FEATURES
- Easy installation for gate, door or window protection
- Water / weather resistant
- 9 Volt battery power (not included)
- High output 110-115 dB alarm siren
- Low Battery / signal LED Indicator
- Optional additional BYPASS button for delayed entry from other side of door or fence
- Optional additional magnetic sensor for screen door exit/entry
IMPORTANT SAFETY TIPS
- Alarm siren is VERY loud; NEVER place the unit close to ears.
- Install the unit high enough to be out of reach of children 54″ or higher is recommended.
- Keep this manual for future reference.
The Safe Pool can provide valuable protection when used correctly. However, it cannot guarantee complete protection against accidents or injuries. Therefore, Techko cannot be held responsible for any loss, damage, or injury that may occur.
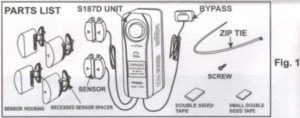
INSTALLATION
WARNING: Read all installation and operation instructions thoroughly before proceeding with installation. Note: Not all parts included are needed for installation. Please read the different mounting instructions to see what is needed for your specific application
INSTALLING THE BATTERY:
- When testing, before installing the battery, use a rubber band to temporarily secure the two magnetic sensors together with the arrows pointing toward each other to avoid setting off the alarm unintentionally. During the actual installation of the alarm, it’s best to install the battery after it’s mounted to avoid the alarm going off unintentionally.
- Remove the battery cover of the unit and install a new 9 Volt battery. Replace cover. (See Fig. 2)
- If you are sensitive to loud sound, please wear ear protection against the loud alarm siren before testing the alarm.
- Once the battery is connected, the unit is now ON and working. To test the alarm siren, make sure you have ear protection before testing. After ear protection is in place, separate the magnetic sensors apart by more than 12 inch. The alarm should sound immediately after the sensors are separated. Press the BYPASS button and immediately secure the two magnet sensors together again to avoid the alarm sounding off unintentionally.
LED LIGHT WARNINGS
- When the battery becomes low in charge or the volume becomes weak, the LED light will illuminate. The 9 volt battery must be replaced.
- Upon battery installation, the unit will beep once and the LED light will flash 10 times as it prepares to become armed.
- When a bypass button is pushed, the LED light illuminates to indicate acknowledgement to PASS through.
- After the bypass button is pushed in and released, the LED light will flash 10 times to allow pass through and to prepare the unit to become armed again.
MOUNTING:
WARNING: The alarm should be positioned close to the door high enough to be out of the reach of children. As each mounting application varies, Techko suggests testing the unit’s installation location and effectiveness before permanently mounting the S187D.
MOUNTING INDOORS Using the provided mounting template printed in this manual, mark the position of the screw holes on the desired mounting surface.
- The Additional delay button may be mounted on the other side of the entrance. When pressed, it will delay the alarm 8-12 seconds before alarm is triggered, allowing time to secure the door/gate.
- The Additional magnetic sensors allow the unit to be used on sliding door with screens.
- Alarm will sound only when BOTH sets of magnetic sensors are apart, there for allowing the slider to be open while still providing protection at the screen door.
MOUNTING INDOORS USING DOUBLE-SIDED TAPE
Make sure that the mounting surfaces for the double-sided tapes are completely clean. Attach the double-sided tapes onto the rear of the unit, and then secure the unit onto the desired mounting surface.
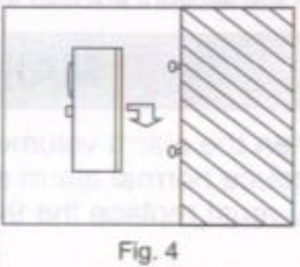
MOUNTING INDOORS USING SCREWS Using the provided mounting template printed in this manual, mark the position of the screw holes on the desired mounting surface. Drill the screws in to the mounting surface with approximately 1/8 inch of thread remaining. Slide the unit over the screws and secure the unit by pushing it downward, as shown in Fig. 4. You may need to adjust the screws towards or away from the mounting surface to provide a more secure fit.
MOUNTING THE SENSORS
Make sure that the arrows of each sensor are pointed towards each other. Using either the double-sided tape or the screws provided, mount the sensors so that they are less than 12 inch away from each other. Sensors must be mounted flush in height and depth, so with some doors or windows, special custom fitting may be necessary. Please make sure that the wired portion of the magnetic sensor is mounted on the non-moving portion of the mounting surface and the standalone sensor is mounted on the door/gate. (See Fig. 5/Fig. 6)
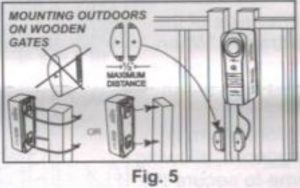
MOUNTING OUTDOORS ON WOODEN GATES
Using the provided mounting template printed in this manual, mark the position of the screw holes on the desired mounting surface. Drill the screws onto the mounting surface with approximately 1/8 inch of thread remaining. Slide the unit over the screws and
Fig. 5 secure the unit by pushing it downward as shown in Fig. 5. You may need to adjust the screws towards or away from the mounting surface to provide a more secure fit. Make sure that the arrows of each sensor are pointed in the same direction. Note: Wooden gates do not require the sensor housings.
MOUNTING OUTDOORS ON METAL GATES
Using the provided zip ties, attach the alarm body to the metal gate frame. (See Fig. 6) Using a small flat head screwdriver, gently pry open the recessed sensor spacer of the sensor housing(fig 6). Make sure that the arrows of each sensor are pointed in the same direction as the sensor housing before placing the magnetic sensors inside the sensor housing. Note: Metal gates may interfere with the magnetic sensor function. Use spacers provided to ensure sensors operate properly. Secure the sensors using the zip ties onto the gate frame. Make sure that the sensors’ arrows are pointed towards each other and that the sensors are less than 1/2 inch apart.
MAINTENANCE
When the alarm volume becomes low, or the unit does not produce normal alarm sound, the red light will illuminate, you must replace the 9-volt battery.
The Safe Pool’s plastic parts resists ultraviolet rays from direct sunlight exposure. However, slight discoloration over time is normal.
WARNING!
THE SAFE POOL ALARM IS EXTREMELY LOUD WHEN ACTIVATED. FOR YOUR SAFETY, NEVER PLACE THE UNIT CLOSE TO YOUR EARS. TO TEST THE ALARM, ALWAYS USE EAR PROTECTION AND DIRECT THE UNIT AWAY BEFORE TESTING/ACTIVATING THE ALARM.
IT IS PROHIBITED BY LAW TO REMOVE THE INSTALLED ALARM AFTER IT HAS PASSED INSPECTION !
Important Warranty Information: A dated proof of purchase is required for warranty service
Customer Service: 1-888-8TECHKO(1-888-883-2456) Website: www.techkomaid.com
Mfg. By TECHKO 11 Marconi Street, Irvine, CA 92618 MAID IN CHINA
![]()
USA Patent: No. 5,473,310
No. 6,727,819
NOTICE
THIS PRODUCT IS PROTECTED UNDER FEDERAL PATENT, TRADEMARK AND COPYRIGHT LAWS AND LAWS PREVENTING UNFAIR COMPETITION. NO DUPLICATION OR SIMULATION OF THIS PRODUCT IS PERMITTED EXCEPT BY WRITTEN AUTHORIZATION OF TECHKO, INC.
TECHKO AND THE CONFIGURATION OF THIS PRODUCT ARE TRADEMARKS OF TECHKO INC. COPYRIGHT 1994 TECHKO, INC. ALL RIGHTS RESERVED
MADE IN CHINA
TECHKO S187D Safe Pool Area Entry Alarm Operation Manual – TECHKO S187D Safe Pool Area Entry Alarm Operation Manual –
Questions about your Manual? Post in the comments!
[xyz-ips snippet=”download-snippet”]