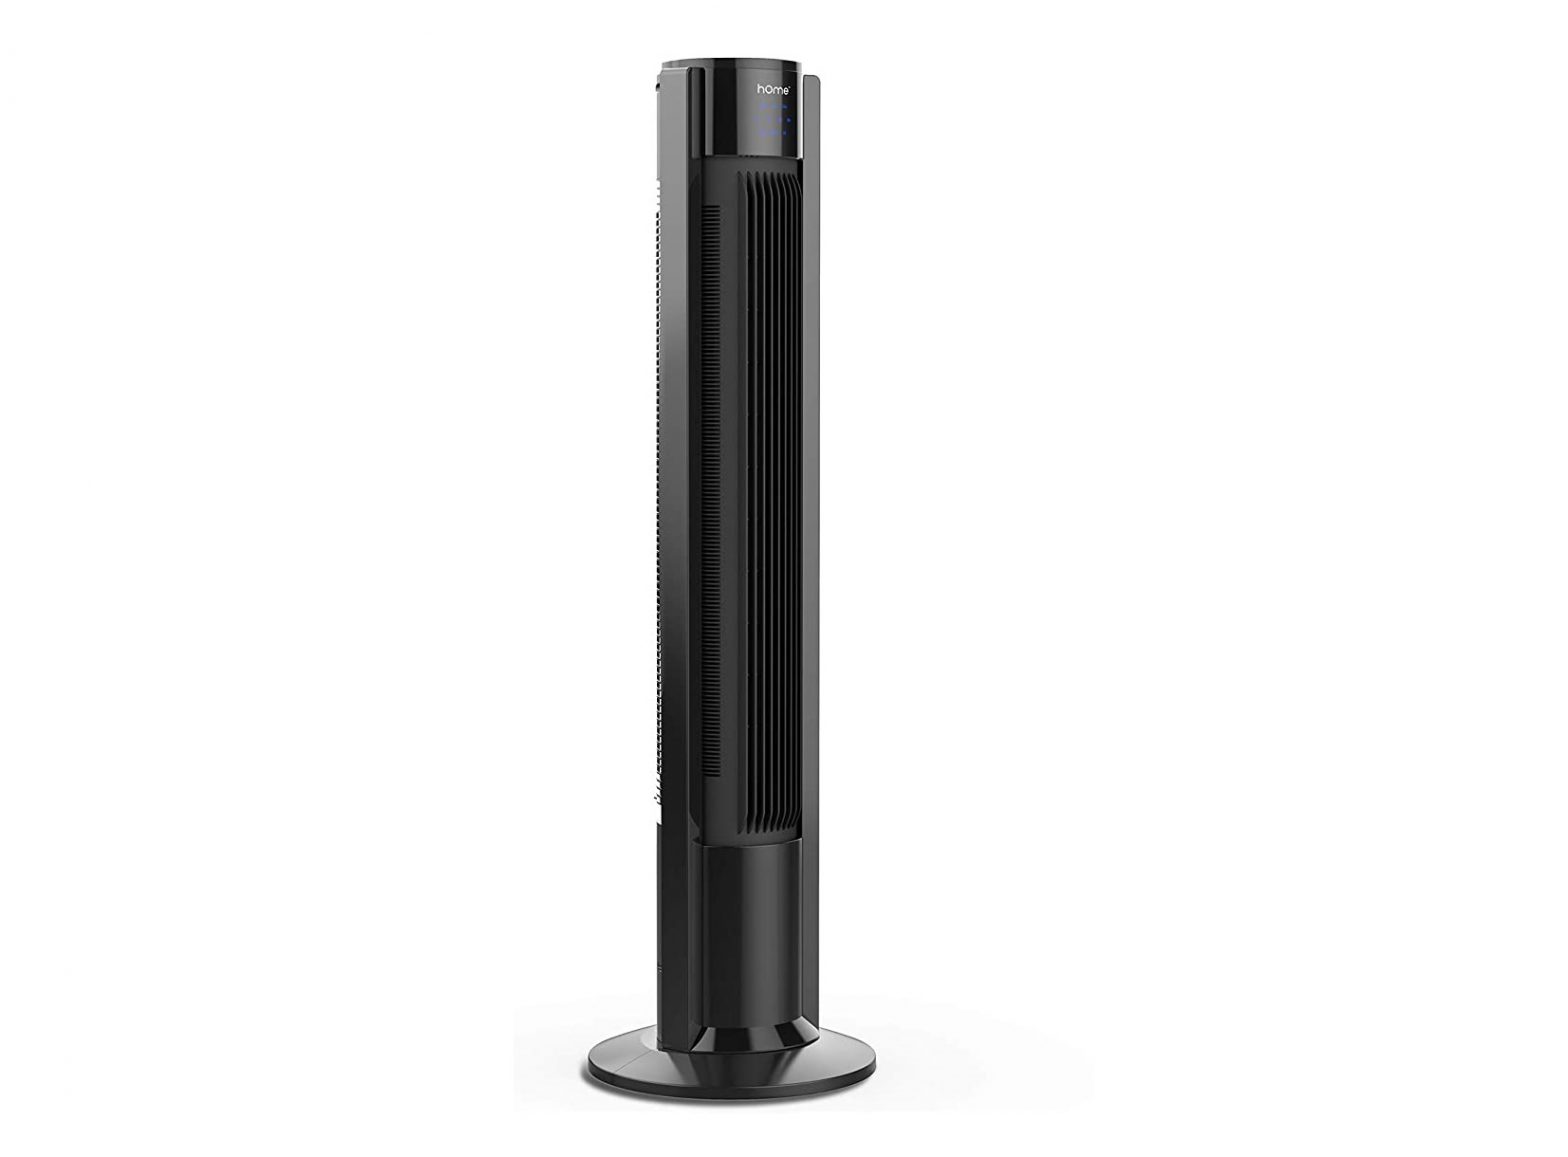
Techvilla TE-TF003 40 inch 360 Degree Oscillating Tower Fan User Manual
Thank you for purchasing the TECHVILLA TE-TF003 Tower Fan. If you need any assistance, please contact our support team [email protected] with your product model number and Amazon order number
IMPORTANT SAFETY INSTRUCTIONS
Read Guidance for Safe Operation and Instructions Carefully
- To reduce the risk of fire or electric shock, do not use this fan with any solid state speed control device.
- This appliance has a polarized plug (one blade is wider than the other).To reduce the risk of electric shock, this plug is intended to the fit in a polarized outlet only one way. If plug does not fit fully in the outlet, reverse plug. If it still does not fit, contact a qualified electrician. Do not attempt to modify this safety feature.
- This appliance is not intended for use by persons (including children) with reduced physical, sensory or mental capabilities, or lack of experience and knowledge, unless they have been supervised or instructed to use of the appliance by a person responsible for their safety.
- Do not leave the fan running unattended
- Unplug or disconnect the appliance from the power supply before servicing.
READ AND SAVE THESE INSTRUCTIONS
- The instructions about cord and plug as below:
- This product employs overload protection (fuse). A blown fuse indicates an overload or short-circuit situation. If the fuse blows, unplug the product from the outlet. Replace the fuse as the user servicing instructions (follow product marking for proper fuse rating) and check the products. If the replacement fuse blows, a short-circuit may be present and the product should be discarded or returned to an authorized service facility for examination and/ or repair.
- Do not operate any fan with a damaged cord or plug. If damaged, return to an authorized service facility for examination and/or repair.
- Do not run cord under carpeting. Do not cover cord with throw rugs, runners, or similar coverings. Do not place the cord under furniture or appliances. Arrange cord away from traffic area where it might be tripped over.
- Fan should be used under rated voltage.
- Connect power only after the fan is fully assembled.
- Never insert fingers, pencils, or any other object through the protective cover when fan is running.
- Unplug from outlet when not in use, when moving fan from one location to another, before putting on or taking off parts, and before cleaning.
- Make sure fan is on a stable surface when operating to avoid overturnin
SPESIFICATIONS
| Model | TE-TF003 |
| Input | 120 Volts AC / 60Hz |
| Power Consumption | 50 W |
PRODUCT COMPONENT
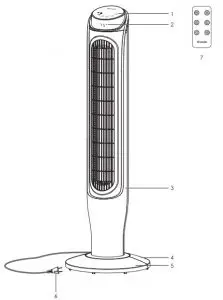
- Control panel
- Display screen
- Body
- Rear base
- Front base
- Power cord
- Remote contro
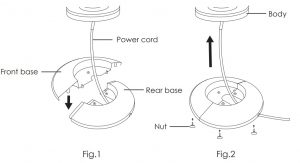
ASSEMBLY INSTRUCTIONS
- Take out the fan body and the spare parts from the box. Put the front base onto rear base and join them together. (See Fig. 1)
- Insert the fan body into the base, then fix the fan body on the base withthe nuts. (See Fig. 2)

OPERATION INSTRUCTION
Remote Controller (Fig.3)
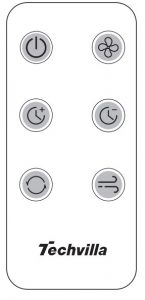 KEY INSTRUCTION
- “ ” ON/OFFPress this key to switch on/switch off the fan.
- “ ” SPEEDWhen the fan started, press this key repeated, the fan will work with “2-3-1-2” circulatory.
- “ ” MODEPress this key to select mode. The sequence is normal, natural, and sleep when this key being touched repeatedly or continuously.The LED screen indicate mode state.
- “ ” OSCILLATIONAfter the fan is turned on, press this key to select oscillation mode. The lights on the display can indicate fan oscillation mode.
- 45°(Display 1° )
- 90°(Display 2°)
- 180°(Display 3°)
- 360°(Display 4°)
- Off
- “ ” TIMERPress this timer key repeatedly to set the time for air delivery. Increase/decrease in 1,setting range: 00-24 hours.
Panel Indication (Fig.4)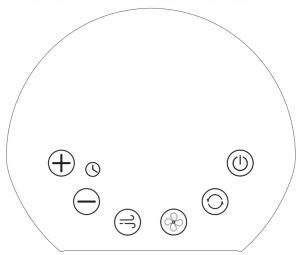 The buttons on the panel such as TIMER, MODE, SPEED, OSCILLATION, ON/OFF have the same functions as those of the corresponding keys on the remote controller.
LED Display(Fig.5)
Memory Function:Automatically returns to the last except the timer; memory will reset to defaultwhen unplugged.
LED Screen SaverLED will switch off in all standby mode when inactive after more than 1 minute
BATTERIES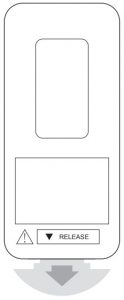
- Remove the back panel in the direction of the arrow to power on the remote control(Fig 6).
Replace with a new battery NOTES:
- Push the button next to the battery cover to release the battery cover.
- Insert 1 x CR2032 type lithium battery , making sure “+” side is facing up as shown in the diagram(Fig 7).
- Once battery is installed, push battery cover closed.

BATTERY WARNING
- Please keep battery out of the reach of children. If a child swallows the battery by mistake, please seek medical attention immediately
- Do not charge or throw into fire to avoid explosion or leakage
- Please put it in a dry and cool place
- Please wipe the battery before use
- Please insert the battery in the correct direction
REMOTE CONTROL OPERATION
Point the remote controller to the receiver on the front of the fan and press the desired button. The remote control will work at distances of up to five meters (16ft) and the angle of 30 degree included between right and left from the receptor.
Note: The batteries must be removed from the remote controller before it is scrapped and properly disposed.
OVERHEAT PROTECTION OF THE MOTORThe motor equips with a thermal-fuse which will turn the fan off to protect the fan from burning out because of overheat, which keeps plastic parts of the fan from deformation.
USER SERVICING INSTRUCTIONS
- Grasp plug and remove from the receptacle or other outlet device. Do not unplug by pulling on cord.
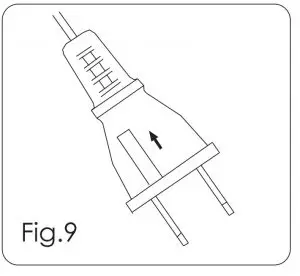
- Open fuse cover. Slide open fuse access cover on top of attachment plug towards blades(Fig.8).
- Remove fuse carefully. Push the fuse from the other side to remove fuse.
- Risk of fire. Replace fuse only with 2.5 Amp, 125 Volt fuse (provided with product.) Close fuse cover. Slide closed the fuse access cover on top of attachment plug(Fig.9).
- Risk of fire. Do not replace attachment plug. Contains a safety device (fuse) that should not be removed.If the plug is damaged, please contact our after-sales searvice team.

NOTE:
- When you replace the fuse, please don’t operate suddenly or overexert, or else the product will be damage or cause accident.
- Confirm positioning is correct.
- Do not use the fan, if the plug is damaged. Turn to the support team [email protected] for help.
CLEANING
- Be sure to unplug the power cord from the outlet before cleaning
- Plastic parts should be cleaned thoroughly with clean water, mild soap and damp cloth or sponge
- Be sure not to get water or other liquid enter the inside of the motor
- Dry all parts completely before plugging into socket
WARRANTY & CUSTOMER SUPPORT
Thank you for purchasing the Techvilla 40″ Tower Fan. Please read this user manual carefully and keep it for future reference. If you need any assistance, please contact our support team [email protected] with your product model number and Amazon order number.
Please read all instructions before attempting to use this product. Techvilla warrants as limited herein to the original purchaser of retail that each new Fan, shall be free of defects in material and workmanship for a period of one (1) year from the date of original purchase. This one (1) year warranty is limited to the Motor and Electric Element.
In the event of malfunctions or failure of your Fan, simply deliver or send the Fan, postage prepaid along with PROOF OF PURCHASE, within the warranty period of one (1) year, to Techvilla reserves the right to inspect the claimed defective part or parts to determine if the defect or malfunction complaint is covered by this warranty. Techvilla shall within sixty (60) days after receipt of the product, at its option, repair and/or replace the defective part or parts free of charge. This warranty shall only cover defect arising from normal usage. Techvilla takes no responsibility whatsoever if the Fan should fail during the warranty period by reason of:
- Misuse, negligence, physical damage or accidents.
- Lack of maintenance (see instructions for proper maintenance).
- Repair by any unauthorized party during the warranty period.
- Damage caused by connection to an improper input voltage (see specification label on your Fan).
Techvilla makes no further warranties or representations, express or implied except those contained herein. No representative or dealer is authorized to assume any other liability regarding the Fan. The duration of the implied warranty granted under State law, including warranties of merchantability and fitness for particular purpose are limited in duration should the duration of the express warranty grant it hereunder. Techvilla shall in no event be liable for direct, indirect, special or consequential damages.
Some states do not allow limitations on how long an implied warranty lasts, and/or the above limitations or exclusion may not apply to you. This warranty gives you specific legal rights and you may have other rights which vary from state to state.
Aukey Technology Co., LtdRoom 102, Building P09, Huanan City Elec-trading Center,Longgang District, Shenzhen,China Aukey Technology Co.,Ltd All right reserved.Techvilla and the Techvilla logo are trademarks ofAukey Technology Co.,Ltd, registered in the United State
[xyz-ips snippet=”download-snippet”]