![]() Dash Patrol DC1 &DC2FullHD Dash CamUser manualTLL711001/TLL711002This manual is available in more languages on www.tellur.com/manuals
Dash Patrol DC1 &DC2FullHD Dash CamUser manualTLL711001/TLL711002This manual is available in more languages on www.tellur.com/manuals
Thank you for choosing Tellur!
Please read this user manual carefully before using the product and keep it safe for future references.Please note! Any damage caused by misuse of the product will void the product’s warranty.
Safety instructions
By using this recorder, you confirm that you have read and agree to our terms of use.
Please pay attention to all warnings below:
- Please follow all instructions of use as written in this manual.
- Protect the power supply from being trampled or squeezed, especially the plug, socket, and the external power cord of the equipment.
- Please leave all maintenance work to a qualified personnel. If the product is damaged (such as damages due to falling, broken plug, liquid splash or other objects fell onto the product) or doesn’t work properly, please ask a qualified personnel to repair it before using it again.
- Do not disassemble, open, squeeze, bend, change shape, pierce, cut it and prevent falling of the product.
- Use the factory’s standard charger.
- Please find a professional to modify the power line.
Warning!The working environment of this camera is -10-60°C. The too low or too high a temperature will lead to the constant failure of this recorder. Please turn on the air conditioner, adjust the temperature in the car and then turn on the dashcam.
Product diagram
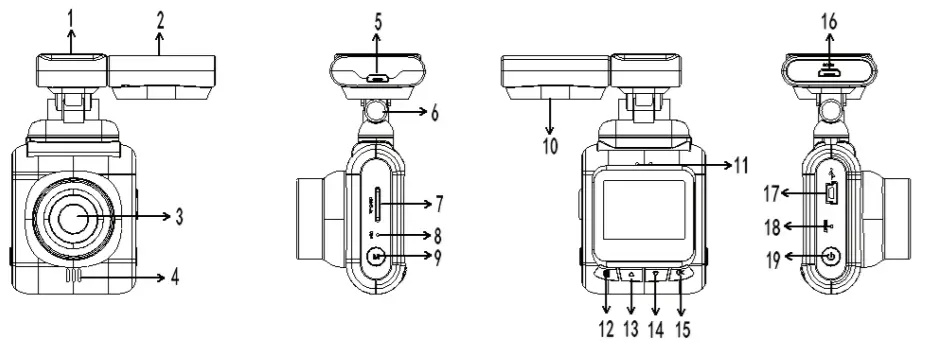
| 1. 3M adhesive for the bracket;2. GPS module (only for DC2)3. Lens;4. Speaker;5. GPS data upgrade interface (only for DC2);6. Bracket rotating shaft; | 7. Memory card slot;8. Microphone;9. Mode button;10. GPS module speaker (only for DC2);11. Power and work indicator;12. Menu button; | 13. Up;14. Down;15. OK/Confirm;16. Power supply interface bracket;17. USB port;18. Reset button;19. Power button. |
Before use
- How to insert the memory card – please insert the memory card in the correct position as indicated by the memory card gap on the device. Press the memory card until the card is fully inserted and you hear a click.Note: Please use a high-speed memory card (CLASS10 or above) since the recorder’s video storage runs faster on the card.
- How to take out the memory card: press the memory card into the memory card slot and the card will pop out.
- For best performance, format the microSD card. When you use the memory card for the first time, make sure you format it. Also, to keep the card working properly, don’t forget to format it regularly.Note: Before formatting the microSD card, make sure to copy all of its contents. Formatting the memory card will erase all the data from your card.
- How to format the memory card: Press the [Menu] key once, then short press again the [Menu] key, press the Up/Down keys to find the format menu, press [OK] to confirm the format is complete, press the [Menu] to exit the menu.Note: when starting up, the camera needs to be connected to the power supply to start automatically. After starting up, the camera will record automatically. Please press [OK] to stop recording before setting the menu.Warning: please make sure the camera is off when inserting or unplugging the memory card, otherwise it can cause damage to the camera or memory card.
Camera installation
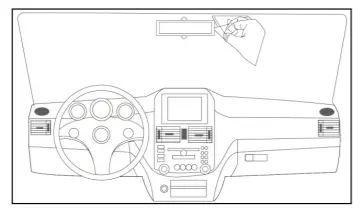
- Clean the front windshield with a cloth (figure 1).

- Tear the 3M adhesive protective tape on the bracket (as shown in figure 2).
- Connect the car charger to the cigarette lighting port (as shown in figure 3).
- Stick the bracket with the sticker removed on the windshield of the car (figure 4).
- Tear off the protective film on the display screen of the recorder.
- The recorder bracket is connected to the host by a magnet.
- Connect the USB terminal of the car charger with the USB terminal of the recorder.
- Tear off the protective film on the lens.Note: you can adjust the video angle according to your preferences.Change the bracket’s position (45°) to adjust the video angle of the front lens (suggestion: the front part of the lower picture accounts for 1/3 of the picture, and the sky point of the upper picture accounts for 1/3).Warning: While driving, for your safety and your passengers’ safety, please keep your eyes on the road, not on the display of the recorder.

Display status and information

- The section-time icon of loop video recording indicates that the cyclic video recording time is 1 minute. You can choose between min, 3mins, 5mins. After shutdown, each video lasts for 5 minutes and the device stops recording when the microSD card is full.
- [00:00:05] When in the white font: remaining video time on the memory card. When in red font: current video duration; After inserting the memory card, the recording time on the remaining space of the memory card will be displayed in white font while in the standby state.After inserting the memory card, the current video duration will be displayed in red font while in recording mode.
- The icon is displayed when the video locks. When g-sensor activates it or you manually press the lock key, the key icon will be displayed on the screen, indicating the current video is locked.
- [P] Parking guard icon. The camera displays this icon only when the parking guard function is on. The camera will automatically start-up and lock for 15 seconds after receiving external vibration.
- [1080 FHD] Video resolution icon. Displays the currently selected video resolution
- Moyement detection icon. When the icon is displayed on the left side of the screen, the feature is enabled.
- Exposure compensation icon. Displays the exposure compensation value adjusted during the current video recording.
- Audio recording ON icon.Audio recording OFF icon. Turn ON or OFF the audio recording function in the settings menu. During recording, press the button to quickly open and close the recording.
- Gravity induction icon. The screen will display after opening gravity induction. This indicates that during recording, when the external vibration exceeds the set value, the current recording video will be locked and saved as a file that cannot be deleted or overwritten
- Storage card status display icon. The icon is displayed after inserting the memory card. Memory card was not inserted.
- Icon of battery power and status. Displays the current state – connected to the car charger. Displays current battery.
- GPS status icon (only available for DC2). After inserting the GPS module into the recorder, the speed will be displayed after searching the signal.
- [ 00:00:05] Time. Displays the current standard time.Please initialize it before use.
- [2018/01/01] Date. Displays the current standard date.Please set it before use.
- [0 km/h] Current speed (only available for DC2). After the camera searches for the GPS signal, the current speed is displayed.
Setting the Time and Date:
- Since the camera automatically starts recording when you start up the car, first you have to press [OK] to pause the recording. The recorder will enter a standby state.
- Then press to pop up the menu, and then press again.Select Date/Time by pressing down or up, then press [OK] to enter the Settings.
- Adjust the value by pressing or keys, select the value, then press [OK] to confirm the selection and enter the next field. Press to exit after you finished setting up the date and time.
Taking a photo with the recorderWhen the recorder is in standby mode, press [M] once to switch to the camera mode. Press [OK] to take a picture. When taking a picture, the screen flashes once, indicating that the picture is taken.
Video/photo playbackIn the recording state, press the [OK] power button to stop recording. Press the [M] key twice to switch to playback mode, and the playback icon will be displayed in the upper left corner of the screen.Move thru files on the memory card by pressing ![]() or
or ![]() keys.Press [OK] to play or view the selected files. Press [OK] again to pause the playback.
keys.Press [OK] to play or view the selected files. Press [OK] again to pause the playback.
Settings menu
- If you are recording, press [OK] to stop.
- Press the key once to bring up the settings menu, and short press the or keys to turn over the menu.
- Select the menu options to be changed and press [OK] to enter.
- Press the button to exit.
Special features:
- Gravity induction function Press the key once to bring up the settings menu, then press the button to find the gravity-sensing option, and press the [OK] button to enter the change (the recommended state of selection). When the gravity induction is on, the camera will automatically save the video during recording as a non-erasable file. The icon will appear on the screen after you activated it.Note: if the gravity induction state is set too high, there will be too many files on the microSD card, making the camera unable to record.
- Parking monitoring functionAfter the parking monitoring is activated, when the vehicle is turned off and the recorder automatically enters the shutdown program, if it detects a vibration generated by external forces, the dashcam will automatically start up and record, then automatically shuts down after 20 seconds. When the vibration is detected again, the camera function is activated again.Note: To set up the parking monitoring function, you must connect the recorder to the power supply and allow the recording to automatically start. After you set up the parking monitoring, this function can be activated only after the power is off and the recorder automatically shut down.
- Motion detection functionWhen the motion detection is turned on, the camera will start recording when an object is detected to be moving. The motion detection starts in 10 seconds. The second detection will continue to record in 10 seconds. When you detect an object moving again, start the camera again!
- USB modeConnect the USB cable to the computer, the auto data recorder will automatically pop up the USB menu, and the following options will appear:1. Storage2. PC CamVideo or photo files that are stored on the microSD card can be accessed in this mode.Select this mode and the USB video device will pop up. It can take photos or video in real-time, so you can use it as a PC camera.
- Battery instructionsBattery power indicator, please refer to the drawing:After the camera is connected to the power supply, the red charging indicator will light up during the charging process.The whole charging time is about 180 minutes. The red charging indicator will turn off after the battery is fully charged.Note: this device is designed to work for a period of time when following the car. The built-in battery is only designed to save files when parking and shutdown. The working time of the fixed battery is limited.
- ResetIf the recorder is not working properly, the system can be reset by pressing the RESET button.
- License plate markingPress the menu key once to bring up the settings menu, press the menu key once to select the setting menu, then press the down key to find the License plate number option, and press [OK] to enter the change. A total of 9 license plates are composed of “Numbers” and “letters”. When the license plate number is less than 9 digits, select a number and replace it with a space. After setting the license plate, press the menu key to exit. Then press the down button to find the license plate switch option and select open. When recording, the video will have the license plate number marked in the fixed position of the image.8. GPS player (available for DC2 only): Please download HITGPS player from the link below https://pcgps.ce2ce.com/hit/hitplayer.html (available for Windows operating systems)9. WiFi connection (available for DC2 only) : DownloadGoPlus Cam APP from Google Play or Apple store or by scanning the Qr code below.
 After the camera is connected to the power supply, the red charging indicator will light up during the charging process.The whole charging time is about 180 minutes. The red charging indicator will turn off after the battery is fully charged.Note: this device is designed to work for a period of time when following the car. The built-in battery is only designed to save files when parking and shutdown. The working time of the fixed battery is limited.
Short press the Up button to activate WiFi mode on the camera.WiFi Name (can be changed) GPLUSPROWiFi password (can be changed) 12345678
Note:
- When the car is turned on, the camera will automatically start recording. When the car’s engine stops, the camera will automatically stop recording. Or you can short press the power button to start or stop recording.
- Loop recording settings will be 1min, 3mins, 5mins. The camera will save the videos with the loop recording function. The G-sensor videos or Lock videos will not be overwritten by loop recording videos.
- Lock files.Note: When the G-sensor function is turned on, the camera detects the crash, then the camera will lock the current videos in order not to overwrite by normal loop recording videos. The function is called Lock files.
Settings
| ‘Settings | Details | Options |
| Resolution | Setting the resolution of videos | 1080FHD, 720P |
| Loop recording | Setting the video length | min, 3mins, 5mins, or off (When off is set then it will not overwrite when microSD card is full) |
| WDR | Wide dynamic automatic adjustment of light | ON/OFF (on is recommended) |
| Exposure | Underexposed, the picture is dim and needs more light | 0.0, -1/3, -2/3, -1.0,-4/3,-5/3,-2.0, +2.0, +5/3, +4/3, +1.0, +2/3, +1/3 |
| Motion detection | In the standby state, it automatically detects when the screen is moved. | ON/OFF |
| Voice | Voice recording | ON/OFF |
| Date stamp | Date stamp in videos | ON/OFF |
| G-sensor | The video generated by the collision will never be overwritten | OFF/ HIGH/ MEDIUM/ LOW |
| Date/time | Date/time | Setting year, month, day, hour, min, second |
| Auto off | Auto power off when not recording | OFF/ 1 Min/3 Min/5Min |
| Screen saver | Turn off the screen at the selected time | OFF/ 1 min/ 3Min/ 5Min |
| Button sound | Button sound | ON/OFF |
| Language | Language setting | Traditional Chinese, Simple Chinese, Russian, Japanese, French, Italian, German, Spanish, English, Romanian |
| Frequency | Light frequency | 50HZ, 60HZ |
| Car plate | Setting car plate | Car plate |
| Car plate on/off | Turn on/ off the car plate watermark in videos | ON/OFF |
| Format | Format data on the microSD card | OK / Cancel |
| Default Settings | Return to default setting/ factory settings | OK/ Cancel |
| Version | Software version number | Version |
Technical specification
| Usage: | Automotive |
| Video resolution: | 1920 x 1080p , 1280 x 720p |
| Lens type: | 4 Glass 2.24 |
| Chipset & sensor: | GP5168 & F37 |
| Field of view: | 140° |
| Display: | 1.5″ Color |
| Frame rate: | Max 30fps |
| Sensor resolution: | 2 Mega Pixels |
| Photo resolution: | 12 Mega Pixels |
| Video compression: | H.264 |
| Video file type: | MOV |
| Built in WiFi: | Yes |
| GPS module: | Included ( only for DC2 ) |
| Speed Display: | Yes |
| Automatic recording: | Yes |
| G-Sensor: | Yes |
| Motion detection: | Yes |
| Parking monitor: | Yes |
| Loop Recording: | Yes , 1 / 3 / 5 minutes |
| PC camera support: | Yes ( By mini USB cable ) |
| Storage support: | Micro SD card, max 32GB, Class 10 (not included) |
| Battery: | 200 mAh |
| Battery autonomy: | Up to 15 minutes |
| Power supply: | Micro USB / Mini USB – 5V 2.1A |
| Mounting: | Magnetic bracket |
| Bracket mounting: | 3M adhesive |
| Working conditions: – | 10° – 60° C |
| Color: | Black |
| Package includes: | -Dash Patrol Dashcam DC1 / DC2-Magnetic bracket-MicroUSB cable-Dual USB car charger-GPS module (only for DC2 )-User manual |
| Product dimensions: | 43.6mm*37.4mm*55mm |
| Product weight: | 79g |
 report this ad
![]() Disposal and recycling information
Disposal and recycling information
The crossed-out wheeled bin symbol on your product, battery, literature, or packaging reminds you that all electronic products and batteries must be taken to separate waste collection points at the end of their working lives; they must not be disposed of in the normal waste stream with household garbage.It is the responsibility of the user to dispose of the equipment using a designated collection point or service for separate recycling of waste electrical and electronic equipment (WEEE) and batteries according to local laws.Proper collection and recycling of your equipment help ensure EEE waste is recycled in a manner that conserves valuable materials and protects human health and the environment, improper handling, accidental breakage, damage, and/or improper recycling at the end of its life may be harmful for health and environment.
References
[xyz-ips snippet=”download-snippet”]