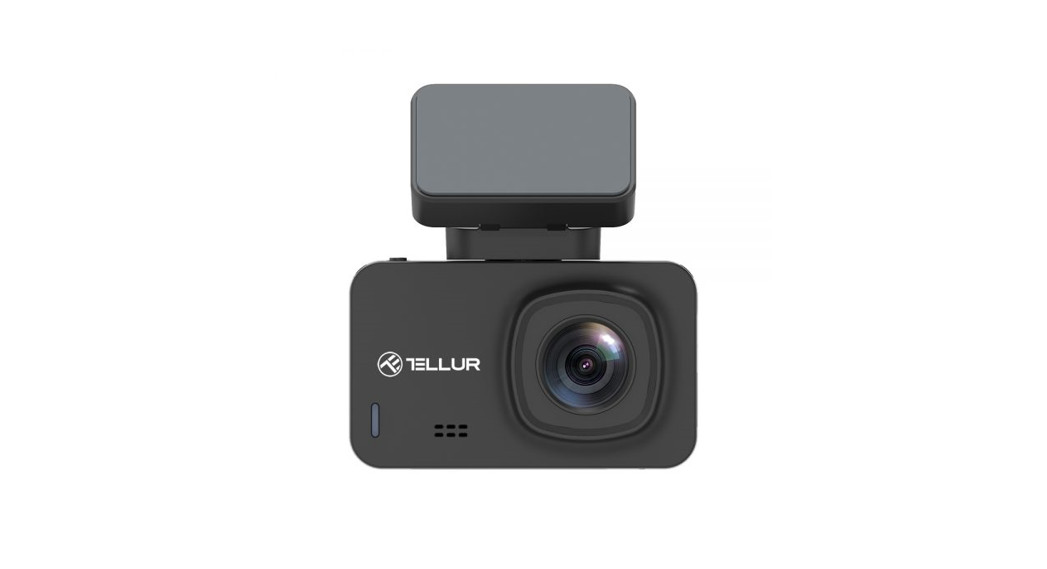
![]() Dash Patrol DC3 4K GPSDash CamUser manualTLL711003This manual is available in more languages on www.tellur.com/manuals
Dash Patrol DC3 4K GPSDash CamUser manualTLL711003This manual is available in more languages on www.tellur.com/manuals
Thank you for choosing Tellur!Please read this user manual carefully before using the product and keep it safe for future references.Please note! Any damage caused by misuse of the product will void the product’s warranty.
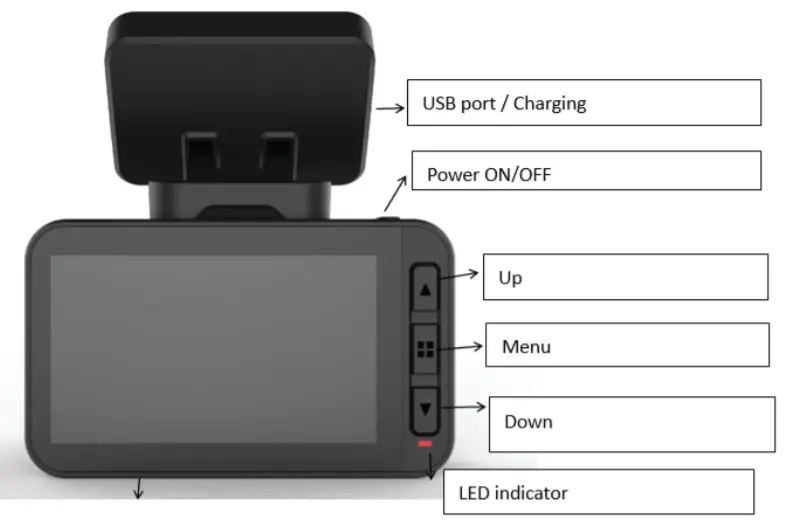
Product diagram
 |
 |
 |
Power button/ OK Key
- Long press (3 seconds) to power on/off or long press (6 seconds or more) to force shutdown.
- Press to play/stop playback
Up arrow/ WiFi button
- Move up in the settings menu.
- Short press up button(1 second) to turn WiFi on; Long press up button (3 seconds) to turn WiFi off.
Down arrow/ audio button
- Move down in the settings menu.
- In the video interface, short press to turn on/off audio recording
Menu button
- While the video is paused, short press M key for menu function, long press video playback function
- At the beginning of the recording, press M to lock the current file.3. In the Menu interface, short press the M button to go back to the previous page.
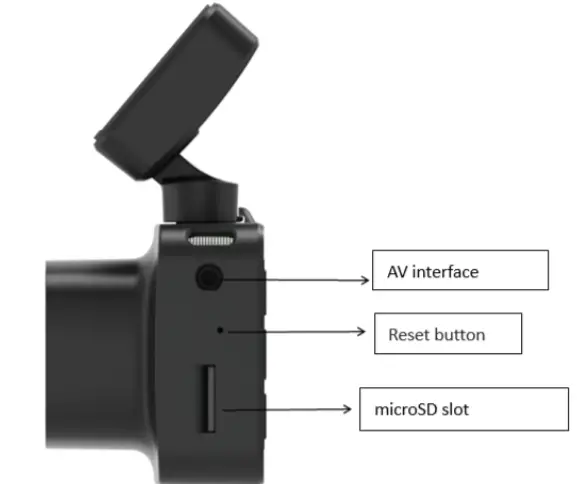
Reset KeyIf the camera doesn’t work properly or can’t connect to WiFi, press the reset key to restart the system.MicroSD card interfaceThe camera supports one microSD card, up to 128GB (Class 10 or above)
Installation
- Turn off the car engine.
- Find a suitable position in the car. The camera’s position should not affect driving. Wipe the windscreen where you want to place the device. Install the bracket and hang the recorder.
- Adjust the lens position to ensure that it is level with the ground.
- Plug one end of the USB cable into the USB port of the recorder and the other end connects to the USB port of the car charger.
- Start the car’s engine and check that the camera is installed correctly.
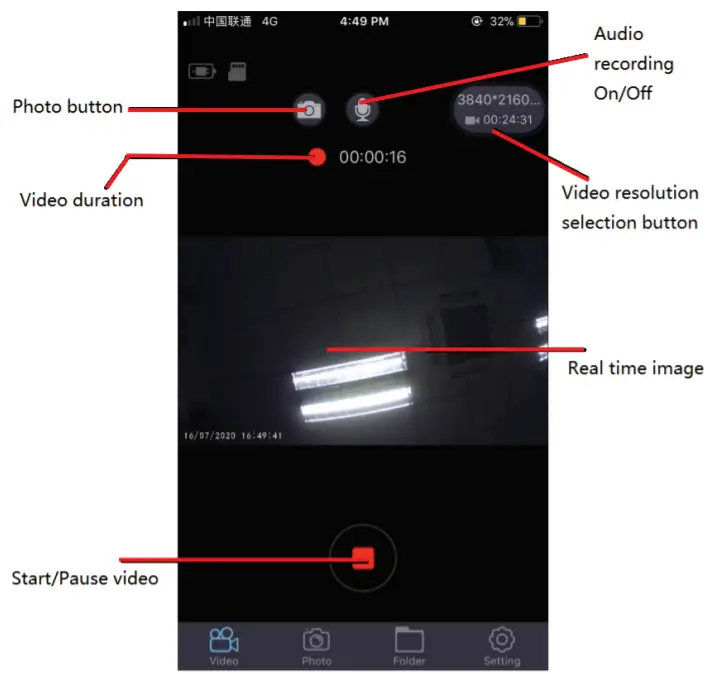
Recording/ taking a photo
- Recording modeWhile the camera is in video mode, the video icon
 will be displayed in the upper left corner of the screen and starts to record. While recording, there is a red dot flashing on the screen and, at this moment, you cannot operate the menu or switch working mode. Press OK to stop recording.
 - Photo ModeWhen in standby, long-press the M button to switch to photo mode. The photo icon will be displayed in the upper left corner of the screen. Press OK to take a picture. The screen flashes once when taking a picture, indicating that the photograph is taken. Press the menu key to set the photomenu, and press M to switch to playback mode.
- Video/ Photo playbackLong press M in photo mode to switch to playback mode.The playback icon will be displayed in the upper left corner of the screen.Press the Up button to select files above.Short press the Down button to select the files downward. Short press OK to play the selected video file.Press the menu key to enter menu Settings, where you can delete or unlock files.
- Menu SettingsIn any mode (recording, photo, or playback), while in standby, press the menu button to enter the menu, and then press it again to switch to the Settings menu 6.2g. By pressing the up or down key, you can move up and down the Settings. Select the Settings you want to change and enter the changes by pressing OK. Press the menu key to exit the menu interface.
Mobile APP Installation
Open App Store and search for “LuckyCam” or scan the following QR code to download and install it:

After installation, open the app which will prompt if you allow “LuckyCam” to access Photo Files on your phone. Click OK.WiFi connection(only devices with WiFi support this feature) There is a WiFi setting menu in the System Settings.Select “on”. When you connect it for the first time, you need to enter the WiFi settings of your phone and enter the password.No password is required to reconnect(or short press UP button 1 second to open WiFi)Android phones & IOS phonesClick WiFi Settings, enter the connection Settings interface, and search the local WiFi name: eg: NVT-CARDV******,and enter the password to connect. The local initial password is 12345678.Open the app. After successfully connecting the phone with the dashcam, you can check the recordings via the app.
 |
 |
Video Preview
After the app has successfully connected to the recorder, click the “folder” menu when the dashcam stops recording and then click the corresponding video to play the current video (direct preview will have video progress buffer)
Video Download
Click ![]() the icon, click the desired video from the list to download, it will be downloaded automatically.Download video is saved in your smartphone’s download list.
the icon, click the desired video from the list to download, it will be downloaded automatically.Download video is saved in your smartphone’s download list.
Photo Preview
Click. ![]() icon, it displays photos or video screenshots.
icon, it displays photos or video screenshots.
Tip
The video file playback on the phone is compressed. If you want to watch the original HD video, please download it on your phone and play it or insert the microSD card into the computer to watch it.
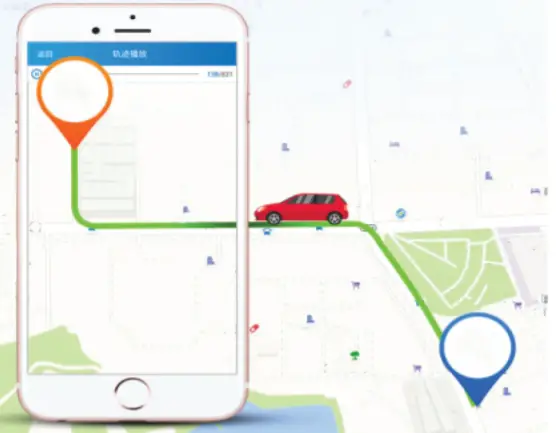
GPS
GPS positioning track operation When the GPS is connected, the display will show the GPS icon in green.Remark: The GPS icon is white before satellite positioning and turns green after satellite positioning.When the GPS successfully receives the location, the video file will be marked with corresponding coordinates (longitude or latitude) and shows the driving speed of the car. When you use the mobile app to playback the recordings, the video files will playback corresponding to the GPS trajectory
Basic Settings
- Video resolution: the default video resolution is 2560*1440 P30, you can choose from the menu between 3840*2160 P30, 2560*1440 P30, 1920*1080 P60, 1920*1080 P30, select the corresponding resolution, and click ok to confirm the
- Loop video recording: the default loop recording is 3 Click the “loop recording” menu and choose between Off/1 minute/ 3 minutes/ 5 minutes (if you select 3 minutes, video saved on the microSD card will be 3 minutes video).
- G-sensor: The default setting is “medium”, which corresponds to the vibration sensitivity of the lock
- Parking monitoring: The default setting is “off”. If “no” is selected, it will automatically shut down after starting the recording by vibration for 15 seconds
- Motion detection: Set “off” by default. If “no” is selected, it will sense the movement of objects in front of it when the car is stopped. The camera stops recording automatically after 10
- Audio recording: the default setting is “on”. Turn on video recording, select “Off” to turn off the audio recording.
- Date label: the default setting is “on” to record videos with the time and date displayed.
- WiFi: The default is “off”, select “no” or short press up button to turn on the WiFi, which will connect to the mobile
- Date/time setting: The default time is East Second select the menu to pop up the date and time, manually adjust the current time and date, or connect to the mobile app. Select time Settings from the Settings menu. Click “auto sync” to set the current date and time.
- Automatic shutdown: the default setting is “off”. You can choose between 1 min/ 3 min/ 5 min.If you select “off”, the recorder will not stop automatically under the stopped state.Select “1 minute” and the camera will automatically shut down after 1 minute from the moment the car engine turned off.
- Backlight setting: the default is “3 minutes”, click the selection menu and select: off/ 1 minute/ 3 minutes/ 5 minutes.If you select “off”, the screen will be bright for a long period of time.Select “1 minute” to turn black the screen after 1 minute.
- Language settings: the default language is “English”. There are many languages in the Settings menu.
- Format: To format the memory card, click “OK” and it will delete all data on the microSD card.
- Default settings: select “ok” to restore factory settings.
- WDR: The default setting is “On”, if “Off” is selected, the recording footage won’t be adjusted automatically.
- Exposure: The default setting is “+0.0”, you can choose to change the exposure in Menu settings.
- Timezone: The default setting is “GMT +2: 00”, you can choose to change the timezone: GMT ±12: 00.
- Speed warning: The default setting is “100km/h”, you can choose to change it from Menu settings.
- Speed Unit: The default setting is “MPH”, you can choose ”KM/H”, “MPH” from Menu settings.
- Gesture Photo: The default setting is “ON”. It will take photos and store the last 10 seconds of video when it detects movement directly under the camera.
Technical specifications
| Usage: | Automotive |
| Video resolution: | 3840 x 2160 30fps / 2560 x 1440 30fps /1920 x 1080 30fps or 60fps |
| Lens type: | 7 Glass 1.6 |
| Chipset & sensor: | Novatek NTK96670 & Sony IMX 335 |
| Field of view: | 140° |
| Display: | 2.45″ Color IPS |
| Frame rate: | Max 60fps (1920 x 1080) |
| Sensor resolution: | 5 Mega Pixels |
| Photo resolution: | 12 Mega Pixels |
| Video compression: | 3840 x 2160 30fps H.265, others H.264 |
| Video file type: | MP4 |
| Built-in WiFi: | Yes |
| GPS module: | Included |
| Speed Display: | Yes |
| Automatic recording: | Yes |
| G-Sensor: | Yes |
| Motion detection: | Yes |
| Parking monitor: | Yes |
| Loop Recording: | Yes, 1 / 3 / 5 minutes |
| Storage support: | Micro SD card, max 128GB, Class 10 (not
included) |
| Battery: | 150 mAh |
| Battery autonomy: | Up to 9 minutes |
| Power supply: | Micro USB – 5V 2.1A |
| Mounting: | Magnetic bracket |
| Bracket mounting: | 3M adhesive |
| Working conditions: | -10° – 60° C |
| Color: k | Black |
| Package includes: | -Dash Patrol Dashcam DC3-Magnetic bracket-MicroUSB cable-Dual USB car charger-User manual |
| Product dimensions: | 72mm*36.3mm*43.8mm |
| Product weight: | 94g |
*Supports automatic video on startup*Supports loop, automatically overwrite the oldest videos, no loss of frame no loss of seconds*Supports vibration video automatic lock, when the collision exceeds the set threshold automatically lock the current video and it will not be overwritten by loop videos*Supports smartphone, iPad, and other devices to download, playback, one-click format, and other functions
Disclaimer
 report this ad
An automobile data recorder is a recording instrument for information related to images and sounds of vehicles on the road.Note: the dashcam should be in recording mode that the video can be recorded.Under the following situations, the image will be damaged or lost:
- While recording, if the memory card is pulled out, the last video file will be damaged or lost.
- Power outages while video recording will cause the last video file to be damaged or lost.
- During the video recording, the video file is damaged or lost due to the destructive collision of the dashcam.
- Heavy collisions during video recording may cause the memory card to loosen, which may damage the file or cause the file loss.
![]() Disposal and recycling informationThe crossed-out wheeled bin symbol on your product, battery, literature or packaging reminds you that all electronic products and batteries must be taken to separate waste collection points at the end of their working lives; they must not be disposed of in the normal waste stream with household garbage.It is the responsibility of the user to dispose of the equipment using a designated collection point or service for separate recycling of waste electrical and electronic equipment (WEEE) and batteries according to local laws.Proper collection and recycling of your equipment help ensure EEE waste is recycled in a manner that conserves valuable materials and protects human health and the environment, improper handling, accidental breakage, damage, and/or improper recycling at the end of its life may be harmful to health and environment.
Disposal and recycling informationThe crossed-out wheeled bin symbol on your product, battery, literature or packaging reminds you that all electronic products and batteries must be taken to separate waste collection points at the end of their working lives; they must not be disposed of in the normal waste stream with household garbage.It is the responsibility of the user to dispose of the equipment using a designated collection point or service for separate recycling of waste electrical and electronic equipment (WEEE) and batteries according to local laws.Proper collection and recycling of your equipment help ensure EEE waste is recycled in a manner that conserves valuable materials and protects human health and the environment, improper handling, accidental breakage, damage, and/or improper recycling at the end of its life may be harmful to health and environment.
[xyz-ips snippet=”download-snippet”]