![]()
![]()
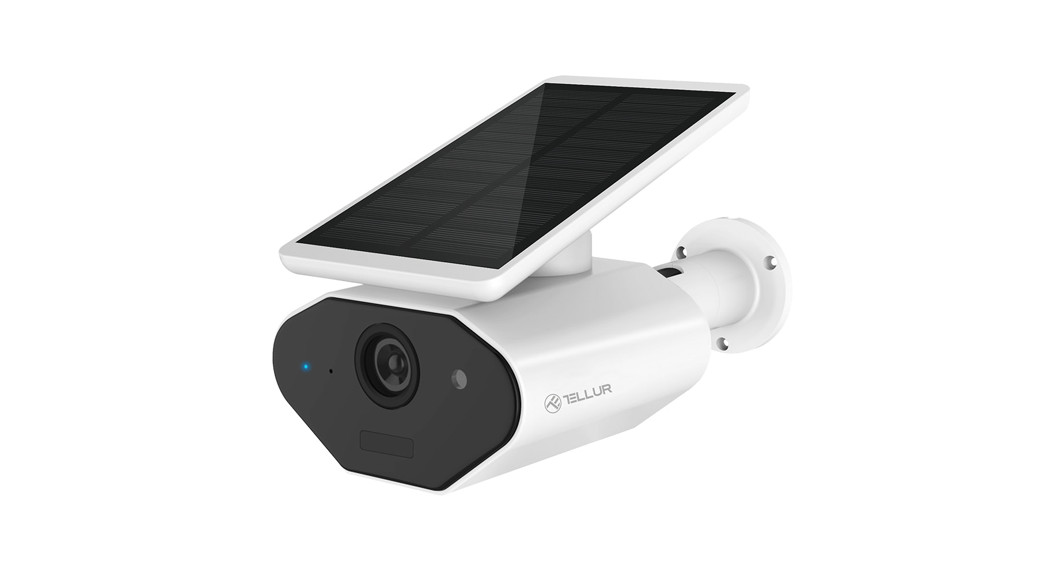
WiFi Smart Solar CameraTLL331231 User manual
For other languages, please visit smart.tellur.com

Thank you for choosing Tellur!To ensure optimum performance and safety, please read this user manual carefully before using the product. Keep this user manual safe for future references.
What’s in the box
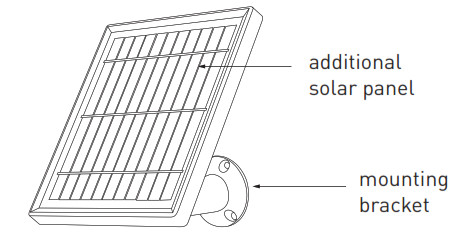
1 x Tellur Solar Camera1 x Additional solar panel1 x USB charging cable2 x Screws sets1 x Screwdriver1 x Mounting bracket1 x Antenna2 x Rechargeable Li-ion batteries
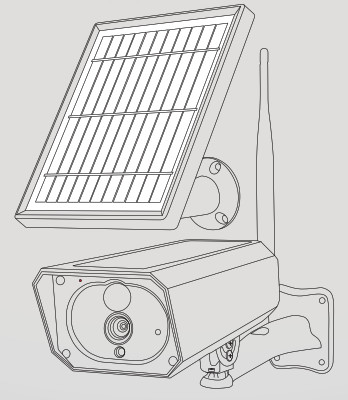
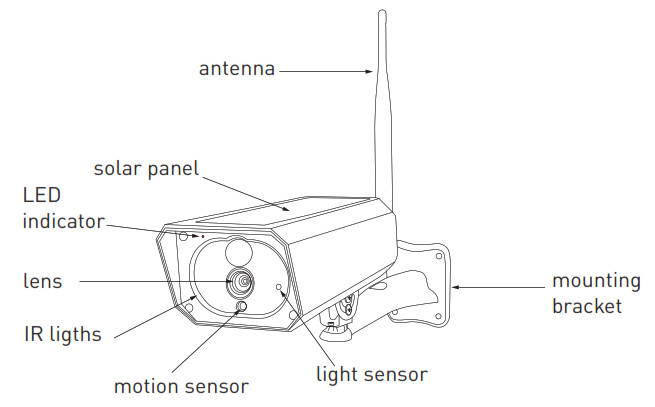
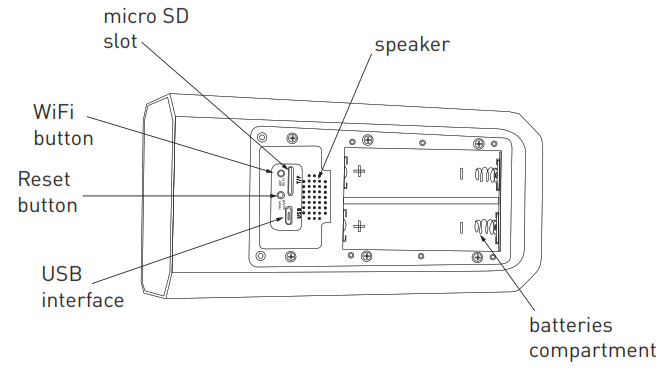
PRODUCT DIAGRAM
PRODUCT INSTALLATION
Important notes:– Prior to final wall installation, charge the camera batteries using the USB cable for at least 10 hours.– Avoid mounting the device in a place where the temperature changes too much, such as heat source, air-outlet, etc. it will cause the equipment to send false alarms.– Ensure that the solar panel is exposed to light for an optimal charge. You can use the included additional solar panel if the camera mounting place does not get enough sunlight.– Ensure the camera is securely fixed in position– Ensure the battery compartment is sealed and the screws are not loose.– Make sure the batteries are NOT wet, moist, damaged, or broken.
PAIRING THE DEVICE
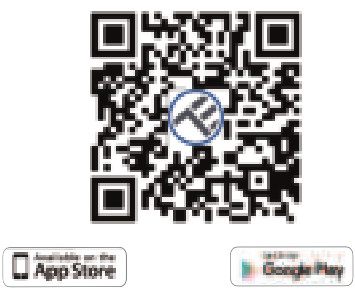
- Download and install the Tellur Smart app, available for either iOS or Android devices.
 https://smartapp.tuya.com/tllsmart
 - Once downloaded, the app will ask you to register your device. Enter your email, select the country you live in and create a password for your Tellur Smart account.

Set up router
This device only supports 2.4GHz frequency band router, does not support 5GHz frequency band router. Please set the relevant parameters of the router before WiFi configuration, WiFi passwords do not include special characters such as #$%^&*(). When the device is configured to the WiFi, the mobile phone and device are as close as to the router, which can speed up the configuration of the device.
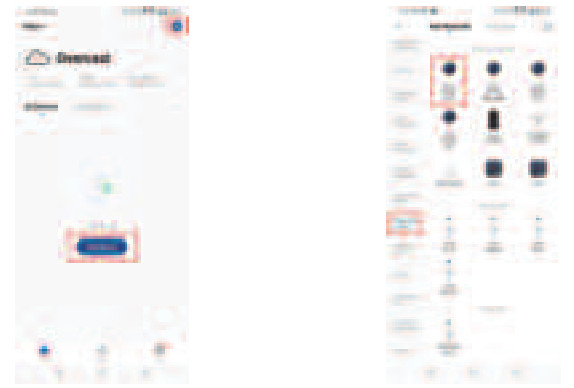
- Open the Tellur Smart app and click “Add device” or “+” and then select “Video Surveillance” -> “Smart Camera (Wi-Fi)”.
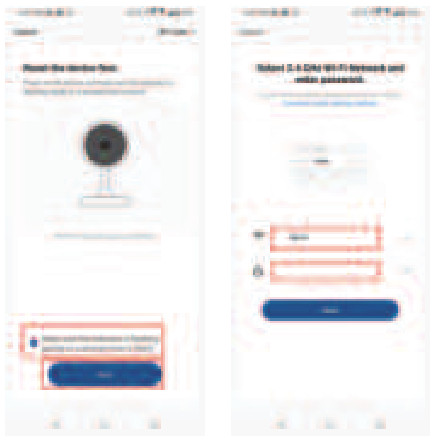
- Power on and reset the Solar Camera until the status indicator is flashing quickly or a prompt tone is heard, and then click “Next”. Then input your WiFi password and click “Next”.Click to change network.
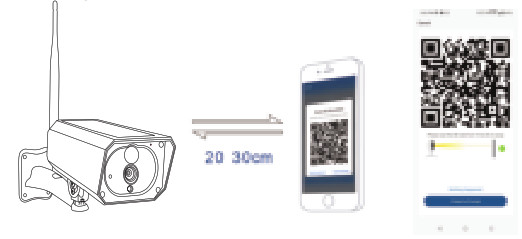
- With the Solar Camera lens, scan the QR code that appeared on your phone. When the device makes a sound, click “I heard a Prompt” and the configuration will complete.
- When connecting, make sure your router, smartphone and the Solar Camera are as close as possible.
Failed to add device?
– Make sure the device is powered on.– Check the WiFi connection of your phone.– Check if the device is in pairing mode. Reset your smart device to enter pairing mode. Please refer to the “How to reset device” section.– Check router or related: If you use a dual-band router, select the 2.4GHz network to add the device. You also need to enable the router’s broadcasting function. Set encryption method as WPA2-PSK and authorization type as AES, or set both on “auto”.– Check if the WiFi signal is strong enough. To maintain the signal strong, keep your router and the smart device as close as possible.– Wireless mode should be 802.11.b/g/n – Make sure you don’t exceed the maximum number of registered devices supported by the app (150).– Check if the router’s MAC filtering function is enabled. If so, remove the device from the filter list and make sure the router is not prohibiting the device connection.– Make sure the WiFi password entered in the app is correct.
Can I control the device with 2G/3G/4G network?When adding the device for the first time, the device and the phone need to be connected to the same WiFi network. Once the device has been successfully paired with the Tellur Smart app, you can remotely control it via 2G/3G/4G networks.
How can I share my device with family?Open Tellur Smart app, go to “Profile” -> “Device sharing” -> “Sharing sent”, tap “Add sharing” and share the device with the added family members. Notice – users must install the Tellur Smart app on their device in order to see shared devices.
How can I manage the devices shared by others?Open App, go to “Profile” > “Device Sharing” > “Sharings Received”, then you can find the devices shared by other users. To delete a shared device, swipe left.
![]() Disposal and recycling informationThe crossed-out wheeled bin symbol on your product, battery, literature, or packaging reminds you that all electronic products and batteries must be taken to separate waste collection points at the end of their working lives; they must not be disposed of in the normal waste stream with household garbage. It is the responsibility of the user to dispose of the equipment using a designated collection point or service for separate recycling of electrical and electronic equipment waste (WEEE) and batteries according to local laws. Proper collection and recycling of your equipment help ensure EEE waste is recycled in a manner that conserves valuable materials and protects human health and the environment. Improper handling, accidental breakage, damage, and/or improper recycling at the end of its life may be harmful to health and the environment.
Disposal and recycling informationThe crossed-out wheeled bin symbol on your product, battery, literature, or packaging reminds you that all electronic products and batteries must be taken to separate waste collection points at the end of their working lives; they must not be disposed of in the normal waste stream with household garbage. It is the responsibility of the user to dispose of the equipment using a designated collection point or service for separate recycling of electrical and electronic equipment waste (WEEE) and batteries according to local laws. Proper collection and recycling of your equipment help ensure EEE waste is recycled in a manner that conserves valuable materials and protects human health and the environment. Improper handling, accidental breakage, damage, and/or improper recycling at the end of its life may be harmful to health and the environment.
References
[xyz-ips snippet=”download-snippet”]