TELLUR TLL331271 WiFi Robot Window Cleaner
Important Safety Precautions
- Fasten the safety rope and secure it to indoor fixtures before use.
- Check if the safety rope is broken or the knot is loose before use.
- Set a danger-warning area downstairs for no-balcony windows and doors.
- The battery must be fully charged (blue light ON) before use.
- Do not use in rainy or moist days.
- Turn the power on before putting the device onto the window.
- Make sure the device sticks to the window.
- Hold the device before turning the power off.
- Do not use on frame-less windows.
- Make sure to properly place the cleaning ring onto the cleaning wheel to avoid liquid leakage.
- Remove anything on the window. Do not use on cracked glass. Reflective or coated windows might be slightly scratched during operation, due to dirt particles on the glass.
- Keep hair, loose clothing, fingers, and all parts of the body away from openings and moving parts.
- Do not use in areas with flammable or combustible liquids or gas.
- Not recommended to be used by children under the age of 8. This product can be used by children aged 8 or over, as long as they are given continuous supervision.
- This appliance can be used by persons with reduced physical, sensitive, or mental capabilities, or lack of experience or knowledge, as long as they have been given supervision or instruction concerning the use of the appliance in a safe way and understands the risks involved.
- Keep this appliance and its power cord out of reach of children.
- Cleaning and maintenance tasks must not be carried out by children.
Product Introduction
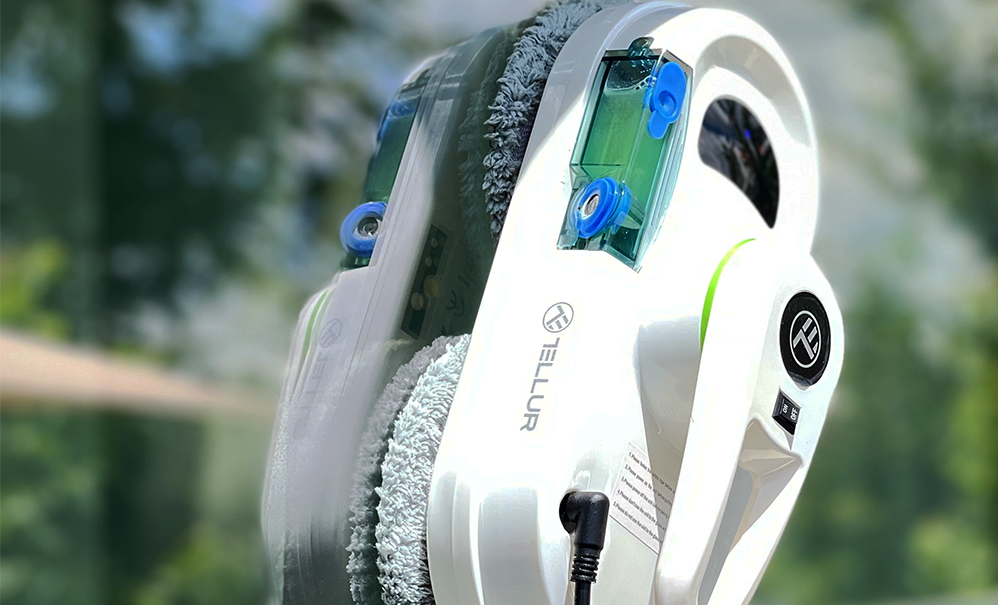
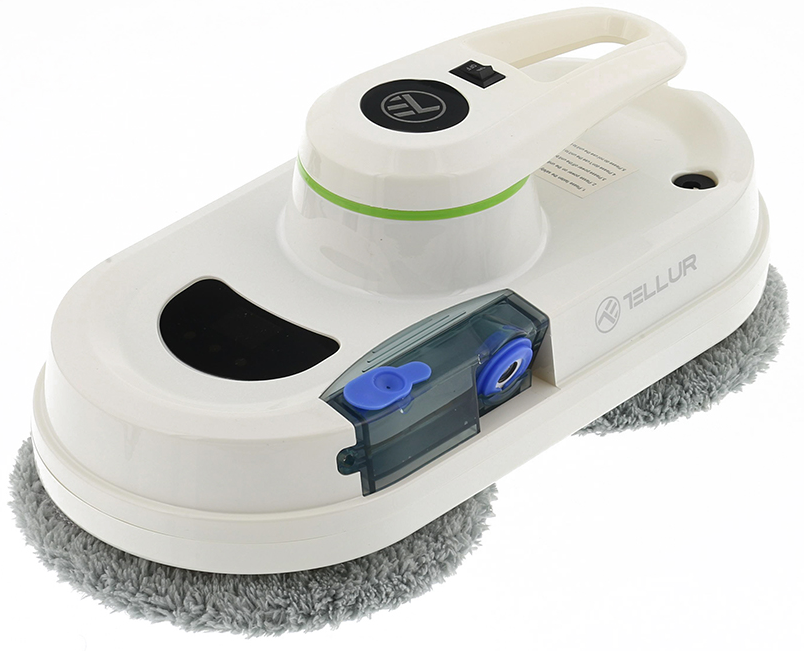
WINDOW CLEANER is a glass-cleaning robot with a vacuum motor that can stick to the surface of the window.An embedded UPS (Uninterrupted Power System) prevents the device from falling off the window in case of electrical power outage.WINDOW CLEANER has two specially designed cleaning wheels that can freely traverse the window surface.The easily replaceable microfiber cloths are used on both cleaning wheels.Micro-fiber cloths are used for an excellent glass-cleaning performance, copying the movement a hand would make.WINDOW CLEANER calculates the path, detects window frames, and cleans the entire window. It also has a manual mode to control the robot from the remote control.WARNING: for your safety, the robot must always be connected to the mains supply. If there were a power outage, the robot would remain attached to the window, thanks to its battery. In that case, remove the robot from the window as soon as possible. The robot cannot work if it is not connected to the main power supply.
Features
- High suction power to hold onto the glass tightly.
- Calculates and programs an optimal cleaning path for maximum efficiency.
- Two modes of controlling it – with a remote control or via the Tellur Smart app.
- Water spray to dissolve dirt + high density fiber cloth that leaves no trace.
- Stops automatically after the task is completed.
Quick Guide
How to put the device on the window
- Turn on the power switch and make sure the fan is running.
- Put the device on the window, 10cm away from the frame.
- Check if the device sticks to the glass before releas-ing it.
How to take the device from the window
- Press Stop from remote control or from Tellur Smart app.
- While the device is running, please hold the safety rope with one hand and take the device from the window with the other hand.
- Turn off the power switch in a safe area.
Safety Rope
- Check if the safety rope is broken or the knot is loose before use.
- Fasten the safety rope and tie it to an indoor fixture before use.
- The UPS function will be enabled automatically when no electric power is supplied. The battery backup will supply enough energy to keep the device attached to the window for about 20 minutes.
- If no electric power is supplied, the device will stop automatically, emit an alarm, and flash a red light. The user must take the device from the window as soon as possible.
- The user can recover the device by pulling from the safety rope. Pull lightly from the safety rope at an angle close to the glass to prevent it from dropping.
Please, make sure the battery is fully charged (green light ON) before use.
- Turn off the power switch on the device and plug it to the power supply. An orange light turns on while charging.
- The green light turns on when fully charged.
LED SIGNALS
The vacuum cleaner robot has been equipped with 3 indicator lights with different functions:
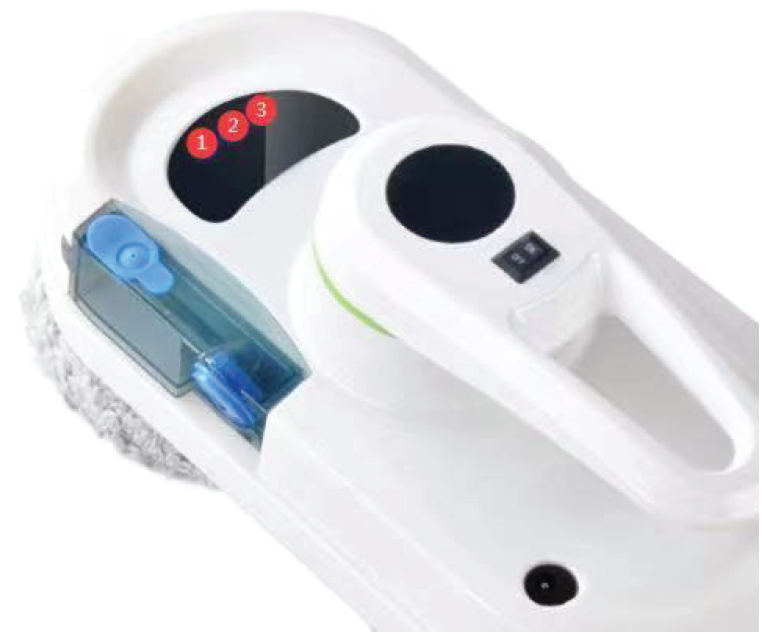
The first light (1), to the left, signals the state of the battery. When the battery is low, incomplete, or charging, the light will turn red. When the robot is fully charged, the light will turn blue.The second light (2) in the middle is the working status indicator light.When starting up, the blue light flashes, indicating that the machine is initializing.In standby mode, the blue light is always on.In the working state, the blue light flashes.When the machine is in error mode, the blue light flashes intermittently, accompanied by a buzzer prompt.The third light (3) on the right (red light) is the WiFi status light.When there is no WiFi connection, the light is off. When waiting for connection, the light is flashing. When connected, the light is always on.
Operation
- Step I: Use a measuring cup to add 15 ml of water or a special glass cleaner liquid to the water tank of the window cleaning robot
- Step II: Connect the robot to the main supply and tie the safety rope. Make sure the battery is fully charged.
- Step III: Place the microfiber cloths on the cleaning wheels.
- Step IV: Light wet the lower cloth or spray little water to the glass.
- Step V: Turn on the robot and place it on the window.
- Step VI: Choose the cleaning mode with the remote control or from Tellur Smart app.
- Step VI: When the robot stops cleaning, grab it by the handle, turn off the switch, and remove it from the window.
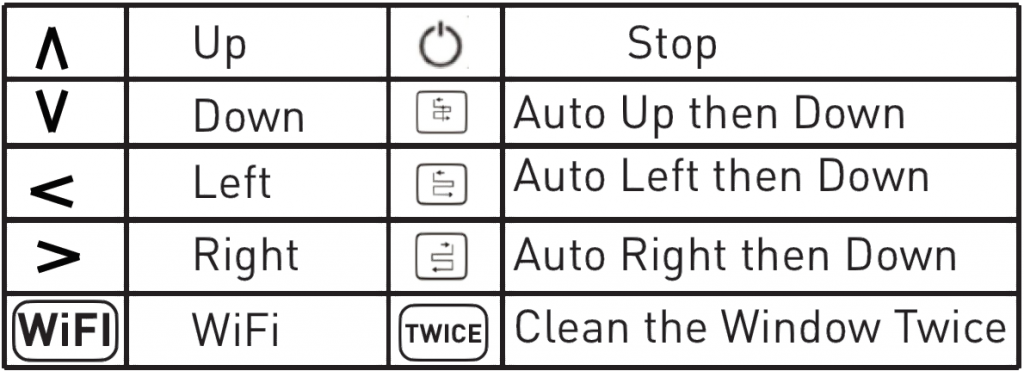
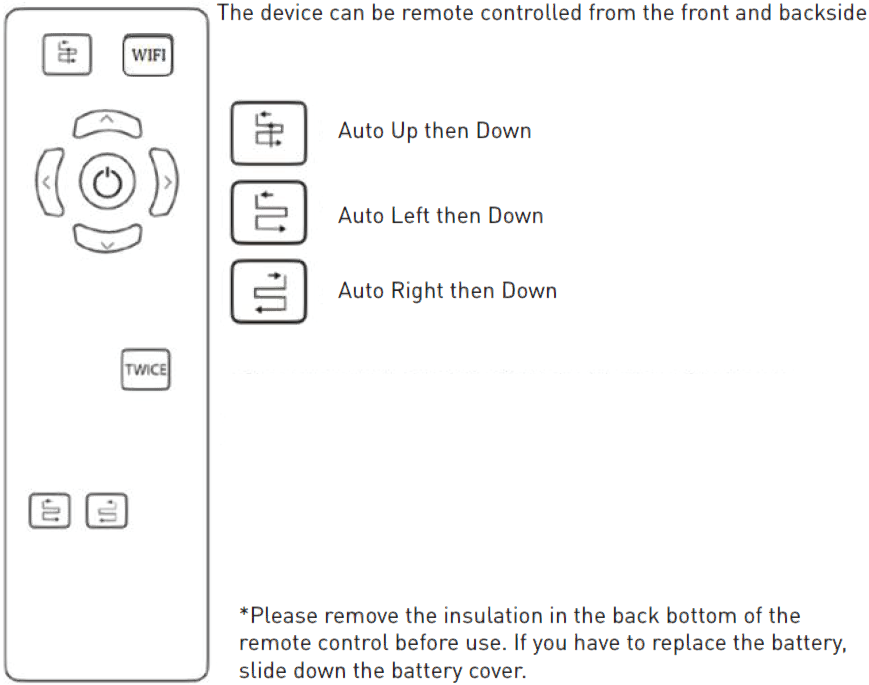
Remote Control
Functions and diagram:
Safety Information
Power Adapter and Battery
Use only the power adapter supplied with this device. The use of other types of power adapter could result in malfunction and/or damage.
- Please use a proper electric outlet and make sure no heavy objects are placed on the power adapter or power cord.
- Allow adequate ventilation around the adapter when in use. Do not cover the power adapter with objects that could reduce cooling.
- Do not use the adapter in moist environments. Never handle the adapter with wet hands.
- Plug the adapter in a suitable power socket. The voltage requirements are found on the adapter.
- Do not use damaged adapters, power cords, or plugs.
- Do not attempt to disassemble the adapter. There are no serviceable parts inside. Replace the whole unit if damaged or exposed to high moisture. Consult your WINDOW CLEANER dealer for help and maintenance.
- The battery may present a risk of fire or chemical burn if mistreated. Do not disassemble, short contact, heat above 60˜C (140˜F), or burn.
- If you need to dispose of the device, please take it to a local waste disposal center for electrical and electronic parts.
General Safety Information
Keep the safety and operation instructions fittingly for future reference.Follow all operation and use instructions.Do not expose your device to rain or extreme humidity and keep it away from liquids (such as beverages, faucets, etc.).Avoid exposing your device to direct sunlight or an intense light source and keep it away from heat sources (such as radiators, heaters, stoves, etc.). Do not place the device near strong magnetic field. Keep the device and accessories away from children.Product operating temperature:0°C~40˜C (32°F~104°F).Product storage temperature:-10°C~50°C(14°F~122°F).
Technical Details
- Power consumption: 80W
- Input voltage: AC 100-240V, 50Hz/60Hz Output adapter: DC 24V / 3.75A
- AC power cord length: 1 meter
- DC power cord length: 4 meters
- Safety rope length: 4.5 meters
- Power failure battery: Li-Ion 500mAh / 14.8V Battery support time: 20 minutes Adhesion to window: Vacuum
- Cleaning types: 3 modes
- Water spray: Yes
- Self stop: Yes
- Cleaning speed: ~4 minutes / m2
- Remote control: Yes
- Maximum cleaning area: 6 m x 5 m Dimensions: 295 x 148 x 120 mm
- Weight: 930g
- WiFi standard: IEEE 802.11b/g/n Supported WiFi network: 2.4GHz
- Color: White
- Package includes:
- 1 x Tellur Window cleaner
- 12 x Cleaning cloth
- 1 x Safety rope
- 1 x Remote control
- 1 x AC adapter
- 1 x DC cable extension
- 1 x Measure cup
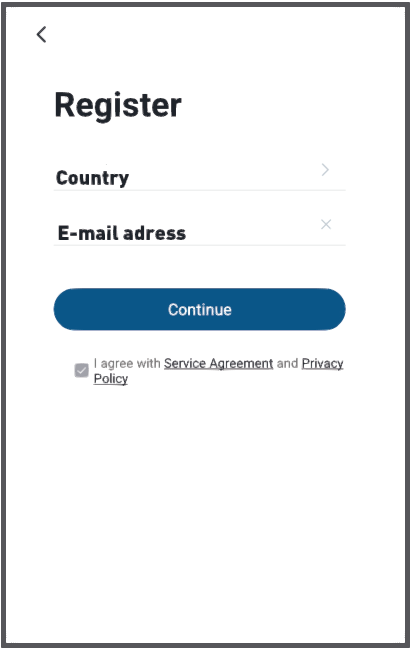
Pairing with Tellur Smart app
- Download and install the Tellur Smart app for either iOS or Android devices.

- Once downloaded, the app will ask you to register your device. Enter your email, select the country you live in and create a password for your Tellur Smart account.
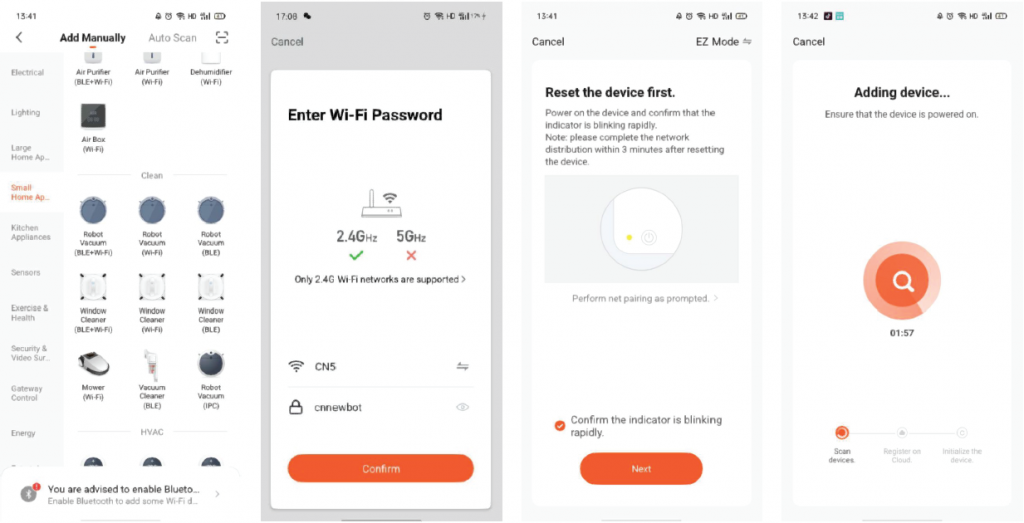
- Check if the WiFi status LED light (the red indicator on the right side of the unit) is flashing.
- Indicator flashes quickly – EZ Mode
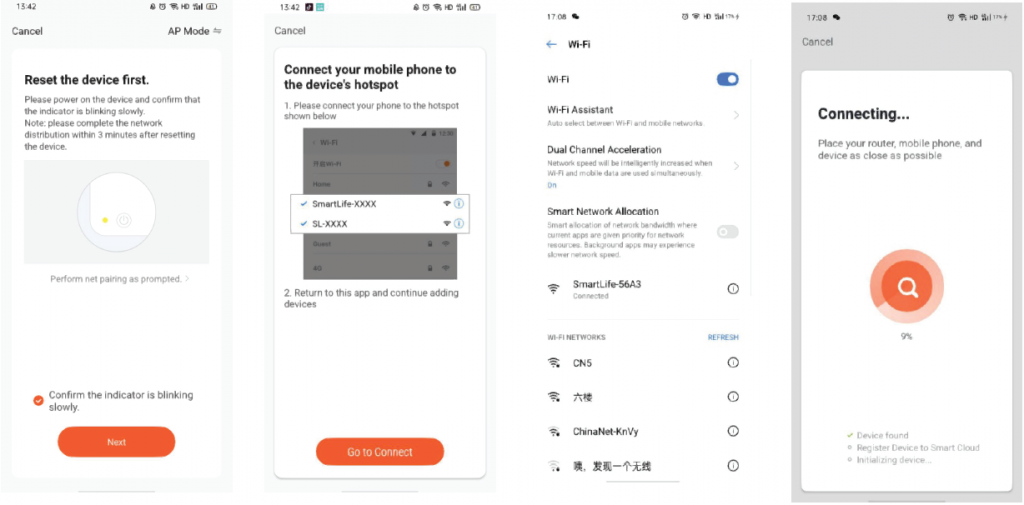
- Indicator flashes slowly – AP ModeHow to reset device?
- Press the reset button for 6 seconds until the LED indicator is flashing quickly.The device will enter EZ mode.
- Press the reset button again for 6 seconds until the LED indicator is flashing slowly. The device turns to AP mode.If the LED is not flashing, double press the WiFi button on the remote to enter pairing mode. When the LED indicator is flashing quickly. The device will enter EZ mode. You can double press the WiFi button again to enter AP mode.Warning: The Robot Window Cleaner will be activated when the device is registered successfully to the Tellur Smart app. Start installing it with the device near router and smartphone (not attached to the window).
- Open Tellur Smart app and click “+”, then select Small Home Appliances from the list, and then select Window Cleaner (Wi-Fi). Select your WiFi network and input the network’s password.
- If the WiFi indicator is flashing quickly, choose EZ Mode to connect.
- If the WiFi indicator is flashing slowly, choose AP Mode to connect. Choose the WiFi hotspot. Return to Tellur App after connecting to hotspot successfully.
- If the WiFi indicator is flashing quickly, choose EZ Mode to connect.
Once Tellur Smart app is installed on your device and you have added your smart device to your app you will be able to control it.
Failed to add device?
- Make sure the device is powered on.
- Check the WiFi connection of your phone.
- Check if the device is in pairing mode. Reset your smart device to enter pairing mode. Please refer to the “How to reset device” section.
- Check router or related: If you use a dual-band router, select the 2.4GHz network to add the device. You also need to enable the router’s broadcasting function. Set encryption method as WPA2-PSK and authorization type as AES, or set both on “auto”.
- Check if the WiFi signal is strong enough. To maintain the signal strong, keep your router and the smart device as close as possible.
- Wireless mode should be 802.11.b/g/n
- Make sure you don’t exceed the maximum number of registered devices supported by the app (150).
- Check if the router’s MAC filtering function is enabled. If so, remove the device from the filter list and make sure the router is not prohibiting the device connection.
- Make sure the WiFi password entered in the app is correct.
EZ and AP connection modes
Smart devices can be connected using two modes:
- EZ represents the easiest way of connecting and enabling a smart device. You will need to have the device, active wireless network through with login password and Tellur Smart app installed on a smart-phone / tablet.
- AP mode can be used to configure and enable a smart device first with the smartphone / tablet and later with the WiFi network.Can I control the device with 2G/3G/4G network?When adding the device for the first time, the device and the phone need to be connected to the same WiFi network. Once the device has been successfully paired with the Tellur Smart app, you can remotely control it via 2G/3G/4G networks.How can I share my device with family?Open Tellur Smart app, go to “Profile” -> “Device sharing” -> “Sharing sent”, tap “Add sharing” and share the device with the added family members. Notice – users must install the Tellur Smart app on their device in order to see shared devices.How can I manage the devices shared by others?Open App, go to “Profile” > “Device Sharing” > “Sharings Received”, then you can find the devices shared by other users. To delete a shared device, swipe left.
The crossed-out wheeled-bin symbol on your product, battery, literature or packaging reminds you that all electronic products and batteries must be taken to separate waste collection points at the end of their working lives; they must not be disposed of in the normal waste stream with house-hold garbage. It is the responsibility of the user to dispose of the equipment using a designated collection point or service for separate recycling of electrical and electronic equipment waste (WEEE) and batteries according to local laws. Proper collection and recycling of your equipment helps ensure EEE waste is recycled in a manner that conserves valuable materials and protects human health and the environment. Improper handling, accidental breakage, damage, and/or improper recycling at the end of its life may be harmful for health and environment.
![]()
References
[xyz-ips snippet=”download-snippet”]