![]()
![]()
Wi-Fi Gas SensorUser ManualTLL331291

For other languages, please visit smart.tellur.com
Thank you for choosing Tellur!To ensure an optimum performance and safety, please read this user manual carefully before using the product. Keep this user manual safe for future references.
WHAT’S IN THE BOX1 x Tellur Gas sensor1 x DC12V adapter1 x 3M tape2 x Screws2 x Screw taps1 x User manual
PRODUCT OVERVIEW
Increase your sense of security with Tellur’s WiFi Smart Gas Sensor. Having a unique airflow design, the core sensor is protected from vapors, oil spills or smoke, ensuring its continuous operation.When it detects gas, the sensor alerts you through an acoustic alarm, a light indicator, and a push notification is sent to your smartphone. The WiFi Smart Gas Sensor is easily installed and works on DC 12V (AC 220V adapter included).The sensor integrates perfectly in the Smart Home ecosystem and allows you to check its working status and history records by simply accessing the Tellur Smart app from your smartphone. Also from the app you can remotely mute the alarm or make the sensor to perform a self-check just to be sure the device is operating effectively.
PRODUCT FEATURES
Detects gas leakage and triggers the alarm.Multiple warnings: light indicator, high-decibel acoustic alarm & push notificationCompatible with Tellur Smart app, perfectly integrated in the Smart Home ecosystemRemote control: mute & self-testEasy to install & useWorking on 802.11 b/g/n 2.4GHz wireless network (no hub required)Wi-Fi network configuration with EZ (Smart Config) and AP (Access Point) modeShare the device with your family Mounting with adhesive tape or screw
Quick guide:
- Make sure the WiFi network is a 802.11 b/g/n 2.4GHz band and internet is available.
- Download the app from Apple store or Google Play;
- Register an account in the app and login with your email address;
- Setup the device WiFi connection;
- Mount the device on specified location;
- Test and check the working state of the device and app.
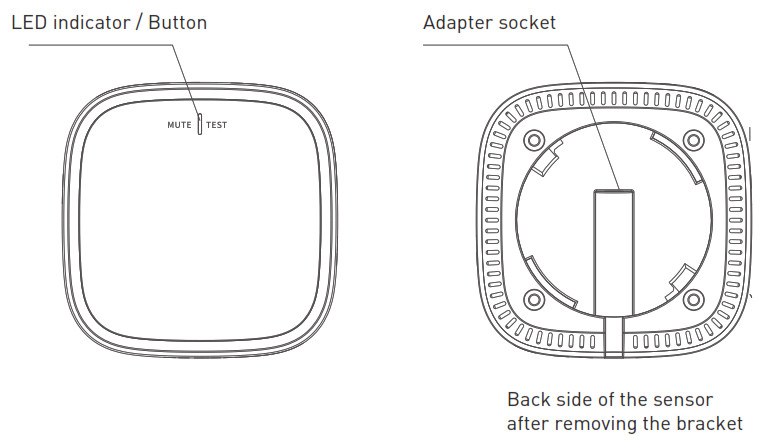
PRODUCT DIAGRAM
LED INDICATORS & SOUND MEANING
| Red LED flashing | Buzzer ON | Gas leaking alarm |
| Red, Green and YellowLED flashing alternately | Buzzer OFF | The sensor is initializing |
| Green LED ON | Buzzer OFF | Normal working status |
| Yellow LED ON | Buzzer ON | Fault |
PRODUCT SPECIFICATIONS
Power supply: DC 12V (AC 220V adapter included)Alarm level: 70dB @ 1 meterPush notifications: YesHistory record: Yes Self-test: YesGas type detection: Natural gas (CH4)Tolerated concentration: ±5% LEL (Lower Explosive Limit)Alarm concentration: 8%LEL, tolerance ±3% LELAlarm response time: <30 secondsWiFi standard: IEEE 802.11b/g/nSupported WiFi network: 2.4GHzColor: WhiteHousing material: PC + ABSInstallation method: Screws or 3M tapeOperating temperature: -10°C – +55°COperating humidity: 5% – 95% RHProduct dimensions: 66 x 66 x 29mmProduct weight: 62 gr
INSTALL APP AND REGISTER AN ACCOUNT
Download the Tellur Smart App for both iOS and Android OS. Scan the QR code to download Tellur Smart App
https://smartapp.tuya.com/tllsmart
Set up router
This device only supports 2.4GHz frequency band router, does not support 5GHz frequency band router, please set the relevant parameters of the router before WiFi configuration, WiFi passwords do not include special characters such as ~!![]() #$%^&*(). When the device is configured in WiFi, the mobile phone and device are as close as to the router, which can speed up the configuration of the device.
#$%^&*(). When the device is configured in WiFi, the mobile phone and device are as close as to the router, which can speed up the configuration of the device.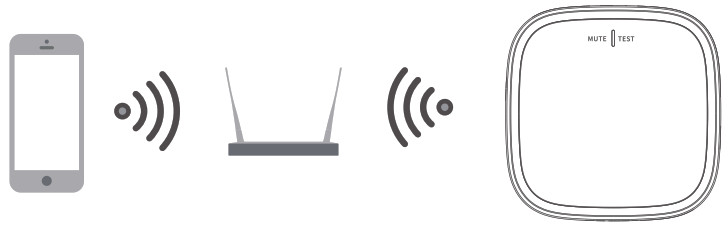
ADD AND REMOVE DEVICE IN YOUR APP ACCOUNT
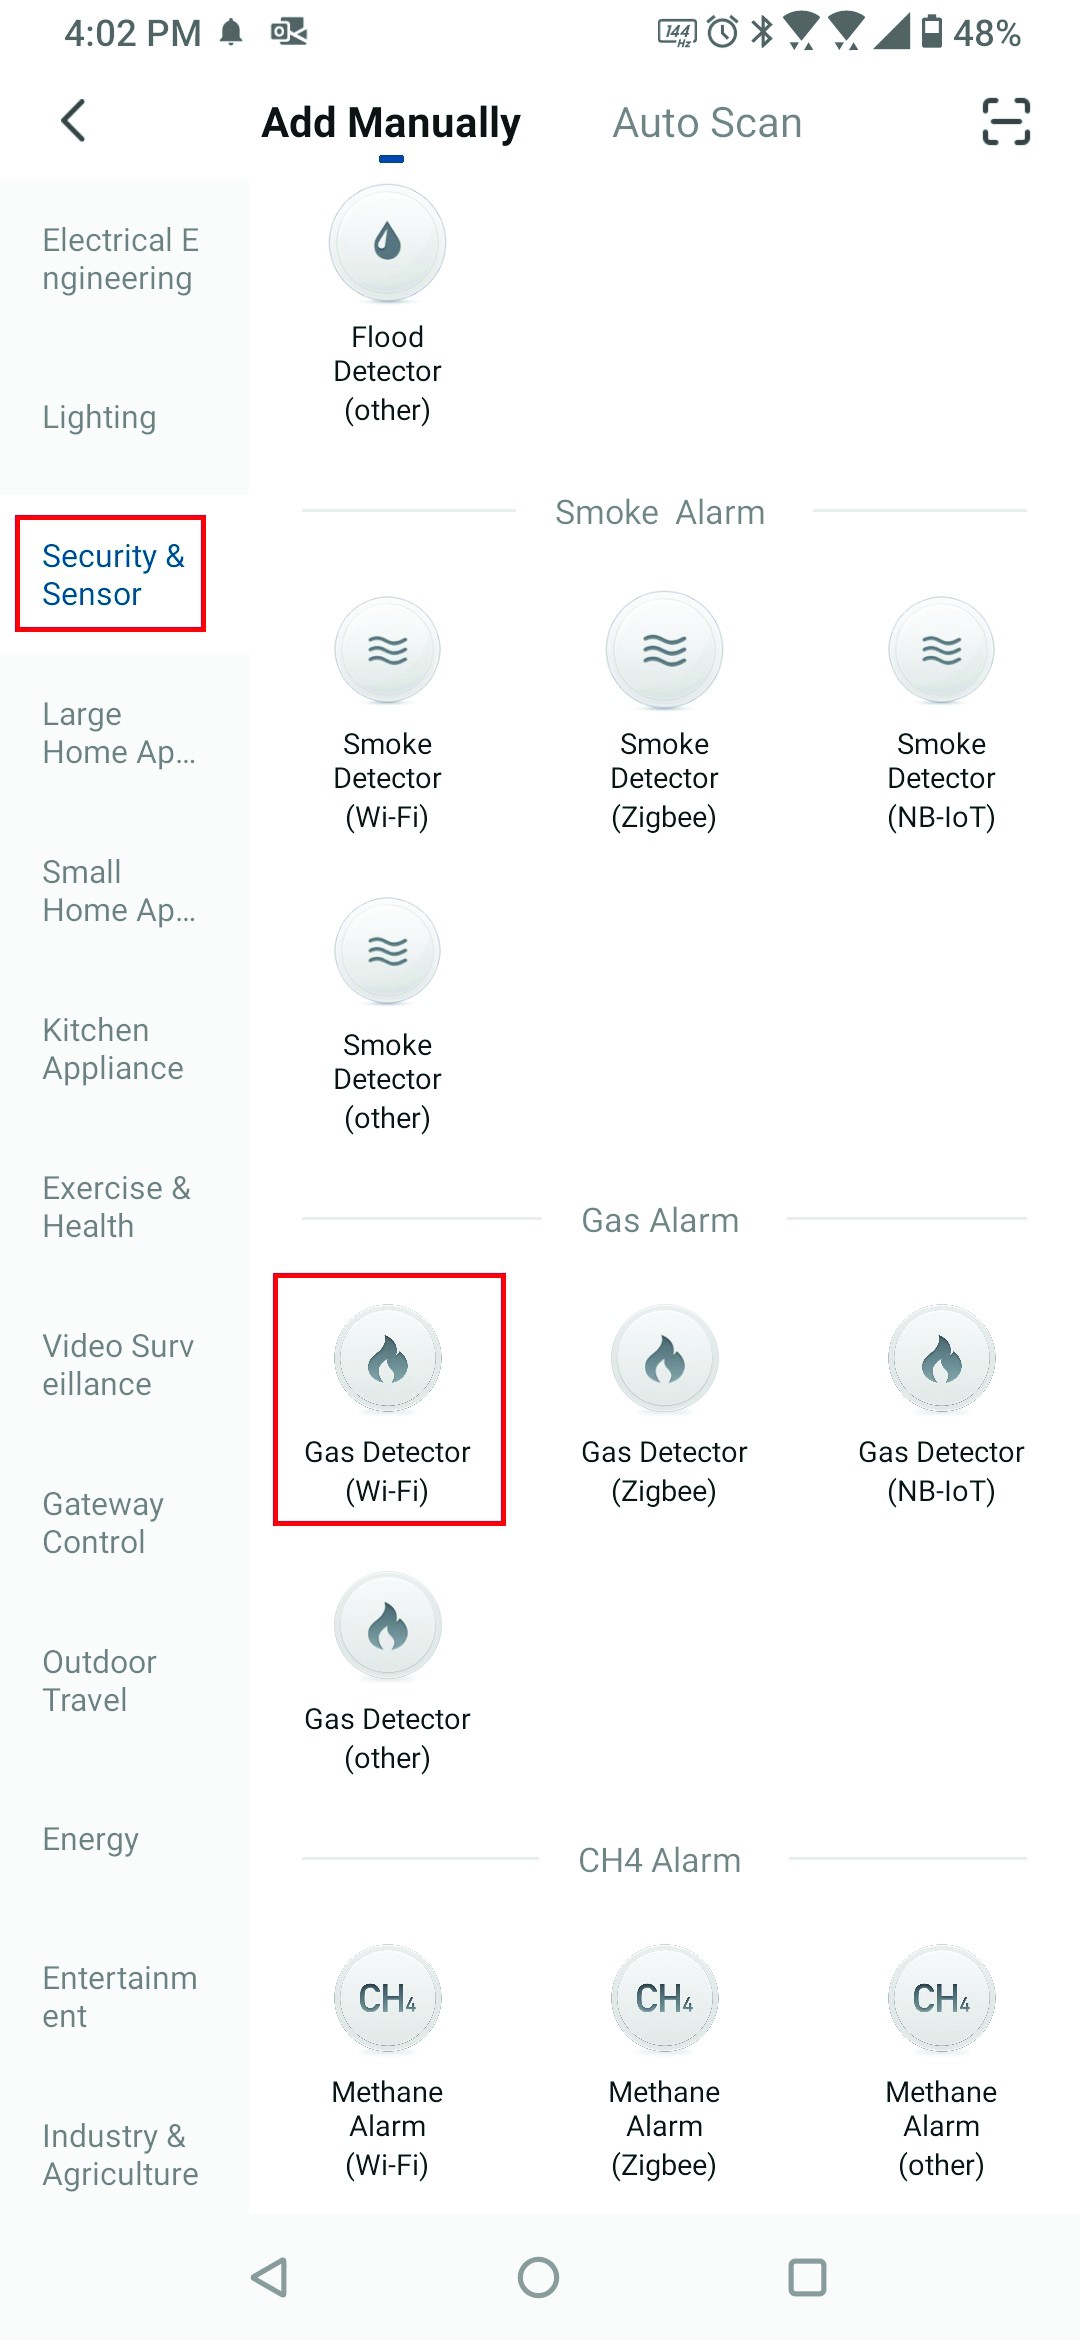
- Open the app and login, Click Add Devices > Security and Sensor > Gas Detector (Wi-Fi) to start the device adding.

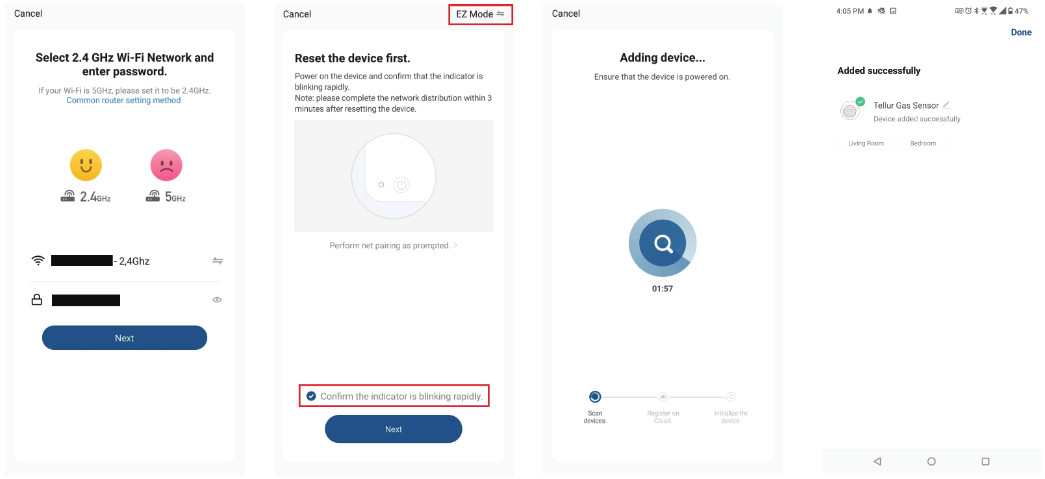
- Press the device button for 5 seconds to enter the Wi-Fi configuration state (fast blinking in EZ mode or slow blinking in AP mode).
- Input the Wi-Fi SSID and password of the Wi-Fi network that the device is going to work with, then waiting around 30 seconds for the Wi-Fi configuration finished until a device is successfully added;
- Change the device name and share it within APP account as you want.
- Click the device just added to launch the device state UI to check the state, battery level, record history and the APP notification setting.Note:*Make sure the device and APP work in same Wi-Fi configuration mode, both in EZ mode or in AP mode.*In some case that the EZ mode is not working Wi-Fi network, AP mode is the only option.• EZ mode:make sure your APP is internet available and device and APP both work in EZ mode. Then input the Wi-Fi network password to finish the device adding. If you want to change the Wi-Fi network, please check the “Change network” in APP;• AP mode:Click AP Mode, make sure your APP is internet available and device and APP both work in AP mode. Confirm to input the SSID and Password of Wi-Fi network, then select the Device AP name with Tellur Smart App in Wi-Fi list then back to App to finish the device adding.After the device is successfully added to APP account, the LED will turn off. Using the methods mentioned in LED indicator to check the device is successfully added or not. If not, please repeat the Device adding again.
- Remove device1) Click “Remove Device” to remove this device from your account; click “Restore manufacturer Defaults” to remove the device from your account and clear the history record in cloud.2) After remove device or Restore manufacturer defaults from the APP, repeating the Device add steps to your account;
 • AP mode:Click AP Mode, make sure your APP is internet available and device and APP both work in AP mode. Confirm to input the SSID and Password of Wi-Fi network, then select the Device AP name with Tellur Smart App in Wi-Fi list then back to App to finish the device adding.
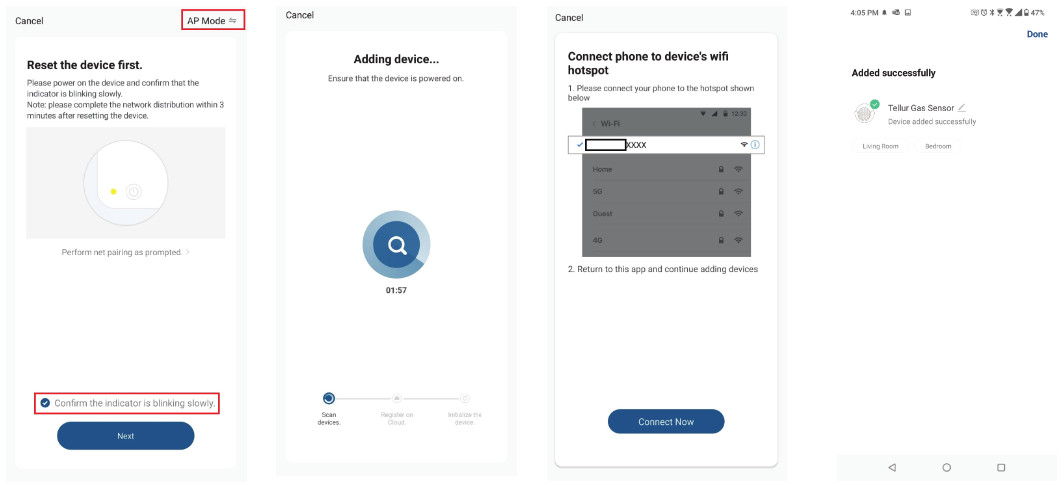 After the device is successfully added to APP account, the LED will turn off. Using the methods mentioned in LED indicator to check the device is successfully added or not. If not, please repeat the Device adding again.
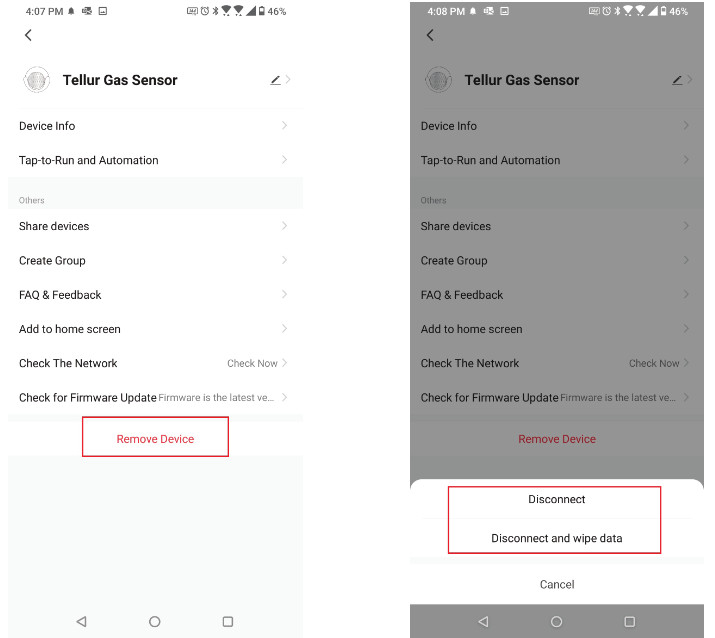 2) After remove device or Restore manufacturer defaults from the APP, repeating the Device add steps to your account;
PRODUCT INSTALLATION
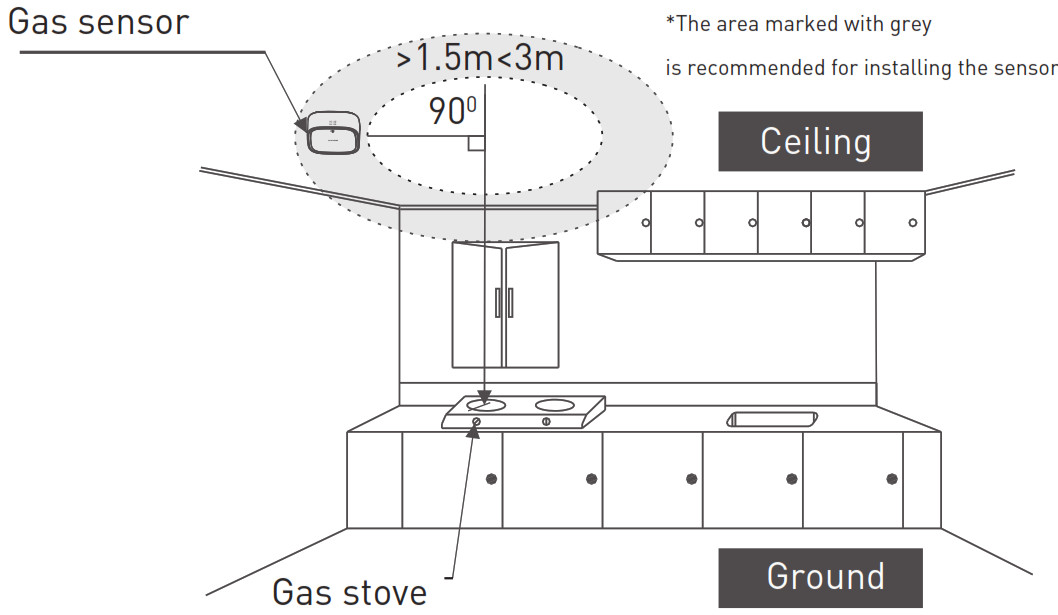
- The product is only for indoor ceiling installation;
- The Gas Sensor is suitable for natural gas detection;
- It is recommended to mount it in a location directly above the gas source
- Fix the bracket to the wall with screws or 3M tape, Fix the sensor into the bracket by rotating it clockwise. If you use 3M tape, please make sure the wall surface is firm, smooth, and clean.
- Screw installation is recommended. The user is responsible for any accidents and safety incidents caused by poor installation.

Functionality:
- Turn on the power of the sensor. If the yellow LED flashes once and the buzzer emits a short sound, it means that the sensor is in preparing state. If red, green, and yellow LED flashed alternately and the green LED remains on, the sensor is working normally.
- In normal working mode, you can press the button to perform a self-test of the sensor. The buzzer will emit a short sound and the red, green, and yellow will flash in sequence until the green light will remain permanently on (returning to normal working mode).
- If a gas leakage is detected, the red LED will flash, the buzzer will emit a repeated sound and you will receive an alarm notification on your smartphone. The alarm will stop if there is no more gas detected.
- If the yellow LED is always on and the buzzer emits a continuous sound, the sensor is faulty.
- If fault is detected, turn off and than again on the power. The sensor will start a self-test. If the fault alarm still persists, remove the sensor and repair it or replace with a new one.
Important notes
- If the mounting location is unconventional (different from the recommended installation in the diagram), check carefully for the best position that ensures an effective monitoring of potential gas leakage.
- In case of house decoration, the gas released by solvents or paint can damage the sensor and can cause false alarms. When decorating try to protect the gas sensor from dust and vapors of any kind. Open the doors and windows to maintain a good ventilation and, if possible, remove the sensor temporarily.
- Do not install the sensor too close to the gas stove, heating and smoke can affect the normal working and sensitivity of the sensor.
- Avoid long-term exposure to liquid vapors and soot.
- Avoid liquid spills or high humidity locations.
- Avoid installation in high or low temperature environments (not higher than 55°C or lower than -10°C)
- Avoid mounting the sensor in an environment with the following gases: silicone vapor, formaldehyde, toluene, acetic acid, and hydrogen sulfide. These are mainly produced from home decoration, decorative materials, adhesives, paint, hair gel, silicone, etc. These gases can cause irreparable damage to the sensor, leading to false alarms or failure. In addition, high concentration of alcohol vapors can lead to a false alarm and can decrease the long term sensitivity of the sensor.
- The sensor will send an audible, visual, and push notification when gas is detected.
- Do not test the sensor with open flame to avoid damaging the product.
- If alarm is sent during the test, it warns you of potential danger and needs immediate attention. Never ignore any alarm, which may lead to casualties or property damage.
- If the sensor fails self-test, please refer to “Troubleshooting” part of the manual. If the fault can not be fixed, the product should be replaced immediately.
Daily maintenance
- Test the sensor periodically.
- Keep the sensor clean and without dust. You can clean it with a vacuum cleaner and a soft fabric material or a soft brush.
- Do not let solvents or cleaning agents inside the gas sensor. It can cause damages to the sensor. After cleaning, perform a test of the sensor.
- Do not paint the sensor, it can affect the normal operation of the product.
TROUBLESHOOTING
- If the sensor is not reacting, check if the sensor is properly installed and is powered correctly.
- Re-position the sensor if there are many false alarms.
- Try to clean the sensor if there are many false alarms.
WARNING
- In case of gas leakage alarm, take all appropriate measures:oClose the gas pipe valve.oOpen the windows and doors.oExtinguish possible fires sources, such fireworks, lighters, matches.oDo not turn on any electrical appliances.oOnly if safe to do, check the reason of gas leakage and promptly notify the relevant departments or professionals to deal with it.
- Do not leave the product in extreme high-temperature environment.
- Do not disassemble the sensor, it will cause the warranty to be lost.
- Keep out of reach of children.
Disposal and recycling information
 The crossed-out wheeled-bin symbol on your product, battery, literature or packaging reminds you that all electronic products and batteries must be taken to separate waste collection points at the end of their working lives; they must not be disposed of in the normal waste stream with household garbage. It is the responsibility of the user to dispose of the equipment using a designated collection point or service for separate recycling of waste electrical and electronic equipment (WEEE) and batteries according to local laws. Proper collection and recycling of your equipment helps ensure EEE waste is recycled in a manner that conserves valuable materials and protects human health and the environment, improper handling, accidental breakage, damage, and/or improper recycling at the end of its life may be harmful for health and environment.
![]() For other langauges please scan the QR code
For other langauges please scan the QR code
www.tellur.com/manual-tll331291
ABN Systems International
![]() Str. Marinarilor, nr.29Sector 1, Bucuresti, Romania
Str. Marinarilor, nr.29Sector 1, Bucuresti, Romania![]() 004.021.233.09.95
004.021.233.09.95![]() [email protected][email protected]
[email protected][email protected]![]() www.tellur.com
www.tellur.com
References
[xyz-ips snippet=”download-snippet”]