
TELLUR TLL511381 Vox 60 Bluetooth Headset User Guide
Technical specifications
Bluetooth version: v5.2Wireless range: Up to 10 mFrequency: 2.4GHz, Class 2Supported profiles: A2DP, AVRCP, HFPMultipoint technology: Pair and maintain connections with two phones and answer calls from either phoneMicrophone frequency range: 100Hz~8KHzMicrophone sensitivity: -44dBm ±3dBSpeaker: 10mmTalk time: Up to 8.5 hoursStandby time: Up to 130 hoursCharge time: Approximately 2 hoursCharge connector: Micro-USBFeatures: Voice alerts, iOS battery state monitor, car charger (1A)Bluetooth pairing name: Tellur Vox 60Product dimensions: 54 x 18 x 23.5mmProduct weight: 11g
Quick Start
The headset contains the following parts (with variations depending on the specific model):
- LED indicator (red, green or blue)
- MFB button (with telephone or power logo)/ Toggle switch
- Volume button included “+” and “–“ (some of the headset does not support)
- Charging port
- Ear hook
- Microphone
- Earpiece
Fully charge the headset before using. For charging details, please refer to “Charger and Battery” in this manual.
Meanwhile, choose the compatible cellphone or other Bluetooth devices for pairing. For details about pairing, please refer to “Basic Operations”.
Tips: Keep the headset away from your credit card or other magnetic storage media; otherwise, the stored information may be lost due to demagnetization.
Basic Operations
(Note: short press = click the button once; twice press = press the button fast, twice; long press = hold and press the button more than one second.)
Power on and pairing:
- At the power off status, long press and hold the MFB button until the blue light or red and blue lights flash alternately, then release the button (here with buzzer or voice tone) and the headset will enter pairing mode.
- At the power off status, press the MFB button, when you see the blue light flashing or hear the voice prompt “Power on, Pairing”, then the headset enters pairing mode automatically.
- At the power off status, hold down MFB for about 3 seconds to power on. Red and blue / blue indicators blink synchronously 3 times, together with a voice of “Power On”. Then the red and blue indicators blink alternatively with a voice of “Pairing”.
- When the headset is in power-off state, push the toggle Upward to power on the headset. The voice prompt “Power on ” will be heard and the headset automatically enters the pairing state. The indicator blinks in red and blue alternatively. The headset automatically powers off if 180 seconds pairing timeout occurs. Match the timeout red light for about 2 seconds after automatic shutdown, accompanied by a “shut down” voice prompt.
Connecting: Turn on your mobile phone’s Bluetooth to search for the Bluetooth headset, find “Tellur Vox 60”, select it and input password 0000 if needed (if the Bluetooth version is V2.1 or higher, no need to input the password), choose headset service to connect successfully.
Answer a call: For an incoming call, some headsets have the TONE/Vibration/ buzzer tone/voice prompt/telephone number prompt, just press the MFB key shortly to enter Talking mode when hearing the buzzer tone.
Reject a call: For an incoming call, Double-click\long press the MFB key/ Volume +/ Volume – and release your hand when you hear a buzzer tone/voice prompt, then the headset will reject the call.
End a call: When in talking mode, press the MFB key shortly to end the call.
Volume Control: If your headset has volume control, when talking, short press Volume+ to increase the volume, short press Volume- to decrease the volume.
Talking Switcher: When talking using Bluetooth headset, press the MFB twice or long press to switch to the mobile phone, repeat the above operation to go on talking with the Bluetooth headset.
Re-dial Last Number: When in standby mode, long press the MFB key or shortly press it twice to redial the last call.
Voice Dialing: When in standby mode, press the MFB twice to operate the voice dialing on the mobile phone, enabled by voice control. Then again press the MFB twice to cancel it. (This function should be supported by mobile phone)
Multi-point Function Operating:
- Use the pairing operation to connect with Phone A, then turn off the headset. Turn on the headset and repeat the pairing steps to connect with Phone B, then turn off the headset again. At last, turn on the headset and, without entering pairing mode, the headset will connect with Phone A and Phone B automatically. Now the headset can receive calls from Phone A and Phone B. (Some of the headsets do not support this function)
- Use the pairing operation to connect with Phone A, then turn off the Phone’s A Bluetooth function and turn off the headset as the same time. Turn on the headset and repeat the pairing steps to connect with Phone B, then turn on the Phone’s A Bluetooth function, the Phone A will connect with the headset automatically. (The phone should have the automatic return function)
Three-party Calling:
- When on a call and a second call comes in, press MFB button once to end the current Call (A) and receive the Call (B); Long press MFB button 3 seconds to reject Call (B) and continue with Call (A) if you do not want to answer Call (B). When on the phone and a new call comes in, press the MFB button twice to switch Call (A) and Call (B) in two-way communication. Long press MFB 1 second to hold on the current Call (A) and receive Call (B). Press MFB button 1 second again to recover Call (A). (Some of the headsets do not support)
Restore Headset Factory Parameter Settings:
- In pairing state, with the Blue indicator light or the Blue and Red indicators light flashing alternatively, press MFB for 2 seconds then release and the Blue and Red indicators will be flashing at the same time.
- When the headset is in charging mode, press volume up or volume down until the Blue indicator flashes three times.
- When the headset is in charging mode, press MFB until the Blue or Red indicator flash.
- Connect the headset to a charger and press MFB and Volume– at the same time for about 3 seconds until the purple indicator blinks once. (Some of the headsets support)
- Press the MFB button for about 5-10 seconds when the headset is being charged. The indicator blinks red for three times and the factory settings are restored.
Power Off:
- When the headset is on, long press MFB button until the Blue or Red indicator flash at the same time (with buzzer/voice prompt), then the headset turns off.
- When the headset is in any state, push the toggle switch downward. the indicator lights up in red for about 2 seconds and then turns off, accompanied by the voice prompt ” Power off”.
- When the headset is in any state, long press MFB about 5 second, the indicator lights up in red for about 2 seconds, accompanied by the voice prompt ” Power off”.
Anti-lose warning: When you walk out of the allowed distance, you will hear a voice prompt “Disconnected”, and then it will enter pairing mode with a voice of “Pairing”. (Some of the headsets support)
Automatic reconnection: After power on, the headset will attempt an automatic reconnection with the previously connected cellphone. (Some of the headsets support)
Charger and Battery
Before using any charger to charge this headset, check whether the specifications of the charger meet the requirements. The recommended output voltage of the charger is DC5V+/-0.25V, and the recommended output current is 100 mA to 500 mA. An over-high charging voltage may damage the headset.
The headset is embedded with a non-removable charging battery. Do not attempt to remove the battery from the headset; otherwise, the headset may be damaged. If the headset is not used for a long time, keep it in a dry and well-ventilated place and charge the headset once every two months.
- If the red indicator blinks with low-voltage beep, the headset’s battery is low. If the headset continues to work, it may be automatically powered off. You need to charge the headset by connecting the cable of the charger to the charging port on the headset.
- Connect the charger to an AC power socket.
- The red indicator is on when the headset is being charged. If the charging doesn’t start, disconnect the headset from the power socket and reconnect the headset again. It takes about 2.5 hours to fully charge the headset. After battery charging is completed, the red indicator is off and the blue indicator is on. Disconnect the charger from the power socket and headset.
- A fully charged battery can provide about 4 hours of talk time, or 120 hours of standby time. The actual talk time and standby time may vary with different cellphones, settings, use methods and environment.
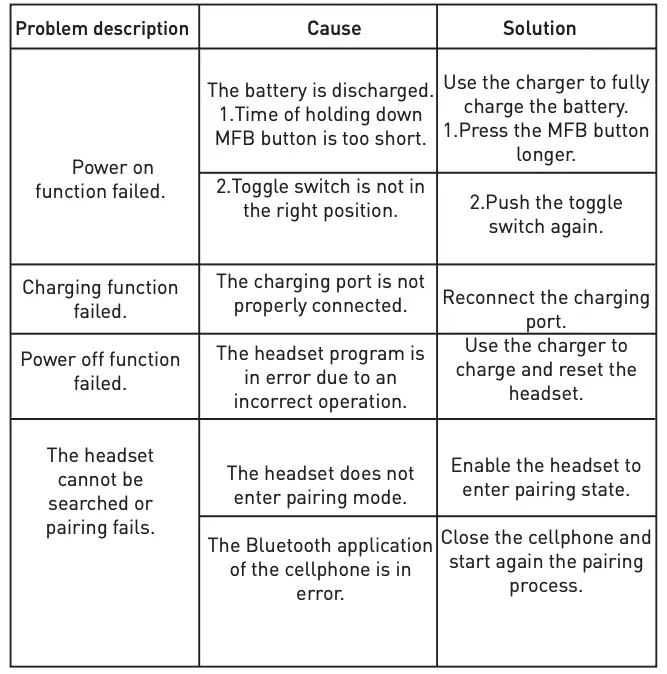
Troubleshooting
 Disposal and recycling information
The crossed-out wheeled-bin symbol on your product, battery, literature or packaging reminds you that all electronic products and batteries must be taken to separate waste collection points at the end of their working lives; they must not be disposed of in the normal waste stream with household garbage. It is the responsibility of the user to dispose of the equipment using a designated collection point or service for separate recycling of waste electrical and electronic equipment (WEEE) and batteries according to local laws.
Proper collection and recycling of your equipment helps ensure EEE waste is recycled in a manner that conserves valuable materials and protects human health and the environment, improper handling, accidental breakage, damage, and/or improper recycling at the end of its life may be harmful for health and environment.
 report this ad
[xyz-ips snippet=”download-snippet”]