![]()
Quick Installation Guide
AX3000 Dual-Band Gigabit Wi-Fi 6 Router

Package contents
- Wireless router x 1
- Power adapter x 1
- Ethernet cable x 1
- Quick installation guide x 1
For product or function details, please go to www.tendacn.com to download the user guide.
I. Connect the router
The “new router” and “router” in this guide refer to the router in the package.
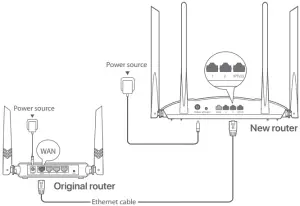
Step 1: Import your PPPoE user name and password into the new router (Optional)
![]() TipsThis function is only applicable when the connection type of the original router is PPPoE, except for PPPoE of some special ISPs or PPPoE connection set up manually with VLAN information.
TipsThis function is only applicable when the connection type of the original router is PPPoE, except for PPPoE of some special ISPs or PPPoE connection set up manually with VLAN information.
- Power on your original and new routers.
- Connect the WAN port of the original router to a LAN port (1, 2 or IPTV/3) of the new router using an Ethernet cable. After the LED indicator of the new router blinks fast for 8 seconds, the PPPoE user name and password are imported to your new router.
- Remove the original router.
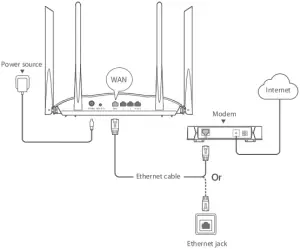
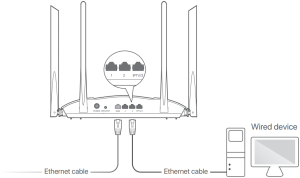
Step 2: Connect the WAN port of the router
- Ensure that the router is powered on.
- Connect the WAN port of the router to the LAN port of your modem or the Ethernet jack using an Ethernet cable. The LED indicator blinks fast for 3 seconds.
II. Connect your device to the router
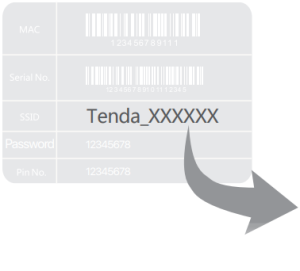
Option A: Connect your WiFi-enabled device, such as a smartphone, to the wireless network of the router. You can find the default WiFi network information on the bottom label of the router.
WiFi-enabled device

Option B: Connect your wired device, such as a computer, to a LAN port (1, 2 or IPTV/3) of the router using an Ethernet cable. The LED indicator blinks fast for 3 seconds.
III. Set up the router
1. Start a web browser on the device connected to the router, and visit tendawifi.com. Click Start.
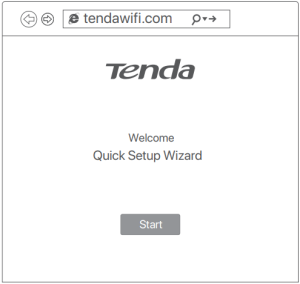
![]() TipsIf the above page does not appear, refer to Q1 in FAQ.
TipsIf the above page does not appear, refer to Q1 in FAQ.
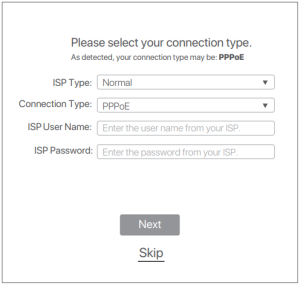
2. The router detects your connection type automatically. Select the ISP Type based on your region and ISP and enter required parameters (if any). Click Next.
3. Set the WiFi name, WiFi password and Login password for the router. Click Next.
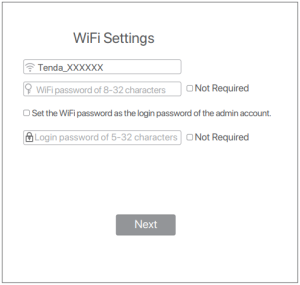
![]() TipsThe WiFi password is used to connect to the WiFi network, while the login password is used to log in to the web UI of the router.
TipsThe WiFi password is used to connect to the WiFi network, while the login password is used to log in to the web UI of the router.
Done.
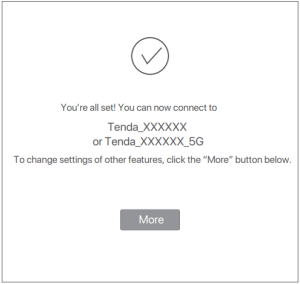
To access the internet with:
- WiFi-enabled devices: Connect to the WiFi network using the WiFi name and password you set.
- Wired devices: Connect to a LAN port (1, 2 or IPTV/3) of the router using an Ethernet cable.
![]() TipsIf you still cannot access the internet after the configuration, refer to Q2 in FAQ.
TipsIf you still cannot access the internet after the configuration, refer to Q2 in FAQ.
LED indicators
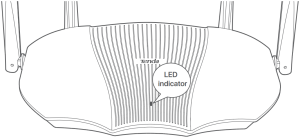
| LED indicator | Status | Description |
| LED indicator | Solid on | The system is starting up, or the router is already connected to the internet. |
| Blink slow | The router is not connected to the internet. | |
| Blink fast for 3 seconds | A device is connected to or disconnected from an Ethernet port of the router. | |
| Blink fast for 2 minutes | The router is pending for or performing WPS negotiation. | |
| Off | The system is faulty, or the router is not powered on properly. |

| Jack/Port/Button | Description |
| POWER | Power jack.Please use the included power adapter to connect this jack to a power source for power supply |
| WPS/RST | Used to start the WPS negotiation process, or to reset the router.• WPS: Through the WPS negotiation, you can connect to the WiFi network of the router without entering the password.Method: Press the button, and the LED indicator blinks fast. Within 2 minutes, enable the WPS function of the other WPS-supported device to establish a WPS connection.• Reset: When the router is working normally, hold the button down for about 8 seconds, and then release it when the LED indicator blinks fast. The router is reset. |
| WAN | 10/100/1000 Mbps auto-negotiation WAN port.Used to connect to a modem or the Ethernet jack using an Ethernet cable for internet access. |
| 1, 2 | 10/100/1000 Mbps auto-negotiation LAN port.Used to connect to computers, switches or game machines, etc. |
| IPTV/3 | 10/100/1000 Mbps auto-negotiation LAN/IPTV port.It is a LAN port by default. When the IPTV function is enabled, it can only serve as an IPTV port to connect to a set top box. |
FAQ
Q1: I cannot log in to the web UI of the router by visiting tendawifi.com. What should I do?A1: Try the following solutions:
- If you are using a WiFi-enabled device, such as a smartphone:– Ensure that it connects to the WiFi network of the router.– Ensure that the cellular network (mobile data) of the device is disabled.
- If you are using a wired device, such as a computer:– Ensure that tendawifi.com is entered correctly in the address bar, rather than the search bar of the web browser.– Ensure that the computer is connected to a LAN port (1, 2 or IPTV/3) of the router properly using an Ethernet cable.– Ensure that the computer is set to obtain an IP address automatically and obtain DNS server address automatically.If the problem persists, reset the router, and try again.
Q2: I cannot access the internet after the configuration. What should I do?A2: Try the following solutions first:
- Check whether the WAN port of the router is connected to a modem or Ethernet jack properly.
- Log in to the web UI of the router and navigate to the Internet Settings page. Follow the instructions on the page to solve the problem.If the problem persists, try the following solutions:
- For WiFi-enabled devices:– Check whether your WiFi-enabled devices are connected to the WiFi network of the router.– Visit tendawifi.com to log in to the web UI and change your WiFi name and WiFi password on the WiFi Settings > WiFi Name & Password page. Then try again.
- For wired devices:– Check whether your wired devices are connected to a LAN port (1, 2 or IPTV/3) properly.– Check whether wired devices are set to obtain an IP address automatically and obtain DNS server address automatically.
Q3: How to change the WiFi names and passwords?A3: Follow the steps below:
- Connect your WiFi-enabled device to the WiFi network of the router, or connect your computer to a LAN (1, 2 or IPTV/3) port using an Ethernet cable.
- Start a web browser and visit tendawifi.com to log in to the web UI of the router.
- Navigate to the WiFi Settings > WiFi Name & Password page to change and save the settings.
Q4: How to reset the router?A4: Try the following methods:Method A: When the router is working normally, hold down the WPS/RST button for about 8 seconds and release it when the LED indicator blinks fast. The router is reset.Method B: Log in to the web UI of the router, navigate to System Settings > Backup/Restore and click Restore.
Q5: I cannot find the WiFi network of the router on my WiFi-enabled device. What should I do?A5: Connect your computer to a LAN port (1, 2 or IPTV/3) of the router to log in to the web UI. Navigate to WiFi Settings > WiFi Name & Password and ensure that:
- The WiFi networks are enabled.
- The Hide function is disabled.
Q6: I cannot find the 5 GHz WiFi network of the router on my WiFi-enabled device. What should I do?A6: Try the following solutions:
• Check whether your WiFi-enabled device supports 5 GHz WiFi network.• Check whether you have enabled Unify 2.4 GHz & 5 GHz on the WiFi Settings > WiFi Name & Password page. If it is enabled, disable it and try again. If it is disabled, refer to Q5 to find a solution.
CE Mark Warning
This is a Class B product. In a domestic environment, this product may cause radio interference, in which case the user may be required to take adequate measures.Operations in the 5.15-5.25GHz band are restricted to indoor use only.This equipment should be installed and operated with minimum distance 20cm between the device and your body.The mains plug is used as disconnect device, the disconnect device shall remain readily operable.NOTE: (1) The manufacturer is not responsible for any radio or TV interference caused by unauthorized modifications to this equipment. (2) To avoid unnecessary radiation interference, it is recommended to use a shielded RJ45 cable.
Declaration of Conformity
Hereby, SHENZHEN TENDA TECHNOLOGY CO., LTD. declares that the radio equipment type RX9/TX9 is in compliance with Directive 2014/53/EU.Hereby, SHENZHEN TENDA TECHNOLOGY CO., LTD. declares that the radio equipment type RX9 Pro/TX9 Pro is in compliance with Directive 2014/53/EU.The full text of the EU declaration of conformity is available at the following internet address: http://www.tendacn.com/en/service/download-cata-101.html
Operating Frequency:2.4 GHz: EU/2412-2472 MHz5 GHz: EU/5150-5350 MHz EU/5470-5725 MHzEIRP Power (Max.):2.4 GHz: 19.86 dBm5 GHz: 22.96 dBmSoftware Version: V22.03.02.X (RX9 Pro/TX9 Pro); V22.03.03.X(RX9/TX9)
For EU/EFTA, this product can be used in the following countries:
| BE | BG | CZ | DK | DE | EE | IE | EL | ES | FR | HR | IT | CY | LV | |
| LT | LU | HU | MT | NL | AT | PL | PT | RO | SI | SK | FI | SE | UK |

FCC Statement
This equipment has been tested and found to comply with the limits for a Class B digital device, pursuant to Part 15 of the FCC Rules. These limits are designed to provide reasonable protection against harmful interference in a residential installation.This equipment generates, uses and can radiate radio frequency energy and, if not installed and used in accordance with the instructions, may cause harmful interference to radio communications. However, there is no guarantee that interference will not occur in a particular installation. If this equipment does cause harmful interference to radio or television reception, which can be determined by turning the equipment off and on, the user is encouraged to try to correct the interference by one or more of the following measures:– Reorient or relocate the receiving antenna.– Increase the separation between the equipment and receiver.– Connect the equipment into an outlet on a circuit different from that to which the receiver is connected.– Consult the dealer or an experienced radio/TV technician for help.The device is for indoor usage only.Operation is subject to the following two conditions: (1) this device may not cause harmful interference, and (2) this device must accept any interference received, including interference that may cause undesired operation.Radiation Exposure StatementThis device complies with FCC radiation exposure limits set forth for an uncontrolled environment and it also complies with Part 15 of the FCC RF Rules.This equipment should be installed and operated with minimum distance 20cm between the device and your body.Caution:Any changes or modifications not expressly approved by the party responsible for compliance could void the user’s authority to operate this equipment.This transmitter must not be co-located or operating in conjunction with any other antenna or transmitter.Operating frequency: 2412-2462 MHz, 5170-5350 MHz, 5470-5725 MHz, 5725-5850MHzNOTE: (1) The manufacturer is not responsible for any radio or TV interference caused by unauthorized modifications to this equipment. (2) To avoid unnecessary radiation interference, it is recommended to use a shielded RJ45 cable.
 Caution (RX9/TX9):
 Caution (RX9/TX9):
Adapter Model: BN073-A12012E/BN073-A12012BManufacture: SHENZHEN HEWEISHUN NETWORK TECHNOLOGY CO., LTD.Input: 100 – 240V AC, 50/60Hz, 0.4AOutput: 12V ![]() 1A
1A![]() : DC Voltage
: DC Voltage
Caution (RX9 Pro/TX9 Pro):
Adapter Model: BN037-A18012E/BN037-A18012B/BN074-A18012E/BN074-A18012BManufacture: SHENZHEN HEWEISHUN NETWORK TECHNOLOGY CO., LTD.Input: 100 – 240V AC, 50/60Hz, 0.6AOutput: 12V ![]() 1.5A
1.5A![]() : DC Voltage
: DC Voltage
![]()
RECYCLING
This product bears the selective sorting symbol for Waste electrical and electronic equipment (WEEE). This means that this product must be handled pursuant to European directive 2012/19/EU in order to be recycled or dismantled to minimize its impact on the environment.User has the choice to give his product to a competent recycling organization or to the retailer when he buys a new electrical or electronic equipment.
Operating Temperature: 0°C – 40°COperating Humidity: (10% – 90%) RH, non-condensing
Wall Mounting
This router can be installed on the wall with two screws. The recommended wall mounting tools are as follows:[Expansion bolt] Outer diameter: 6.0mm; Length: 26.4mm[Screws] PA3*14mm; Head diameter: 5.2mm; Head height: 1.8mm
Technical Support
Shenzhen Tenda Technology Co., Ltd.6-8 Floor, Tower E3, NO.1001, Zhongshanyuan Road, Nanshan District, Shenzhen, China.518052USA hotline: 1-800-570-5892Toll Free: 7 x 24 hoursCanada hotline: 1-888-998-8966Toll Free: Mon – Fri 9 am – 6 pm PSTHong Kong hotline: 00852-81931998Global hotline: +86 755-2765 7180 (China Time Zone)Website: www.tendacn.comE-mail: [email protected]
 report this ad
Copyright© 2020 Shenzhen Tenda Technology Co., Ltd. All rights reserved.Tenda is a registered trademark legally held by Shenzhen Tenda Technology Co., Ltd. Other brand and product names mentioned herein are trademarks or registered trademarks of their respective holders. Specifications are subject to change without notice.
[xyz-ips snippet=”download-snippet”]