![]()
![]() Vidiu XLive Streaming EncoderQuick Start Guide
Vidiu XLive Streaming EncoderQuick Start Guide
PHYSICAL PROPERTIES
![]()
| A: SD card slot (not shown)B: Broadcast buttonC: Video status indicator (top)D: Network status indicator (top)E: A broadcast status indicator (top) | F: OLED displayG: Menu joystickH: USB modem port (not shown)I: HDMI input | J: HDMI outputK: Mic/Line stereo inputL: 10/100 Ethernet portM: USB Type-C power input |
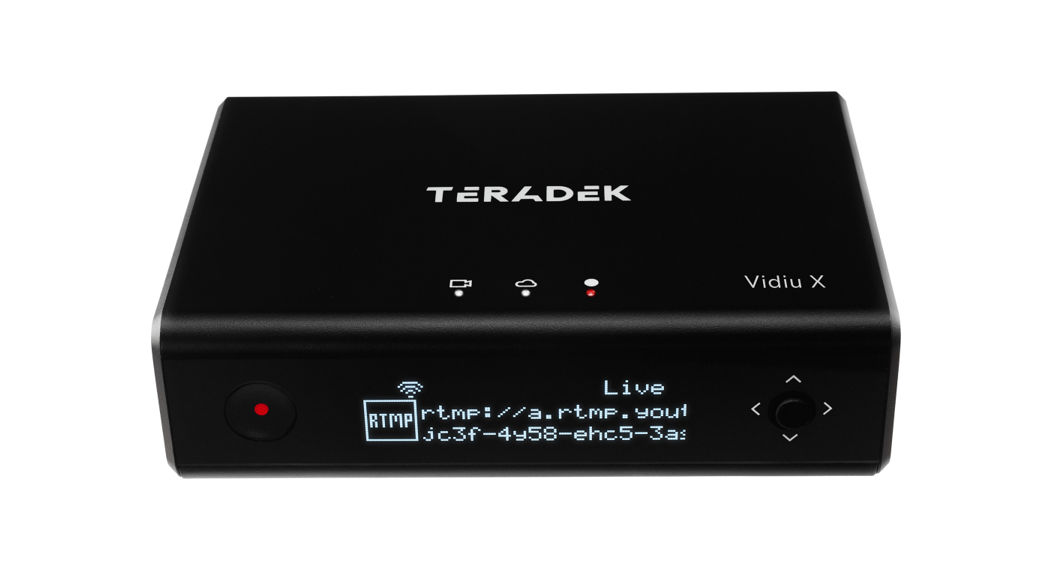
Use the Menu joystick and the Broadcast/Record button to navigate the front panel and to begin your Livestream.
 |
Menu JoystickUse the menu joystick to navigate through the menus. Press the joystick inward to confirm or open selection. |  |
Broadcast/Record ButtonStart/stop broadcast or recording. |
POWER AND CONNECT
- Connect the HDMI output from your video source to Vidiu X’s HDMI input (I).
- Connect power to Vidiu X using the included USB-C A/C adapter or another USB-C power source. Vidiu X will power on once connected.
GET ONLINE
You can use the front panel interface, the built-in web UI, or the Vidiu app (iOS/Android) to remotely control and configure Vidiu X to connect to a network and get online.CONNECT TO A WIFI NETWORKVidiu X supports two wireless (wi-fi) modes; Access Point (AP) Mode and Client Mode. In AP Mode, Vidiu X generates a wi-fi network for your phone or laptop to connect to. To use wi-fi as your Internet connection, you’ll need to connect Vidiu X to another network using the Client mode.
- Navigate to theNetwork Settings menu from the front panel then selects Wireless.
- Select a wireless mode:a. Access Point (AP) Mode – Connect your phone or laptop to Vidiu X’s network,Vidiu-X-XXXXX (XXXXX represents the last five digits of Vidiu X’s serial number).b. Client Mode – Select Client, tap Scan for Networks, then enter your credentials for the network you select.
CONNECT VIA ETHERNET
- Plug an Ethernet cable from the Vidiu X’s Ethernet port to an Ethernet switch or router.
- Navigate to the Network menu, then select Wired to verify that Ethernet is set to DHCP and to view Vidiu X’s IP address.
CONNECT VIA USB MODEMInsert a compatible 3G/4G USB modem, then wait for the front panel display.![]() icon to appear on the
icon to appear on the
ACCESS THE WEB UI
- Press down on the Menu joystick until the IP address that corresponds to the selected network is revealed.
- Enter the network’s IP address in your web browser’s navigation bar.
- Enter the default password “admin.”

Before you begin streaming, make sure you visit teradek.com/pages/downloads to check for the latest firmware and/or software updates. You can also check for the latest firmware updates by navigating to System>Firmware>Check for updates on the web UI.
Sharelink is a cloud service by Teradek created specifically for Vidio devices. Sharelink unlocks the full potential of your live streams by offering network bonding, streaming to multiple platforms simultaneously, remote management from anywhere in the world, and cellular tethering.NOTE: A subscription to Sharelink is required to bond Internet connections. TO CREATE AN A-SHARE LINK ACCOUNT:
- Visit share link. tv and select a pricing plan that best suits your needs.
- After selecting a plan and creating an account, return to the login screen and enter your credentials.
TO CONNECT TO SHARE LINK:
- Select Sharelink from the Streaming menu, then click Apply.
- Copy the authorization code generated for your Vidiu X, then navigate to the link provided.
- Login to your Sharelink account, and select Add new Vidio.
- Enter the authorization code, then click Add.
SUPPORTED CONNECTIONS
- Ethernet
- Up to one Teradek Node or 3G/4G/LTE USB modem.
- WiFi (Client mode) – Connect to an existing wireless network or mobile hotspot
CHOOSE A PLATFORM AND QUALITY
Vidiu X can broadcast directly to any compatible video streaming platform. Simply enter your credentials using the Vidiu app, web UI (page 5), or the front panel interface.
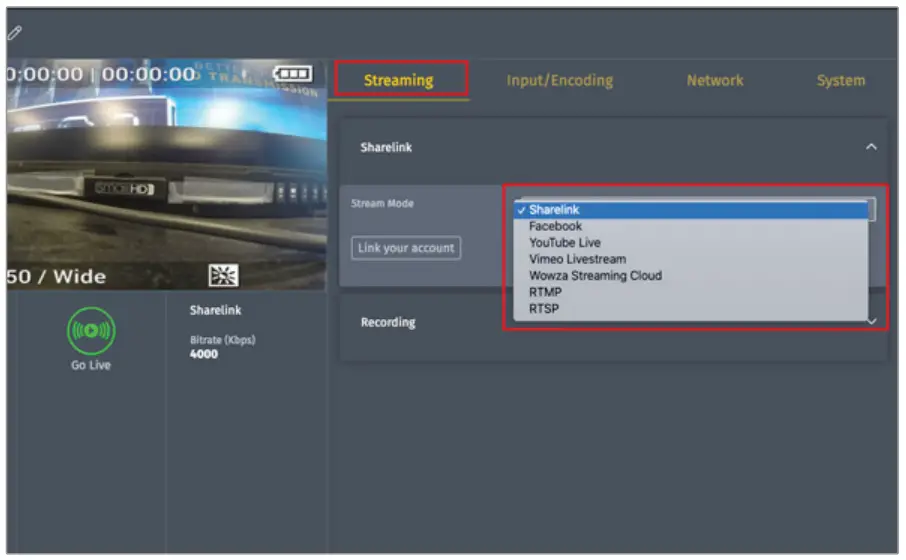
- Enter the Streaming menu.
- Select a Stream mode – Facebook, YouTube, Vimeo, Wowza – or select RTSP or manual RTMP.
- Enter your credentials or destination information, then click Apply.
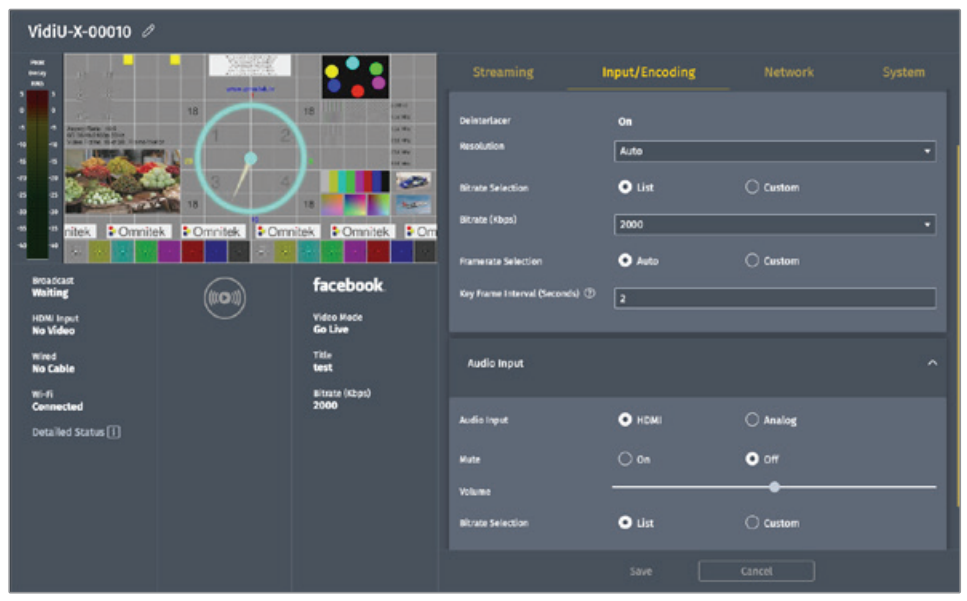
- Enter the Input/Encoding menu, then select your desired video bitrate and resolution.
- To Go Live:· From the front panel – Press the Broadcast/Record button.· From the web UI – Click the button.· From the Vidiu app – Tap the Go Live button.
VIDIU APP
The Vidiu app can be used to remotely monitor and configure Vidiu X and allows you to broadcast high-definition video to any compatible streaming platform directly from your phone or tablet.MAIN DISPLAY
- Settings – Tap the button at the top of the display to configure Vidio X’s options such as streaming destinations, video, and audio options, and network settings.
- Info – Displays the stream mode, broadcast status, and output information.
- Audio/Video – Displays the current audio and video bitrate, input resolution, and video framerate.
- Go Live/Stop Broadcast – Start/stop your broadcast and/or recording.NOTE: This button is only available once a destination is configured or Recording is enabled.
RECORDING
Vidiu X supports recording to an SD card or compatible USB thumb drive.
- Insert a compatible SD card or USB drive into the corresponding slot. The front panel will indicate that the media is detected.
- Enter the Recording menu, and select Enabled.Once enabled, a copy of your broadcast will be saved to the storage media. For best results, use Class 6 or higher SD cards.
 report this ad
RECORDING CONSIDERATIONS
- Recordings are triggered by the broadcast state. When a broadcast starts, a new recording is created.
- If a broadcast is interrupted for connectivity reasons, recording will continue.
- If a recorded file exceeds your storage media’s file size limits, a new file will be created and recording will continue.
- Recording resolution and quality match your configured Broadcast settings.
|
 |
Teradek regularly releases new firmware versions to improve performance, add features, or fix vulnerabilities. teradek.com/pages/downloads contains all the latest firmware and software updates. Visit support.teradek.com for tips, information, and to submit help requests to Teradek’s support team.© 2020 Teradek, LLC. All rights reserved.
References
[xyz-ips snippet=”download-snippet”]