Theben Astronomical Time Switch Instructions
Basic safety information
WARNING :![]() Danger of death through electric shock or fire! Installation should only be carried out by a qualified electrician!
Danger of death through electric shock or fire! Installation should only be carried out by a qualified electrician!
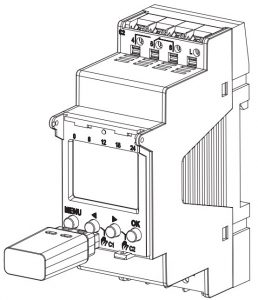
- The device is designed for installation on DIN top hat rails (in accordance with EN 60715)
- Power reserve (10 years) is reduced when Bluetooth OBELISK top3 is connected (in battery mode)
- The device corresponds to type 1 STU in accordance with IEC/EN 60730-2 7
Proper use
- Digital astronomical time switch with weekly program, annual program
- Interface for Bluetooth OBELISK top3 (app)
- 3 special programs with date function per channel
- Time synchronisation via connection of an external DCF or GPS antenna (1710330+1720330)
- The astronomical time switch is used, for instance, for lighting equipment (roads, external staircases, display windows, entrances etc.).
- Only for use in closed, dry rooms.
Do not use on safety devices, e.g. escape route doors, fire safety equipment, etc.
Disposal :
- Dispose of device in environmentally sound manner
Installation and connection
WARNING :![]() Danger of death through electric shock or fire! Installation should only be carried out by a qualified electrician!
Danger of death through electric shock or fire! Installation should only be carried out by a qualified electrician!
Mounting the time switch

Check the depth of the control cabinet when OBELISK top3 is connected. The depth must be > 94 mm.
- Mount on DIN top hat rail (as defined in EN 60715)
- Disconnect power source
- Ensure device cannot be switched on
- Check absence of voltage
- Earth and bypass
- Cover or shield any adjacent live components.
Connecting the time switch : Refer to the operating instructions when connecting a GPS antenna (9070610).
Minimum number of participants needed to operate the GPS antenna:
- 2 x weekly timer TR 611 top3 RC, SELEKTA 171 top3 RC LUNA 121–122 top3 RC each with 50 mA feed, or
- 1 x weekly timer with 50 mA feed plus 1 x top2 GPS power unit (9070892) with 50 mA feed.
- SELEKTA 171 top3 RC

- SELEKTA 172 top3
- SELEKTA 172 top3 RC

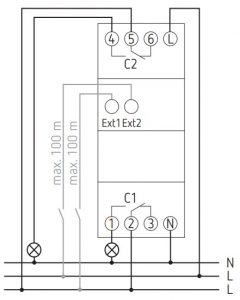
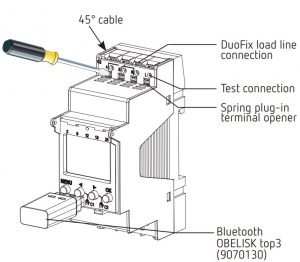
Connecting the cable
- Correct connection required for smooth function of the zero-cross
- switchingStrip cable to 8 mm (max. 9)
- Insert cable in the open DuoFix plug-in terminal at 45°
- 2 cables per terminal position possible
- To open the DuoFix plug-in terminal, press screwdriver downwards.
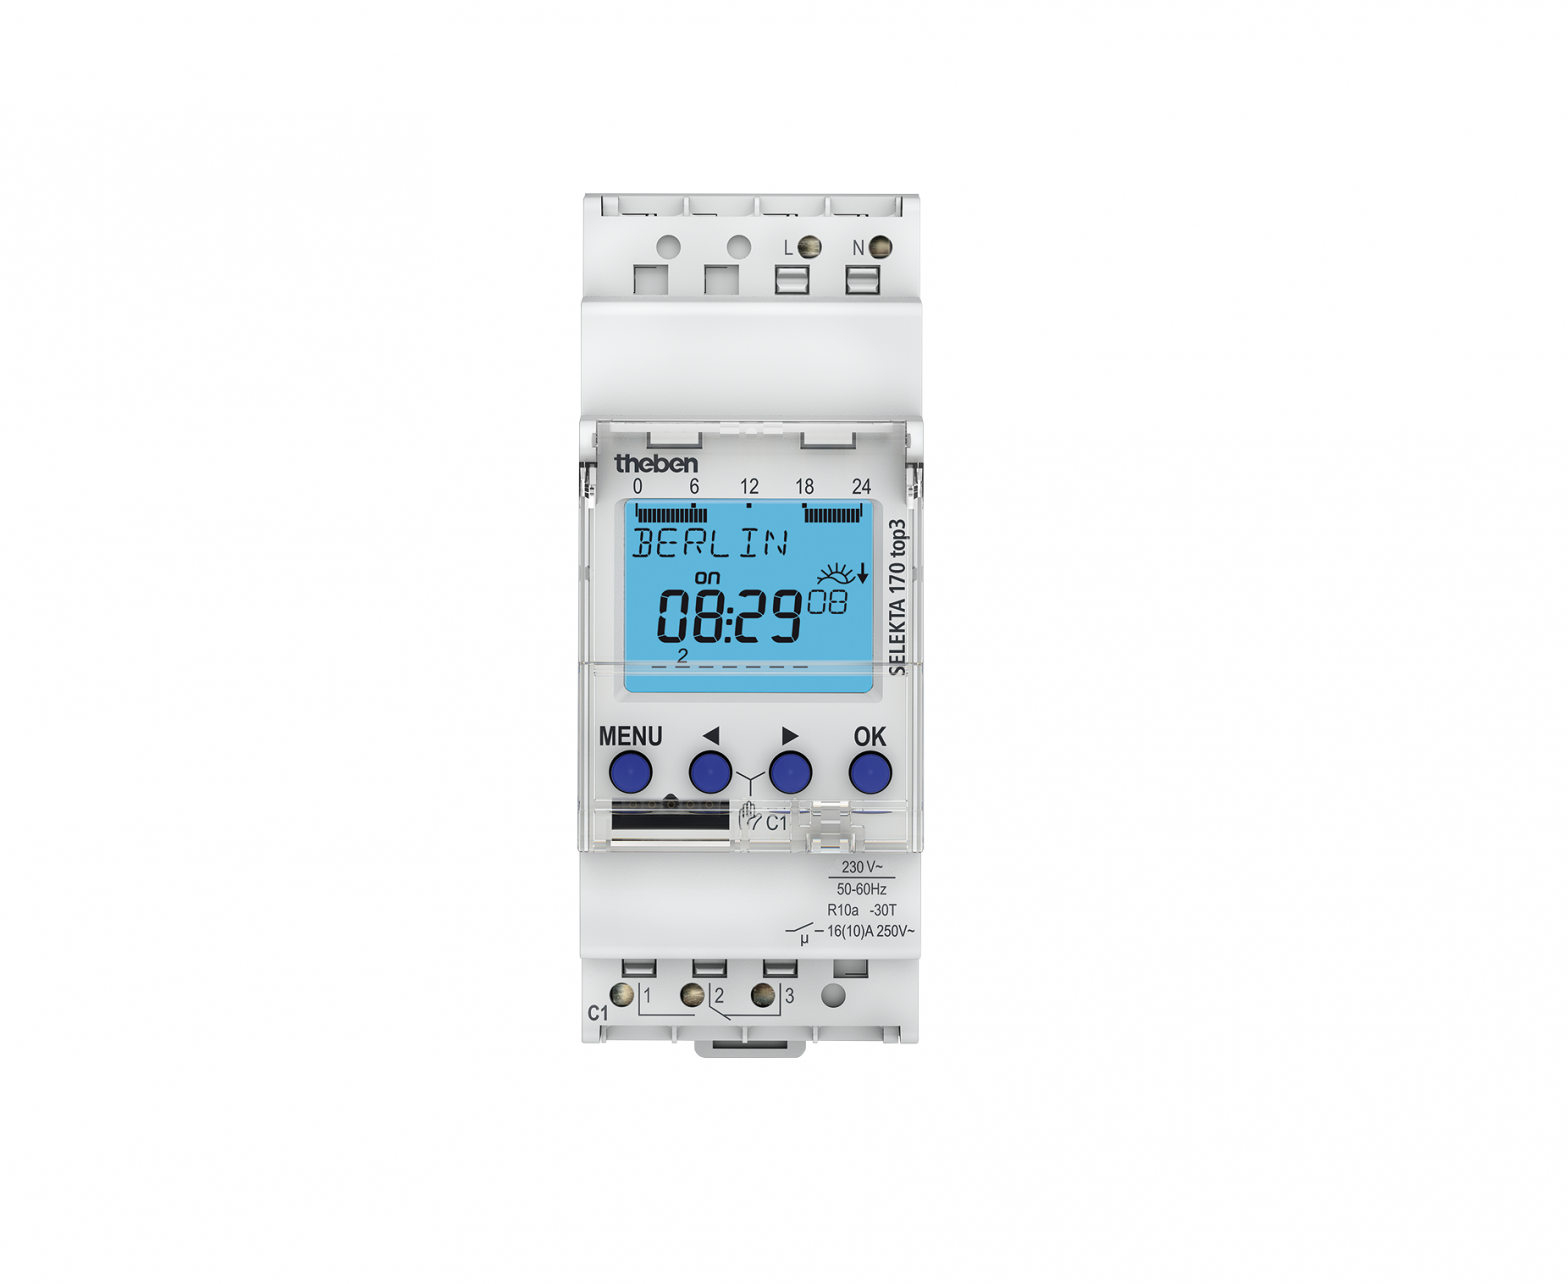
Device description
Display and buttons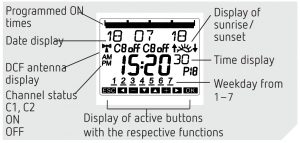
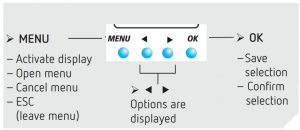
Operating instructions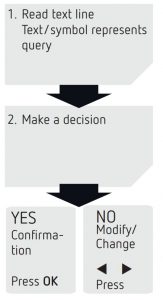
Overview of navigation menu

Initial operation
- Set language, country, town/city, date, time as well a summer/winter time (SU-WI)
- Press any button and follow on-screen instructions (see picture).
Settings and functions
In standard setting, an astronomical time switch switches on during twilight and off during sunrise. Therefore, in most applications, only one night switch-off (e.g. from 22:00 to 06:00) has to be programmed – and, if needed, to be copied to all weekdays.
Astronomical time switches can be used for precise switching of connected consumers based on sunrise and sunset. They have an additional astro pulse, which can be used for roller blinds and blinds control.
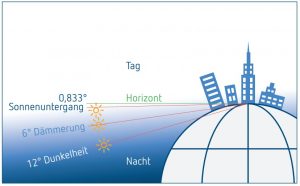
Furthermore, the astronomical time switched offer a twilight range in three increments:
- Sunset (civil twilight)
- Twilight (nautical twilight)
- Darkness (astronomical twilight)
ASTRO menu : In the ASTRO menu, astro times, total simulation, offset, astro mode and position (locations) can be queried or changed.
- Astro times : Display of the astro times (including the offset) for the current day
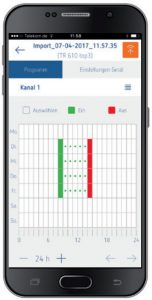
- Total simulation : Display of the switching response with a freely selectable start date (the holiday program is not shown)
- Offset : The offset (correction value) can be used to shift the calculated astro times by +/– 120 min. This means that the astro turn-on and turn-off times can be adapted to local conditions (e.g. mountains, high buildings etc.) or to personal requirements.
- Astro mode
- Evenings on, mornings off: At sunset it switches on, at sunrise it switches off (example: street lighting
- Evenings off, mornings on: At sunset it switches off, at sunrise it switches on (example: terrarium)
- Astro not active: The astro times are ineffective (only the “fixed switching time” time switch function)
- Astro time : 3 twilight ranges can be set:
- Sunset (civil twilight): Sunset is the moment in which the upper edge of the sun disappears behind the horizon
- Twilight (nautical twilight): Twilight is when the centre of the sun is 6° below the horizon
- Darkness (astronomical twilight): The darkness setting, technically correct astronomical twilight, is when the centre of the sun is 12° below the horizon. Stars can be seen.
- Location
- Setting the location by selecting a town/city or via coordinates (latitude/longitude, time zone). By using the Bluetooth OBELISK top3, up to 10 further towns/ cities (= favourites) can be added.
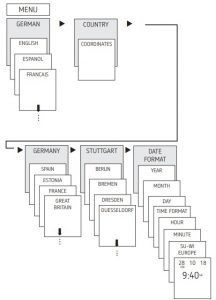
Changing the astro time/location

E.g. enter a different country, a different town/city :
- Press MENU (see picture).
Setting the offset function
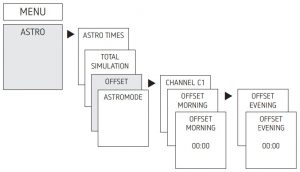
- Press MENU
- Select ASTRO and press OK to confirm
- Select OFFSET and press OK to confirm
- Select CHANNEL, confirm with OK
- Select OFFSET MORNING or OFFSET EVENING and press OK to confirm
- Set the time and press OK to confirm.
Setting individual twilight ranges
In the ASTRO menu → Astro time, 3 twilight ranges can be set.
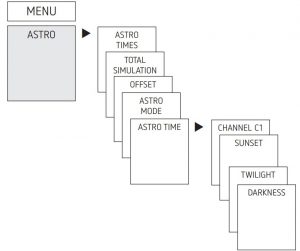
- Press MENU
- Select ASTRO and press OK to confirm
- Select ASTRO TIME, confirm with OK
- Select CHANNEL, confirm with OK
- Select SUNSET, TWILIGHT or DARKNESS, confirm with OK.
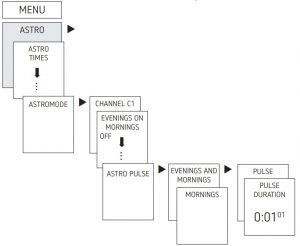
Setting the astro pulse : Suited for blinds and roller blinds control, etc.
- Press MENU
- Select ASTRO and press OK to confirm
- Select ASTROMODE, confirm with OK
- Select CHANNEL, confirm with OK
- Select ASTRO PULSE, confirm with OK.
- EVENINGS AND MORNINGS, EVENINGS, etc. appears.
- Select desired time, confirm with OK
- Enter PULSE DURATION
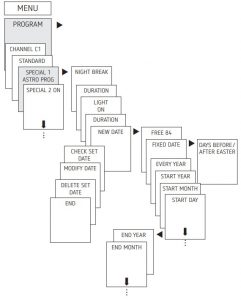
Setting a fixed switching time (e.g. in standard program)

- switching time always consists of a start time and an end time (DURATION UNTIL), e.g. night switch-off on Monday 23:00 – 05:00.
- There are 84 memory cells available.
- Press MENU
- Select PROGRAM, confirm with OK
- Select CHANNEL, confirm with OK
- Select STANDARD, confirm with OK
- Select NEW, confirm with OK
- Select NIGHT BREAK or LIGHT ON and press OK to confirm
- Set selected switching times (hours, minutes, day) and press OK to confirm
- Select COPY or SAVE
- To save press and press OK to confirm
- To copy press OK
Setting special programs
- The devices SELEKTA top3 feature 3 special programs, which can be used for calendar-dependent switching.
- Each special program can be activated over one or several date areas.
- There are 3 types of date areas:
- Fixed date area: e.g. starting time on 2018-04-02 at 16:00 end time on 2018-04-24 at 10:00
- Yearly repeating date area: e.g. Christmas:starting time on 24-12 at 18:00 every year end time on 26-12 at 23:00 every year.
- Date area depending on Easter: e.g. Whit Sunday and Whit Monday:starting time 49 days after Easter at 00:00 every year end time: 51 days after Easter at 00:00, every year.
- The public holiday set is set via app, or OBELISK software.
- 24:00 is programmed as 00:00 of the following day.

- Special program 1
- Astro times active
- Optional 1x night interruption
- Optional 1x daytime switch on
- Active in the programmed date areasExample: The standard program switches on stree lighting depending on Astro times. A night interruption is programmed from 23:00 to 04:00. Special program 1 is active within the date area from April 30 12:00 until May 1, 12:00. Since no night interruption is programmed, the street lighting will remain on all night.
- Special program 2
- Permanent ON
- Always on during the programmed date areas Example: The standard program switches on lighting of a neon advertising sign only at night. The specialprogram switches on the neon advertising sign permanently during a promotion week from 2018-04- 17, 9:00 until 2018-04-24, 18:00.
- Special program 3
- Permanent OFF
- Always off during the programmed date areas Example: The standard program switches on the car park lighting depending on the astro times. The special program does not switch on the car park lighting on July 14, from 00:00 to July 15, 04:00.
Setting summer/winter time
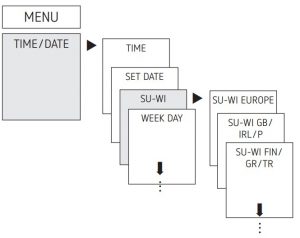
- Press MENU
- Select TIME/DATE and press OK to confirm
- Select SU-WI and press OK to confirm
- Select region for the SU-WI time and press OK to confirm
Note : If a DCF/GPS antenna is used, the SU/WI change over has still to be activated.
Switching permanent ON/OFF
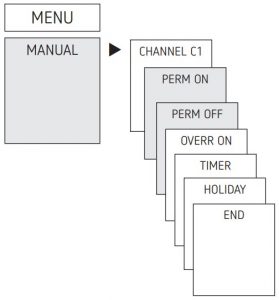
- Press MENU
- Select MANUAL, confirm with OK
- Select CHANNEL, confirm with OK
- Select PERM ON or PERM OFF and press OK to confirm
Setting holiday function
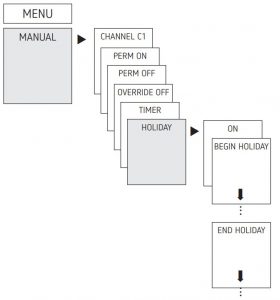
- Press MENU
- Select MANUAL, confirm with OK
- Select CHANNEL, confirm with OK
- Select HOLIDAY, confirm with OK
- Select ON, confirm with OK
- Select BEGIN HOLIDAY, confirm with OK
- Enter YEAR, MONTH, DAY, HOUR, confirm with OK
- Select END HOLIDAY and press OK to confirm
- Enter YEAR, MONTH, DAY, HOUR, confirm with OK
Setting an external input
For the channel, an EXT INPUT (see figure) can be set with different functions.3 sub-menus can be selected: not active, button (function), switch (function)
- NOT ACTIVE: The external input has no function.
- BUTTON: Manual (manual control), timer (countdown timer), and staircase light timer switch are selectable
- SWITCH: Perm on, perm off and Astro only are selectable.
Note : If a function is activated via an external button or switch, EXTERNAL is displayed.
- Press MENU, with u select EXT INPUT and follow the indications on the display.

Setting channel lock (only for 1720130+1720330) : There are situations where two channels must not be switched at the same time! The channels can be interlocked in this case.
- The channel lock can prevent both channels from switching on at the same time.
- This prevents damages at consumers, e.g. forward and backward running of engines.
If one channel is already switched on, the second channel will not switch on until the first channel is switched off and a waiting time of 1 s has passed. If both channels are switched on at the same time, channel 1 has priority.
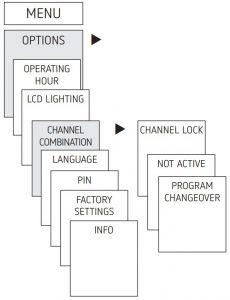
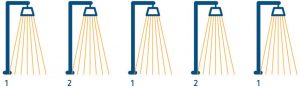
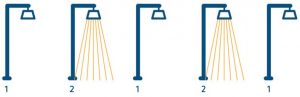
Channel combination (program change)
The channel combination reduces maintenance for wear to the lamps and also allows energy to be saved.
- Astronomical switch-on at sunset
- Switch off the second channel at a defined time, to save energy and retain basic lighting.
- Changing the channel that is switched off each week/day, to use the consumers evenly.
- Switching both channels back on in the morning, switching off astronomically at sunrise.


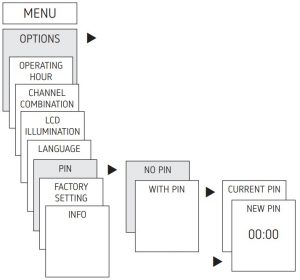
Activating PIN code
The PIN code is set in OPTIONS via the menu.
- If you have forgotten your PIN, please call the Theben Hotline.
- Have the serial number of the device ready!
Setting manual control or permanent switching
Manual control or permanent switching can be set via the menu in MANUAL or (in the automatic display) by button combination (see picture).
- Manual control: Reversing the channel status until the next automatic or programmed switch.
- Permanent switching: As long as permanent switching (on or off) is activated, the programmed switching times are ineffective.


Activating manual control
- Briefly press both buttons simultaneously.
Activating permanent switching
- Press both buttons simultaneously for 2 seconds.
Cancelling manual control/permanent switching
- Press both buttons simultaneously.
Hour counter
The operating hours of the channel (relay) are displayed and deleted in the OPTIONS menu. If the number of operating hours exceeds the value set in the Service menu, SERVICE will appear in the display.Example: Replace a lamp after 5,000 h.
- Delete operating hours or set a higher value in Service (e.g. 10,000 h).
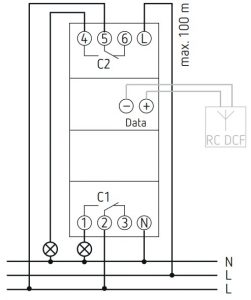
Time signal can be received with appropriate top2 RC antenna (only with 1720130+1720330)
- The top2 RC-DCF antenna (9070410) and the top2 RC-GPS antenna (9070610) can be connected to the SELEKTA top3 RC time switch.
- Follow the advice in the top2 RC-DCF/GPS antenna operating instructions.
- Connection to the top2 RC-DCF antenna allows the time switch to be automatically synchronised via DCF signal.
- After connecting to the power supply or resetting, the automatic display appears as soon as the DCF transmission signal has been received.
- Additional power unit (9070892) required for GPS if only one device is connected to the antenna.
Adjusting of time zones
After successful synchronisation, the time zone can be altered in the TIME/DATE menu option.
- In the TIME menu (display: MODIFY HOUR) correct the applicable local time (time zone).
DCF transmission signal reception:Display: Day + Month + RC (Radio Control)No reception of the DCF transmission signalDisplay: e.g. 24 11 18 no connection to antenna:Display: e.g. 24 11 18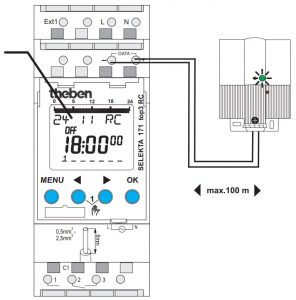
Using Bluetooth OBELISK top3
All functions can also be transferred to the time switch using the Bluetooth OBELISK top3 memory card (9070130).
Copy OBELISK → TIME SWITCH
This copies the switch programme and optionally all time switch settings (e.g. time format, etc.) from the memory cardto the time switch.
Copy TIME SWITCH → OBELISK
Copies all switch programmes and settings from the time switch to the memory card.
Starting OBELISK program
Takes over the switching times that are programmed on the memory card. As soon as the memory card is removed, the switching times of the time switch are re-activated.

Connecting time switch, Bluetooth OBELISK top3 and smartphone (via app)
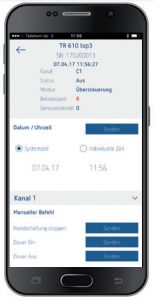
The devices in the top3 range can be programmed using an app (for Android, iOS) on a mobile end device. Communication takes place via Bluetooth OBELISK top3. Switch programmes are transferred and direct switch commands are sent to the device.
- Download the OBELISK top3 app from the App Store or Google Play Store. Note : Bluetooth connection only possible in automatic mode, not in manual mode like OPTIONS, etc.
- Open the app and activate using one of the 3 commands, by pressing “Download” , “Manual command” or “Upload” .
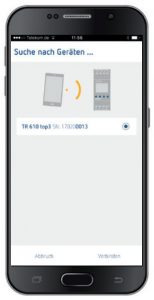
- Device/device list appears on the display.
- Device/device list appears on the display.
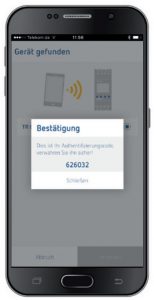
- Press “Connect”
- Press OK on the time switch
- The display shows BLUETOOTH ACTIVE
- Press “Close” in the app within 30 s Now, for example, projects can be created and uploaded.


 Now, for example, projects can be created and uploaded.
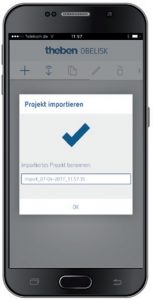
Resetting the time switch
- Press the 4 buttons simultaneously
- Now, you can choose between RETAIN PROGRAMS and DELETE PROGRAMS.
Technical data
|
Operating voltage: |
230 V AC, +10% / –15% (1720130) 110 – 230 V AC (1720130+1720330) |
|
Frequency: |
50–60 Hz |
|
Standby: |
< 0.4 W (1720130) 0.8 W (1720130+1720330) |
|
Max. switching capacity: |
16 A (at 250 V AC, cos j = 1) |
|
Switching capacity: |
10 A (at 250 V AC, cos j = 0.6) |
|
Min. switching capacity: |
10 mA/230 V AC 100 mA/24 V AC/DC |
|
Switch output: |
Switching of any phase is permitted |
|
Shortest switching time: |
1 min |
|
Switching accuracy: |
to the second |
|
Protection rating: |
IP 20 in accordance with EN 60529 |
|
Protection class: |
II in accordance with EN 60730-1 subject to designated installation |
|
Software: |
Class A |
|
Operating temperature: |
|
|
Power reserve: |
10 years at +20 °C (without Bluetooth OBELISK top3) |
|
Time accuracy (typical): |
± 0.25 s/day (25 °C) |
|
Rated impulse voltage: |
4 kV |
|
Pollution degree: |
2 |
|
Contact: |
Changeover contact |
|
Max. switching cycles with 16 A resistive load: |
50 000 |
|
Incandescent lamp load: |
2600 W |
|
Halogen lamp load: |
2600 W |
|
Fluorescent lamps (LLB low-loss ballasts): uncompensated series compensated parallel compensated |
2600 V 2600 VA 1300 VA (130 µF) |
|
Compact fluorescent lamps (EVG): |
1100 W |
|
LED lamps (< 2 W): |
50 W |
|
LED lamps (> 2 W): |
600 W |
|
Bluetooth OBELISK top3:
|
IP 40 –30 °C … +55 °C 15 m on open air test site |
Contact
Theben AGHohenbergstr. 32 72401 HaigerlochGERMANY : Phone +49 7474 692-0 Fax +49 7474 692-150Hotline Phone +49 7474 692-369Email : [email protected]Addresses, telephone numbers etc.www.theben.de
References
[xyz-ips snippet=”download-snippet”]