ThermoPro TP829B Super Long Range Wireless Meat Thermometer
Introduction
Congratulations on your purchase of the Professional Remote Food Thermometer, a programmable radio frequency food thermometer. You will now be able to remotely monitor the temperature of cooking food and the temperature inside your grill, oven or smoker from anywhere in your home.
Components
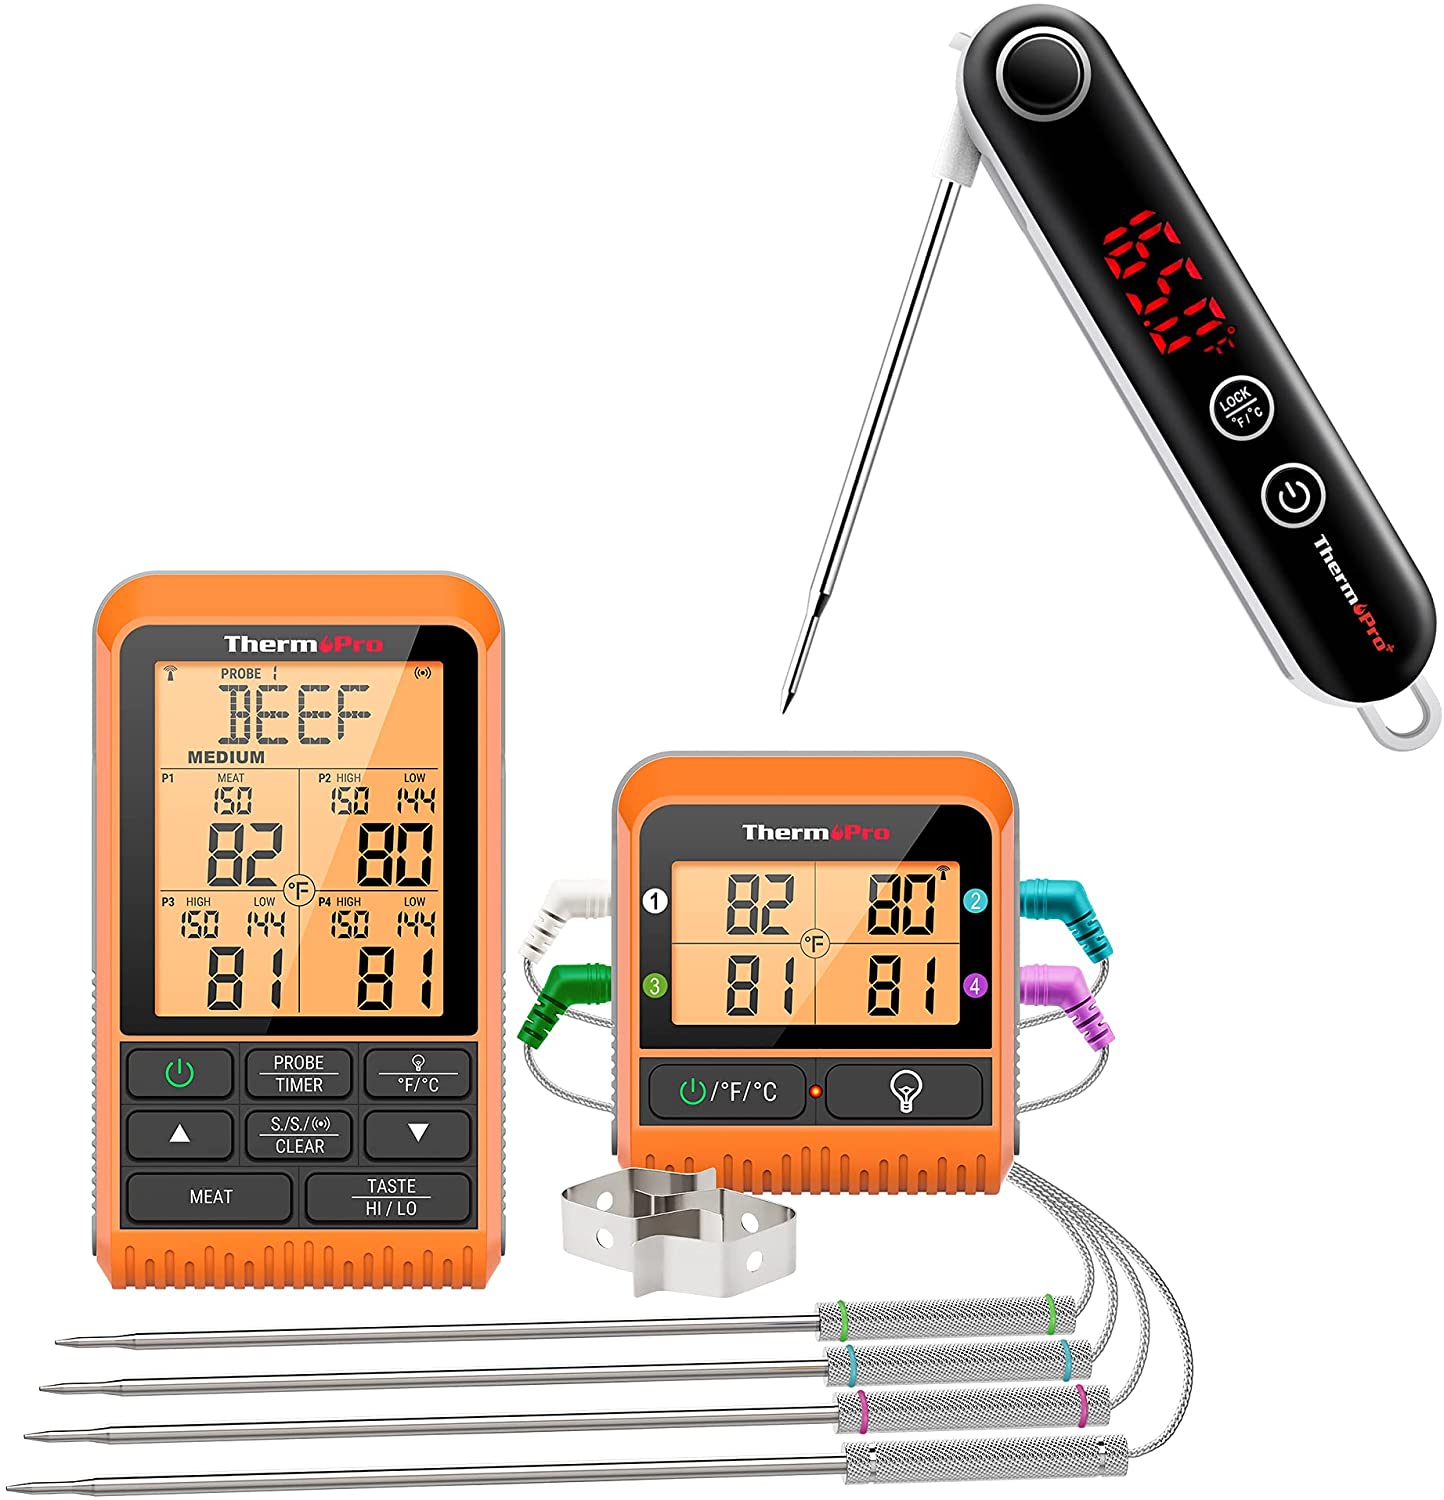
- 1 x Receiver
- 1 x Transmitter
- 4 x Detachable, color coated stainless steel probes with steel mesh cable
- 4 x Plastic Winders
- 4 x AAA batteries.
- 2 x Clips
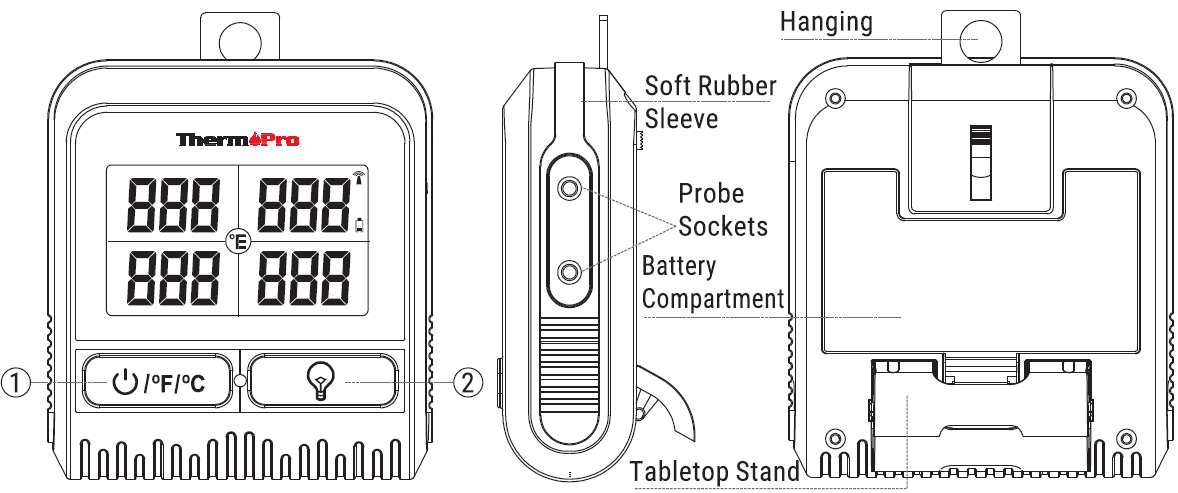
Receiver Features
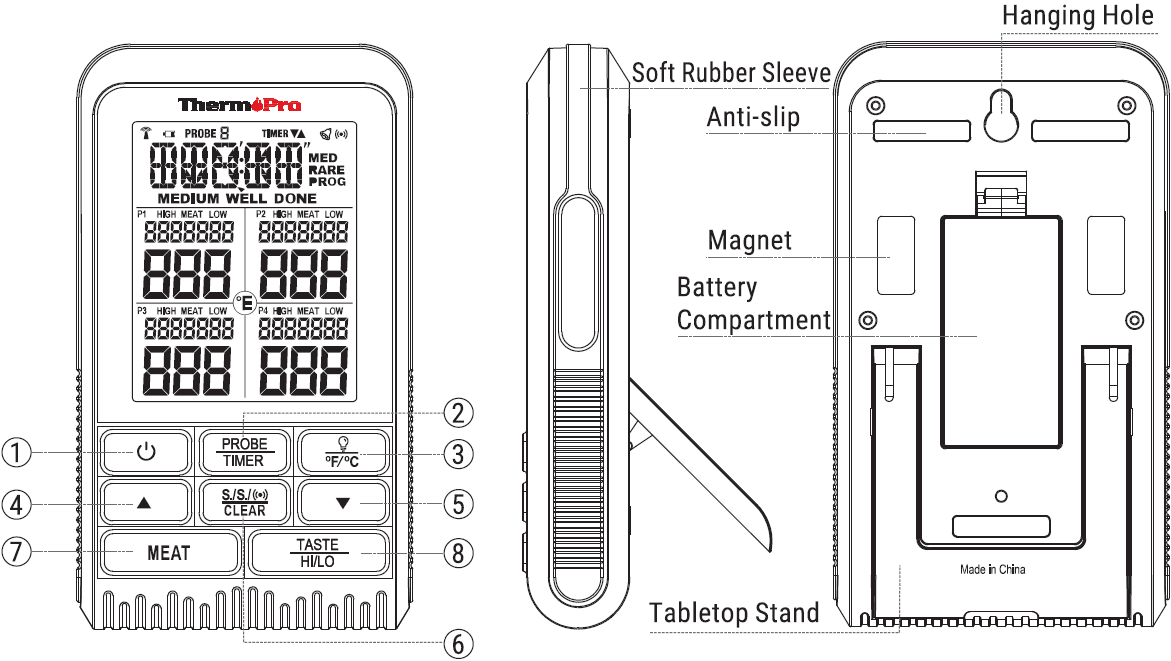
- LCD (Liquid Crystal Display) – Displays all icons, and temperature
- Low battery Indicator
- Remote range: 1 000FT(300m)
- IPX4 Waterproof(Protects from splashing water, but do not submerge in water)
- Backlight
- Temperature Alarm
- Four Color Coated Steel Stainless Probes
- Temperature Range of Probe: 14°F to 572°F (-10°C to 300°C)
- Temperature Accuracy: ±1.8°F (±l .0°C)
- Tabletop, magnet and wall-mounted design
- Battery Compartment: Holds 2*AAA batteries, 3.0V
- Timer
- POWER Button: Press to turn on/off the Receiver. Press and hold for 3 seconds to enter the Synchronization/Pair process.
- PROBE/TIMER: Press to rotate between Thermometer Probe 1, Probe 2, Probe3 or Probe 4; Press and hold for 3 seconds to enter Timer mode.
- 9 /° F/° C: Press to turn on/off the backlight. Backlight will automatically turn off after 15 seconds of inactivity. Press and hold for 3 seconds to switch between °F and °C.
- UP Button: While in thermometer mode (Probe 1, 2, 3, or 4), press once to increase the temperature setting. Press and hold for 3 seconds to rapidly scroll through digits. While in timer mode, press once to increase Hour, Minute or Seconds setting. Press and hold for 3 seconds, the hours, minutes, or seconds will rapidly scroll through digits.
- DOWN Button: While in thermometer mode (Probe 1, 2, 3, or 4). Press once to decrease the temperature setting. Press and hold for 3 seconds to rapidly scroll through digits. While in timer mode, press once to decrease Hour, Minute or Seconds setting. Press and hold for 3 seconds, the hours, minutes or seconds will rapidly scroll through digits.
- S./S./CLEAR: Press to turn ON/OFF the alarm in thermometer mode. When setting the timer, press to confirm the Hours, Minutes, and then Seconds setting. When the timer is set, press once to start the timer. When the timer is running, press once to pause the timer. Press and hold for three seconds to clear the timer setting.
- MEAT: While in thermometer mode, press to select the meat type: GPOUL(Ground Poultry), BBQ, PROG (Program – USER DEFINED TEMPERATURE), BEEF, VEAL, CHCKE {Chicken), PORK, POUL T (Poultry), LAMB, FISH, HAM and GBEEF (Ground Beef).
- TASTE/HI/LO: While in thermometer mode, press to select the meat doneness level: RARE, MED RARE, MEDIUM, MEDIUM WELL and WELL DONE. While in BBQ mode, press to display HI or LO BBQ temperature. Once you set a temperature, press TASTE/HI/LO again to confirm. While in timer mode, press to select between an Hour/Minute timer and a Minute/Second timer.
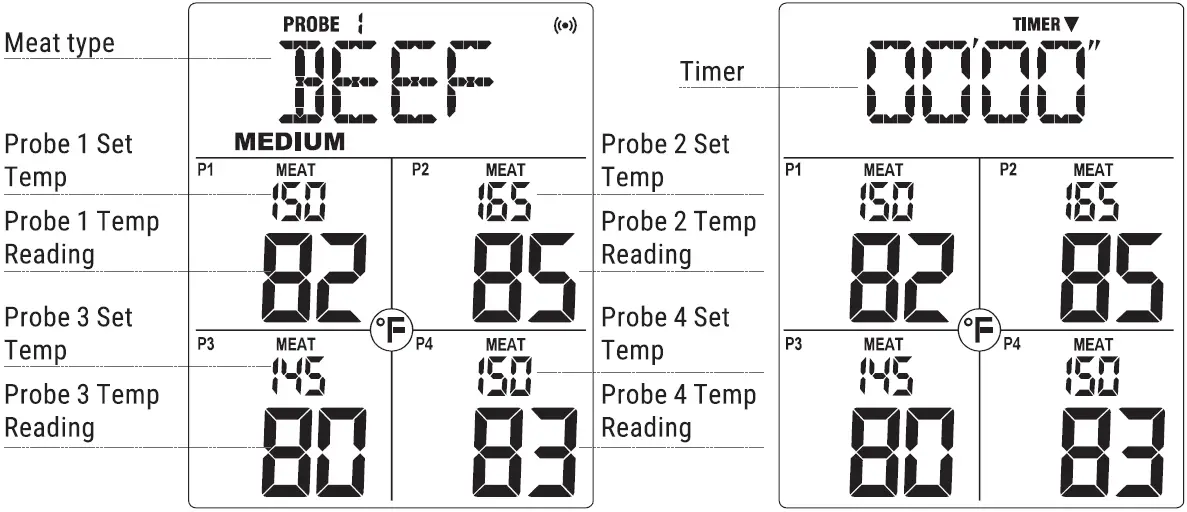
LCD Screen
Transmitter Features
- LCD (Liquid Crystal Display) – Displays all icons and temperature
- Low battery Indicator
- Remote range: 1 OOOFT(300m)
- IPX4 Waterproof(Protects from splashing water, but do not submerge in water)
- Backlight
- Tabletop, and wall-mounted design
- POWER/°F/°C: Press to turn on/off the Transmitter. Press and hold for 3 seconds to switch between °C and °F.
- LIGHT Button: Press to turn on/off the backlight. Backlight will automatically turn off after 15 seconds of inactivity.
Installing Batteries
Open the battery compartment of the receiver and insert two “AAA” batteries with correct polarity.Open the battery compartment of the transmitter and insert two “AAA” batteries with correct polarity.
Turn On/Off Unit
Press POWER button on the receiver to turn on/off the receiver;Press POWER /°F/°C button on the transmitter to turn on/off the transmitter.
Auto Off Feature
The receiver will turn off automatically if it has not received the temperature signal from the transmitter for more than 30 minutes.The transmitter will automatically shut down if the temperature of the 4 probes stays below 40 °C for 2 hours.
Synchronize/Pair Transmitter and Receiver
The transmitter and receiver were already paired at our manufacturing facility. Usually you do NOT need to re-synchronize or re-pair the units. You just plug in the probes, insert batteries, turn on the receiver and the transmitter and wait for a few seconds, you will see the temperatures shown on both receiver and transmitter and the units are ready for use.However, in some unusual cases, the transmitter and receiver are no longer paired, then you may need to re-synchronize them by following the below steps:
- Insert two AAA batteries into the receiver, the signal icon on the display will flash.
- Insert two AAA batteries into the transmitter, and insert the stainless steel probes into the corresponding plugs in the transmitter. The LCD display will show the current temperatures of each probe.
- Press the POWER button on the receiver and hold for three seconds to enter the synchronization mode.
- Wait for a moment until the temperature reading shows on the receiver display, it means the synchronization/pairing is completed. Your professional remote cooking thermometer is now ready for use.
Note: The synchronization between the transmitter and the receiver won’t be lost even if you replace the batteries.
How to Set Meat Temperatures to Preset Temps and Doneness Levels
You can use the four probes (Probe 1- Probe 4) to measure and monitor the temperatures of four pieces of meat or four sections of the same large piece of meat.
- Press the PROBE/TIMER button to select between four probes (Probe 1-Probe 4). Your selection will be represented by a small icon (PROBE 1 or PROBE 2, PEOBE3, PROBE4) on the upper part of the display.
- Press the MEAT button to select preset meat type: GPOUL (Ground Poultry), BBQ, PROG (Program – USER DEFINED TEMPERATURE), BEEF, VEAL, CHCKE (Chicken), PORK, POUL T (Poultry), LAMB, FISH, HAM and GBEEF (Ground Beef).
- Press the TASTE/LO/HI button to choose the level of doneness for the preset meat type selected: RARE, MED RARE, MEDIUM, MEDIUM WELL and WELL DONE.
- Once the current temperature reaches the preset target temperature for Probe 1, Probe 2, Probe3, or Probe4, the receiver will sound an alarm. Press any button to stop the alarm.
How to Set Meat Temperature to your Specific Taste
- Press the PROBE/TIMER button to select between the four probes (Probe 1- Probe 4).
- Press the MEAT button until the LCD displays PROG (program). Press the UP or DOWN buttons to increase or decrease the set temperature. Press and hold the UP or DOWN buttons to rapidly increase or decrease the temperature values.
- Once the current temperature reaches the target temperature for Probe 1 or Probe 2, Probe 3, or Probe 4, the receiver will sound an alarm. Press any button to stop the alarm.
How to Set and Monitor BBQ Temperature
You can use any of the 4 probes to measure and monitor the ambient temperature inside your smoker, barbecue or oven.Remember to clip the selected probe(s) to the rack of the barbecue or smoker.
- Press the PROBE/TIMER button to select between the four probes (Probe 1- Probe 4).
- Press the MEAT button until the LCD displays BBQ.
- Press the TASTE/HI/LO button to switch to the HI BBQ temperature setting. Press the UP or DOWN buttons to increase or decrease to set your desired HI BBQ temperature. Press and hold the UP or DOWN buttons to rapidly increase or decrease the temperature values. The HI BBQ temperature range is 140°F -572°F (recommended temperature range) and the default setting is 250°F.
- Press the TASTE/HI/LO button again to confirm the HI BBQ temperature and turn to setting the LO BBQ temperature.
- Press the UP or DOWN buttons to increase or decrease to set your desired LO BBQ temperature. Press and hold the UP or DOWN buttons to rapidly increase or decrease the temperature values. The LO BBQ temperature range is 32°F – 554°F (recommended temperature range) and the default setting is 225°F.
- Press the TASTE/HI/LO button again to confirm the LO BBQ temperature.
- Press the S./S./C/CLEAR button to turn on/off the alarm.Note: The HI BBQ will not allow you to set the temperature below the LO BBQ temperature.Note: The LO BBQ temperature alarm will not be activated until the actual BBQ temperature goes above the set LO temperature.
Fast Target Temperature Setting
To quickly set all probes’ target temperature to the current probe set target temperature, press and hold the MEAT and TASTE/HI/LO keys at the same time for 3 seconds.For example, when probe 1 selects BEEF MEDIUM 160°F, press and hold the MEAT and TASTE/HI/LO keys at the same time, and then the target temperature of PROBE 2, 3, 4 will be set to BEEF MEDIUM 160°F.
How to Set a Count Down Timer
- Press and hold the PROBE/TIMER button for 3 seconds to switch to TIMER mode. If done correctly, the timer will display 00:00 and a small timer icon will be shown in the upper part of the display.
- Press the TASTE/HI/LO button to select between an Hour/Minute timer and a Minute/Second timer.
- Press the UP or DOWN buttons to adjust the initial timer setting. Press and hold the UP or DOWN buttons to rapidly adjust timer setting. Press the S./S./CLEAR button to confirm this setting.Note: the maximum countdown timer setting is 99 hours and 59 minutes
- After you complete setting the timer, press the S./S./CLEAR button to start the timer. If done correctly, TIMER DOWN will be blinking, indicating the countdown timer is running.
- To pause the countdown timer, press the S./S./CLEAR button. The TIMER DOWN will become solid.
- If you wish to clear the timer, press and hold the S./S./CLEAR button. If you wish to continue the timer, simply press the S./S./CLEAR button again.
- Once the countdown timer reaches 00:00, an alarm will sound for one minute.Press any button to stop the alarm.Note: When the timer counts down below 1 :00 hour, the display will automatically adjust to which indicates 59 minutes 59 seconds. The seconds will then begin to count down.
How to Set a Count Up Timer
- Press and hold the PROBE/TIMER button to switch to the TIMER mode. If done correctly, the timer will display 00:00 and a small timer icon will be shown in the upper part of the display.
- Press the S./S./CLEAR button to start count up. The TIMER UP will blink indicating the count up timer is running. The maximum count uptime that can be reached is 99 hours and 59 minutes.
- To pause the count up timer, press the S./S./C./CLEAR button. TIMER UP will become solid.
- If you wish to clear the timer, press and hold the S./S./C./CLEAR button. If you wish to continue the timer, simply press the S./S./C./CLEAR button.
Note: When the count up timer reaches 59 minutes and 59 seconds, it will automatically change to Hour: Minute display format.
Helpful Hints
- If the receiver and / or the transmitter do not show the temperature, wait for the probe to reach room temperature. Push the probe jacks harder into the transmitter and twist them back and forth so they make good contact. If the problem persists, it is likely the internal probe wire has shorted out either through moisture or heat damage.
- If the temperature displayed seems to read too high or the temperature seems to increase too quickly, check to make sure the probe tip is not poking through the food. Re-position the probe tip in the center of the thickest part of food. Avoid touching bone or heavy fat areas.
Cautions
- Always wear a heat resistant glove to touch the stainless-steel probe sensors or wires during or just after cooking. Do not touch with bare hands.
- Keep the stainless-steel probe sensors and wires away from children.
- Clean the stainless-steel probes and dry thoroughly after each use.
- Do not expose the plugs of the stainless-steel probes or the probe sockets of the transmitter to water or any liquid. This will result in a bad connection and faulty readings.
- Wipe the transmitter and receiver with damp cloth.
- Do not expose the receiver or transmitter to direct heat.
- Do not use stainless steel probes in a microwave oven.
- The Probe Thermometer registers temperatures as low as 14°F (-10°C) and as high as 572°F (300°C). Do not use the stainless probe sensor above 572°F. Doing so will deteriorate the wire.
- Not Intended for use by persons aged 12 and under.
Cleaning
- Always wear heat resistant glove to touch the stainless steel probe sensor or wire during or just after cooking. Do not touch with bare hands.
- Keep the stainless steel probe sensor and wire away from children.
- Wash the metal probe tip with hot soapy water and dry thoroughly. Do not immerse the probe in water while cleaning
- Wipe the transmitter and receiver with damp cloth. Do not immerse either in water.
FCC Compliance
Information to UserWarning: Changes or modifications to this unit not expressly approved by the party responsible for compliance could void the users’ authority to operate the equipment.Note: This equipment has been tested and found to comply with the limits for a Class B digital device, pursuant to part 15 of the FCC Rules. These limits are designed to provide reasonable protection against harmful interference in a residential installation. This equipment generates, uses and can radiate radio frequency energy and, if not installed and used in accordance with the instructions, may cause harmful interference to radio communications.However, there is no guarantee that interference will not occur in a particular installation. If this equipment does cause harmful interference to radio or television reception, which can be determined by turning the equipment off and on, the user is encouraged to try to correct the interference by one or more of the following measures:
- Reorient or relocate the receiving antenna.
- Increase the separation between the equipment and receiver.
- Connect the equipment into an outlet on a circuit different from that to which the receiver is connected.
- Consult the dealer or an experienced radio/TV technician for help.
This device complies with part 15 of the FCC Rules. Operation is subject to the following two conditions:
- This device may not cause harmful interference, and
- This device must accept any interference received, including interference that may cause undesired operation.
Declaration of Conformity
Hereby, the manufacturer declares that this product complies with the basic requirements and applicable regulations of the Radio Equipment Directive 2014/53/EU, the EMC Directive 2014/30/EU. The complete declaration of conformity can be found at: https://itronicsmall.com/eu-declaration-of-conformity/
Disposal
- Protect our environment: do not dispose of electrical equipment in the domestic waste.
- Please return any electrical equipment that you will no longer use to the collection points provided for their disposal.
 report this ad
![]()
[xyz-ips snippet=”download-snippet”]