LT08 LCD Hourly Programmable Thermostat
Installation, Mounting
Caution: Turn off LT08 and the electronic devices (e.g. heater, cooler) which will be connected before installation start. It is highly recommended that the installation procedure is processed by trained personnel.
Installation Location
Choose an indoor location that provides good temperature detection. Prevent direct exposure to sunlight; at low air circulation, near heat/cool generating sources, or suffer from great temperature changes (e.g. near door).
Wiring
There are 3 wiring terminals at the top-right corner at theback of LT08, labeled as “L”(Live), “H”(Heater) and “C”(Cooler). “H” and “C” are input to heater and cooler.Leaves unused hole blank.DO NOT CHANGE OR EXCHANGE ANY WIRINGS.3. Mounting:Using the accessory screws and wall anchors provided,mount the thermostat with the key-hole at the back. Thethermostat should be mounted on the wall as shown in
 Figure 1
Slide Switch at Back and HEAT/COOL slide switch:
In Winter put the HEAT/COOL slide switch at HEAT, while in summer set it at COOL. The slide switch at Back set the minimum off time of the heater/cooler:
HEAT COOLNO DELAY 10sec 5minDELAY 5min 5min
Note: When COOL is set, the minimum off time is fixed at 5 min.When the switch is in the OFF mode, middle position on the slide switch, even when the rotating symbol could be shown, the device state is OFF.
Start/Reset
- After wiring, mounting and switch off all connected devices, place 2 pieces of new AA 1.5V alkaline batteries according to the polarities marked. LCD display will be switched on.
- In case the thermostat does not turn on accordingly, press ‘RST’ to reset.
- Switch ON the heater/cooler. The heater/cooler will remain at OFF until LT08 activate the output ON with
 rotating.
Normal Time Mode
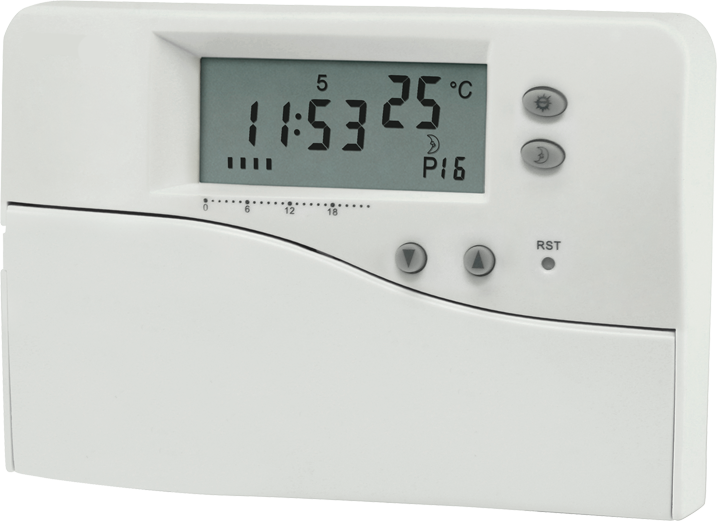
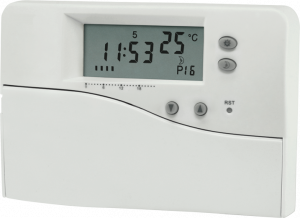
LCD displays the time, room temperature, programnumber and output status.
Time Setting Mode
- Press < >, Day of Week (1-7) will flash, press <▲>/<▼> to select Day of Week.
- Press < >, Hour will flash, press <▲>/<▼ > to adjust Hour.
- Press < >, Minute will flash, press <▲>/<▼ > to adjust Minute.
- Press < > jump back to Normal Time Mode, or auto return after 10 seconds.
- Jumper selection for 12/24 HR display can be selected at the PCB during installation, factory pre-set at 24 HR.
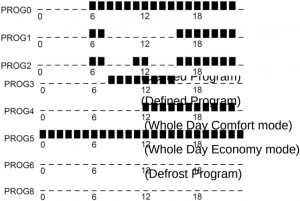
Factory Defined Programs: FTY PROG (0-6,8), USER PROG (10-16,18)
Set Program Time
- Press , Day of Week (1-7) will flash, press <▲>/<▼ > to select Day of Week.
- Press , Program Nos. P (0-6,8,10-16,18) will flash, press <▲>/<▼ > to select Program nos.
- Press < >/< > will select the Comfort/Economy mode for each Hour Bar in user programs (10-16,18).
- Press < > to jump back to Normal Time Mode, or auto return after 10 seconds.
G.Comfort and Economy Temperature Setting
- Hold < >/< > for 1 sec will enter Comfort and Economy Temperature Setting mode.
- Press <▲>/<▼> to adjust different temperature.
- Press < > to jump back to Normal Time Mode, or auto-return after 10 sec.
Temporary Override Mode
- Temporary Override Mode can change the current program mode to the opposite program mode temporarily. The time when the next program of opposite state or the next day is reached, Temporary Override mode will be released automatically.
- At < > mode, press < > will enter the Temporary Override mode with displayed; or at < > mode, press < > will enter the Temporary Override mode with displayed.
- Follow section G to adjust setting temperature if necessary.
- Temporary Override mode will automatically release when the time reaches the opposite of < >/< > state, or when the next day is met.
- To release Temporary Override mode manually, press < >/< > key of the opposite of < >/< > state.
Comfort and Economy Hold Timer:
- Comfort/Economy Hold Timer can force the thermostat to run at Comfort/Economy mode for a defined period of time.
- Hold < > for 1 second will see setting temperature flashing, press < > again will enter the Comfort Hold Timer with flashing. On the other hand, hold < > for 1 second will see setting temperature flashing, press < > again will enter the Economy Hold Timer with flashing.
- Press <▲>/<▼> to adjust the number of hours for hold timer.
- Press < > to confirm setting and back to Normal Time Mode, or auto return after 10 sec.
- Follow section G to adjust the setting temperature in necessary.
- Press < >/< > key of the opposite state can release the Hold Timer.
Special conditions
- If battery level is LOW, “C”, “P”, & “:” will be flashing, the recent batteries must be replaced with new one.
- When room temperature is below 5°C, Defrost ‘df’ is displayed. Heat output will turn ON and Cool output will turn OFF.
- Below 0°C, L is displayed. Heat output will turn ON and Cool output will turn OFF.
- Above 39.5°C, H is displayed. Heat output will turn OFF and Cool output will turn ON.
Specification
- Temperature measurement: 0.0 – 39.5 °C
- Accuracy: ± 0.5 °C
- Temperature control range: 5.0 – 35.0 °C
- Temperature detection: 10 sec.
- Switching voltage: 24…250VAC 50/60Hz
- Switching current: 8(3)A max.
- Terminals: 2.5 mm2 cable
- Electronic control: Type 2.B action
- Battery: 2 x 1.5V AA alkaline
- Operating temperature: -10 – 50 °C
- Storage temperature: -20 – 60 °C
- Operating humidity: 5-90% non-condensing
LT08 LCD Hourly Programmable Thermostat Installation Guide – LT08 LCD Hourly Programmable Thermostat Installation Guide –
[xyz-ips snippet=”download-snippet”]