
![]()
Dual Lens Mirror Dash CamCarView3USER MANUAL
PCARVIEW-V1.0
ThiEYE Social MediaOfficial Website http://www.thieye.com/Facebook
 https://www.facebook.com/thieyecamYouTube
 https://www.youtube.com/channel/UColUm5m9XeBDIZaJ6P4feGQ
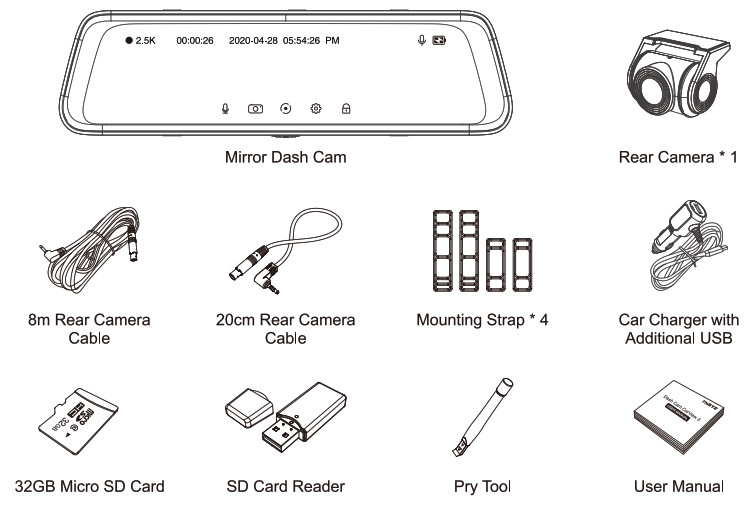
What’s Included
Layout
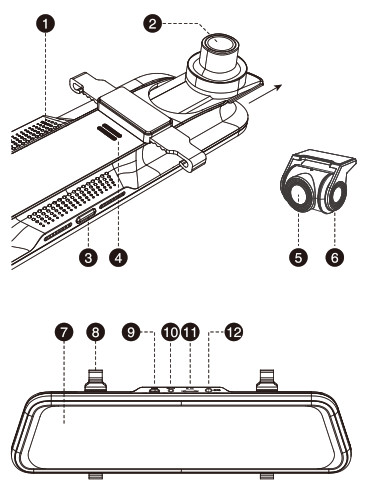
- Reset
- 170º Wide Angle Front Lens
- Power Button
- Speaker
- 170º Wide Angle Rear Lens
- IP67 Water Resistant Rear Camera
- 10″ IPS Ultra HD Full-Size Touch Screen
- Back Clip Fiexd Hook
- Mini USB Port
- Rear Camera Port
- MicroSD Card Slot
- GPS Port(Note: Optionally, you need to purchase an external GPS module that records real time location, driving speed and trajectory.
Installation Instructions
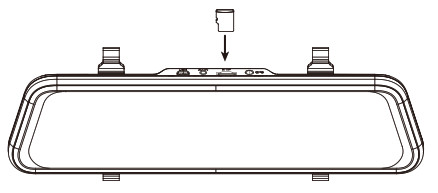
- Insert a Micro SDCard Supports up to 128GB Class 10 Micro SD Card. Please format the Micro SD Card in the camera before first use.Note:* To keep your Micro SD card in good condition, please format it regularly. As reformatting erases all of your contents, be sure to back up your photos and videos first.* Ensure that the device is completely power off before removing the Micro SD card to avoid damages to the memory card.* To prevent loss of important data, frequently copy recorded videos from Micro SD card to another storage device such as personal computer.
- Install the Mirror Dash Cam to the CarFront Camera Isntallation Wiring Diagram
- Install the Rear CameraThe installation location of rear camera is actually quite flexible, so there are some recommended locations with different angles of visions.A: Installed on the front windshield for in-car recordingThe rear camera is connected to the main unit through a 20cm rear camera cable, you can catch the views of the interior of the car with its rear camera that is mounted on the front windshield. “A” installation location is especially valuable for taxi cab, Uber/Lyft drivers, or other rideshare drivers who want to record the goings-on in their vehicles. Parents too, can monitor, and record what their kids are getting up to in the car.B: Installed on the rear windshield for recording outside the carThe rear camera is connected to the main unit via a long 8 meters rear camera cable, you can record the rear areas of the vehicle with its rear camera that is mounted on the rear windshield. “B” is the best location of vision from height, which has a full range of rear views, and is very easy to install.C: Installed near the license plate for recording the rear areas of the carThe rear camera is connected to the main unit through a long 8 meters rear camera cable , you can record the rear areas of the vehicle with its rear camera that is mounted above the license plate. “C” is the traditional rear camera location, which brings limited vision (upper), and professional assistance is required when installing.Connecting the Red Wire with the Reversing LightPlease identify the wire that feeding the Reverse Light from the rear light cluster, although its placement may vary, so be sure to refer to your car’s manual. Once spotted, use a pair of pliers or wire strippers to peel the rubber to expose the live wire.For safety, make sure you do this while the car is turned off. Tie the Red Trigger Wire with the positive terminal of the correct wire and then wrap it with electrical tape.Note:1. DO NOT connect the Red Trigger Wire with Brake Light or Tail Light.2. While on reverse gear, it will make the dash camera’s screen automatically changes to the rearview in order to view the reversing situation.Note:The installation illustrations are for your reference only. The placement of the devices and cables may vary depending on the car model. If you encounter any problems during installation, contact a skilled installer (such as the service personnel of the car) for assistance.
- Connect to Power1. Plug the Rear Camera Cable (26ft) into the AV Port of the Front Camera, and plug the other end of the Rear Camera Cable into the Rear Camera.2. Connect the power cable to Mini USB port of the dash cam.3. Plug the car charger adapter end of the power cable into a vehicle power socket.4. The car charger with additional USB, you can keep the dash cam charging on the go, and at the same time charge your smart phone or pad with the same charger.
 Note:* To keep your Micro SD card in good condition, please format it regularly. As reformatting erases all of your contents, be sure to back up your photos and videos first.* Ensure that the device is completely power off before removing the Micro SD card to avoid damages to the memory card.* To prevent loss of important data, frequently copy recorded videos from Micro SD card to another storage device such as personal computer.
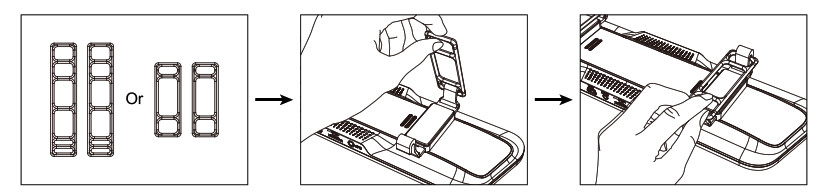 Front Camera Isntallation Wiring Diagram
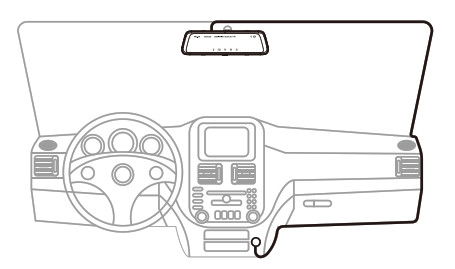
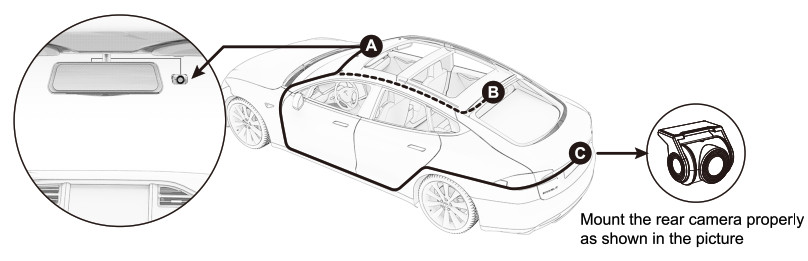 A: Installed on the front windshield for in-car recordingThe rear camera is connected to the main unit through a 20cm rear camera cable, you can catch the views of the interior of the car with its rear camera that is mounted on the front windshield. “A” installation location is especially valuable for taxi cab, Uber/Lyft drivers, or other rideshare drivers who want to record the goings-on in their vehicles. Parents too, can monitor, and record what their kids are getting up to in the car.B: Installed on the rear windshield for recording outside the carThe rear camera is connected to the main unit via a long 8 meters rear camera cable, you can record the rear areas of the vehicle with its rear camera that is mounted on the rear windshield. “B” is the best location of vision from height, which has a full range of rear views, and is very easy to install.C: Installed near the license plate for recording the rear areas of the carThe rear camera is connected to the main unit through a long 8 meters rear camera cable , you can record the rear areas of the vehicle with its rear camera that is mounted above the license plate. “C” is the traditional rear camera location, which brings limited vision (upper), and professional assistance is required when installing.
 Connecting the Red Wire with the Reversing LightPlease identify the wire that feeding the Reverse Light from the rear light cluster, although its placement may vary, so be sure to refer to your car’s manual. Once spotted, use a pair of pliers or wire strippers to peel the rubber to expose the live wire.For safety, make sure you do this while the car is turned off. Tie the Red Trigger Wire with the positive terminal of the correct wire and then wrap it with electrical tape.Note:1. DO NOT connect the Red Trigger Wire with Brake Light or Tail Light.2. While on reverse gear, it will make the dash camera’s screen automatically changes to the rearview in order to view the reversing situation.Note:The installation illustrations are for your reference only. The placement of the devices and cables may vary depending on the car model. If you encounter any problems during installation, contact a skilled installer (such as the service personnel of the car) for assistance.
Get Started
- Power On/OffThe camera is designed to power on and start recording automatically when the car power adapter is plugged to power source.1. Auto Power On/Off with Ignition When powered by the car charger, the dash camera will automatically turn on when you start your car engine. When turning off your car, the camera will automatically turn off after approximately 5 seconds.2. Manual Power On/Off To manually turn the camera On/Off, press and hold the power button at least 3 seconds.Note:* In low power status, the dash cam will be automatically shut down after it displays low battery.
- Screen On/OffSimply press the Power Button once to switch the screen off when the Mirror Dash Camera is ON, press it again or tap the touchscreen to wake the camera up.Note: When recording, switch the screen off, the dash cam will also keep recording.
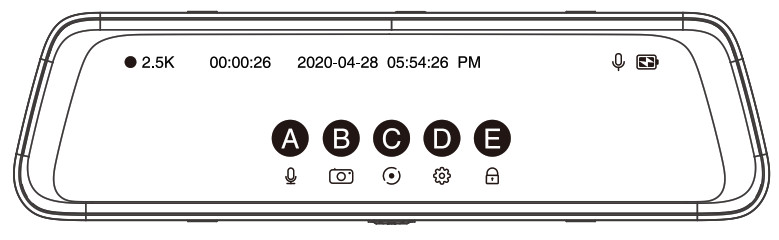
- Touch Screen Overview
Operation Function A Tap the Audio On / Off Icon Open / Close Audio Recording B Tap the Photo Taking Icon Enter Into Photo Mode C Tap the Video Recording Icon Start / Stop Video Recording D Tap the Menu Icon Enter into the Setting Menu E Tap the Emergency Lock Icon Manually Lock File More Gestures Operation:* Swipe upward and downward on the left part of the touch screen to fine tuning the angle of the front and rear camera.* Swipe upward and downward on the right part of the touch screen to adjust the display brightness.* Swipe down at the middle part of the touch screen to enter into setting menu.* Swipe the touch screen from right to left to switch among the view from the rear cameras, the View from the front camera, and the view from both cameras.* Swipe the touch screen from left to right to enter into playback mode.
- Video ModeIn the main interface, tap the Video Recording Icon to start recording, the screen will appear a red dot and flash slowly, indicating the video is recording.
- Photo ModeIn the main interface, tap the Photo Taking Icon to enter into photo mode, then tap ” ” icon to take a photo.
- Playback ModeSwipe the touch screen from left to right to enter into playback mode.Note: When entering the playback mode, recording pauses and resumes when returns. View videos and photos by category, tap the folder name to switch: Front urgent video, Front ordinary video, Rear urgent video, Rear ordinary video, Front photo, Rear Photo

* When in video mode, tap “![]() ” or swipe down at the middle part of the touch screen to enter into video setting menu.* When in photo mode, tap “
” or swipe down at the middle part of the touch screen to enter into video setting menu.* When in photo mode, tap “![]() ” or swipe down at the middle part of the touch screen to enter into photo setting menu.
” or swipe down at the middle part of the touch screen to enter into photo setting menu.
Here is the description of main functions:
![]() ResolutionsThe resolution of the front camera is set to 2.5K while the resolution of the rear camera is set to 1080P by default. Tap to switch the resolution.
ResolutionsThe resolution of the front camera is set to 2.5K while the resolution of the rear camera is set to 1080P by default. Tap to switch the resolution.![]() Loop RecordingIn the case of recording and saving at interval of 1/3/5 minutes, the dash cam will automatically overwrite the earliest file in the memory card once the card is full.
Loop RecordingIn the case of recording and saving at interval of 1/3/5 minutes, the dash cam will automatically overwrite the earliest file in the memory card once the card is full.![]() Time-LapseNote: An extra Hardwire Kit (also called the step-down line or buck line, sold separately) is required for using the lime-Lapse function ( OFF/15/2S/3S).
Time-LapseNote: An extra Hardwire Kit (also called the step-down line or buck line, sold separately) is required for using the lime-Lapse function ( OFF/15/2S/3S).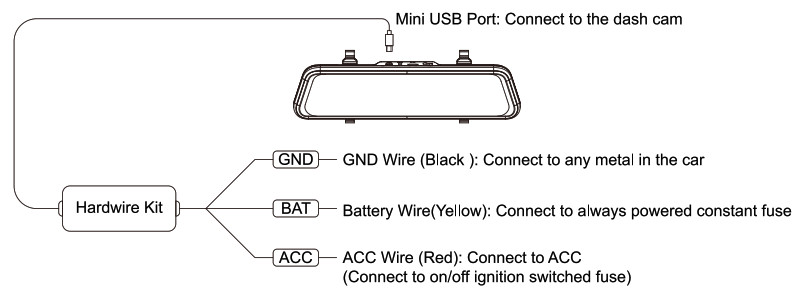 * When using the Hardwire Kit to supply power for the dashcam, and when the car engine turns off: If you set Time-Lapse at OFF, the dashcam will power off automatically. If you set Time-Lapse at 15, the camera will capture 1 frame per 1s and merge them into a video. Selecting 2S indicates that the camera will capture 1 frame per 2s, and selecting 3S indicates the camera will capture 1 frame per 3s.* When using the Hardwire Kit to supply power for the dash cam, and when the car engine turns on: The dash cam will exit the time-lapse function, and start recording normally.Note: If you connect both the Battery Wire and ACC Wire to always powered constant fuse, and when the car engine turns off, you will realize 24-hour recording. (But the Time-Lapse doesn’t work)
![]() G-sensorG-sensor will lock the file when detecting a collision during the recording. The G-sensor sensitivity can be selected OFF / High / Middle / Low in the menu.
G-sensorG-sensor will lock the file when detecting a collision during the recording. The G-sensor sensitivity can be selected OFF / High / Middle / Low in the menu.![]() Parking MonitorWhen the car is parked and the Parking Monitor has been turned on, the dash cam will activate and start recording automatically once it detects a collision. And it will turn off after continuously recording 20 seconds.Note:* Only turn on the Parking Monitor while parking, the dash cam will record when detecting a collision. It means that you do not need to turn on G-sensor.*To use the parking monitoring function with 24-hour continuously recording after the car engine is off, you need a step-down line that connects the line record to the car battery (the buck line needs to be purchased separately.)
Parking MonitorWhen the car is parked and the Parking Monitor has been turned on, the dash cam will activate and start recording automatically once it detects a collision. And it will turn off after continuously recording 20 seconds.Note:* Only turn on the Parking Monitor while parking, the dash cam will record when detecting a collision. It means that you do not need to turn on G-sensor.*To use the parking monitoring function with 24-hour continuously recording after the car engine is off, you need a step-down line that connects the line record to the car battery (the buck line needs to be purchased separately.)![]() Screen SaverWhen recording If you turn on Screen Saver Mode, the screen display will be turned off after a period of inactivity, but the camera is still recording when the screen display turns off. The options of Screen Saver are 1 min, 3min and off. To turn on the screen display again, please tap the touch screen.
Screen SaverWhen recording If you turn on Screen Saver Mode, the screen display will be turned off after a period of inactivity, but the camera is still recording when the screen display turns off. The options of Screen Saver are 1 min, 3min and off. To turn on the screen display again, please tap the touch screen.
![]() GUSB ModeWith TF card inserted, when you use Mini USB Cable (not included) to connect to computer, and then tap the USB Mode, three options will be available: STORAGE, UVC, CHARGE.* STORAGE allows the TF card to be accessed via computer as an external storage.* UVC can act as a camera for your computer.* CHARGE allows the dash cam to function normally while charging via computer.
GUSB ModeWith TF card inserted, when you use Mini USB Cable (not included) to connect to computer, and then tap the USB Mode, three options will be available: STORAGE, UVC, CHARGE.* STORAGE allows the TF card to be accessed via computer as an external storage.* UVC can act as a camera for your computer.* CHARGE allows the dash cam to function normally while charging via computer.![]() Streaming MediaSet the first views of the display. If Streaming Media is ON, the display will show the rear camera’s view by default when starting the engine. If it’s OFF, the display will show the view from the front and rear camera.
Streaming MediaSet the first views of the display. If Streaming Media is ON, the display will show the rear camera’s view by default when starting the engine. If it’s OFF, the display will show the view from the front and rear camera.![]() Date/TimeTap to start setting the date and time. Swipe upward/downward to select the year, month, date, hour and minute, the tap Confirm to set the time. This setting is to set correct date and time on the dash cam for video recording and camera shooting.
Date/TimeTap to start setting the date and time. Swipe upward/downward to select the year, month, date, hour and minute, the tap Confirm to set the time. This setting is to set correct date and time on the dash cam for video recording and camera shooting.
![]() FormatAll files will be deleted in format mode. To enable the micro SD card to work immediately after installation, we recommend to format the micro SD card on dash cam before installation.
FormatAll files will be deleted in format mode. To enable the micro SD card to work immediately after installation, we recommend to format the micro SD card on dash cam before installation.![]() DefaultIn default setting, all user information set before will be cleared. When you encounter any problem with the dashcam, you can try to fix it by resetting to default setting.
DefaultIn default setting, all user information set before will be cleared. When you encounter any problem with the dashcam, you can try to fix it by resetting to default setting.
[xyz-ips snippet=”download-snippet”]