Thomann 496918 Swissonic HDMI CAT Extender 80 4K UHD User Guide
![]()
HDMI CAT Extender 80 4K UHD
Quick Start Guide
This quick start guide contains important information on the safe operation of the product. Read and follow the safety advice and instructions given. Retain the manual for future reference. If you pass the product on to others please include this manual.
Safety instructions
Intended useThis device is used to transmit HDMI signals via network cables. Any other use or use under other operating conditions is considered to be improper and may result in personal injury or property damage. No liability will be assumed for damages resulting from improper use.
Danger for children
![]() Ensure that plastic bags, packaging, etc. are disposed of properly and are not within reach of babies and young children. Choking hazard! Ensure that children do not detach any small parts from the product. They could swallow the pieces and choke! Never let children unattended use electrical devices.
Ensure that plastic bags, packaging, etc. are disposed of properly and are not within reach of babies and young children. Choking hazard! Ensure that children do not detach any small parts from the product. They could swallow the pieces and choke! Never let children unattended use electrical devices.
Where to use the productNever use the product
- in conditions of extreme temperature or humidity
- in extremely dusty or dirty areas
- at locations where the unit can become wet
General handling
• To prevent damage, never use force when handling the product.• Never immerse the product in water. Just wipe it with a clean dry cloth. Do not use liquid cleaners such as benzene, thinners or flammable cleaning agents.
Features
- Transmission of HDMI signals up to 80 meters
- Cost-eff ective transmission via CAT5e or CAT6 cables
- For resolutions up to 2160p30 / 3840 × 2160 at 30 Hz
- Supports HDMI 1.4 and HDCP 1.4
- Bidirectional transmission of infrared signals
- Supported audio transmission: DTS Digital, Dolby Digital, DTS-Hp and Dolby TrueHD
- Optical SPDIF audio output
- 3.5 mm stereo audio output
- Power supply via external power supply
- Each device can be confi gured as a receiver or transmitter
- Dimensions housing (W × H × D): 113 mm × 28 mm × 80 mm
- Scope of delivery: 2 × transmitter/receiver, 2 × power supply, 2 × IR receiver/transmitter
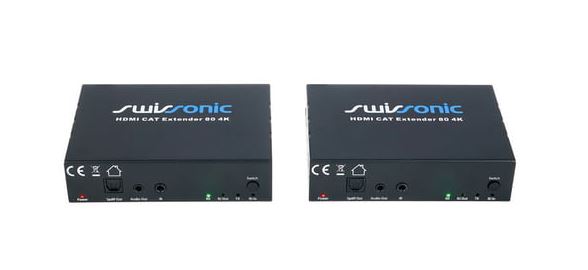
Operating elements

- Power – Power indicator
- Spdif Out – Digital audio output (optical)
- Audio Out – Analog audio output (3.5 mm mini jack)
- IR – Connection for infrared interface
- RX – Display for device function ‘Receiver’
- RJ Out – Display for connected RJ45 output
- TX – Display for device function ‘transmitter’
- RJ In – Display for connected RJ45 input
- Switch – Switch for changing the device function
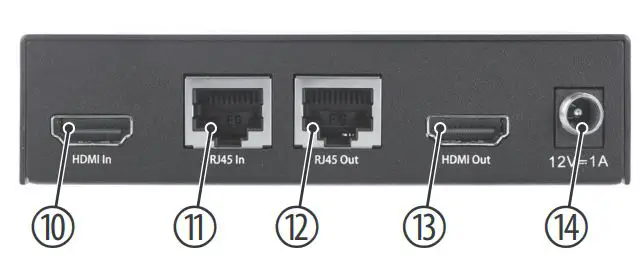
- HDMI In – HDMI input
- RJ45 In – RJ45 input
- RJ45 Out – RJ45 output
- HDMI Out – HDMI output
- 12 V – 1 A – Connection for power supply
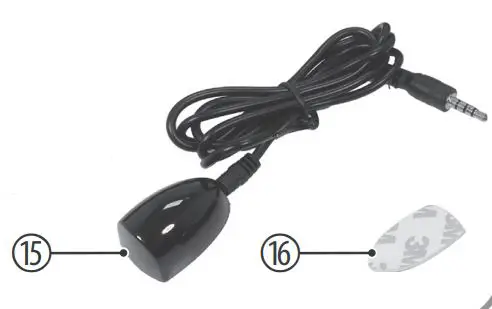
- – Infrared interface
- – Adhesive pad
Using the product
- Connect both devices using the supplied power supplies with properly wired wall outlets. The respective Power indicator lights up, the devices are immediately ready for operation.
- For the intended use of a pair of devices, one device must work as a transmitter and the other as a receiver. The LEDs TX and RX indicate the current device function. If the TX LED lights up, the device is working as a transmitter. If the RX LED lights up, the device is working as a receiver. To switch the device function to the respective other one, press the ‘Switch’.
- Connect the HDMI source with a suitable cable to the HDMI In socket of the device, which works as a transmitter. If desired, connect a suitable display to the HDMI Out socket of this device.
- Connect one infrared (IR) interface each to the IR sockets of both devices.
- Align the IR interface connected to the transmitter, if necessary using the supplied adhesive pad, to the IR sensor of the HDMI source. You can fi nd out where this sensor is located in the operating instructions for the HDMI source.
- Connect the RJ45 out socket of the transmitter to the RJ45 in socket of the receiver using a CAT5e or CAT6 cable (max. length 80 m). The TX indicator on the transmitter and the RX indicator on the receiver light up to confirm the connection has been established.
- If the audio signals transmitted within the HDMI signal are to be played back via dedicated audio devices, connect them to the Audio Out (analogue) or Spdif Out (digital, optical) sockets using suitable cables.
- Connect the HDMI target device to the HDMI Out socket of the receiver using a suitable cable.
- Turn on the HDMI devices and start the playback at the HDMI source.
- If you want to control the HDMI source with its IR remote control from the location of the receiver, align the IR remote control so that its signals can be detected by the IR interface connected to the receiver.
- To send the signal to further receivers, you can connect the RJ45 Out socket on the receiver to the RJ45 In socket on the next receiver. In this way, the signal can be sent to a total of 8 receivers.
![]() For the transport and protective packaging, environmentally friendly materials have been chosen that can be supplied to normal recycling. Ensure that plastic bags, packaging, etc. are properly disposed of. Do not just dispose of these materials with your normal household waste, but make sure that they are collected for recycling. Please follow the notes and markings on the packaging.
For the transport and protective packaging, environmentally friendly materials have been chosen that can be supplied to normal recycling. Ensure that plastic bags, packaging, etc. are properly disposed of. Do not just dispose of these materials with your normal household waste, but make sure that they are collected for recycling. Please follow the notes and markings on the packaging.
![]() This product is subject to the European Waste Electrical and Electronic Equipment Directive (WEEE) in its currently valid version. Do not dispose of your old device with your normal household waste. Dispose of this product through an approved waste disposal fi rm or through your local waste facility. Comply with the rules and regulations that apply in your country. If in doubt, consult your local waste disposal facility.
This product is subject to the European Waste Electrical and Electronic Equipment Directive (WEEE) in its currently valid version. Do not dispose of your old device with your normal household waste. Dispose of this product through an approved waste disposal fi rm or through your local waste facility. Comply with the rules and regulations that apply in your country. If in doubt, consult your local waste disposal facility.
Technical specifications

Thomann GmbH
- Hans-Thomann-Straße 1
- 96138 Burgebrach
- www.thomann.de
- [email protected]
DocID: 496918_25.01.2021
References
[xyz-ips snippet=”download-snippet”]