![]() .us +1 877-288-8099Outdoor Grill NG Conversion Document
.us +1 877-288-8099Outdoor Grill NG Conversion Document
Warning:
INSTALLATION AND SERVICES MUST BE PERFORMED BY A QUALIFIED INSTALLERIMPORTANT: SAVE INSTRUCTION MANUAL FOR THE LOCAL INSPECTOR’S USE.READ AND SAVE THESE INSTRUCTIONS FOR FUTURE REFERENCE
 Warning:
This conversion kit must be installed by a qualified service technician in accordance with the manufacturer’s instructions and all applicable codes and requirements of the authority having jurisdiction. Failure to follow instructions may result in fire, explosion or production of carbon monoxide causing property damage, personal injury or loss of life. The qualified service agency is responsible for the proper installation of this kit. The installation is not proper and complete until the operation of the converted appliance is checked as specified in the manufacturer’s instructions supplied with this kit.
Warning:
Before proceeding with the conversion, shut off the gas supply before disconnecting electrical power to the appliance. Be sure power supplies are off before installing the conversion kit. Failure to do so could cause serious bodily injury.
CAUTION Do do not use a flame to check for gas leaks
For any parts/installation inquiries, please contact [email protected] or call 877-288-8099.Please keep all the LP-related parts accessories for potential future use.
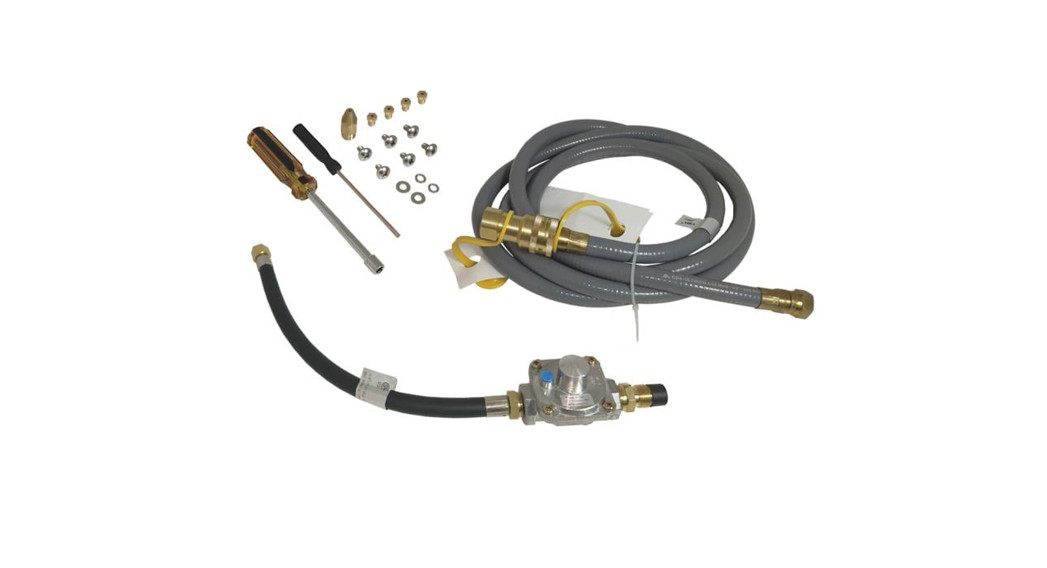
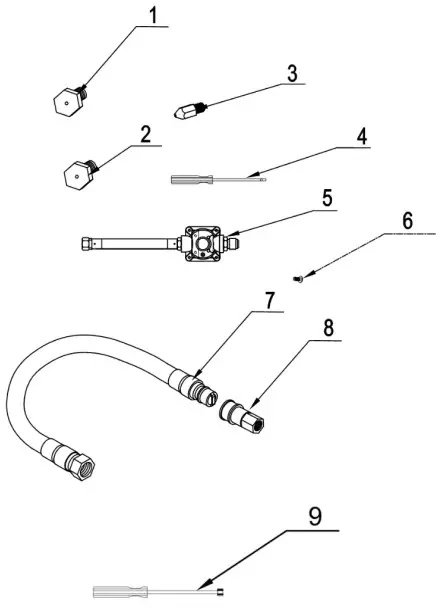
Parts Information
Parts #: NGKMK04SS304
| # | Part ft | Part Name | Size | Quantity |
| 1 | 10.05.008007-000-Al | Front Broil BurnerOrifice – NG | 1.70mm | 1 |
| 2 | 10.05.008005-000-Al | Main Tube BurnerOrifice – NG | 1.68mm | 3 |
| 3 | 10.05.008004-000-Al | Back Broil BurnerOrifice – NG | 1.48mm | 1 |
| 4 | 05.99.008021-000-A0 | LP/NG screwdriver | 1 | |
| 5 | 09.99.008001-000-A0 | NG regulator | 1 | |
| 6 | 06.10.000022-000-A0 | 5/32″*8 Philip’s flathead screw | 4 | |
| 7 | 11.02.008003-000-A0 | NG inlet pipe | 10” | 1 |
| 8 | 05.99.008205-000-A0 | NG quick coupling | NPT ½” | 1 |
| 9 | 01.17.000106-000-A0 | 6mm Tool | 6mm | 1 |
Additional tools like a wrench and Philip’s flat screwdriver are needed to help with the NG conversion.
Below is LP orifice information, please keep for reference (these orifices are already installed in the product)
| Explosive # | Part # | Part Name | Size | Quantity |
| 10.05.008006-000-AO | Front Broil Burner Orifice – LP | 01.07mm | 1 | |
| 10.05.008014-000-A0 | Main Tube Burner Orifice – LP | 01.02mm | 3 | |
| 10.05.008002-000-A0 | Back Broil Burner Orifice -LP | 00.91mm | 1 |
Grill Cabinet Installation
Step 1
- Open Grill cover and take out the Rotisserie, grill racks (3 pcs) and flame tamer;

- Then take out 3 pcs tube burners and 1 pc front broiler burner. Use Philip head screwdriver to take out screws are shown in the picture;3. Use a screwdriver to take out the screws next to the front infrared broiler burner and front tube burners’ electrodes, then take out the front infrared broiler burner and front burners.4. Check the front 5 burner knob layout. From left to right are front Broiler burner knob, front left tube burner knob, front middle burner knob, bake Broiler burner knob and front right burner knob.
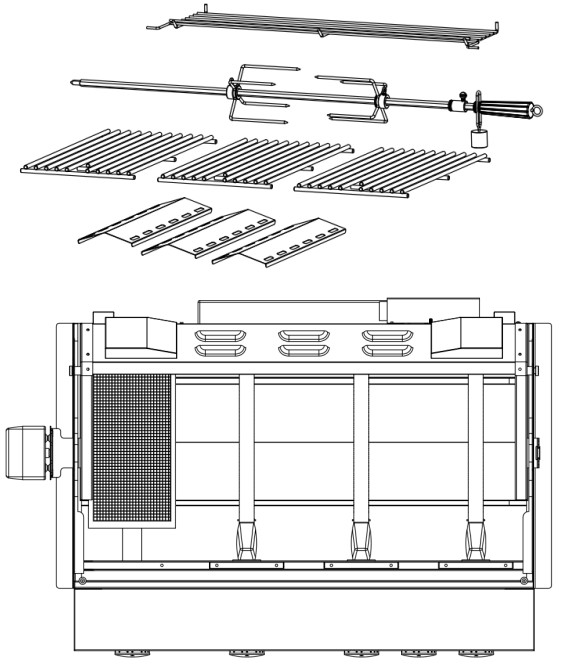
 3. Use a screwdriver to take out the screws next to the front infrared broiler burner and front tube burners’ electrodes, then take out the front infrared broiler burner and front burners.
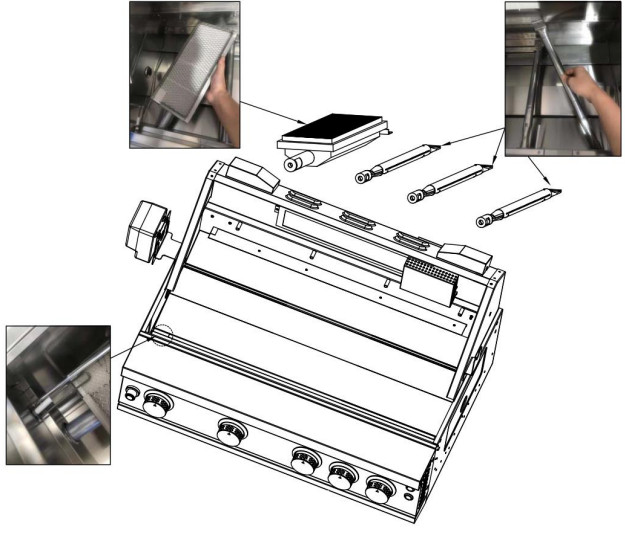 4. Check the front 5 burner knob layout. From left to right are front Broiler burner knob, front left tube burner knob, front middle burner knob, bake Broiler burner knob and front right burner knob.
Step 2
- Make sure all the front burners are taken out from grill cavity;
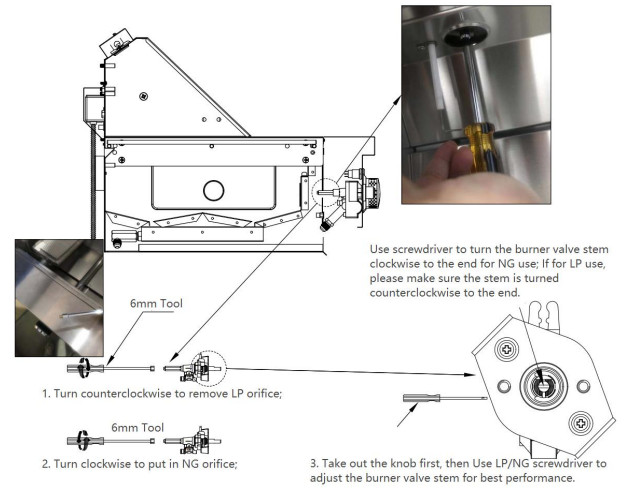
- Use 6mm tool (included in NG conversion kit) to take out original (LP) orifices from the burner valve inside the grill cavity, then put in NG orifices. Detailed orifice information are shown below:NG orifice (included in NG Conversion Kit)
Part # Part Name Size Quantity 10.05.008007-000-AO Front Broil BurnerOrifice – NG 1.52mm 1 10.05.008005-000-AO Main Tube BurnerOrifice – NG 1.44mm 3 LP Orifice (came with the product, need to be replaced by NG orifice)
Part U Part Name Size Quantity 10.05.008006-000-AO Front Broil BurnerOrifice – LP 01.07mm 1 10.05.008014-000-AO Main Tube BurnerOrifice – LP 01.02mm 3 - Take out all the burner knobs (total 5 knobs, one for front infrared broiler burner, three for tube burners, and one for back infrared broiler burner) and get access to adjustment of burner valve;
- Use a flat screwdriver (LP/NG screwdriver in the kit) to adjust the burner valve for NG use. Turn the stem clockwise all the way to the end for NG position; for adjusting back to LP use, counter-clockwise all the way to the end–LP position.
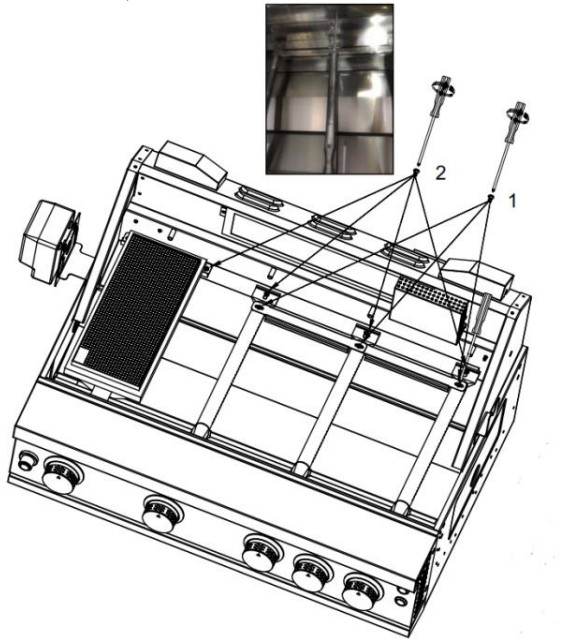
Step 3
- Open outdoor grill cover first and then remove the 4 screws shown in the picture (right side of the back infrared broiler), and then remove the back infrared broiler burner orifice’s protection cover from the back;
- Use wrench to remove the original orifice (LP Orifice – 0.91mm) counterclockwise so that it could be removed;
- Use wrench to screw in NG orifice (1.31mm) clockwise; Detailed orifice information is shown below: NG orifice (included in NG Conversion Kit)
10.05.008004-000-A0 Back Broil BurnerG Orifice – NG
1.31mm 1 LP Orifice (installed with the product, need to be replaced by NG orifice)
10.05.008002-000-AO Back Broil Bu PrnerGOrifice –LPG Φ00.91mm 1 - Use a wrench to take out the LP regulator and gas pipe counterclockwise.

Step 4
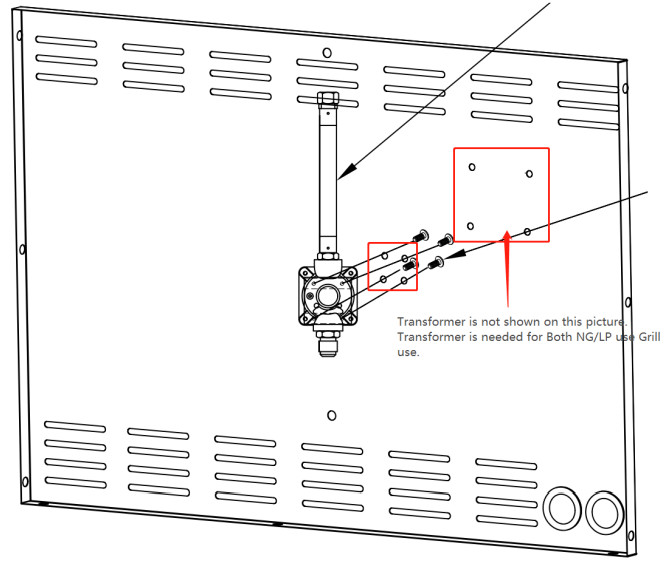
- Regulator Installation: Use 4 pcs 5/32″*8 Philip’s flat head screw to install NG regulator part to the back panel of the cabinet;
- Use Wrench to connect BBQ manifold with NG regulator;
- Use Wrench to connect NG gas inlet pipe with NG regulator; Connect NG quick coupling to NG pipeline, then connect NG inlet pipe with NG quick coupling.
- NG gas inlet must be PNT 1/2”. Each connection needs to be tightened with wrench and do bubble test. Please follow below procedures for small bubble test.– Mix a small amount of dish soap into a large container of water;– Make sure the gas is on;– Using a cloth or sponge, wipe down the suspected area;– If you see bubbles forming, that means you have a leak. Please disconnected the gas and check the condition of the connection. INSTALLATION AND SERVICES MUST BE PERFORMED BY A QUALIFIED INSTALLER.

Step 5
Safety and Performance Check after NG Conversion:
- All the distance between electrode needle and burner orifice should be around 3 – 5 mm (0.11 – 0.19 inch)
- Check all gas connections with Bubble test (detailed procedures please follow Step 4 – 4)
- Check the regulator gas pressure (4- inch water column for NG)
- Check the burner BTU for each burner (BTU is not changing after NG Conversion)
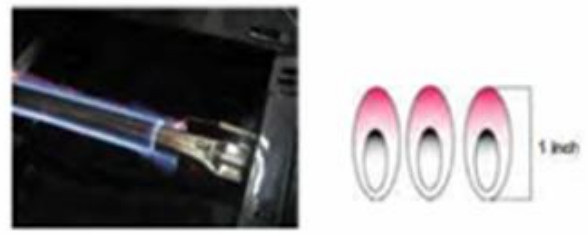
- Check the flame condition (See below picture)– Visually check the burner flames. They should be blue or slightly yellow.– Check and clean all burners/ venturi tubes for insects and insect nests. A clogged tube can lead to fire hazard under the outdoor cooking grill.
[xyz-ips snippet=”download-snippet”]