![]() Owner’s GuidePlease read carefully prior to first use
Owner’s GuidePlease read carefully prior to first use
Thank you for purchasing your Thorn bicycle.Here at Thorn Cycles, we want you to be delighted with your purchase and have made every effort to try to ensure just that!This owner’s manual outlines the simple maintenance that you will need to carry out on your Thorn bicycle to allow you to gain the best and longest service from your bike. Given the appropriate care and maintenance, it requires we are convinced your bicycle should last many years. Don’t forget ourspecialist sales team and our mechanics are always ready to help you and we can service your bike for you should you wish.Contained in the manual are the details of our lifetime warranty on the frame and forks for you the original owner which we are proud to have offered and upheld for over 25 years.The manual also shows you how to approach riding your new Thorn bicycle in the safest manner.Every effort is made to ensure your bicycle has reached you in perfect mechanical order, however, it is very important that you read this manual thoroughly. Ensure you follow the reassembly instructions and the basic safety checks as detailed in the manual before you ride your new bicycle.We aim to provide you with reliable, efficient service at all times. Not only do we boast one of the best warranties on the market, but we also strive to provide outstanding after-sales service. All of our staff are here to look after you and to provide you with the customer service you require.If you have any questions about your new bicycle, or if you need advice concerning cycling-related issues, please do not hesitate to contact us (details on the back cover) and we will do our utmost to help you.Enjoy your bicycle and happy riding!Best wishes,Robin Thorn
Preparing your bicycle before your first ride
Although a lot of time has been spent preparing your bicycle to a very high standard, if it has been delivered in a box there are certain adjustments that will need to be carried out before it is possible to ride the bike.This section will cover these important points stage by stage.If you are unsure about any of these tasks, please do not hesitate to contact us.When your new Thorn bicycle bike left our workshop, it will have been inspected thoroughly to ensure it meets our exacting standards but it may have traveled many miles in its cardboard box and, although it shouldn’t have been, it may have been roughly handled. Please check the box for signs of damage in transit and contact us immediately if you have any concerns.
- Remove all packaging from your bicycle. Do not to use any sharp instruments too close to the paintwork or the tyres! Retain the packaging in case your cycle needs to be returned. Please dispose of responsibly when no longer required.
- Visually inspect the bicycle to ensure there has been no damage in transit. Again, contact us if you have any concerns.
- Locate your pedals (either in the packaging – or your own pedals if none have been supplied with your bicycle) and identify which pedal is which (left/right). Apply some grease (preferably copper slip) sparingly to the threads.
- Put the right pedal into the drive side crank arm and screw the pedal in a clockwise direction and tighten firmly.
- Put the left pedal into the non-drive side crank arm and screw the pedal in an anti-clockwise direction. It is important not to under tighten the pedals, as permanent damage to the threads can occur.
- Loosen the bolts holding the handlebar stem to the forks. This has two bolts on the back of the stem which clamp around the steerer tube. Loosen these bolts with a 5mm Allen key. There is no need to loosen the top cap Allen bolt and unless your handlebars have been removed or your stem has been lowered (see 1 – 7 below), it’s best not to.
- Turn the handlebar stem until it is in line with the front wheel.
- Re-tighten the bolts you loosened in step 6.
- See page 5 if your bars or fork have been detached from your bike for the correct way to assemble the spacers and stem.
- There is a chance that the headset may now have some play in it. You can check this by applying the front brake and rocking the bicycle back and forwards. If there is ANY movement, you should loosen the stem bolts and anything else clamped around the steerer tube.
Then, GENTLY tighten the top cap Allen bolt so the spacers and stem cap are pulled together until the correct tension is achieved (this is when you can still turn the spacers around the steerer but there. Then re-tighten the stem bolts and accessories to the correct torque.Some of our bikes when packed require their stems to be placed on the steerer tube lower than the actual position needed to achieve the correct setup for riding. This is so that we may fit the bike into the box. Bikes boxed in this way require another few steps of reassembly:
- Loosen off the top cap Allen bolt.
- Release the 2 bolts on the stem.
- Remove the spacers and stem from the steerer tube.
- Refit the spacers (largest first and gradually getting smaller) and refit the stem.
- Tighten up the top cap Allen bolt until there is no play in the headset bearings.
- Straighten the stem to be in line with the front wheel and then tighten up the stem bolts to the correct torque setting.
- Double-check there is no play in the system and carry on with the rest of the checks as per the rest of the instructions.
If you have any doubts about assembling your bicycle correctly, please refer the task to a qualified bicycle mechanic as incorrectly assembled bicycles can be lethal.
Correct reassembly of the handlebars
IMPORTANT YOU MUST READ THIS NOTICE BEFORE YOU ASSEMBLE YOUR NEW THORN BICYCLE
![]()
The correct way to reassemble the spacers and stem is shown on the right with the spacers between the stem and the head tube.The picture on the left shows how NOT to assemble the bicycle, this is very dangerous and may cause serious injury or death!
Mechanical safety checks
Routinely check the condition of your bike before every ride.
- Visually inspect the bicycle to ensure no components have been damaged.
- Check stem & handlebar bolts are tightened securely to the appropriate torque settings.
- Check that the QR skewers are fitted correctly and tightly closed.
- In the case of rim brakes. Check that the pads are tight. When the brakes are applied, check that the pads do not touch the tires.
- Check that the cables do not pull through and check that maximum braking force can be applied before the levers hit the bars.
- In the case of disc brakes, ensure that the brakes work before riding the bike. If they are hydraulic – check for hydraulic leaks. If they are cable-operated discs, check that the cables can’t pull through.
- With all-disc brakes, be aware that it takes several long, hard applications before maximum braking efficiency is achievable.
- Before embarking on a longer ride. Ride ‘round the block’ and apply the brakes at low speed, before trying them at higher speed.
- In the case of derailleur gears, check that the rear derailleur hanger has not been bent and try shifting into the big sprocket, to confirm that the mech does not get caught by the spokes.
- Ensure you run through all the gears of the bike before setting off on a ride.
- Check the tightness of mudguard stays and carriers.
- Check the function of your lights.
- Check that the tire pressures are appropriate – not necessarily max pressure (see page 7).
WARNING!IF ALL IS NOT TOTALLY CLEAR YOU MUST CONTACT US BEFORE YOU ATTEMPT TO RIDE THE BIKE.
Tyre pressures
Bicycles must NEVER be ridden with their tyres inflated higher than the maximum pressures stated in the tables below – regardless of the maximum pressures stated on the tyres. This is because when riding a bike with overinflated tires, the forces placed on the sidewalls of rims are enormous and can cause the rims to fail catastrophically or be permanently damaged, which may cause injury or even death! NB: Even the stated maximum pressures in the tables below will be too high for lightweight rims E.g. Ryde Grizzly or Ryde Zac 19 rims. For your own safety, we implore you to treat the recommended pressures as the maximum pressures for these rims.
It may be necessary, however, to over-inflate the tires in order to get the tires to seat correctly, but once seated, it is essential that the pressure is reduced accordingly before riding. DO NOT ride your bike with overinflated tires.The minimum stated pressures may be used for comfort or for grip on tricky surfaces but when doing so, extra care must be taken to avoid large stones and potholes; this is especially important if heavy loads are being carried.The recommended pressures provide the perfect balance between comfort, efficiency, and reliability – there is nothing to be gained by using higher pressures than these and much to lose.
| 26″ tyre size | SOLO | |||
| RecommendedFRONT | RecommendedREAR | AbsoluteMAX | MIN | |
| 1.35″ | 60 | 65 | 80 | 45 |
| 1.6″ | 48 | 53 | 70 | 35 |
| 1.75″ | 45 | 50 | 65 | 32 |
| 2.0″ | 40 | 45 | 58 | 30 |
| 2.1″ | 38 | 43 | 54 | 28 |
| 2.25″ | 35 | 40 | 50 | 26 |
| 2.35″ | 32 | 37 | 48 | 24 |
| 700c tyre size | SOLO | |||
| RecommendedFRONT | RecommendedREAR | AbsoluteMAX | MIN | |
| 23c | 108 | 118 | 130 | 85 |
| 25c | 100 | 110 | 120 | 75 |
| 28c | 88 | 95 | 105 | 65 |
| 32c | 70 | 75 | 90 | 55 |
| 35c | 60 | 65 | 80 | 45 |
| 38c | 53 | 58 | 75 | 40 |
| 40c | 48 | 53 | 70 | 35 |
SIS derailleur gear adjustment
To help ensure that your derailleur gears work efficiently and to prolong their life, they must be kept clean and free from excess dirt and should be properly lubricated.The next few pages and diagrams show the basics of how to adjust derailleur gears. If you have any problems you should contact us before riding.Rear derailleur
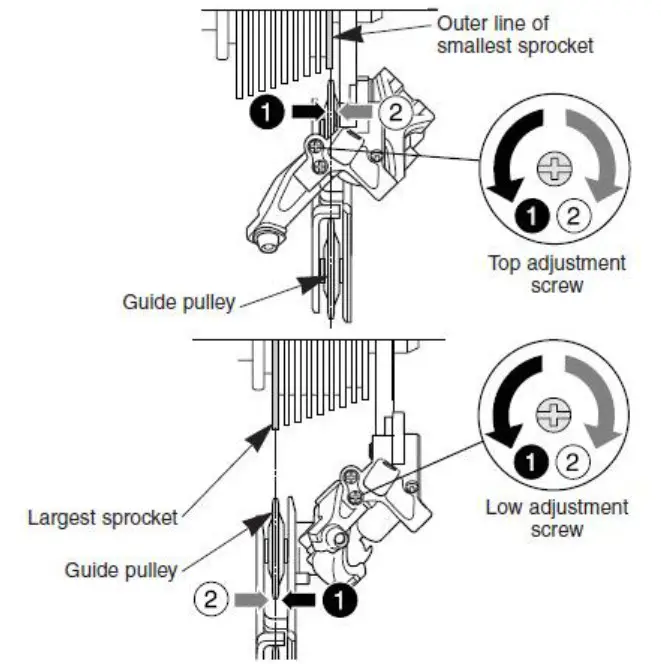
High and Low adjustment (the rear wheel must be free to rotate)The idea is to find the position where the shift will always occur, but there is no possibility of accidentally over-shifting the rear derailleur into the spokes.This will not only be expensive but will cause the rear wheel to lock up…with potentially serious consequences.We recommend that you confirm the gear operation whilst cycling at low speed on a quiet road. Turn the low adjustment screw so that the top jockey wheel moves to a position directly below the largest sprocket. Turn the top gear adjustment screw on the gear mechanism so that, looking from the rear, the top jockey wheel is below the outer line of the small sprocket.Check that the chain cannot accidentally over-shift the small sprocket.
Trim adjustment
- If the chain will not move to the 2nd gear, turn the right-hand down tube cable adjusting barrel to increase the tension (counterclockwise).If the chain moves past the 2nd gear, decrease the tension (clockwise).
- Next, with the chain on the 2nd sprocket, increase the inner cable tension while turning the chain wheel forward. Stop turning the cable adjusting barrel just before the chain makes noise against the 3rd sprocket. This completes the adjustment.
Be sure to lubricate each part of the derailleur.Front derailleur
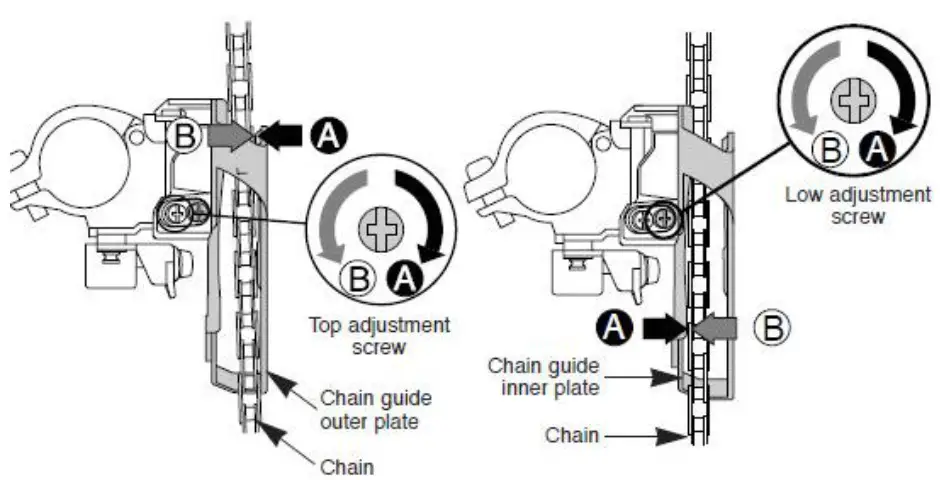 The adjustment of the sideways movement of the front changer is done by means of two gear stop screws situated on the body of the changer mechanism. The top screw limits the inner travel of the changer cage, the low limits the outward movement Use the following procedure for adjustment: (the rear wheel must be free to rotate)
- While turning the pedals forward select the middle (on a triple chainset) or the top chain ring then select the smallest rear sprocket.
- While turning the pedals adjust the top screw on the front changer so that the chain will just drop into the lower ring with the gear lever fully forward.
- Select the largest rear sprocket. If there is any evidence of chain rub adjust the top screw until this just ceases.
- With the chain still on the largest rear sprocket select the ring below the largest at the front. Adjust the low screw so that the chain just selects the outer chainring when the gear lever is moved through its full arc range.
- Select the smallest rear sprocket, if there is any evidence of chain rub then adjust the low screw until this just ceases.
- If problems continue to arise please contact us for advice.
Cable tension adjustment
In time if your gears do not operate smoothly, it may be that your gear cables have stretched out a bit and need adjustment.You can adjust the tension for the front and rear gear cables by using the in-line barrel adjusters situated on the gear pods (Rapid-fires) or on the down tube (road STI’s).Further detailed instructions on gear and derailleur adjustments can be found in the supplied manufacturer’s component instruction manuals.
Derailleur gear changing
The rider’s left gear lever controls the front derailleur.The right gear lever controls the rear derailleur.The large rear sprockets generate low gears for hill climbing. The small rear sprockets enable high gear ratios for speed and downhill riding.The small front chainring produces low gear ratios while the larger front chainrings produce higher gear ratios.To operate your derailleur gear system efficiently thus reducing damage, wear, and keeping noise to a minimum, avoid using the maximum crossover gear ratios of large chainring/large rear sprocket and small chainring/small rear sprocket.NB: For positive gear selection, observe these four precautions:
- Change only when pedals and wheels are moving in a forward motion.
- Reduce pedal pressure while changing gears.
- Never backpedal when changing gear.
- Never force the gear levers.
Gear selection should be made in anticipation of need since forwarding motion of the bicycle is required.It is advisable to change to a low gear before stopping in order to be in the proper gear when you startup.On hills, change gear early while still maintaining forward speed.
STI rapid-fire levers
STI Rapid-fire lever uses two levers mounted conveniently under the bar and are operated by the thumb and index finger.Using the thumb lever you can shift one gear at a time, or shift through the entire cassette with a full stroke push.Using the finger lever you can shift to a lower gear one cassette sprocket at a time.You can shift the triple front chainrings with the same precise STI action, 1 or 2 chainrings at a time, using the levers on the left-hand shifter pod.
STI road levers
Road STI’s use two levers mounted one behind the other on the drop bar levers where they can be easily operated by the fingers.Using a leading silver finger lever you can shift one gear at a time, or shift through the entire cassette with a full stroke push.Using the back black finger lever you can shift to a lower gear one cassette sprocket at a time.You can shift the triple front chainrings with the same precise STI action, 1 or 2 chainrings at a time, using the levers on the left-hand shifter pod.
Transmission chain tension on Rohloff equipped Thorn cycles
There is always a “tight spot” on all chain drive systems; when setting chain tension there must always be some slack in the chain at this “tight spot”. A slack chain will do no damage whatsoever, if it is allowed to become very slack the only danger is that it may fall off. By contrast, a chain that is too tight wears prematurely, causes premature wear to the bottom bracket assembly (possibly to the hub too) and causes an unnecessary expenditure of energy in use.
- Do NOT re-adjust the chain tension until T1 – T2 reaches 40mm (T1-T2=40mm). The “crude but simple, reliable and effective” system we use for locking the eccentric depends upon the points of the screws being able to bite into the alloy eccentric… if unnecessary chain adjustments are made, the holes created by the points will be too close together and the eccentric will simply slip back into its previous position.
- The chain should be adjusted before T1 – T2 reaches 60mm (T1-T2=60mm). Failure to do this makes it possible for the chain to become slack enough to fall off the chainring (or sprocket).
- With a new chain (and especially a whole new transmission), it may not take very long for 40mm of slack to become 60mm of slack but please don’t worry… the situation will improve dramatically with the passing of the miles.
![]()
How to readjust the transmission chain tension on Thorn Rohloff cycles (not Mercury models)
The following pages (13 and 14) show how to correctly adjust the position of the eccentric to readjust the transmission chain tension.
![]()
![]()
![]()
Pictures 1 to 4 show the range of incremental adjustments that can be made without damaging the eccentric when the eccentric screws are tightened.NB. The thin section of the eccentric is moving from the 3 O’clock position through the 12 O’clock position and ending towards the 9 O’clock position.
![]()
Picture 5 shows how the eccentric should NOT be positioned when making adjustments. The eccentric screws should NEVER be tightened when the thin part of the eccentric is positioned between 9 O’clock, through 6 O’clock, and back towards 3 O’clock. THIS WOULD CAUSE IRREVERSIBLE DAMAGE TO THE ECCENTRIC WHEN THE ECCENTRIC SCREWS ARE TIGHTENED.If the eccentric reaches this point and the chain still needs tensioning, return to start position (3 O’clock) and remove a chain link to repeat the process over again.
![]()
Connecting chain tension on a Rohloff equipped tandem
The tension of the chain which transfers drive from the front to the rear of your tandem (connecting chain) is adjusted by way of an eccentric insert on the front bottom bracket.
- There is always a “tight spot” on all chain drive systems; when setting chain tension there must always be some slack in the chain at this “tight spot”. A slack chain will do no damage whatsoever, if it is allowed to become very slack the only danger is that it may fall off. By contrast, a chain that is too tight wears prematurely causes premature wear to the bottom bracket assembly and causes an unnecessary expenditure of energy in use.
- Once the bottom bracket screws have been tightened, do not re-adjust the chain tension until T1 – T2 reaches 40mm (T1-T2=40mm). The “crude but simple, reliable and effective” system we use for locking the eccentric depends upon the points of the screws being able to bite into the alloy eccentric… if unnecessary chain adjustments are made, the holes created by the points will be too close together and the eccentric will simply slip back into its previous position.
- The chain should be adjusted before T1 – T2 reaches 60mm (T1-T2=60mm). Failure to do this makes it possible for the chain to become slack enough to fall off the chainring.
- With a new chain (and especially a whole new transmission), it may not take very long for 40mm of slack to become 60mm of slack but please don’t worry…this situation will improve dramatically with the passing of the miles.

To re-adjust the connecting chain tension on tandem cycles
NB. When adjusting the chain tension on a tandem you may have to slacken the connecting chain tension using the front eccentric before you start. You will have to subsequently need to readjust the connecting chain tension in any case. Follow the instructions on pages 13 and 14 for how to correctly position the eccentrics when tensioning the transmission chain.
Thorn lightweight mini eccentric (Mercury models only)
In order to save weight, the new eccentric had to be smaller in diameter.Being smaller means that it can adjust little more than half a link. When no more adjustment can be made with the eccentric, a new chain must be fitted. By choosing one of the ideal chainring and sprocket combinations, the service life of the chain is maximized.
A. has all adjustments remaining.B. has half adjustment remaining.C. has no adjustment remaining.
Note that the eccentric should be rotated in a clockwise direction so as the thin part of eccentric is at the bottom of the shell, this helps prevent ingress of water through the slots.The 4 M5 screwson in the bottom bracket must be removed at least once every year and fresh copper slip should be applied to the threads. If the bike is used in harsh conditions, such as on salted roads or beaches, re-lubrication, with copper slip, must be more frequent.
The 4 x M5 screws need to be tightened and loosened in a particular sequence (please see diagram below).Tightening & loosening Sequence: 1, 3, 4, 2, 1, 3, 4, 2 etc.
Finger tighten each screw and then using an 8mm spanner, tighten each screw by a sixth of a turn (60°) at a time and in the correct order until they are tight (5 Nm is more than sufficient and this removes the chance of shearing the screws).NB. This procedure only applies to the mini-eccentric and the Mercury – NOT to the eccentric we use on all of our other Rohloff-specific models.
Brake type identification
Cantilever brakesIf your bicycle has come equipped with drop handlebars, and it is a model from our range of 26” or 700c wheeled bikes, then you may have cantilever brakes fitted.
V brakes
V Brakes can be on straight or drop handlebar bicycles with specific levers fitted. These are very easy to adjust with a little patience.
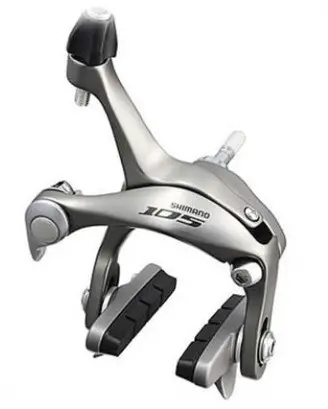
Dual-pivot caliper brakesSome of our bikes are supplied with dual-pivot caliper brakes, these are fitted to most of the 700c wheel models.
 Cable-operated disc brake caliper
Some of our Mercury and Club Tour bikes are supplied with disc brakes.
Brake adjustment
The brakes on your bicycle should have been adjusted correctly by us. However, as cables do stretch, it is important to check the adjustment of your brakes after your first ride. Please refer to the manufacturer’s manual for adjustment instructions for the specific type you have on your bike.
Brake maintenance
To maintain cable brakes in efficient working order, regularly check the brake adjustment and lightly lubricate brake pivots and springs. Oil the exposed parts of the cable to prevent corrosion.Slow or inefficient braking often indicates that the brake cables themselves require lubrication. As this job requires the removal of the complete brake cable, we recommend strongly that this service is done professionally.Note: To ensure smooth braking, wheels must run true and be correctly adjusted, with the rim brake tracks free from dents and kinks. The brake blocks should be in correct alignment with the rim track and toed in at an angle of 0.5mm.Important: Brakes should function freely and release fully. If brakes bind, first check for cleanliness and proper lubrication. Contact us if you are in any doubt regarding wheel and brake adjustment.
Handlebar position
The position of the handlebar should be set to allow a comfortable and easy reach of gear and brake levers. When riding, your weight should be so balanced that your hands rest lightly on the handlebars. This prevents strain on wrists and forearms when pedaling. If you alter the riding position, remember to tighten all nuts and bolts securely. Be extra careful to tighten the bolts which hold the handlebars onto the stem – usually two or four hex bolts at the front of the stem.
Tyre care
To obtain maximum life and full benefit from your tyres, it is essential to maintain suitable tyre pressures, this can change depending on terrain from the recommended pressure indicated on the tyre sidewall.Make sure that your wheels run true and are in correct alignment to avoid chafing the tyre sidewall against the bicycle frame or fork.Tires should regularly be inspected for wear and cuts. Check that the tyre tread pattern is clearly showing all around the outside edge of the tire. Tires should be replaced if damaged. If you are storing your bicycle for a long period of time, it is advisable to store the machine with the tyres off the ground to prevent them from becoming distorted.
Quick release front wheel removal
- To remove the front wheel, first release the front brake.
- Then release the quick release lever on the axle and pull the wheel from the forks.
- To install, fit the wheel into the forks with the quick release lever on the left side.
- Lock and check that the quick release has gripped the fork end. It may be necessary to tighten or loosen the adjuster slightly.
- Make certain to reset the quick-release front brake to ensure proper operation.
- The wheel must clear the frame and fork by at least 2mm.
- The wheel should turn freely and have no side-play.
- Check the quick-release lever is correctly and fully locked in position before each ride.
Quick release rear wheel removal
- Operate the quick-release lever by pulling it away from the wheel and turning it 180° to release the wheel.
- When installing the rear wheel, use the same adjusting and closing procedure as outlined for the quick release front wheel.
- Check the release lever is in the correct and fully locked position before each ride.
- Reset the rear brake quick-release mechanism and check the brake for proper operation.
- Do not over-tighten Rohloff skewers.
Rear-wheel removal with internal gear mech
Removal of the wheel:
- Release the V brake pipe.
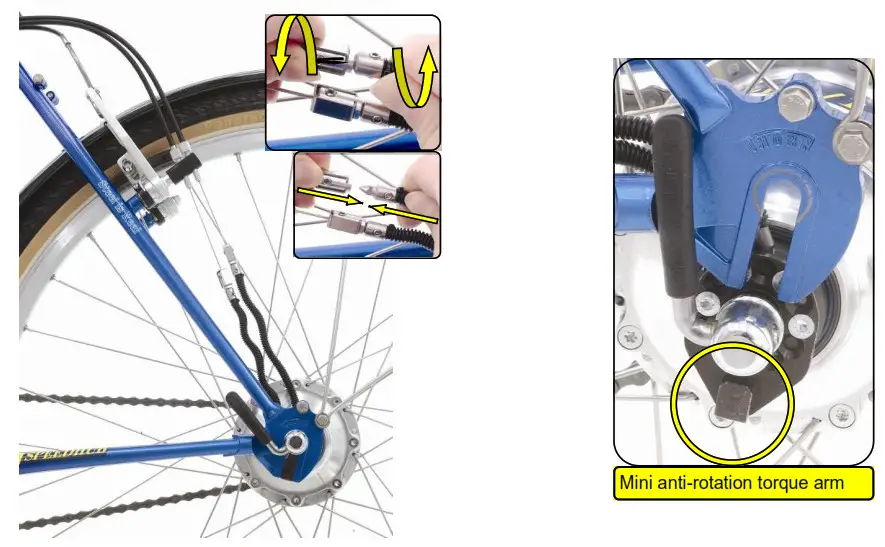
- Quick-release the two Rohloff cables by twisting them through 90 degrees (see picture below left).
- Quick release the skewer.
- Lift out the wheel.
Replacement of the wheel:
- Locate the chain on the sprocket.
- Ensure that the mini anti-rotation torque arm fits into the deep slot on the LH dropout (see picture below right).
- Tighten the quick-release skewer.
- Ensure you reinstall the V brake pipe.
Rear-wheel removal with external gear mech
Removal of the wheel:
- Ensure that the shifter is in gear 14.
- If the bike has V brakes, release the V brake pipe.
- Unscrew the cable box thumbscrew see picture below left).
- Remove the cable box.
- Quick release the skewer.
- Lift out the wheel.
Replacement of the wheel:
- Locate the chain on the sprocket.
- Ensure that the mini anti-rotation torque arm fits into the deep slot on the LH dropout (see picture below right).
- Tighten the quick-release skewer.
- Check that the shifter still reads ‘14’.
- Replace the cable box and tighten the thumbscrew.
- Ensure you reinstall the V brake pipe if you have removed it.
Maintenance of S+S machine couplings
Keep the threads clean and lubricated with Teflon-bearing grease (SJS Cycles Part Number: 1796). No other lubrication is currently approved.Apply enough grease to completely coat the threads then wipe off the excess. Grit and dirt can stick to the grease on the couplings causing damage to the threads, so keep the couplings clean especially when they are open.
Precautions
- When assembling your bike, make sure there is nothing between the coupling teeth that could prevent the teeth from meshing properly.
- Always handle the frame carefully when the couplings are opened with their threads and teeth exposed.
- Do not drop the frame or allow the couplings to impact hard surfaces like concrete.Damaged threads or teeth could prevent the coupling from functioning properly. This could result in an unsafe condition. Do not attempt to ride a bike with a damaged coupling.
- When you screw the coupling together or take them apart, be sure to align the frame in a manner that allows the nut to turn easily by hand. Turning the nut with the wrench should only be necessary for about the last 1/4 turn when tightening and the first 1/4 turn when loosening. The careful alignment will minimize thread wear.
- Tighten the nut with the spanner wrench to at least 35-foot pounds of torque. That requires at least 70 pounds of force against the end of a 6″ wrench. Tighten the nut as tight as you can get it (we don’t think it’s possible to over tighten the nut with a 6″ wrench). Remember, the 35 foot- pounds of torque is a minimum value. Be sure to apply the force at 90 degrees to the wrench.
- Check the tightness of the couplings daily or more often with hard use. Once you perfect the amount of torque that is required to keep the couplings tight over a long period of time, you may be tempted to check them less frequently, however, it is a good idea to take a few seconds to check them daily. Just like with other critical parts of a bike such as tires, skewers, brakes, spokes etc., it is better to check them to ensure your safety.
- Be sure to re-attach all cables and fittings, ensuring correct brake and gear function.
- When assembling a bike, tighten the couplings twice to make sure you have done it right.
- The most important time to recheck the couplings for tightness is after a bike has been put back together then ridden once.
- Inspect the couplings frequently for wear or damage.
When you pack your bike, protect the coupling threads and teeth from damage. If frame tube covers are used, they should be long enough to completely cover the couplings. Covers will also help to keep the internal portion of the coupling clean. An old tennis ball with an x cut-through on one side can be slipped over the coupling to provide additional protection. Damaged threads or teeth could prevent the coupling from functioning properly. This could result in an unsafe condition.
Do not attempt to ride a bike with a damaged coupling.Failure to follow this guide could result in a serious accident or injury.
Best practice for Rohloff oil changes
N.B. Rohloff has endorsed this procedure.
- Rinse the hub with 25ml of Rohloff cleaning oil and drain it thoroughly.
- Add only 8ml of Rohloff speed hub oil.
There will be 15ml of oil remaining in the hub.8ml of it will slowly leak out as an oil mist – normal and nothing to worry about!As a result, there will be very little excess oil in the hub so when the next oil change is performed it will not be as messy.Rohloff has confirmed that adding only 8ml of oil after draining the cleaning oil will cause no damage to the hub. The only downside is that the hub will run slightly more noisily than it would with the original recommendation of 25ml of oil which merely serves to dampen the sound.For a more in-depth explanation refer to the “Living with Rohloff” brochure.
Thorn expedition rack
If your bike is fitted with a Thorn expedition rack it will either have a rear bar or a plate mount fitted to it depending on whether you have ordered a rear light or not.Whichever one is not used will be supplied with the bike.The plate mount is pre-drilled to fit a wide selection of on-the-market rear lights.
Safer cycling – the basics
NOTE: Like any activity, cycling involves the risk of injury and damage. By choosing to ride a bicycle, you must take responsibility for that risk and so you must practice safe and responsible riding. The following are some points that, if practiced, may reduce that risk. The following list is by no means exhaustive. There may be omissions and strict adherence to these points in no way guarantees survival.
- Always carry out a mechanical safety check before you get on a bike.
- Always wear an approved helmet when riding your bike and follow the manufacturer’s instructions for fit, use, and care.
- Always ride with at least one hand in contact with the handlebar.
- Be careful to keep body parts and other objects away from the sharp teeth of chainrings, the moving chain, the turning pedals and cranks, and the spinning wheels of your bicycle.
- Always wear shoes that will stay on your feet and will grip the pedals.
- Be thoroughly familiar with the controls of your bicycle.
- Wear bright, visible clothing that is not so loose that it can catch on moving parts of the bicycle or obscure lighting or reflectors.
- When carrying luggage, ensure your bike is correctly loaded.
- Don’t jump with your bike.
- Think about your speed, and keep your speed at a level that is consistent with conditions. Always keep in mind that there is a direct relationship between speed and control, and between speed and component stress.
Some “rules” of the road
- You are sharing the road or the path with others – other cyclists, motorists, pedestrians, and often horse riders. Respect their rights, and be tolerant if they infringe on yours. Remember, horses can be extremely unpredictable.
- Be assertive when necessary but always be prepared to ride defensively when required…if you don’t know how to be safely assertive, always ride defensively. Assume that the people with whom you are sharing the road are so absorbed with what they are doing and where they are going that they are oblivious to you.
- Look ahead of where you’re going, and be ready to avoid any hazards and distractions, for example:• Vehicles slowing or turning in front of you.• Vehicles entering the road or your lane ahead of you or coming up behind you.• Parked car doors opening in front of you.• Pedestrians stepping out in front of you.• Horse riders using or entering the road or your lane ahead of you.• Children playing near the road.• Potholes, sewer grating, expansion joints, debris, and other obstructions that could cause you to swerve into traffic, catch your wheel or otherwise cause you to have an accident.
- Where they exist, seriously consider riding in designated bike lanes, or on designated bike paths. Where they don’t exist, always ride on the correct side of the road, in the same direction as car traffic.
- Stop at stop signs and traffic lights, slow down and look both ways at junctions. Remember that a bicycle always loses in a collision with a motor vehicle.
- Use hand signals. Learn the local vehicle code for the correct signals.
- Riding with headphones can be dangerous, they mask traffic sounds, distract you from what is going on around you, and wires can tangle in the bicycle causing you to lose control.
- Never carry a passenger, unless in an approved correctly mounted child carrier or trailer.
- Never carry anything which obstructs your vision or interferes with your complete control of the bicycle.
- Don’t do stunts, wheelies or jumps. They can damage your bike.
- Don’t weave through traffic or make any moves that may surprise people with whom you are sharing the road.
- Never ride your bicycle while under the influence of alcohol.
- Take extra care when riding in bad weather, poor visibility at dawn/dusk, or in the dark.
N.B. It is your responsibility to be familiar with the laws of the areas where you ride and comply with all applicable laws.
Wet weather riding
WARNING: Wet weather impairs traction, braking, and visibility, both for the cyclist and for other vehicles sharing the road. The risk of an accident is dramatically increased in wet conditions.The stopping power of your brakes (as well as the brakes of other vehicles sharing the road) is dramatically reduced and your tyres don’t grip nearly as well. This makes it harder to control speed and easier to lose control.Make sure that you can slow down and stop safely in wet conditions; you may have to ride more slowly and apply your brakes earlier.
Night riding
Riding a bicycle at night is many times more dangerous than riding during the day.
WARNING: Riding at dawn, at dusk, after dark, or at times of poor visibility without a bicycle lighting system that meets local and national laws and without reflectors is illegal.Even if you have excellent night vision, many of the people with whom you’re sharing the road don’t. A cyclist can be very difficult for motorists and pedestrians to see at dawn-dusk, at night or at other times of poor visibility.Make sure that your bicycle is equipped with correctly positioned and securely mounted lights etc.Wear reflective clothing and accessories, such as leg bands, or reflective stripes on your helmet.Make sure your clothing does not obstruct a reflector or light.Be especially careful in areas that have heavy traffic and when on roads with speed limits over 40 mph.Be on the constant lookout for road hazards.These pages are intended for you to keep records of your Thorn bicycle.To keep your bicycle in tip-top condition we recommend that you have your bike regularly serviced by a qualified mechanic. You may wish to record this below. Call 01278441505 to book a service.
| DATE: | SERVICE: |
| DATE: | SERVICE: |
| DATE: | SERVICE: |
| DATE: | SERVICE: |
| DATE: | SERVICE: |
| DATE: | SERVICE: |
| DATE: | SERVICE: |
Looking after your frame
All our frames and forks have thick steel tube walls, along with stainless steel fittings and bosses. They are given extra rust protection by being internally sprayed with cavity wax. Our frames are designed to give a lifetime’s service which is why they come with a “Lifetime Guarantee” for the original purchaser (see the online Mega Brochure for more details), but, this does NOT mean that they should be neglected. All frames need regular servicing and attention and failure to do so will result in damage to the frame.
Servicing your frame
To prevent the seat post from possibly seizing into the seat tube, seat posts and shims should be removed, re-greased, and replaced before and after every winter (or monsoon season!). If your seat post ever does seize, please contact us for the correct advice on how to free it. 01278441505If your bottom bracket or frame is ever submerged (as sometimes happens in floods or riding through deep water), remove the BB and let it, and the frame, dry out.If at all possible, keep your bike indoors. If you do need to store your bike outside, use extra thick chain lube and grease it more regularlyReapply cavity wax inside your frame at regular intervals. Where you live and the conditions you choose to ride in will determine how often you do this.Regularly grease the following threads: BB threads on derailleur equipped frames; eccentric and eccentric threads on Rohloff equipped frames; seat clamp screw threads.Bare metal steerer tubes can be thickly greased if you wish but care must be taken to ensure that the handlebar stem is retightened sufficiently when refitted, otherwise, a serious accident could occur resulting in injury, or even, death. Forks manufactured in later productions are ED coated and do not require a thick application of grease as they are more rust-resistant. You will be able to tell if your forks are ED coated as they are shiny and black.Avoid letting scratches turn rusty by applying lead oxide primer as soon as possible. Scratches must then be touched up with suitable paint or patched when convenient.If a scratch does go rusty, remove the rust with fine wet and dry paper and then apply lead oxide primer. N.B. This will increase the size of the area which needs to be touched in so early detection of scratches is preferable. Damage caused by rust or neglect is absolutely NOT covered by our lifetimewarranty.Prop stands – a warning! Whilst we concede that prop stands are sometimes very useful, there is no doubt that prop stands can cause serious damage to frames. Overtightening the stand, damages the paint and might crush the tube. Under-tightening the stand causes chaffing to the paint, which is difficult to detect because of the stand’s position on the underside of the frame. We do not recommend the fitting of prop stands as they can cause severe damage to the frame. Damage caused by prop stands is absolutely NOT covered in our lifetime warranty.
WARRANTY
In offering this warranty Thorn Cycles Ltd in no way seeks to diminish your statutory rights as a consumer.Frame and forksThe frame and forks have a lifetime warranty against defective manufacture and materials (except the Thorn Voyager and ME’N’U2 which carry 5-year warranties).This warranty applies to complete bike purchases and for the original purchaser only.This warranty does not cover accident, wear and tear, misuse, abuse or improper maintenance.After the first year, the outcome of any lifetime warranty claim is at the sole discretion of Thorn Cycles Ltd.Component partsComponent parts fitted to the frame and forks are warranted against failure or defects for 12 months from the date of delivery.This warranty does not cover accident wear and tear, misuse, abuse or improper maintenance.Registering Your Rohloff hubWhen you receive your bike, please make a note of the serial number of your hub. It can be found on the hub shell. It will also be in the notes of your original invoice.You have 100 days to test ride your new Rohloff-equipped bike. When you are certain you are going to keep the bike, you will need to register your ownership of the hub online at: https://www.rohloff.de/en/service/my-speedhub/registrationThis means the hub’s unique serial number is then registered solely to you. If in the event your bike gets stolen and the hub ever makes its way back to Rohloff in Germany they will only ever return it to you, the original owner.
 report this ad
![]()

Thorn Cycles Ltd, 91-93 St John Street, Bridgwater, Somerset England TA6 5HXEmail: [email protected]Telephone: +44 (0) 1278 441505Company no: 4121096Incorporated in England
References
[xyz-ips snippet=”download-snippet”]