
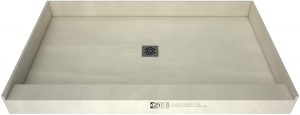
Tile redi Tranch Designer Drain Grate Installation Guide
COMPONENTS:
- Designer Drain Grate (x1)
- Rubber Bumpers (x4)
- Drain Strainer (x1)
- Trench Recess
- Vertical Drain Spacers: 2mm (x2), 4mm (x2), 6mm (x2)

HOW TO TILE THE SHOWERPAN FLOOR EDGES AROUND THE TRENCH RECESS:
- Insert the Designer Drain Grate into the Trench Recess.
- Dry fit the tiles to the shower pan floor.
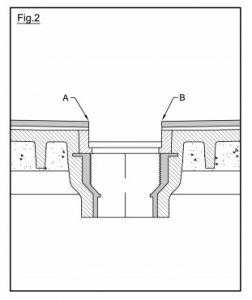
- Note Tiling Tip: Before setting tile on the shower pan floor, you must comply with the following: tile up to the edges of the recessed trench (A and B) so that the shower pan floor is not visible, while at the same time insuring(i) none of the shower pan floor tiles extend beyond the shower pan floor into the space above the recessed trench,(ii) proper drainage is achieved by having none of the tiles encroach into the drainage space between the tiled shower pan floor and the Designer Drain Grate, and(iii) the floor tile will not prevent the removal of the Designer Drain Grate from the Trench Recess.
- Now, remove the Designer Drain Grate from the Trench Recess and tile the shower pan floor.
HOW TO INSERT THE DESIGNER DRAIN GRATE INTO THE TILED SHOWER PAN SO THAT (A) IT IS SPACED CORRECTLY FOR DRAINAGE AND (B) IT IS AT THE SAME LEVEL AS THE ADJACENT TILE:
- Select a combination of Vertical Drain Spacers (2mm, 4mm, and/or 6mm) so that the top surface of the Designer Drain Grate is at the same level as the top of the floor tiles adjacent to the trench.
- Insert the Rubber Bumpers into the Designer Drain Grate side holes by inserting them into the holes until they are locked in place (Fig. 1).
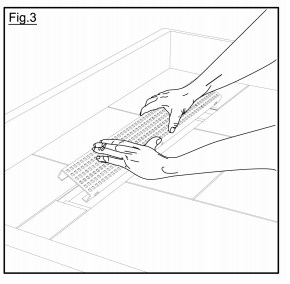
- Slide the Designer Drain Grate into the shower pan Trench Recess, first by compressing the side of the grate with the Rubber Bumpers against the wall of the shower pan Trench Recess (Fig. 3).
- Finally, slide the other side of the Designer Drain Grate into the shower pan Trench Recess.
HOW TO REMOVE THE DESIGNER DRAIN GRATE FROM THE TRENCH RECESS:
1. Insert your fingers or an Allen wrench into the space between the Designer Drain Grate and the Trench Recess wall (i.e., either between E and F or between G and H), carefully lift out one side of the grate and grab it with both hands and then carefully remove the other side by lifting the entire grate with your hands.

tile redi Tranch Designer Drain Grate Installation Guide – tile redi Tranch Designer Drain Grate Installation Guide –
[xyz-ips snippet=”download-snippet”]