TIMEX 04K-096000 LCD Analog Watch User Guide
EXTENDED WARRANTY
from date of purchase for $5. You can pay with AMEX, Discover, Visa or MasterCard by calling 1 800-448-4639 during normal business hours. Payment must be made within 30 days of purchase. Name, address, telephone number, purchase date, and 5-digit model number required. Youcan also mail a check for $5 to: Timex Extended Warranty, P.O. Box 1676, Dept. EF, Little Rock, AR 72203.
Please read instructions carefully to understand how to operate your Timex® watch.
FEATURES AND BASIC OPERATIONS
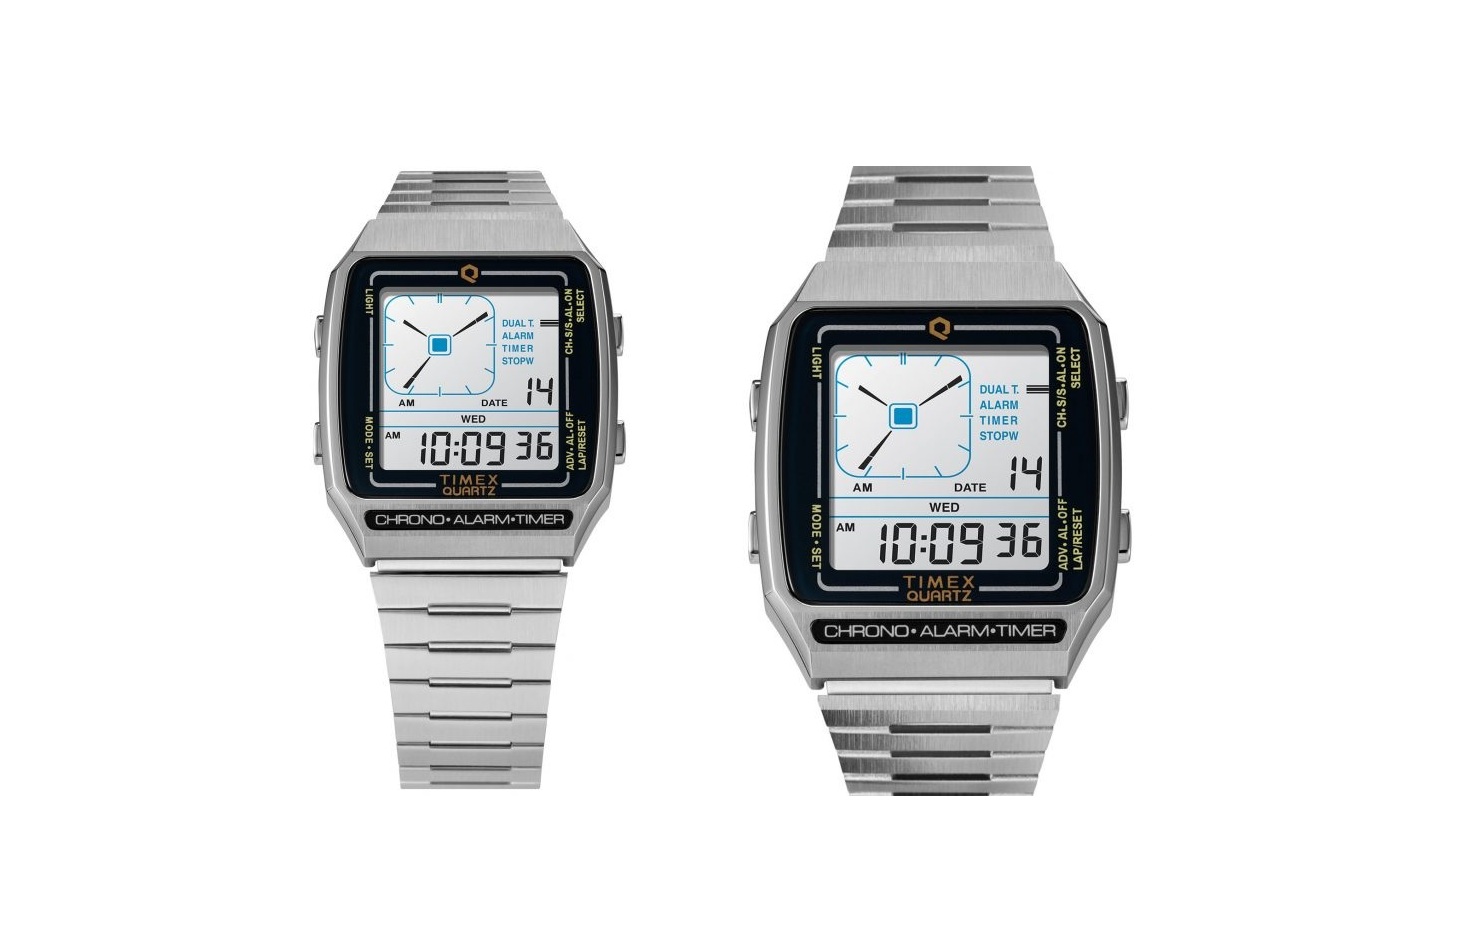
 Button functions shown
- LCD Analog (Hands) and Digital Timekeeping with Hours, Minutes, Seconds – AM/PM/24-Hour Format
- Daily Alarm and Hourly Chime
- 24-Hour Stopwatch with Split time
- 60-Minute Countdown Timer
- Dual Time (2nd Time Zone)
TIME
To set Time and Date
- Press MODE repeatedly until the Time is shown with the Seconds flashing.
- Press LAP/RESET to set Seconds to zero.NOTE: If Seconds are greater than 30, the Minutes will increase by one.
- Press START/STOP to set Minutes, as indicated by its flashing. Press LAP/RESET to advance the Minutes setting. Press and hold to increment quickly.
- Press START/STOP to set Hours, as indicated by its flashing. Press LAP/ RESET to advance the Hours setting to AM or PM. Press and hold to increment quickly.NOTE: There is ONLY an indicator for PM hours.
- Press START/STOP to set the Date (01-31), as indicated by its flashing. Press LAP/RESET to advance the Date setting. Press and hold to increment quickly.
- Press START/STOP to set the Month number (01-12), as indicated by its flashing. Press LAP/RESET to advance the Month setting. Press and hold to increment quickly.
- Press START/STOP to set the Day setting (SUN-SAT), as indicated by its flashing. Press LAP/RESET to advance the Day setting. Press and hold to increment quickly.
- Press MODE to exit Time Set.
- To switch from AM/PM to 24-Hour time format, press and hold START/ STOP for 4 seconds. Press and hold START/STOP for 4 seconds to reverse the format change.NOTE: A “24HR” indicator in the bottom right corner of the display confirms the change. There is ONLY an indicator for PM hours.
DUAL TIME
To set the time for a Second Time Zone – shown on the LCD Analog watch face
- Press MODE until the indicator is next to the “DUAL T” on the display.
- Press START/STOP. The Hour Hand on the watch face can be seen flashing.
- Press LAP/RESET to advance the Hour Hand around the watch face setting to AM or PM. Press and hold to increment quickly.NOTE: There is ONLY an indicator for PM hours.
- Press START/STOP. The Minute Hand on the watch face can be seen flashing.
- Press LAP/RESET to advance the Minute Hand around the watch face.Press and hold to increment quickly.
- Press START/STOP to exit Dual Time Set, and the Second Hand will appear on the watch face.NOTE: In Dual Time mode, the AM/PM indication is tied to the Analog time.
ALARM
To turn on/off the Daily Alarm, or to turn on/off the Hourly Chime
- Press MODE until the indicator is next to the “ALARM” on the display.NOTE: The alarm setting is tied to the primary time zone.
- Press START/STOP and LAP/RESET simultaneously and repeatedly to enable the Alarm (
 ), enable the Chime ( ), disable the Alarm, and disable the Chime.NOTE: You can turn the Alarm on/off without changing the Chime setting by pressing LAP/RESET.
To set a Daily Alarm – shown on the LCD Analog watch face
- Press MODE until the indicator is next to the “ALARM” on the display.NOTE: The alarm setting is tied to the primary time zone
- Press START/STOP. The Hour Hand on the watch face can be seen flashing.
- Press LAP/RESET to advance the Hour Hand around the watch face setting to AM or PM. Press and hold to increment quickly.NOTE: There is ONLY an indicator for PM hours.
- Press START/STOP. The Minute Hand on the watch face can be seen flashing.
- Press LAP/RESET to advance the Minute Hand around the watch face.Press and hold to increment quickly.
- Press START/STOP to exit Alarm Set mode.
- When the alarm sounds, press ANY button to silence the alert, or it will stop after 20 seconds.NOTE: The alarm will sound the next day at the same time unless you go into Alarm Mode and press LAP/RESET to turn it off.
TIMER
To set a countdown for up to 60 minutes – shown on the LCD Analog watch face
- Press MODE until the indicator is next to the “TIMER” on the display. Ifthe Timer shows any previous setting, the indicator will flash.
- Press LAP/RESET repeatedly to increase the number of Minutes for the countdown.NOTE: If you go past the desired number of minutes, you will have tocontinue to press LAP/RESET to wrap around the setting display.To use the countdown timer – shown on the LCD Analog watch face
- Press MODE until the indicator is next to the “TIMER” on the display. If the Timer shows any previous setting, the indicator will flash.NOTE: If no setting is shown, press LAP/RESET to restore the previously set countdown (or refer to the Timer Set instructions)
- Press START/STOP to begin the countdown. The watch face will showSeconds counting down along its outer edge.
- Press START/STOP to pause the timer.
- Press START/STOP to resume the countdown, or press LAP/RESET to reset the timer to its previous setting.
- When the countdown ends, the alert will sound for 5 seconds, or press ANY button to silence it.NOTE: The alert will sound even if you are not in TIMER mode.
STOPWATCH
Use this function for recording elapsed time up to 24 hours.
- Press MODE until the indicator is next to the “STOP” on the display.NOTE: The current time of day is shown on the LCD Analog watch face
- Press START/STOP to start the stopwatch. It will be shown in the lower digital display.
- With the stopwatch running, press LAP/RESET to record and show the Split time. The stopwatch will continue timing in the background.NOTE: A “split” is the elapsed time (from the beginning) to the point it was recorded.
- Press LAP/RESET to release the display and show the current running stopwatch time.
- Press LAP/RESET to record another Split time.
- Press START/STOP to pause the stopwatch.NOTE: If the stopwatch is paused when the display is showing a Split time, the displayed elapsed time is updated.
- Either press START/STOP to resume timing, or press LAP/RESET to reset the stopwatch to zero
DISPLAY LIGHT FEATURE
Press the LIGHT button to activate the display light.
HOW TO ADJUST BRACELET SLIDING CLASP BRACELET
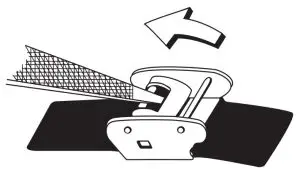
- Open locking plate.
- Move clasp to desired bracelet length.
- Exert pressure while holding locking plate and slide clasp back and forth until it engages in grooves on underside of bracelet.
- Press locking plate down until it snaps closed. Clasp can be damaged if excessive force is used.
WATER AND SHOCK RESISTANCE
This watch is water-resistant a 30-meter rating.
| Water-Resistance Depth | p.s.i.a. * Water Pressure Below Surface |
| 30m/98ft | 60 |
pounds per square inch absolute
WARNING: TO MAINTAIN WATER-RESISTANCE, DO NOT PRESS ANY BUTTONS UNDER WATER
- Watch is water-resistant only as long as lens, push buttons and case remain intact.
- Watch is not a diver watch and should not be used for diving.
- Rinse watch with fresh water after exposure to salt water.
- Shock-resistance will be indicated on watch face or caseback. Watches are designed to pass ISO test for shock-resistance. However, care should be taken to avoid damaging crystal/lens.
BATTERY
Timex strongly recommends that a retailer or jeweler replace battery. If applicable, push reset button when replacing battery. Battery type is indicated on caseback. Battery life estimates are based on certain assumptions regarding usage; battery life may vary depending on actual usage.
DO NOT DISPOSE OF BATTERY IN FIRE. DO NOT RECHARGE. KEEPLOOSE BATTERIES AWAY FROM CHILDREN.
TIMEX INTERNATIONAL WARRANTYhttp://www.timex.com/productWarranty.html
©2020 Timex Group USA, Inc. TIMEX and INDIGLO are registered trademarks of Timex Group B.V. and its subsidiaries.
References
[xyz-ips snippet=”download-snippet”]