
TIMEX Dual Alarm Fm Clock Radio
TIMEX Dual Alarm Fm Clock Radio
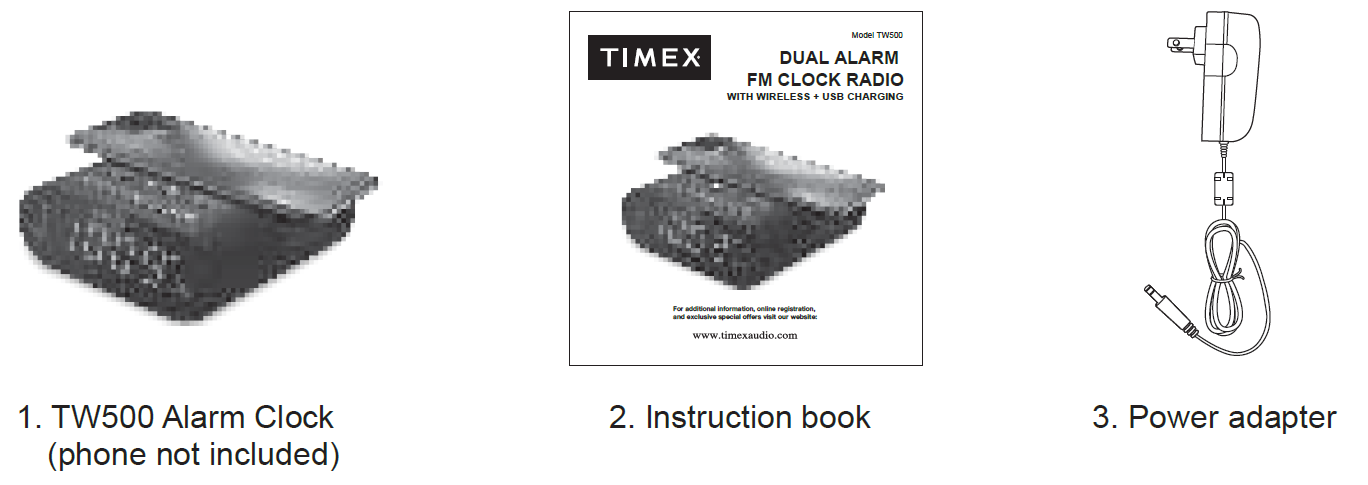
What’s in the Box
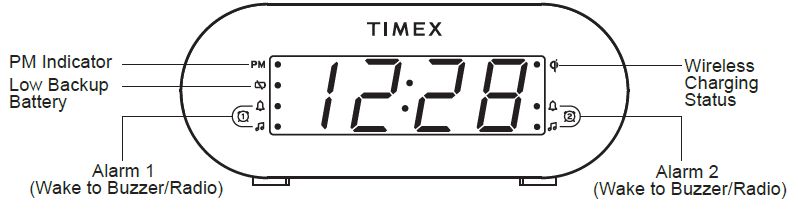
Controls Overview

Display
Backup Battery
Your new Timex Clock includes a built-in battery backup system that will maintain the time and alarm settings during a temporary power interruption. Remove the battery pull tab located on the bottom of the unit. When the Low Backup Battery Icon glows on the display, it is time to the replace the backup battery. 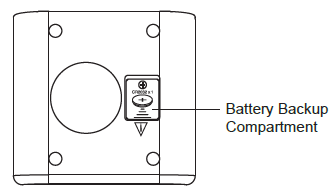
- Keep unit connected to AC power when replacing the battery, or you will lose settings.
- Use a Phillips screwdriver to open the battery backup compartment door located on the bottom of the unit.
- Remove exhausted battery and replace with a fresh CR-2032 battery, making sure the ‘+’ side is facing up.
- Replace the battery compartment door. Do not overtighten the screw.
Product Care
- A protective film is attached to the front of the display. It can be removed by peeling it off.
- Place the unit on a level surface away from sources of direct sunlight or excessive heat.
- Protect your furniture when placing your unit on a natural wood and lacquered finish. A cloth or other protective material should be placed between it and the furniture.
- Stronger cleaning agents, such as Benzene, thinner or similar materials can damage the surface of the unit.
Set Up
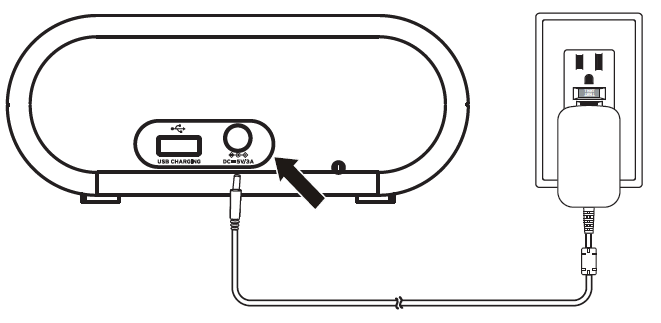
Connecting to Power Source:Connect the included AC adapter to the DC jack located on the back of the unit and connect the other end to a working wall outlet.
Setting the Time
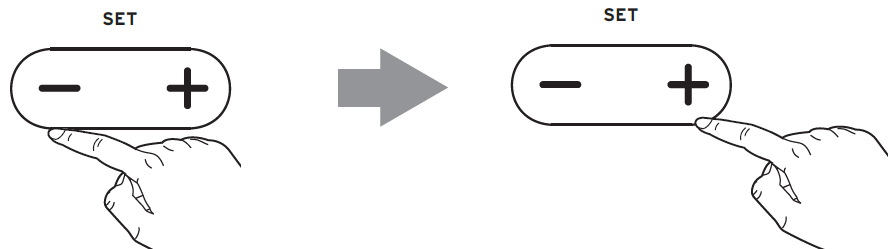
- Press and hold the Time Set Button.
- Press and release the Minus Button (-) repeatedly to adjust the hour.Press and release the Plus Button (+) repeatedly to adjust the minute.NOTE: The PM indicator will light on the display when the hour is set for PM. There is no AM indicator.
- Press the Time Set Button to confirm settings.

 Press and release the Plus Button (+) repeatedly to adjust the minute.NOTE: The PM indicator will light on the display when the hour is set for PM. There is no AM indicator.
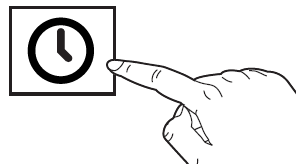
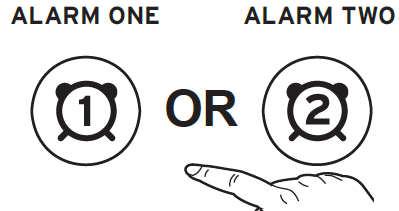
Setting and Using Alarms
- Press and hold Alarm One OR Alarm Two. Each alarm can be set in the same way.
- Press and release the Minus Button (-) as needed to adjust the hour.Press and release the Plus Button (+) as needed to adjust the minute.Press Alarm One or Alarm Two to confirm the alarm time.NOTE: The PM indicator will light on the display when the hour is set for PM. There is no AM indicator.
- Press and release the Minus Button (-) or Plus Button (+) to select your wake to source: buzzer or radio. The or icon will light on the display to confirm your selection.Press Alarm One or Alarm Two to confirm settings.
 Press and release the Plus Button (+) as needed to adjust the minute.Press Alarm One or Alarm Two to confirm the alarm time.NOTE: The PM indicator will light on the display when the hour is set for PM. There is no AM indicator.
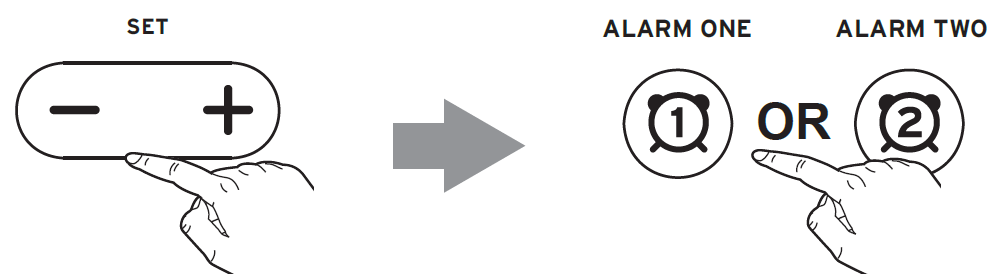
Sleep Mode
- Press the Power/Alarm Reset Button to turn on FM radio.
- Press and release the Minus Button (-) or Plus Button (+) to select a radio station. (Press and hold to quickly scroll through the stations.)
- Press the Sleep Mode Button repeatedly to select a sleep period between 10-90 minutes, or OFF.
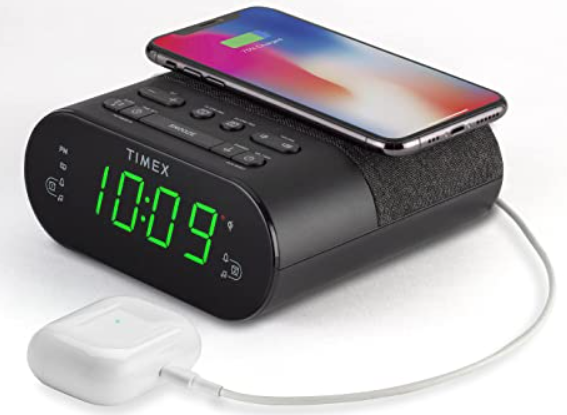
Wireless Charging
Supports
- Qi compatible phones (also works with plastic cases up to 3mm thick)
- AirPods with wireless charging case
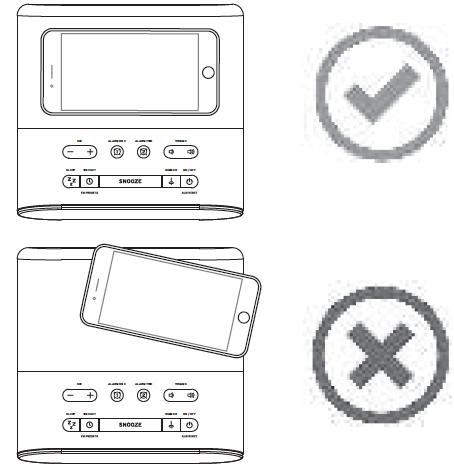
- Place Qi compatible device face up on the wireless charging pad as pictured below:
- Place Qi compatible device face up on the wireless charging pad as pictured below:
CAUTION
Remove metal protective or magnetic case from phone before charging. When charging phone, do not place magnetic-striped or other metal objects on the charger. Doing so could damage the object or this unit. Qi compatible phones with metallic looking finishes will charge normally.
Check the Wireless Charging Status LED Indicator to monitor charging status
- Solid green LED: Device is charging.
- Rapid blinking amber LED: Device is not charging properly. Reposition device.
- Solid amber LED: Device fully charged.
Note: The LED indicator may continue to glow solid green when iOS devices are fully charged. The LED indicator may alternate between solid green and flashing amber while charging AirPods.
Charging Devices via USB Port
You can also charge your devices via the USB port located on the back of the unit.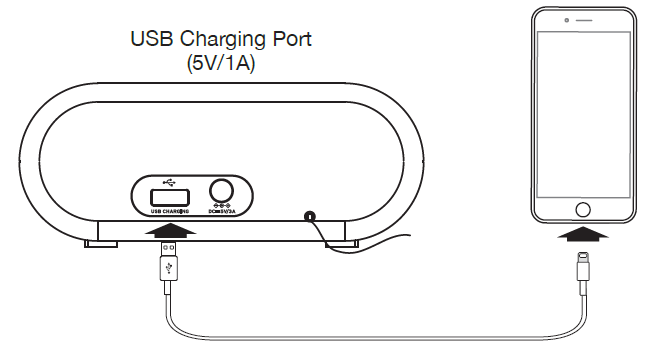
To charge devices:
- Connect the standard size end of a USB cable (not included) to the USB port on the back of the unit.
- Connect the other end to the charging port on your device.(Make sure the unit is plugged into a working outlet in order to charge devices.)
FM Radio and Presets
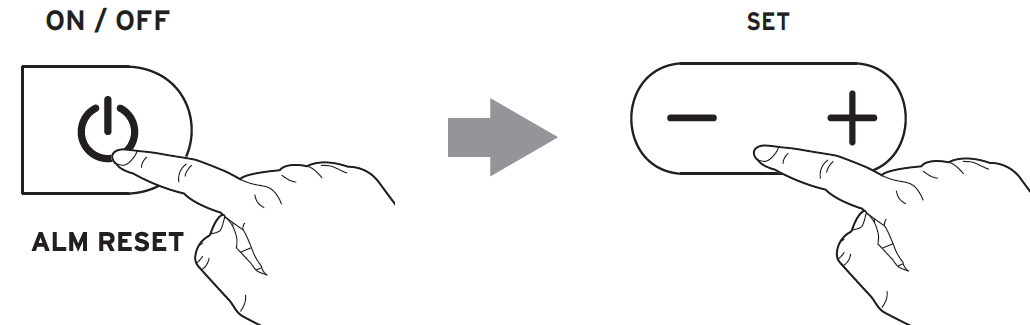
- Press the Power/Alarm Reset Button to turn on FM radio.
- Press and release the Minus Button (-) or Plus Button (+) to select a radio station.(Press and hold to quickly scroll through the stations.)
Make sure the antenna is extended for best reception.
HOW TO PROGRAM FM RADIO PRESETS
You can store up to 10 FM presets by following these steps:
- Press the Power/Alarm Reset Button to turn on FM radio.
- Press and release the Minus Button (-) or Plus Button (+) to select a radio station. (Press and hold to quickly scroll through the stations.)
- Press and hold the Time Set/FM Presets Button. The display will flash.
- Press and release the Minus Button (-) or Plus Button (+) to choose a preset position between P01-P10.
- Press the Time Set/FM Presets Button again to confirm the preset station.
- Repeat steps 2-5 to set up to 10 preset stations.When listening to FM radio, repeatedly press the Time Set/FM Presets Button to access your stored stations.
Troubleshooting
- The unit does not power ON.The unit is not connected to AC outlet, the AC outlet has no power, or is controlled by a wall switch that is “OFF”. Check AC outlet and wall switch.
- Alarm does not come on.The alarm time AM or PM incorrectly set, Alarm was OFF, etc. Check alarm settings.
- Unit shuts “Off” unexpectedly.a. A power surge has occurred, or the AC outlet has been disconnected.b. The AC outlet may be controlled by a wall switch that is turned OFF. Check AC outlet or wall switch.
IMPORTANT SAFETY INSTRUCTIONS
Please heed all warnings, read and follow all instructions and keep these instructions handy for future reference.
- Do not use this product near water, and clean only with dry cloth.
- Do not block any ventilation openings. Install in accordance with the manufacturer’s instructions.
- Heat – This product should be situated away from heat sources such as radiators, heat registers, stoves or other appliances (including amplifiers) that produce heat.
- Only use attachments/accessories specified by the manufacturer.
- Unplug this product during lightning storms or when unused for long periods of time.
- Damage Requiring Service – This product should be serviced by qualified service personnel when:
- Plug has been damaged.
- Objects have fallen into or liquid has been spilled into the enclosure.
- The unit has been exposed to rain. The unit has been dropped or the enclosure damaged.
- The unit exhibits a marked change in performance or does not operate normally.
- No naked flame sources, such as lighted candles, should be placed on this product.
- Attention should be drawn to the environmental aspects of battery disposal.
- This product is suitable for use in tropical and/or moderate climates.
- WARNING: To reduce the risk of fire or electric shock, do not expose this product to rain or moisture.
- Do not dispose of batteries in the household trash or fire.
- The mains plug of power adaptor is used as the disconnect device, it shall remain readily operable.
WARNING:
- Do not ingest the battery, Chemical Burn Hazard. This product contains a coin/button cell battery. If the coin/button cell battery is swallowed, it can cause severe internal burns in just 2 hours and can lead to death.
- Keep new and used batteries away from children. If the battery compartment does not close securely, stop using the product and keep it away from children. If you think batteries might have been swallowed or placed inside any part of the body, seek immediate medical attention.”
- CAUTION – RISK OF EXPLOSION IF BATTERY IS REPLACED BY AN INCORRECT TYPE. DISPOSE OF USED BATTERIES ACCORDING TO THE INSTRUCTIONS.
FCC Information
This equipment complies with FCC RF radiation exposure limits set forth for an uncontrolled environment. This device complies with Part 15 of the FCC Rules, operation is subject to the following two conditions:
- This device may not cause harmful interference.
- this device must accept any interference received, including interference that may cause undesired operation.
Warning: Changes or modifications to this unit not expressly approved by the party responsible for compliance could void the user’s authority to operate the equipment.
NOTE: This equipment has been tested and found to comply with the limits for a Class B digital device, pursuant to Part 15 of the FCC Rules.
These limits are designed to provide reasonable protection against harmful interference in a residential installation. This equipment generates, uses and can radiate radio frequency energy and, if not installed and used in accordance with the instructions, may cause harmful interference to radio communications.
However, there is no guarantee that interference will not occur in a particular installation. If this equipment does cause harmful interference to radio or television reception, which can be determined by turning the equipment off and on, the user is encouraged to try to correct the interference by one or more of the following measures:
- Reorient or relocate the receiving antenna.
- Increase the separation between the equipment and receiver.
- Connect the equipment into an outlet on a circuit different from that to which the receiver is connected.
- Consult the dealer or an experienced radio/TV technician for help.
This equipment should be installed and operated with minimum distance 20cm between the radiator & your body.
IC Statement
This equipment complies with IC RSS-102 radiation exposure limits set forth for an uncontrolled environment. This device contains licence-exempt transmitter(s)/receiver(s) that comply with Innovation, Science and Economic Development Canada’s licence-exempt RSS(s).
Operation is subject to the following two conditions
- This device may not cause interference.
- This device must accept any interference, including interference that may cause undesired operation of the device.
The device comply with ISEDC RF exposure requirement, users can obtain Canadian information on RF exposure and compliance.
This equipment should be installed and operated with a minimum distance of 20 cm between the radiator and your body. Any Changes or modifications not expressly approved by the party responsible for compliance could void the user’s authority to operate the equipment.
Limited 90 Day Warranty Information
Timex Audio Products, a division of SDI Technologies Inc. (hereafter referred to as SDI), warrants this product to be free from defects in workmanship and materials, under normal use and conditions, for a period of ninety (90) days from the date of original purchase.
Should this product fail to function in a satisfactory manner, it is best to first return it to the store where it was originally purchased. Should this fail to resolve the matter and service still be required by reason of any defect or malfunction during the warranty period, SDI will repair or, at its discretion, replace this product without charge. This decision is subject to verification of the defect or malfunction upon delivery of this product to the Factory Service Center authorized by Customer Service.
If service is required, please visit timexaudio.com/support for more information. A copy of the sales receipt is required to validate in-warranty coverage.Disclaimer of Warranty
NOTE: This warranty is valid only if the product is used for the purpose for which it was designed. It does not cover
- products which have been damaged by negligence or willful actions, misuse or accident, or which have been modified or repaired by unauthorized persons;
- cracked or broken cabinets, or units damaged by excessive heat;
- damage to digital media players, CD’s or tape cassettes (if applicable);
- the cost of shipping this product to the Factory Service Center and its return to the owner.
This warranty is valid only in the United States of America and does not extend to owners of the product other than to the original purchaser. In no event will SDI or any of its affiliates, contractors, resellers, their officers, directors,shareholders, members or agents be liable to you or any third party for any consequential or incidental damages, any lost profits, actual, exemplary or punitive damages. (Some states do not allow limitations on implied warranties or exclusion of consequential damages, so these restrictions may not apply to you.) This warranty gives you specific legal rights, and you may also have other rights which vary from state to state. Your acknowledgment and agreement to fully and completely abide by the above mentioned disclaimer of warranty is contractually binding to you upon your transfer of currency (money order, cashier’s check, or credit card) for purchase of your SDI product.
© 2020 SDI Technologies, Inc. All rights reserved
Questions? Visit www.timexaudio.com
TIMEX is a registered trademark of Timex Corporation in the United States and other countries.
DOWNLOAD RESOURCES
- [pdf] User Guide Dual Alarm Fm Clock Radio, TW500
- Read more:
FAQ’S
Press and hold the Clock Set Button until the hour flashes. Then press the Hour Button to set the hour. Repeat this for setting the minutes. Press and release the Clock Set Button when finished.
Press and hold the Alarm Set Button until you hear a beep, then press the Hour Button to set the hour. Repeat this for setting the minutes. Press and release the Alarm Set Button when finished.
When an alarm sounds, press any button except Snooze/Light to stop it. The Snooze/Light Button will activate a snooze function if pressed within five minutes of an alarm sounding. To turn off a snoozed alarm, press any button except Snooze/Light within five minutes of it sounding. To turn off a non-snoozed alarm, press any button except Snooze/Light after five minutes have passed since it sounded.
Press and hold the Alarm Set Button until you hear a beep, then press the Hour Button to set the hour. Repeat this for setting the minutes. Press and release the Alarm Set Button when finished.
If the alarm hasn’t gone off, you’d click the alarm button (alarm 1 or alarm 2) and then click it again quickly. That will turn it off completely, and then you would have to do the same to turn it back on.
Touch the watch screen to bring up your apps. Swipe left, then select Settings. Swipe down and select Factory Reset. Enter Code (last 4 digits of IMEI), then select YES.
An inconsistent/unreliable power source can also be the cause of false alarms. Unlocked or loose doors and windows: Door and window sensors are activated when the connection between the two sensors is disrupted. If a door or window is loose, it can easily be rattled by the wind and trigger an alarm.
As the battery in a smoke alarm gets weak, the smoke alarm will “chirp” about once a minute to let you know that the battery needs to be replaced. Note: Only the device with a low battery will chirp. The other interconnected alarms should be silent.
A radio controlled clock has a radio inside, which receives a signal that comes from a place where an atomic clock is located. In the United States, the signals received by radio controlled clocks originate from NIST Radio Station WWVB, which is located near Fort Collins, Colorado.
Check that the power supply is in full working order. Change the current battery for a fresh one and reset your clock. It can take quite a few minutes for the clock to pick up the MSF radio signal, so be patient. Try rotating the clock.
Radio buttons allow the user to select one option from a set. You should use radio buttons for optional sets that are mutually exclusive if you think that the user needs to see all available options side-by-side. If it’s not necessary to show all options side-by-side, use a spinner instead.
If you own a Pixel device or any smartphone running stock Android 10 and above, you’ll need to: Head to Settings. Locate the Display option. Toggle the switch next to Dark theme.
VIDEO
References
[xyz-ips snippet=”download-snippet”]