![]()
M03K COMMAND URBAN™
03K-096000-02 8.27.20Register your product at https://www.timex.com/product-registration.htmlRegistra tu producto en www.timex.es/es_ES/product-registration.htmlEnregistrez votre produit sur fr.timex.ca/product-registration.html, www.timex.fr/fr_FR/product-registration.htmlRegistre o seu produto no site www.timex.eu/en_GB/product-registration.htmlRegistrare il prodotto all’indirizzo www.timex.it/it_IT/product-registration.htmlRegistrieren Sie Ihr Produkt bei www.timex.de/de_DE/product-registration.htmlRegistreer uw product bij www.timex.eu/en_GB/product-registration.html
01391-INS20 00797_2019
EXTENDED WARRANTY
Available in U.S. only. Extend your warranty for an additional 4 years from the date of purchase for $5… You can pay with AMEX, Discover, Visa, or MasterCard by calling 1 800-448-4639 during normal business hours Payment must be made within 30 days of purchase Name, address, telephone number, purchase date, and 5-digit model number required You can also mail a check for $5 to Timex Extended Warranty, POBox 1676, Dept.EF, Little Rock, AR 72203. Please read the instructions carefully to understand how to operate your Timex ® watch. Your model may not have all of the features described in this booklet.
FUNCTIONSReal-time calendar clock, Three-time zones, 64 World Time (WT) cities / 30 time zones, Chronograph, and lap/split recording, Countdown timer, Daily/weekday/weekend alarm, hourly chime, and INDIGLO®night-light with Night-Mode®feature
BASIC OPERATION
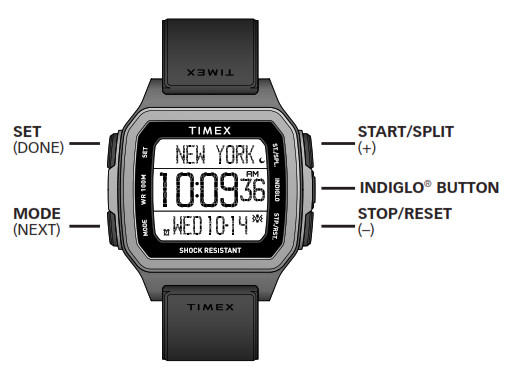
When setting, each button has a different function as indicated above Watch face will indicate when the button changes function
TIME/DATE/MODE DISPLAYS
Three-time zones (T1, T2, T3) for quick view of user-selected world cities. World Time cities are selected by the user for each time zone.TIME/DATE/MODE DISPLAYS Three time zones (T1, T2, T3) for a quick view of user-selected world cities. World Time cities are selected by the user for each time zone.
- In TIME mode, press and hold SET. The Time Zone (1, 2, or 3) will flash, and press + or – to change. Press NEXT to select the displayed time zone.
- Press + to scroll World Time city in ascending alphabetical order, press -to scroll in descending alphabetical order.NOTE: See Step 11 (below) for changing the World Time city order.
- Press NEXT. DST (Daylight Saving Time) setting will flash.
- Press + or – to turn DST ON or OFF. If DST is set to ON, the DST indicator will appear and time will advance by 1 hour.
- Press NEXT. Hour digits flash.
- Press + or – to change hour including AM/PM. (Scroll through 12 hours to get to AM/PM). Hold + or – to change rapidly.
- Press NEXT. Minutes digits flash. Press + or – to change minutes. Hold + or – to change rapidly.
- Press NEXT. Seconds digits flash. Press + or – to set seconds to zero.
- Press NEXT. Month flashes. Press + or – to change the month. Hold + or – to change rapidly.
- Press NEXT. Date flashes Press + or – to change the date. Hold + or – to change rapidly.
- Press NEXT and continue setting pattern for Year, 12-hour or 24-hour Time Display, MM-DD, or DD.MM, Date Format, sort by City Name or UTC Offset, Alert Type (TONE, VIBE or COMBO), Hourly Chime on/off, Button Beep on/off, World Time mode (show or hide), Chrono mode (show or hide), Countdown Timer mode (show or hide), Alarm 1 mode (show or hide), Alarm 2 mode (show or hide), Alarm 3 mode (show or hide).NOTE: If you select BEEP on, a beep will sound every time you push a button (except INDIGLOr.- button).
- Press DONE to confirm and exit or MODE to continue and reset the first time zone or set second and/or third time zones if desired.
DISPLAYING ALTERNATE TIME ZONES
1. When in Time mode, press START/SPLIT once or twice to “preview” one of the other two time zones for 3 seconds (Ti, T2 or T3 flashes).2. To switch that time zone to the displayed one, continue to hold START/ SPLIT for 4 seconds.
WORLD TIMETo view 64 World Time cities / 30 time zones, view and set DST and Sort Order for each of those time zones.
- Press MODE until WORLD appears.
- Press + to scroll each World Time city in an Eastward direction, press – to scroll in a Westward direction.NOTE: If you select “City Name” in Step 4 (below), press + to view each city in ascending alphabetical order or press – to view each city in descending alphabetical order
- Press SET for each displayed time zone, and + or – to tum DST ON or OFF. If DST is set to ON, the DST indicator will appear and time will advance by 1 hour.
- Press NEXT to select Sort Order. Press + or – to select UTC Offset or City Name.
- Press DONE to exit World Time set mode.
CHRONO
- Press MODE until CHRONO appears.
- Press and hold SET.
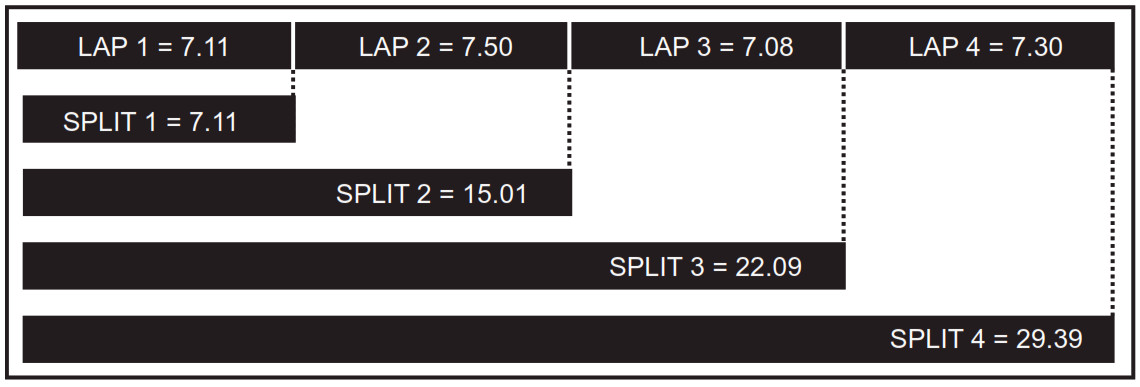
- The Display will read: FORMAT/SET, then LAP/SPL or SPLJLAP. Press + or – to select desired format. See the table above to explain LAP vs. SPLIT timing.
- Press DONE to confirm and exit.
- To USE Chrono mode, press START/SPLIT. The chronograph continues to run even if you exit the mode.
- Press START/SPLIT to take a split. Lap and split times will then be displayed in the format you selected. The lap number will appear in the top line of the display.NOTE: Lap and split times will appear for 10 seconds while the chronograph runs in the background. Press MODE to release the display and see the running chronograph.
- Press STOP/RESET to pause the chronograph.
- Press START/SPLIT to resume timing or press and hold STOP/RESET to reset the chronograph.
COUNTDOWN TIMER
- Press MODE repeatedly until TIMER appears.
- To SET the Timer, press and hold SET. Hour digits flash, and HOURS appears on the bottom line.
- Press + or – to change the hours. Hold + or – to change rapidly.
- Press NEXT. Minutes digits flash and MINUTES appear on the bottom line.
- Press + or – to change the minutes. Hold + or – to change rapidly.
- Press NEXT. Seconds digits flash and SECONDS appear on the bottom line.
- Press + or – to change the seconds. Hold + or – to change rapidly.
- Press NEXT. STOP or REPEAT (AT END) flash. Press + or – to change the action.
- Press DONE to confirm and exit.
- To USE the Timer, press START/SPLIT to begin the countdown.NOTE:a. If REPEAT (AT END) was selected, the REP # will appear on the top lineb. If STOP (AT END) was selected, the
 will flashc. If REPEAT (AT END) was selected, the will flash
 - At the end of the countdown, your watch will alert you. Press any button to stop the alert.NOTE: Your alert is based on the Alert Type selected in Time set mode.a. For TONE, the watch will sound and the INDIGLO® night-light will flash when the timer has reached zero, or when it starts to count down again.b. For VIBE, the watch will vibrate and the INDIGLO® night-light will flash when the timer has reached zero, or when it starts to count down again.c. For COMBO, the watch will vibrate and the INDIGLO® night-light will flash and then the watch will sound and the INDIGLO® night-light will flash when the timer has reached zero, or when it starts to count down again.d. For REPEAT (AT END), settings under 30 seconds will be alerted by a single beep, no matter the selected Alert Type.
- Press STOP/RESET to pause the Timer.
- Press START/SPLIT to resume the Timer or press STOP/RESET to reset countdown time to its last setting.
ALARM
Setting the Alarm is similar to setting Time. Your watch model has three alarms. Follow the below procedure to set each alarm.
- Press MODE repeatedly until ALARM 1, ALARM 2, or ALARM 3 appears, and stop at the alarm you want to set.
- Press SET to set alarm.
- Hour digits flash. Press + or – to change an hour. Hold + or – to change rapidly.
- Press NEXT. Minutes digits flash. Press + or – to change minutes. Hold + or – to change rapidly.
- Press NEXT. If in 12-hour format, AM/PM flashes. Press + or – to change.
- Press NEXT. Press + or – to select DAILY, WEEKDAYS, OR WKENDS frequency.
- Press NEXT to go back to change other settings, or press Done to confirm and exit.
- Press START/SPLIT or STOP/RESET to arm or disarm the alarm. When armed, OFF will be displayed. When armed, and the alarm frequency will appear in the lower line of the display.
- When the alarm time is reached, the INDIGLO® night-light flashes and the selected alert runs for about 10 seconds.
- Press any button to stop the alert.
- A one-time backup alarm will sound after five minutes if no button is pressed during the alert. The flashes indicate the backup alarm is pending.
INDIGLO® NIGHT-LIGHT / NIGHT-MODE® FEATURE
Press INDIGLO® button to activate the nightlight. Electroluminescent technology used in INDIGLO® night-light illuminates the entire watch face at night and in low light conditions. While the night light is on pressing any button keeps it on for three seconds.
Press and hold INDIGLO® button for 4 seconds to activate NIGHT-MODE® feature. Moon icon ![]() will appear. Once activated, any button pushed will cause INDIGLO® night-light to stay on for 3 seconds. NIGHT-MODE® feature will stay activated for 8 hours or until deactivated by pressing and holding INDIGLO® button again for 4 seconds.
will appear. Once activated, any button pushed will cause INDIGLO® night-light to stay on for 3 seconds. NIGHT-MODE® feature will stay activated for 8 hours or until deactivated by pressing and holding INDIGLO® button again for 4 seconds.
WATER AND SHOCK RESISTANCEIf your watch is water-resistant, meter marking or(![]() ) is indicated
) is indicated
| Water-Resistance Depth | p.s.i.a. * Water Pressure Below Surface |
| 30m/98ft | 60 |
| 50m/164ft | 86 |
| 100m/328ft | 160 |
*pounds per square inch absolute
WARNING: TO MAINTAIN WATER RESISTANCE, DO NOT PRESS ANY BUTTONS UNDERWATER.
- Watch is water-resistant only as long as a lens, pushbuttons, and case remain intact.
- Watch is not a diver watch and should not be used for diving.
- Rinse watch with fresh water after exposure to saltwater.
- Shock resistance will be indicated on the watch face or caseback. Watches are. designed to pass ISO test for shock resistance. However, care should be. taken to avoid damaging crystal/lens.
 report this ad
BATTERYTimex strongly recommends that a retailer or jeweler replace the battery If applicable, push the reset button when replacing the battery. Battery type is indicated on the case back. Battery life estimates are based on certain assumptions regarding usage; battery life may vary depending on actual usage.DO NOT DISPOSE OF BATTERY IN FIRE. DO NOT RECHARGE. KEEPLOOSE BATTERIES AWAY FROM CHILDREN.TIMEX INTERNATIONAL WARRANTYhttp://www.timex.com/productWarranty.html©2019 Timex Group USA, Inc.TIMEX, INDIGLO, NIGHT-MODE, and COMMANDURBAN are trademarks of Timex Group BV and its subsidiaries
References
[xyz-ips snippet=”download-snippet”]