TIMEX T1200 Dual Alarm Clock with USB Charging User Manual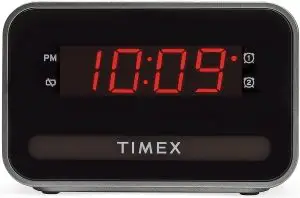
Preparation For Use
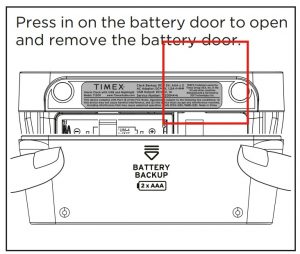
SureAlarm Battery Back-up System
Your new Timex Alarm Clock includes a SureAlarm battery backup system that will maintain the time and alarm settings, and even turn on the alarm during a temporary power interruption. The battery backup system requires two ‘AAA’ batteries (not included). We recommend you use alkaline batteries for longest life and best performance. If you experience a power failure while batteries are installed, the display will not be visible but the clock will continue running and maintain your alarm setting. When power is restored, the display will turn on again and the time will be correct
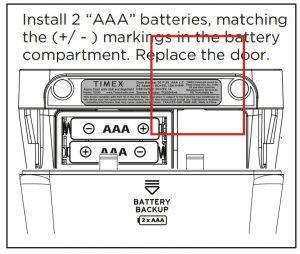
Installing the Batteries
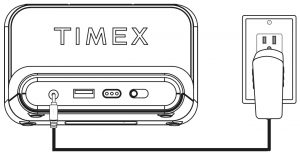
AC Adapter
Connect the included AC adapter to the DC jack located on back of the unit and plug into a working outlet not controlled by an On/O switch.
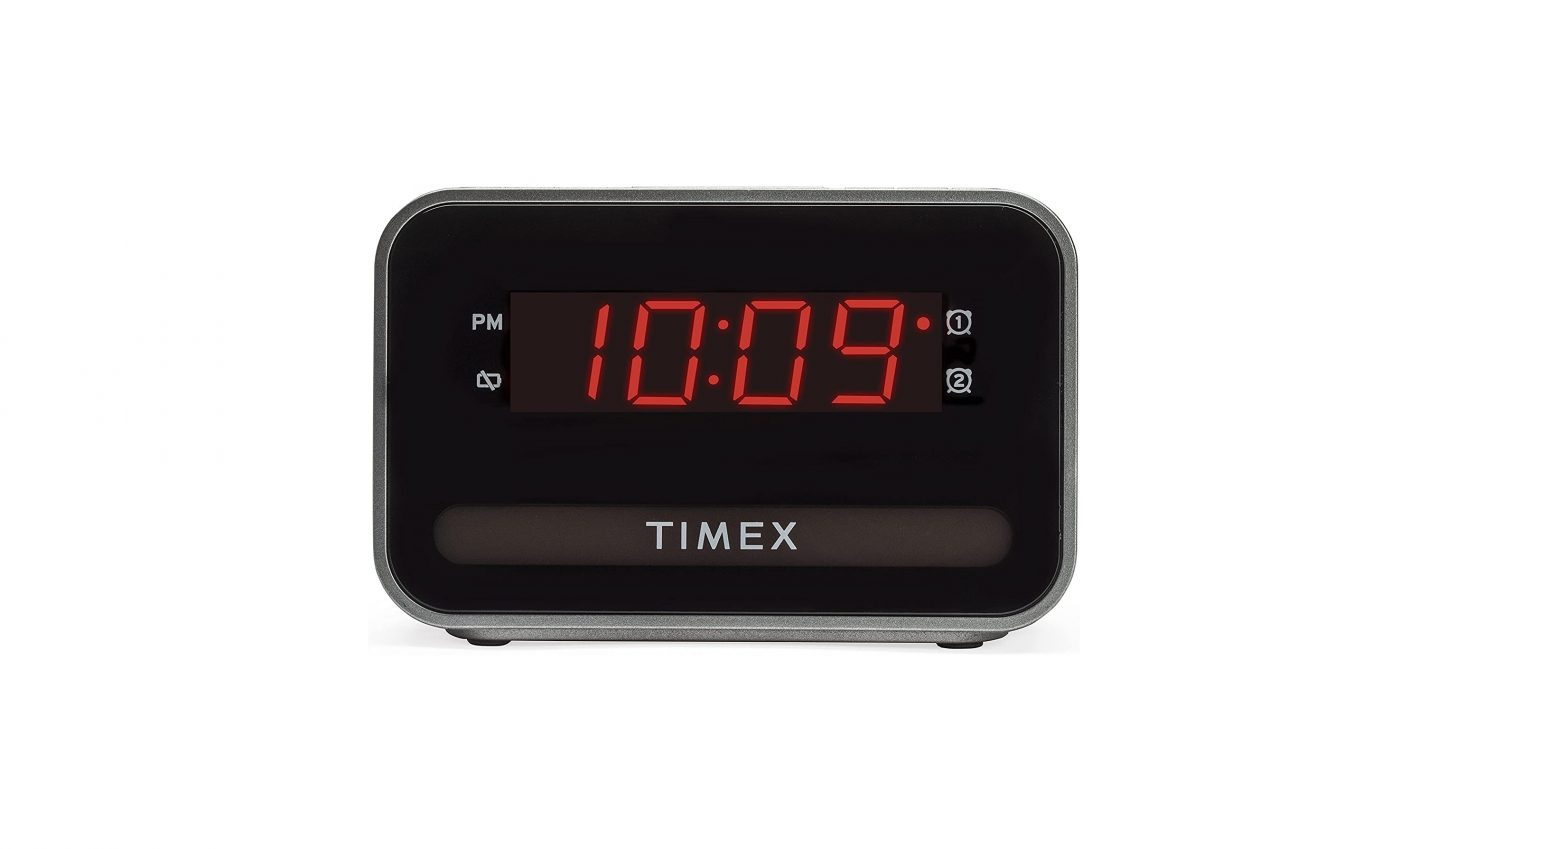
Controls and Indicators
Top Panel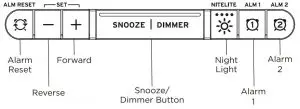
Back Panel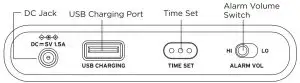
Display
Operating Instructions
Connect AC adapter to DC jack completely and insert the plug into a 120V/60Hz AC outlet. Use an outlet that is always ‘live’. Do not use an outletthat is controlled by a wall switch.When the clock is connected to the AC outlet for the first time the display will turn on and begin flashing “12:00 (PM)”. If the back-up batteries were not installed, the Low Battery indicator will also be flashing.
Setting The Time
- Press and hold the Time Set Button for 2 seconds until display starts to flash and 1 beep sounds. Release the Time Set Button.

- Use + or – to set the hour. Press Time Set to confirm.Use + or – to set the minute. Press Time Set to confirm.Two beeps will confirm setting.


To toggle between 12/24 time displays, press Alarm 1 or Alarm 2 while the unit is in Time Set mode.
Observe the PM indicator on the clock display to confirm that you have set the hour correctly. If the PM indicator is lit, the hour on the display is PM. If the PM indicator does not appear, the hour on the display is AM.
Display Dimmer ControlTo adjust the brightness of the display, press SNOOZE/DIMMER repeatedly to cycle through Hi, Med, Lo, and OFF.
Night LightTo adjust the brightness of the night light, press the ![]() Button repeatedly to cycle through Hi, Med, Lo, and OFF.
Button repeatedly to cycle through Hi, Med, Lo, and OFF.
Setting The Alarms
- Each alarm is set in the same way. Press and hold or until time and the LED indicator for that alarm flashes and 1 beep sounds. Release the button.
- Use + or – to set the hour. Press or to confirm.Use + or – to set the minute. Press or to confirm.
- Two beeps will sound to confirm the alarm is set, and the corresponding alarm icon will appear on the display to indicate the alarm is armed.Note: Observe the PM indicator to confirm that you have set the hour correctly.
- Adjust the alarm volume using the switch on the back of the unit.


To Preview Alarm: Press and release the corresponding Alarm Button (1 or 2) during normal operation (when alarm is not sounding).
When An Alarm SoundsPress the corresponding Alarm Button (1 or 2) or the Alarm Reset Button to shut off the alarm and reset it for the same time the following day.
When alarm is not sounding, press![]() or
or![]() twice to cancel the alarm. No alarm will be set for the next day.
twice to cancel the alarm. No alarm will be set for the next day.
Snooze Alarm
When alarm is sounding, press SNOOZE/DIMMER to delay the alarm for 9 minutes. This can be pressed numerous times up to one hour
USB Charging Function
To charge your mobile device, connect the USB charging cable that was supplied with your device to the USB charging port on the back panel of this alarm clock. The output rating of the USB charging port is 1 Amp
Important Safety Instructions
Please heed all warnings, read and follow all instructions and keep these instructions handy for future reference.
- Do not use this product near water.
- Unplug unit and clean only with damp cloth. Stronger cleaning agents, such as Benzene, thinner or similar materials can damage the surface of the unit.
- Do not block any ventilation openings. Install in accordance with the manufacturer’s instructions.
- Heat – This product should be situated away from heat sources such as radiators, heat registers, stoves or other appliances (including amplifiers) that produce heat.
- Only use attachments/accessories specified by the manufacturer.
- Unplug this product during lightning storms or when unused for long periods of time.
- Damage Requiring Service – This product should be serviced by qualified service personnelwhen:
- Plug has been damaged.
- Objects have fallen into or liquid has been spilled into the enclosure.
- The unit has been exposed to rain. The unit has been dropped or the enclosure damaged.
- The unit exhibits a marked change in performance or does not operate normally.
- No naked flame sources, such as lighted candles, should be placed on this product.
- Attention should be drawn to the environmental aspects of battery disposal.
- This product is suitable for use in tropical and/or moderate climates.
WARNING:
- To reduce the risk of fire or electric shock, do not expose this product to rain or moisture.
- Do not dispose of batteries in the household trash or fire.
- The mains plug of power adaptor is used as the disconnect device, it shall remain readily operable.
Battery Cautions and Tips
- Caution – Risk of explosion if the battery is replaced by an incorrect type.
- Only use the recommended/supplied batteries or equivalent.
- Use alkaline batteries for longer life.
- Do not mix old and new batteries, and do not mix alkaline, carbon-zinc or rechargeable nickel-cadmium batteries.
- Insert batteries with proper polarity (+/–) as indicated.
- Remove exhausted batteries from product.
- Do not attempt to recharge non-rechargeable batteries.
- Do not open batteries or heat them beyond normal ambient temperatures.
- To prevent battery leakage or damage, remove batteries from a product if it will not be used for a month or longer.
- Use extreme caution handling leaking batteries (avoid direct contact with eyes and skin).If battery leakage comes in contact with eyes, IMMEDIATELY flush the eye with lukewarm and gently flowing water for at least 30 minutes. If skin contact occurs, wash skin with clean water for at least 15 minutes. Seek medical attention if any symptoms occur.
- Store in cool, dry, ventilated area away from hazardous or combustible material.
- Follow applicable laws and local regulations for the disposal and transportation of batteries.
Maintenance
- Place the unit on a level surface away from sources of direct sunlight or excessive heat.
- Protect your furniture when placing your unit on a natural wood and lacquered finish. A cloth or other protective material should be placed between it and the furniture.
FCC Information
This equipment complies with FCC RF radiation exposure limits set forth for an uncontrolled environment.This device complies with Part 15 of the FCC Rules, operation is subject to the following two conditions
This device may not cause harmful interference, and (2) this device must accept any interference received, including interference that may cause undesired operation.
- Warning: Changes or modifications to this unit not expressly approved by the party responsible for compliance could void the user’s authority to operate the equipment.
- NOTE: This equipment has been tested and found to comply with the limits for a Class B digital device, pursuant to Part 15 of the FCC Rules.
These limits are designed to provide reasonable protection against harmful interference in a residential installation. This equipment generates, uses and can radiate radio frequency energy and, if not installed and used in accordance with the instructions, may cause harmful interference to radio communications.However, there is no guarantee that interference will not occur in a particular installation. If this equipment does cause harmful interference to radio or television reception, which can be determined by turning the equipment off and on, the user is encouraged to try to correct the interference by one or more of the following measures:
- Reorient or relocate the receiving antenna.
- Increase the separation between the equipment and receiver.
- Connect the equipment into an outlet on a circuit dierent from that to which the receiver is connected.
- Consult the dealer or an experienced radio/TV technician for help.This equipment should be installed and operated with minimum distance 20cm between the radiator & your body
ISED Information
This equipment complies with IC RSS-102 radiation exposure limits set forth for an uncontrolled environment.This device contains licence-exempt transmitter(s)/receiver(s) that comply with Innovation, Science and Economic Development Canada’s licence-exempt RSS(s). Operation is subject to the following two conditions:
- This device may not cause interference.
- This device must accept any interference, including interference that may cause undesired operation of the device.
The device comply with ISED RF exposure requirement, users can obtain Canadian information on RF exposure and compliance.This equipment should be installed and operated with a minimum distance of 20 cm between the radiator and your body.Any Changes or modifications not expressly approved by the party responsible for compliance could void the user’s authority to operate the equipment.
Limited 90 Day Warranty Information
Timex Audio Products, a division of SDI Technologies Inc. (hereafter referred to as SDI), warrants this product to be free from defects in workmanship and materials, under normal use and conditions, for a period of ninety (90) days from the date of l purchase.
Should this product fail to function in a satisfactory manner, it is best to first return it to the store where it was originally purchased. Should this fail to resolve the matter and service still be required by reason of any defect or malfunction during the warranty period, SDI will repair or, at its discretion, replace this product without charge. This decision is subject to verification of the defect or malfunction upon delivery of this product to the Factory Service Center authorized by Customer Service
If service is required, please visit timexaudio.com/support/ for more information. A copy of the sales receipt is required to validate in-warranty coverage.
Disclaimer of Warranty
NOTE: This warranty is valid only if the product is used for the purpose for which it was designed. It does not cover (i) products which have been damaged by negligence or willful actions, misuse or accident, or which have been modified or repaired by unauthorized persons; (ii) cracked or broken cabinets, or units damaged by excessive heat; (iii) damage to digital media players, CD’s or tape cassettes (if applicable); (iv) the cost of shipping this product to the Factory Service Center and its return to the owner.
This warranty is valid only in the United States of America and does not extend to owners of the product other than to the original purchaser. In no event will SDI or any of its aviates, contractors, resellers, their ochers, directors, shareholders, members or agents be liable to you or any third party for any consequential or incidental damages, any lost profits, actual, exemplary or punitive damages. (Some states do not allow limitations on implied warranties or exclusion of consequential damages, so these restrictions may not apply to you.) This warranty gives you specific legal rights, and you may also have other rights which vary from state to state.
Your acknowledgment and agreement to fully and completely abide by the above mentioned disclaimer of warranty is contractually binding to you upon your transfer of currency (money order, cashier’s check, or credit card) for purchase of your SDI product.
© 2021 SDI Technologies, Inc. All rights reserved.Questions? Visit www.timexaudio.com
TIMEX trademark owned by Timex Group USA, Inc.in the US and other countries

References
[xyz-ips snippet=”download-snippet”]