Wheel Bearing Replacement
Guide
Proper wheel bearing removal and installation helps avoid premature damage to bearings and surrounding components. Below are the steps for replacing tapered single-row wheel bearings in passenger cars and light trucks.
1. Wheel End Disassembly
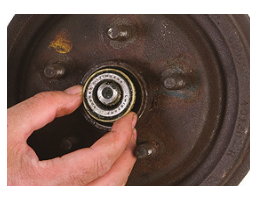
Follow the vehicle manufacturer’s recommended procedure to remove the tire and wheel assembly, disk brake caliper, dust cap, cotter pin, adjusting nut and washers. Pull the rotor/hub assembly toward you to loosen the outer bearing cone assembly. Remove the outer bearing cone assembly. Pull the rotor/hub assembly off the spindle – the inner bearing cone assembly, inner cup, outer cup and seal will come with it. Use a seal puller to remove the seal, then remove the inner bearing cone assembly from the rotor/hub. Discard the seal after removal. Use a cup driver or mild steel bar to remove the inner cup and the outer cup from the hub assembly.
2. Clean and Inspect
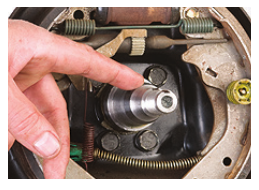
Hubs and Spindles Remove all old lubricant from the rotor/hub assembly and spindle. Clean the rotor/hub assembly and spindle with kerosene or mineral spirits. Inspect the spindle for wear. Use a fine file, wire brush, emery cloth or honing stone to remove any debris, nicks or burrs. Follow the vehicle manufacturer’s recommendation for permissible spindle wear. Apply a light grease coating on the cone seats to ease installation and prevent fretting.
3. Install Cups

Use a cup driver or mild steel bar to drive the new inner cup and outer cup into the hub/ rotor assembly until solidly seated against the hub shoulders. Be careful not to damage the cup surfaces. Never use a bearing cone assembly to drive a cup.
4. Lubricate
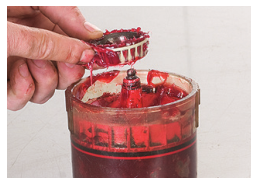
Use a mechanical grease packer to pack the inner bearing cone assembly with grease. Place the bearing cone assembly, small end down, into the grease packer funnel. Plug the bore of the large end of the bearing cone assembly with the conical retainer. Firmly press down on the conicalretainer. This forces the grease between the rollers, cage and cone. Smear excess grease on the outside of the bearing cone assembly. Pack grease between the inner and outer cups in the hub cavity. Also, liberally coat the hub cap inner wall. This layer combats moisture and retains the grease in the inner and outer bearing cone assemblies.
5. Install Grease Seal

Replace the grease seal when it leaks or when bearings are being repacked or replaced. Install the inner bearing cone assembly in the hub, then install the new seal. Make sure the seal lips are pointed in the right direction following the vehicle manufacturer’s specification. Use the proper seal installation tool.
6. Install Rotor/ Hub Assembly
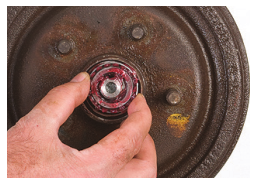
Be careful not to damage the seal against the spindle when sliding the rotor/hub assembly back over the spindle. After following Step 4, pack the outer bearing cone assembly with grease. Install the outer bearing cone assembly, washer and adjusting nut on the spindle.
7. Bearing Adjustment
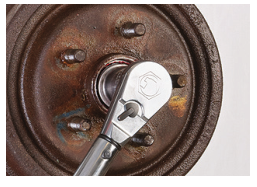
Use a torque wrench to tighten the adjusting nut to 50 ft. lbs. while turning the rotor. Back off the adjusting nut 1 full turn. Re-torque the nut to 10 ft. lbs. while turning the rotor. Next, back off the adjusting nut ¼ turn. Lock the nut with a new cotter pin.
8. Check Bearing Adjustment
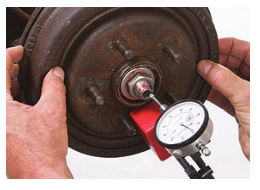
Use a dial indicator to measure endplay. Mount the indicator base as close to the center of the hub/ rotor as possible. With the indicator tip against the end of the spindle, set the indicator at zero. Grasp the rotor at three o’clock and nine o’clock. Push the rotor in while oscillating and read the dial indicator. Pull the rotor out while oscillating and read the dial indicator again. The bearing end- play is equal to the total indicator movement, which should be between 0.001 in. and 0.005 in. If not, repeat steps 7 and 8. Reinstall all components as the vehicle manufacturer recommends.
Skill Level: Intermediate | Special Tools: Cup Driver, Mild Steel Bar, Mechanical Grease Packer, Dial Indicator
Visit timken.com/techseries to enroll in free technical training and Get more TechTips online at www.timken.com/techtips
![]() WARNINGFailure to observe the following warnings could create a risk of death or serious injury.Never spin a bearing with compressed air. The components may be forcefully expelled.Proper maintenance and handling practices are critical. Always follow installation instructions and maintain proper lubrication.A bearing/component should not be put into service if its shelf life has been exceeded.
WARNINGFailure to observe the following warnings could create a risk of death or serious injury.Never spin a bearing with compressed air. The components may be forcefully expelled.Proper maintenance and handling practices are critical. Always follow installation instructions and maintain proper lubrication.A bearing/component should not be put into service if its shelf life has been exceeded.
CAUTIONFailure to follow these cautions may result in property damage.Use of improper bearing fits may cause damage to equipment.Do not use damaged bearings.
TechTips is not intended to substitute for the specific recommendations of your equipment suppliers.Every reasonable effort has been made to ensure the accuracy of the information contained in this writing, but no liability is accepted for errors, omissions or for any other reason.

The Timken team applies their know-how to improve the reliability and performance of machinery in diverse markets worldwide. The company designs, makes and markets high-performance mechanical components, including bearings, gears, belts, chain and related mechanical power transmission products and services.
http://www.timken.com/aftermarket
Stronger. Commitment. Stronger. Value. Stronger. Worldwide. Stronger. Together. | Stronger. By Design.02-16: 29 Order No. 10840 | Timken ® is a registered trademark of The Timken Company. | © 2016 The Timken Company | Printed in U.S.A.
Wheel Bearing Replacement Guide – Wheel Bearing Replacement Guide –