TOA Neck Worn Microphone EM-362-AS Instruction Manual![]()
NECK WORN MICROPHONE
Before installation or use, be sure to carefully read and follow all the precautionary instructions in this section to ensure long, trouble-free use of your equipment
 WARNING
 WARNING
- Be sure to act on the instructions as safety precaution to prevent bodily injury and property damage. – Use the appropriate battery. Pay attention with thebatteries polarity when insert the batteries to unit.
1. SAFETY MAINTENANCE
- Do not expose the unit to rain or an environment where it may be splashed by water or other liquid, hightemperature and high humidity.
- Do not open the cover to modify the For service, contact the nearest TOA dealer.
- Do not drop the unit to hard object and use dry cloth to clean the Do not use gasoline, thinner, etc.
3. GENERAL DESCRIPTION
The EM-362-AS is a neck worn condenser microphone that is designed exclusively for leader prayer in mosque (Imam) and other applications where constant body movement is unavoidable. This product is equipped with an optional power that is selectable between battery and phantom power. The microphone position can be easily adjust near the mouth forbest pick up.
FEATURES
- Press the button on the microphone to turn on/off the microphone.
- Battery/phantom switch selection on battery case for microphone operation.
- Use two pieces batteries size “ AAA ”.
5. NOMENCLATURE AND FUNCTIONS
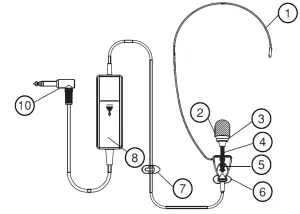
1. Wire Hanger
Using this on neck as a hook to microphone. the hook made from durable material and can be stretched according to size of neck
2. Microphone
Close-talk type cardioid electret condenser micro- phone. It has the high sensitivities and wide range frequencies.
3. LED Ring
Light blue when the microphone is turned on and it will turn off when microphone in off mode.
1. Flexible Shaft
Adjust the flexible shaft for microphone positioning to achieve optimum performance.
Press this key to turn on or off microphone.
3. Microphone Clip
Using the clip on clothes, shirt, etc to keep the unit
in position.
4. Cable Clip
Hook the clip in position so that cable do not interfere user’s movement and reduce risk of being walk on or sit on.
5. Batteries Compartment
Place the AAA batteries ( 2 pcs ).
6. Selector Switch
Select this switch to use battery or phantom as the power supply for this unit.
7. Phone Plug
Direct connect balanced phone jack to input of ampli- fier.
6. BATTERY
6.1. Life Span
Assuming application and usage being 1 hour/day, unit can be used for 6.7 months to 9.3 months depending on brand and type of batteries.
6.2. Battery Insertion

Step 1. Open the battery cover. Insert the battery according to battery polarity (see the right picture )Step 2. Put back the battery cover to product
7. CONNECTION
Step 1. Set the amplifier’s microphone volume control to the minimum position.Step 2. Plug the phone jack of microphone unit to the amplifier’s microphone input.
8. OPERATION
Step 1. Use the necklace hanger to the neck, adjust the flexible shaft to first position ( see the top right picture). Hook the both the clips to clothes, shirt, etc on your body.Press the microphone ON/OFF button. The LED on the unit will light blue, turning on the microphone.
Step 2. Keep your mouth 3 – 6 cm away from the microphone and speak normally for the best possible sound reproduction. Adjust the microphone orientation for the best position by turning its flexible shaft. If distance of mouth is too near, it causes voice distortion. Adjust the microphone by pulling away or lowering it. This is due to the highsensitivity of the microphone.
Step 3 Switch off the power, when not in used.Note : The battery will be depleted if the microphone is not turn off after used.
9. USING THE SWITCH SELECTOR MODE
Selector switch have 2 modes. There are battery mode and phantom power mode. If using battery as power input, select the switch to battery position and if using phantom power as power input, select to phantom power position.
10. SPECIFICATIONS
| Power Source | 3V DC ( 2 x “AAA” batteries ) or Phantom power ( 9 ~ 52 V ) |
| Microphone Element | Electret Condenser |
| Polar Pattern | Cardioid |
| Rated Impedance | 600 ohm, Balanced |
| Rated Sensitivity | -35 ± 3 dB ( 1kHz 0 dB = 1 V/Pa ) |
| Frequency Response Mic | 60 Hz ~ 20 kHz |
| Output Connector | 1/4 “ Balanced L Plug, 200 mm |
| Cable Length | 7 m |
| Operating Temperature | 0 °C to +40 °C (32 °F to 104 °F) |
| Finish | Battery Case Unit, Switch Unit, Mic Unit : ABS Resin, Black, Flexible Shaft : Copper Alloy, Black, Paint, Shield tube
Wire Hanger : Steel wire shield rubber, Black, Paint |
| Dimensions | 260 mm ( h ) x 135 mm ( w ) (10.24” x 5.31”) |
| Weight | 190 g ( exclude batteries ) |
report this adNote: The design and specifications are subject to change without notice for improvement.
Read More About This Manual & Download PDF:
References
[xyz-ips snippet=”download-snippet”]