
Tokk Cam T6 Instruction Manual – iCooky
Thank you for your purchase.
We hope you will enjoy your new TOKK CAM. If you encounter any issues setting it up and/or using your new Camera,please do not hesitate to call us and we will be very happy to help you. You can also watch our step by step demo video on our website: www.tokktech.com
Our customer service email is Our customer service phone number is +1 858 999 2114 ext1
Quick Set up and User Guide
- Download the application called “iCookyCam” on your smart device (APP available on the App Store for iOS and Google play for Android)
- If you have a SD card, insert it in the Micro-SD Slot. in motion detection mode you will receive a notification and the footage will be recorded on the SD card, if you do not have an SD card you will receive a notification and will have to open app and record manually, the footage or picture will be stored on your smart device.
- Turn on the camera
- Open the app “iCookyCam”
- Add the camera (using the “+” sign on the app)
- Select “not been connected to the router”
- Go to WIFI settings on your smart device
- Wait until your camera name appears “iCooky_XXXXXX”, it might take 2 to 3 minutes for the camera to set itself, so wait and refresh your wifi until the camera appears as a choice, when it appears select it, (it should ask you for the password, type “12345678” and join), wait for iCooky… to connect, youmight have to type the password a couple of times
- Go back to the app “iCookyCam”, press “next”
- Add device password “ok123456” and change the name Camera to the name you want your camera to be called (if you have multiple ones this might come in handy, to name Entrance, Lobby, Room 1…) then click on the check mark “V” on the upper right corner of the app.
- A message “connect to router” appear: if you want to connect your camera to your wifi to keep it at home press “yes” then select the name of your Home Wifi router and type your password.
- When you see the message “camera succesfully added”, and a black screen with the camera status “online” you have successfully set-up with your TOKK Cam. Turn off the camera and turn it on again to finalise the set up. It should say online, select the image and touch the play con, the live feed of the camera will appear. If the camera says offline, refer to troubleshooting in the next two page.
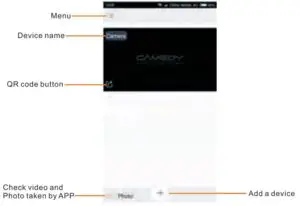
A. 1st Screen of iCookyCam app
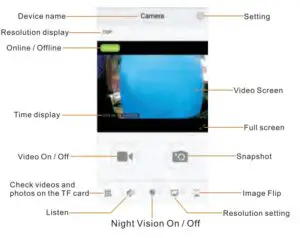
B. Screen after selecting the camera

Using TOKK Cam:
Power ON: Press and hold the confirmation button for 3 seconds.
Power Off: Press and hold the confirmation button for 5 seconds and release, the camera will turn off after a few seconds.
Open your iCookyCam APP, select your camera and press play. Use the speaker icon to turn on the listen function, the camera icon to take picture, the video camera icon to record, change Light setting (for night vision), and change the angel (Flip the camera). In the setting menu you can turn on the Motion sensor (this will trigger an alert message and start filming), change password, reset to factory setting and much more…
Tips:
Using the camera outside your home: Turn on the camera, go to iCookyCam app select the camera. If it says offline check that iCookyCam is selected in your Wifi settings. If it is not just select it and return in your app.
Trouble shooting:
To Add the camera device manually: Click the “+” to add a device, select “been connected to the router”. Press on the pencil icon (bottom right), type in the UID of the camera you want to add (you can find the UID behind the camera. Type in the password “ok123456” and change the name of the camera if you wish to, click on the check mark (upper right corner).
Complete Instruction Manual
1. Download App
Scan QR Code or search keyword “iCookyCam” to download and installation App From Application market.
2. Power ON/ Power Off Operation
If you have a Micro SD Card proceed to 2.1, If you do not have a Micro SD Card proceed to 2.2.
- Insert Micro SD Card: Class 10 or above is recommended. Maximum support 64 GB, Please format memory card before using.
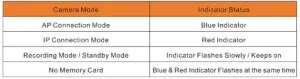
- Power ON: Connect the camera to power supply or long press confirmation button for 3 seconds, Red & Blue indicator keeps on and then alternate scintillation, camera starts to initialize(it takes around 60 seconds). After initialization succeed Blue indicator flashes slowly, camera enters AP connection mode and starts recording automatically. Press confirmation button once to stop video recording, blue indicator keeps on and the camera turns to standby mode.
Warm Prompt:
- If you want to power on without connecting to the USB charger, make sure that the camera has enough power!
- If after initialization succeed red indicator flashes slowly, show that the machine is in the IP connection mode, please double click confirmation button to return to AP connection mode and blue indicator flashes slowly.
- If the memory card is not inserted, the red and blue indicator flicker at the same time when the machine is initialized, and the camera can’t turn on the video. Memory card does not support hot swap, if you want to pull off or insert the memory card, Please turn off the camera first.
- Power OFF: long press confirmation button for 5 seconds, Red & Blue indicator flashes for 7 times and turn off.
Warm Prompt:
It is not possible to power off the camera through the above operation when USB power is connected.
3. connect the Camera to the App
- Go to WIFI settings on your smart device, choose Power “Cooky_ *****” from available networks when prompted for a password, type “12345678” and join.
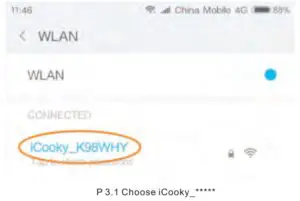
Warm Prompt: The effective range of the WiFi signal iCooky_** sent by the camera is within 10 meters. When the mobile phone exceeds the range, it will be disconnected from the WiFi signal.
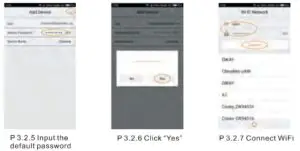
- Log into iCooky Cam APP, click the “+” in the middle or below the interface, then choose “Not been connected to the router”, click “Next” to enter the add device interface, input “ok123456” in the device password bar and then click “” , APP will prompt “Connect to the router?”, please select “Yes” to enter the “Wi-Fi Network” setup interface. Choose the network you want to connect and input the right Wi-Fi password, then click “Connect”(P 3.2.1-3.2.7)
Warm Prompt:
For your personal privacy, please change the default password of the camera

Warm Prompt:
- Please choose the right network and type in correct password. The camera turns to AP mode if wrong password were typed in, blue indicator flashes slowly in AP mode. Please click Delete on APP and withdraw from APP, check out APP and add a device again.
- In order to improve the stability and success rate of WiFi connection, try to be close to the wireless router.
- For initial use, the device requires a certain amount of time for IP connection. Please wait patiently. (About 1-3 minutes based on network conditions). After the IP connection is successful, the red indicator flashes slowly. After multiple refresh, if still showing offline, please try to check the network environment of the device and the mobile phone is good or not.
- SSID with special characters and 5G network are both not compatible with APP. Only 2.4G frequency WiFi is supported, 5G frequency WiFi is not supported temporarily, and WiFi encryption mode can not be WEP mode, and the password can not be empty.
- The camera starts to restart after click “Connect”, Please wait for about 90 seconds, at the same time, APP automatically returns to the device list interface and successfully adds the camera to the list. Red indicator flashes slowly after the camera reboots, and the camera turns into IP connection mode. click the camera in the list to preview image and control the camera. (P 3.3.1-3.3.2)
4. If you do not want to connect the Camera to your Home or Office WIFI:
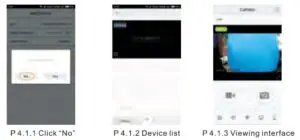
- If you need only AP connections but not IP connections, please select “No” when prompted “Connect to the router?” in the above P3.2.6 operation steps. APP automatically returns to the device list interface and successfully adds the camera to the list. Click the camera in the list to preview image and control the camera.(P 4.1.1-4.1.3)
- To switch from IP connection mode to AP connection mode: Please double click Confirmation button. Marks: AP connection mode: Camera connect to Wi-Fi of smart phone for short distance preview image. IP connection mode: Camera connect to router for unlimited distance preview image.
5. Add the camera manually
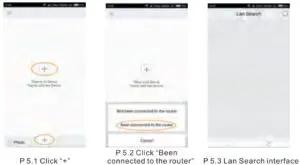
- If the camera has been connected to the Internet to work in IP remote mode, when you want to add the camera to other people’s APP please open APP on the other’s phone, click the “+” in the middle or below the interface, select the “Been connected to the router”and enter to the” Lan Search “interface. (P 5.1-5.3)
- Search addition under the same WiFi If the mobile phone and the camera are connected to the same WiFi, then in the “Lan Search” interface will auto matically search all the camera serial numbers under the WiFi, select the camera that you need to add, and input device password (the default password is “ok123456”). can be added successfully. (P 5.1.1-5.1.2)

- Adding your camera to an other Smart Phone: Open the APP that has already added the camera, find the camera that needs to be added in the device list, and click the share button in the lower right corner to automatically generate a camera QR code. Open the APP on the phone that needs to add the camera, enter the “Lan Search” interface, click the QR code scan button in the lower left corner to open the scan window, scan the generated camera QR code, and then input the correct device password to add.(P 5.2.1-5.2.5)


- Manual input addition Open the APP that needs to add the camera, enter the “Lan Search” interface to select the manual add button in the lower right corner, and input the correct device UID and password in the “Add Device” interface to be added successfully.(P 5.3.1-5.3.2)
6. Interface Introduction
- Device List Interface
- Real Time Interface
- Setting Interface
7. Reset Device Password
Under IP connection & standby mode (red indicator keeps on), connect the USB power for charge, long press the confirmation button for 5 seconds, the red and blue indicators flash quickly. The machine will reboot automatically after successful reset P.W..It takes about 1 minute, Please wait patiently.
8. Indicators
Pred Technologies USA Inc Customer Service
- Our website: www.tokktech.com
- Our customer service email is
- Our customer service phone number is +1 858 999 2114 ext 1
Pred Limited Warranty
Pred Technologies USA Inc. warrants this product against defects in material or workmanship as follows:
- Labor and Parts: If this product is determined to be defective. Pred Technologies will repair or replace the product, at its option, at no charge. From and for a period specified by the retail partner you have purchased our product from.
- Proof of purchase in the form of a bill of sales or receipted invoice which is evidence that the unit is within the Warranty period must presented to obtain warranty service.
- To obtain warranty service, please contact our customer support center: Via email or call 1 858 999 2114 ext 1
This warranty gives you specific legal rights and you may also have other rights which vary from state to state.
Thanks
Pred Technologies USA Inc.
© 2020 PRED Technologies USA Inc. All Rights Reserved.
Features, specifications and appearance are subject to change without notice. Manufactured & Distributed by: PRED Technologies USA Incorporated,
7855 Fay Avenue, La Jolla, CA 92037
predtechnologies.com
Read More About This User Manuals…
 report this ad
Questions about your Manual? Post in the comments!
[xyz-ips snippet=”download-snippet”]