
![]()
DECT digital monitor with movement sensor padINSTRUCTIONS FOR USEmodel 1082Stommeetippee.com
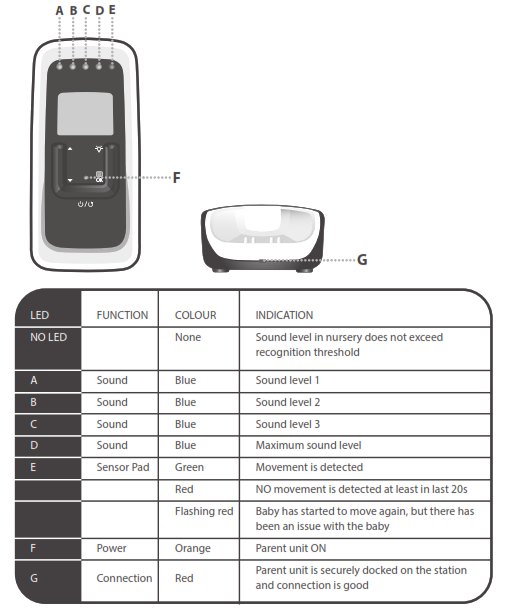
baby unit (=BU)
- Power on/off. Screen illuminates when power is on.
- Nightlight control (low, medium, high).
- No movement sensor alarm.
- Low battery indicator flashes if battery is low.
- Room temperature display.
- Movement sensor light flashes green with each movement baby makes.
- Volume control. 7a) increase 7b) decrease
- Microphone.
- Sensor pad input socket.
- Mains adaptor input socket.
- Sensor pad on/off.
- Battery compartment takes 4 x AA batteries (not included). Remove casing using a screwdriver.
- Thermometer sensor.
- Sensor pad sensitivity switch, (low, medium, and high).
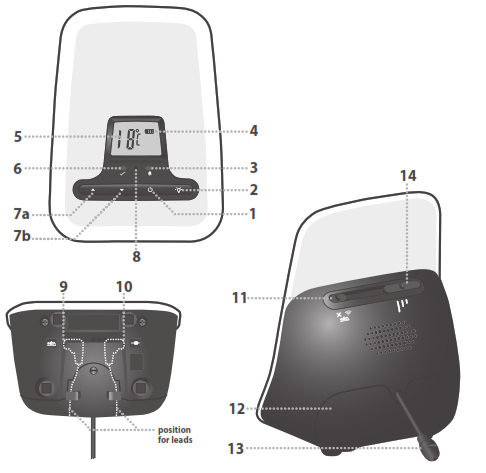
parent unit (=PU)
15 Mains power on/off/menu scroll back.16 Volume Control. 16a) increase 16b) decrease.17 Nightlight control – low, medium, high.18 Menu/ok.19 Power-on light.20 Talkback button.21 Microphone.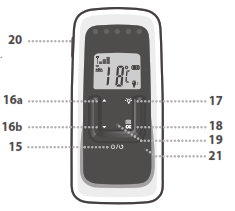 parent unit docking station22 Charging indicator.23 Mains adaptor input socket.
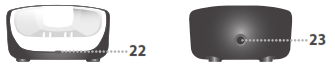
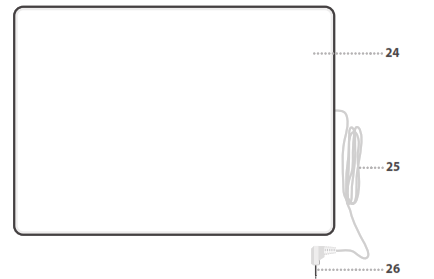
movement sensor pad24 Sensor pad.25 Connection lead plugs into baby unit26 Connecting plug.
parent unit icons
![]()
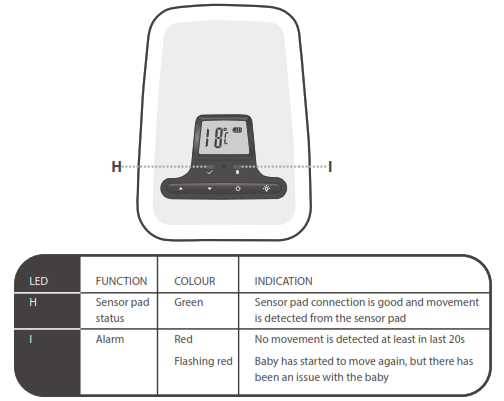
parent unit LEDs
baby unit icons
![]()
baby unit LEDs
charging your monitor before first use:THE PARENT UNIT:
- The parent unit is supplied with rechargeable batteries 2 x AAA (LR3) that should be inserted before use.
- To insert batteries, open the battery casing with a screwdriver. Insert the supplied 2 x AAA (LR3) rechargeable batteries. Take extra care to ensure that the batteries are inserted correctly and the right way round. Ret the battery casing securely with a screwdriver.
- DO NOT use non-rechargeable batteries.
- Place the parent unit on the docking station and recharge for 10 hours before use.
- The charging icon on the LCD will show the charging status.
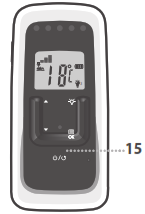
- Turn on the parent unit by pressing the POWER key (15) for 3 seconds.
- The docking station will light red to show that the parent unit is securely docked on the station and connection is good.
- Turn off the parent unit by pressing the power key (15) for 5 seconds.
THE BABY UNIT:
- The baby unit does not require batteries if powered from the mains.
- If mains usage is not available, the baby unit will operate on batteries 4 x AA (LR6), which are not supplied.
- To insert batteries, open the battery casing with a screwdriver. Insert 4 x AA (LR6) batteries (rechargeable or non-rechargeable, but not mixed) and close casing securely with screwdriver. Take extra care to ensure that the batteries are inserted correctly and the right way round.
- There is NO charging function on the baby unit for rechargeable batteries.
- The screen will illuminate on the baby unit when switched on.
- The battery icons will indicate if the battery is low.
- Battery power is disconnected automatically when the mains adaptor is in use. If the adaptor is turned off at the mains and still remains connected to the monitor then the batteries will be automatically activated.
- When the baby unit is connected to the power supply, the LCD backlight will be on. With battery power only, the LCD backlight will last only approx. 20 seconds.
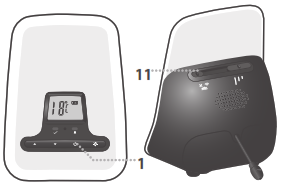
- Turn on the baby unit by pressing the POWER key (1).
WARNING about using the baby unit!• The baby unit should be 1 to 1.5 metres away from the baby’s cot on a at surface.• Never place the baby unit in the baby’s cot.correct use of batteries
- Non-rechargeable batteries are not to be recharged.
- Rechargeable batteries are to be removed from the baby unit before being charged.
- Rechargeable batteries are only to be charged under adult supervision.
- Dierent types of batteries or new and used batteries are not to be mixed.
- Only batteries of the same or equivalent type as recommended are to be used.
- Batteries are to be inserted with the correct polarity.
- Exhausted batteries are to be removed from the monitor.
- CAUTION: risk of severe malfunction if battery is replaced by an incorrect type. Dispose of used batteries according to the instructions.
setting up your baby unit
- Connect the mains adaptor into a nearby wall socket in your baby’s nursery and switch on the power at the mains.
- Press and hold (1) for 3 seconds until the LCD/Power LED illuminates.
- Ensure that the sensor pad on-off switch (11) is turned OFF.
setting up your parent unit
- Connect the mains adaptor into a nearby wall socket.
- Press and hold (15) for 3 seconds until the LCD/Power LED illuminates.
- A link will now be made between the parent unit and baby unit.

testing the parent unit
- First ensure that the baby unit has been set up and is working correctly following the previous instructions.
- To test the parent unit you must ensure that it is at least 5 metres away from the baby unit.
- Turn the sensor pad OFF by means of switch (11).
- Place a sound source such as a radio in the nursery at least 1 to 1.5 metres away from the baby unit, close the nursery door and go to another room.
- Set up the parent unit in the docking station.
- Turn on the power (15) and adjust the volume up (16a) or down (16b) to a comfortable level.
- You will hear sounds from your nursery and some of the sound lights (A-E) will come on. The louder the sound the more lights will come on.
- Lift the parent unit from the docking station and walk around your house and garden, ensuring that you can hear the sounds from the baby unit at all times. The monitor will work up to a distance range of 300 metres approximately. Depending on the surrounding conditions as well as spatial and structural factors, the range may be reduced. The range indoors is normally less than outdoors.
- If you lose the signal from the baby unit an alert tone will be emitted from the parent unit every 10 seconds and the LCD will ash until the link is restored. The LCD will show ‘No Link’.If this happens, move closer to the baby unit.
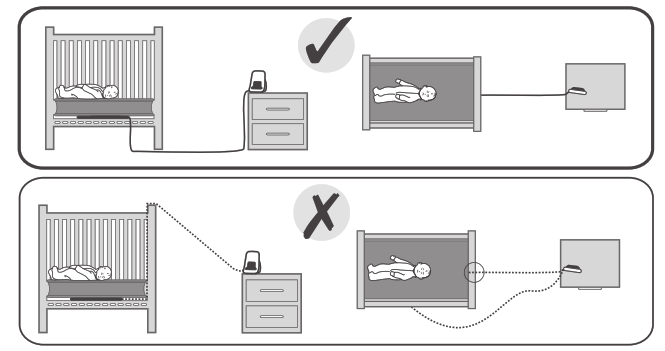
WARNING about the danger of cords:STRANGULATION HAZARD! – Keep cords out of the reach of children. Do not use with an extension cord.
![]() WARNING! STRANGULATION HAZARD! Children have STRANGLED in cords. When using without protective covering. Keep this cord out of the reach of children (more than 0.9 m (3ft) away).
WARNING! STRANGULATION HAZARD! Children have STRANGLED in cords. When using without protective covering. Keep this cord out of the reach of children (more than 0.9 m (3ft) away).
- Check immediately the location of corded monitors to make sure cords are out of arm’s reach of your baby and other young children.
- Place cords more than a metre away from any part of the cot. The monitor must not be used in any other sleep environment.
- Check the location of the monitor periodically, as what is within arm’s reach to a baby will change as the baby grows.
- Make sure the sensor cords are taut and not dangling to reduce the strangulation hazard.
- Do not place furniture or other obstructions on the adaptor cords and be sure to position them so that nobody can trip over them.
- Keep adaptor cords away from hot surfaces such as radiators and central heating pipes.
- Be careful not to position the adaptor where a child might try to step on it.
- Never use Tommee Tippee monitor adaptors with any other equipment. Nor should you use any other adaptors with your Tommee Tippee monitor.
- Please note that the adaptors become warm in use – this is quite normal and not a hazard.
- The adaptors convert your AC power to safe low DC voltage.
- Use the power adaptor provided.
- The product is only suitable for use for cots and cot beds that comply with EN716
MODEL-S004LB0600045 or S004LV0600045Input-100 – 240V~ 50/60Hz 150mA6V – 450mAOutput-Output6V – 450mAsetting up the movement sensor padThe monitor has the ability to monitor your baby’s movements via the highly sophisticated movement sensor pad. It is designed for use in a cot with a flat, firm base. It should not be used in a travel cot, swinging crib, Moses basket, or with a hollow or foam-free mattress.
- Place the sensor pad between the cot mattress and the cot base, directly under the area where your baby will be sleeping.
- Ensure the sensor pad is positioned the correct way up and that the connecting cord is fed through the base of the cot out of the accessibility range of your baby (50cm from the surface of the mattress) and other young children.
- If the cot has a solid base it may be necessary to make a small hole through which the connecting cord can pass.
- Ensure the connecting cord plug is pushed fully into the socket underneath the baby unit.
- Do not hang the cable over the top or through the bars of the cot.
- Place the cable down and onto the floor.
IMPORTANT !TEST YOUR SENSOR PAD BEFORE PROCEEDING FURTHER:
- Turn the sensor pad switch to ON at the back of the baby unit (11). The sensor pad LED on the baby unit will light up if movement is detected.
- Check the sensor pad is working by touching the cot mattress gently anywhere near where your baby will be sleeping.
- Each touch should produce a flash of the green sensor light on the baby unit (H) and on the parent unit (E) together with an audible tick sound. The volume of the tick can be adjusted.
- Test the alarm by continuing to touch the mattress for a few moments and then step away from the cot and stop all movement near the sensor pad.
- After approximately 20 seconds the alarm will sound and the red alarm light will come on (I) on the baby unit and (E) on the parent unit.
- If movement is detected again after the alarm has activated then the red alarm light will flash (I) on the baby unit and (E) on the parent unit to let you know that the alarm has activated.
- To reset the alarm, switch the baby unit off and on again.
PROBLEM-SOLVING IF YOUR SENSOR PAD TEST FAILS:
No alarm after 20 seconds if NO movement-Make sure there is no movement or vibration around the sensor pad and test again. If alarm triggers again, decreasesensitivity setting and test again.False alarm when there IS movement-Check the connections are secure and test again. If alarm triggers again, increase sensitivity setting and test again.8 . If the parent unit is linked with the baby unit successfully, the sensor pad icon will indicate on the parent unit. The 5th LED (E) will light up Green if movement is detected.9. If the sensor pad switch is on without the sensor pad connected securely, there is an error tone from the baby unit and the sensor pad icon with image of![]() in the parent unit will flash. A Text Prompt on the parent unit ‘Connect Pad’ will also flash.10. If the sensor pad is securely installed, after 20 seconds without detecting any movement, the alarm will be triggered on both parent unit and the baby unit and the red alarm light will come on. The LCD will show ‘CHECK BABY’ until the sensor pad is reset.11. If movement is detected again after the alarm has activated then the alarm will stop and the red alarm light will flash in both the parent unit and the baby unit to let you know that a problem has occurred and the baby should be checked. The LCD will show ‘CHECK BABY’ until the sensor pad is reset. 12 To reset the alarm, switch the sensor pad off and on again.testing the movement sensor pad function on the parent unit:
in the parent unit will flash. A Text Prompt on the parent unit ‘Connect Pad’ will also flash.10. If the sensor pad is securely installed, after 20 seconds without detecting any movement, the alarm will be triggered on both parent unit and the baby unit and the red alarm light will come on. The LCD will show ‘CHECK BABY’ until the sensor pad is reset.11. If movement is detected again after the alarm has activated then the alarm will stop and the red alarm light will flash in both the parent unit and the baby unit to let you know that a problem has occurred and the baby should be checked. The LCD will show ‘CHECK BABY’ until the sensor pad is reset. 12 To reset the alarm, switch the sensor pad off and on again.testing the movement sensor pad function on the parent unit:
- To test the sensor pad function on the parent unit you will need someone else to carry out the sensor pad functions on the baby unit.
- If the sensor pad switch has been turned on at the baby unit the 5th LED (E) on the parent unit will light up GREEN, and you will hear the tick sound.
- When no movement has been detected for appro x. 20 seconds the 5th LED (E) on the parent unit will light up RED and you will hear the sensor pad alarm.
- If movement is detected again after the alarm has activated then the red alarm light will change to flashing mode.
- To reset the alarm it will be necessary to go to the baby unit and turn it off then on again.if the movement sensor alarm sounds:
- The Tommee Tippee Closer to Nature sensor pad monitor is NOT a medical device and is NOT designed to prevent cases of sudden infant death syndrome (SIDS). This Tommee Tippee Closer to Nature monitor is intended to help you monitor your child and is NOT to be used as a substitute for adult supervision.
- The alarm going off may not be a sign of a problem with your baby. It may be a sign that the baby has moved away from the sensor pad area, or that batteries are running low if not mains power operated.
adjusting the sound sensitivity settings of the baby unit:• The sound sensitivity settings of the baby unit can be changed only when parent unit is linked with the baby unit.TO CHANGE THE SENSITIVITY SETTINGS:a. Press ok and +/- to go to SENSITIVITY menu in parent unit.b. Press ok and the current sensitivity level is displayed.c. Press +/- to adjust the sensitivity level from Level 1 to Level 5
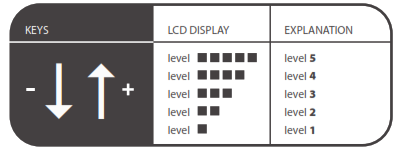
d. Press ok to confirm the settings.e. “SAVED” will display and back to previous screen.adjusting the ticking sound:The audible ticking sound gives reassurance that your sensor pad is correctly connected and the monitor is sensing movement. If you wish to switch o the ticking sound:
- Press and +/- to go to TICK TONE menu in parent unit.
- Press and +/- to go to SENSITIVITY menu in parent unit.
- Press and the current status is displayed.
- Press +/- to select ON or OFF.
- Press to confirm the settings.
- “SAVED” will display and back to previous screen.
adjusting the sensitivity of the sensor pad:• This monitor is compatible with standard cot mattresses. With thicker mattresses (ie spring interior) you may need to adjust the sensitivity switch on the baby unit (14) from it’s preset ‘medium’ position to the ‘ high’ position. With some very thin mattresses you may need to change the sensitivity setting to ‘low’.WARNINGS ABOUT USING THE SENSOR PAD!
- A moving or swinging cord may be interpreted by the sensor pad as a baby’s movement. To avoid this, ensure that the cord is not positioned where it may be subject to movement.
- You should ensure there is no vibration in or near the nursery, so that the sensor pad is monitoring only your baby’s movements.
- The sensor pad does not carry any electricity and will not aect your baby even if the mattress is subject to bedwetting or vomiting.
- Never immerse the sensor pad in liquid. To clean, wipe with a dry, lint free cloth.
- Never place the connecting cord in contact with any moving objects, or near any heated surface.
- Always ensure wires and cables are out of reach from your baby and younger children and never place connecting cords amongst your baby’s bedding, the child could be strangled.
- Ensure the sensor pad is used the correct way up.
- Do not immerse sensor pad in liquid and avoid contact with moisture.
HELPFUL ADVICE ABOUT USING THE SENSOR PAD:• If you remove your baby from the cot (e.g. for a feed) remember to turn off the sensor pad by turning off switch (11) to prevent the alarm from sounding. Remember to switch the alarm back on when you put the baby back into the cot.• If you just wish to monitor the sound of your baby turn off the sensor pad function with switch (11) on the baby unitchanging the baby unit volumeThe baby unit volume is preset to level 3. Changing the volume will affect the loudness of voice from the parent unit and the talkback mode. However, it will NOT affect the loudness of the sensor pad alarm.To change volume level:
- Press + (7a) to increase the speaker volume level (Level 1 to Level 5).
- Press – (7b) to lower the speaker volume level (Level 1 to Level 5). There is no volume off option on the baby unit.

The new volume level is shown on the display for 2 seconds then saved. A warning tone is emitted on attaining the maximum or minimum volume level.changing the parent unit volumeThe parent unit volume is preset to level 3. Changing the volume will affect the loudness of voice from the baby unit, so when volume is off there will be no sound from the baby unit. However, it will NOT affect the loudness of the sensor pad alert tone.To change volume level:
- Press + (16a) to increase the speaker volume level (Level 1 to Level 5 and OFF).
- Press – (16b) to lower the speaker volume level (Level 1 to Level 5 and OFF).
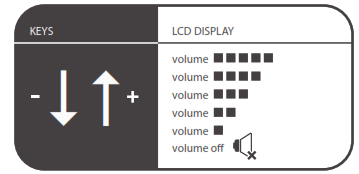
The new volume level is shown on the display for 2s then saved. A warning tone is emitted on attaining the maximum or minimum volume level.changing volume of baby unit from parent unit
- Press (18) and +/- to go to BABY VOLUME menu in parent unit.
- Press and the current Volume level is displayed. If volume is not changed within 2 seconds, it will go back to idle.
- Press +/- to adjust the Volume level from Level 1 to Level 5
- Press to confirm the settings.
- SAVED will display temporarily.
using the nightlight
- To turn on the nightlight, press key (17) on parent unit or (2) on baby unit.
- To adjust the brightness or turn it off, press the key again with the sequence L-M-H-Off.
- If operating the baby unit on batteries the brightness of the nightlight is limited to the lowest level to conserve energy. In battery mode, both the parent unit and the baby unit will have the key sequence L-Offf.
- The nightlight on the baby unit operates even if the parent unit is out of battery power or turned off.
- Nightlight settings and the corresponding icons are synchronized between baby unit and parent unit if they are connected successfully.
- The nightlight fades out after 5 minutes in battery mode.
HELPFUL ADVICE ABOUT USING THE NIGHTLIGHT• You may find it useful to use a lower brightness if you wish your baby not to sleep in complete darkness and then adjust to a higher brightness for when baby needs attention during the night and you do not wish to turn on the main bedroom lights.
using talkback
Talkback allows you to communicate from the parent unit to the baby unit.
- To use talkback press button (20) on parent unit and hold. The parent unit screen will show TALK.
- The audio from baby unit will be muted and the parent will not be able to hear the baby until the button (20) has been released.
- If the volume of parent unit is set to OFF during TALKBACK, volume will be changed to default volume level (medium).
paging to locate the parent unit
- If both Up + (7a) and Down – (7b) keys for 3 seconds are pressed on the baby unit at the same time, the paging tone is emitted.
- Both parent unit and baby unit will display PAGING on the LCD.
- If volume is OFF before paging start, reset it to default volume level (medium).
- During paging, any key pressed on the parent unit or baby unit will stop the paging tone.
- If the link is lost between the parent unit and the baby unit, the paging tone will not be emitted when both Up + (7a) and Down – (7b) keys are pressed together. There will be no change on baby unit.
- If paging is not stopped, it will expire in 2 minutes.
- Paging function does not work if parent unit is turned off.
the room temperature displayThe temperature surrounding the baby unit will be displayed on both the baby unit and the parent unit between 10°C and 30°C. Both PU and BU will state LO below 10°C and HI above 30°C. To ensure accuracy of the temperature display, do not position the baby unit in direct sunlight or near a source of heat.selecting CELSIUS or FAHRENHEIT:
- The monitor is preset to measure temperature in CELSIUS.
- To change this setting press
ok(18) to access main menu. - Press +/- to select FORMAT then press
ok - Press +/- to select CELSIUS or FAHRENHEIT.
- Press
okto confirm. - “SAVED” will display and back to previous screen.
- Both parent unit and baby unit will change to the temperature format selected.
- Temperature format in baby unit and parent unit will be synchronized automatically when parent unit is linked with baby unit.
selecting a different language
- The monitor is preset in English.
- To change to another language press
ok(18) on the parent unit and +/- to go to language menu. - Press
okand the current language is displayed. - Press +/- to select desired language and press
okto confirm the settings - “SAVED” will display and back to previous screen.
to reset settings to default
- Press
okand +/- to go to Reset menu. - Press
okand “CONFIRM?” is displayed. - Press
okto confirm reset or press to ignore the reset request and back to previous menu level.
GENERAL SAFETY INFORMATION:
- Warning! Adult use only – Keep out of reach of children at all times. Do not allow a child to play with it – It is not a Toy
- Make sure you store your monitor in a safe place when not in use, away from heat and water.
- Take care not to drop either unit as this may aect the functioning of you monitor.
correct disposal of this productInformation on the disposal for Waste Electrical & Electronic Equipment (WEEE) This symbol on the products and accompanying documents means that used electrical and electronic products should not be mixed with general household waste. For proper disposal for treatment, recovery and recycling, please take these products to designated collection points where they will be accepted on a free of charge basis. In some countries you may be able to return your products to your local retailer upon the purchase of a new product.Disposing of this product correctly will help you save valuable resources and prevent any possible effects on human health and the environment, which could otherwise arise from inappropriate waste handling. Please contact your local authority for further details of your nearest collection point for WEEE. Penalties may be applicable for the incorrect disposal of this product in accordance with national legislation. Do not immerse in water.This appliance is not intended for use by persons (including children) with reduced physical, sensory or mental capabilities, or lack of experience and knowledge, unless they have been given supervision or instruction concerning use of the appliance by a person responsible for their safety. Warning! Children should be supervised to ensure that they do not play with the appliance Keep this instruction sheet for future reference as it includes important information. If the supply cord is damaged, it must be replaced by a special cord or assembly available from the manufacturer or its service agent. WEE/JC0045SY IMPORTANT:The Tommee Tippee monitor has been designed to give you added reassurance for those times when you cannot be in the same room as your baby, it is NOT a substitute for proper adult supervision. It is important that an adult stays within range of the monitor at all times during use. Please remember that your Tommee Tippee monitor is not a medical device, nor a device to prevent cases of Sudden Infant Death Syndrome or ‘cot death’, and you should not rely on it for your baby’s well-being. You should personally check your baby as frequently as necessary.
If you are having any problems in setting up your monitor or require any further information please visit our website www.tommeetippee.comPlease retain our address for future reference: Mayborn Baby and Child, Northumberland Business Park West, Cramlington, Northumberland NE23 7RH, UK
Tommee Tippee 1082S Dect Digital Monitor With Movement Sensor Pad Instructions Manual – Tommee Tippee 1082S Dect Digital Monitor With Movement Sensor Pad Instructions Manual –
[xyz-ips snippet=”download-snippet”]